To avoid these ads, REGISTER NOW!

Lift installation troubles - Derek Weaver W-9KFP

quakerj

Well-known member
Joined
Nov 11, 2021
Messages
171
Location
Meade County, KY
Got my lift installed, cables routed, hydraulics working. Followed the (very meager) instructions to the letter, step by step.

Can someone explain to me how the safety locks work? From what I can tell there are two devices on each side that lock it-- seems to be a primary and secondary. The cheap pull cable seems to activate the primary one and release it (you hear a loud clunk when you pull it) but the secondary ones (colored grey) stay stuck in the locked position for some reason. They don't respond to the pull cable at all. I was only able to lower the lift by putting my fingers in there (with a helper) and pulling the secondary locks back by hand. This was just a test run, don't have a vehicle on it yet (or desire to) until I have the safety lock stuff sorted out.

Anyone know how these secondary locks work? The manual (Chinese translated into Chinglish) is zero help and the parts diagram looks like it was made in 1987, the resolution is that bad.

I'll call DW tomorrow and maybe they can help, but I'm not confident they know much about these Chinese machines they resell. If anyone has any ideas or can tell me how these safetey mechanisms operate, I'd be grateful!
 
To avoid these ads, REGISTER NOW!

dagofast

Well-known member
Joined
Oct 15, 2006
Messages
411
Location
The QC in AZ
I'm not familiar with your particular lift but on most lifts I am familiar with, the secondary locks only engage when cable tension is lost; i.e. a cable breaks.
 
OP
Q

quakerj

Well-known member
Joined
Nov 11, 2021
Messages
171
Location
Meade County, KY
Thanks for the reply dagofast, and you're right about the secondary locks-- they're supposed to engage when there's slack in the chain. So if you lose hydraulics all the sudden, the secondary safety latch catches.

I spent enough time yesterday night to determine what might be wrong, and a call to Derek Weaver confirmed it. The chain was routed wrong, seemingly from the factory (chain comes already installed). It had to ride on the other side of a spring loaded lever, so that when tension is on the chain, it keeps the secondary locks from engaging. They had it installed on the wrong side, so the secondary locks stayed engaged irregardless of chain tension. Very frustrating and their manual was near useless.

To reroute the chain, I had to remove a lift cylinder to get my hands in there, which was a messy proposition dumping about a quart of hydraulic oil on the floor. The other side I figured out how to do without removing the lift cylinder, but my hands are pretty bruised up, it's that tight of a space.

Long story short, it works now. I tried it with my heaviest vehicle (4800#) and it lifts to max height no problemo.

Any idea how tight the equalization/balancing cables should be? Their manual made no mention of that.
 
Joined
Oct 24, 2022
Messages
5
Thanks for the reply dagofast, and you're right about the secondary locks-- they're supposed to engage when there's slack in the chain. So if you lose hydraulics all the sudden, the secondary safety latch catches.

I spent enough time yesterday night to determine what might be wrong, and a call to Derek Weaver confirmed it. The chain was routed wrong, seemingly from the factory (chain comes already installed). It had to ride on the other side of a spring loaded lever, so that when tension is on the chain, it keeps the secondary locks from engaging. They had it installed on the wrong side, so the secondary locks stayed engaged irregardless of chain tension. Very frustrating and their manual was near useless.

To reroute the chain, I had to remove a lift cylinder to get my hands in there, which was a messy proposition dumping about a quart of hydraulic oil on the floor. The other side I figured out how to do without removing the lift cylinder, but my hands are pretty bruised up, it's that tight of a space.

Long story short, it works now. I tried it with my heaviest vehicle (4800#) and it lifts to max height no problemo.

Any idea how tight the equalization/balancing cables should be? Their manual made no mention of that.
Good afternoon I just installed this lift been a total pain directions ****. I should have had help. I think I have same problems with the chain. I can’t get mine to go down. Can you take a picture of the chain touting and cylinders? Thanks.
 
Joined
Oct 24, 2022
Messages
5
Thanks for the reply dagofast, and you're right about the secondary locks-- they're supposed to engage when there's slack in the chain. So if you lose hydraulics all the sudden, the secondary safety latch catches.

I spent enough time yesterday night to determine what might be wrong, and a call to Derek Weaver confirmed it. The chain was routed wrong, seemingly from the factory (chain comes already installed). It had to ride on the other side of a spring loaded lever, so that when tension is on the chain, it keeps the secondary locks from engaging. They had it installed on the wrong side, so the secondary locks stayed engaged irregardless of chain tension. Very frustrating and their manual was near useless.

To reroute the chain, I had to remove a lift cylinder to get my hands in there, which was a messy proposition dumping about a quart of hydraulic oil on the floor. The other side I figured out how to do without removing the lift cylinder, but my hands are pretty bruised up, it's that tight of a space.

Long story short, it works now. I tried it with my heaviest vehicle (4800#) and it lifts to max height no problemo.

Any idea how tight the equalization/balancing cables should be? Their manual made no mention of that.
Also how did you wire it there is nothing in the owners manual about it thanks. 865 256 0276
 
To avoid these ads, REGISTER NOW!
OP
Q

quakerj

Well-known member
Joined
Nov 11, 2021
Messages
171
Location
Meade County, KY
Good afternoon I just installed this lift been a total pain directions ****. I should have had help. I think I have same problems with the chain. I can’t get mine to go down. Can you take a picture of the chain touting and cylinders? Thanks.
The cylinders probably aren't the problem. They just drop in a hole in the baseplate and the chain rides on the pulley at the top.

Each cylinder had a steel plug on one side of the cylinder, and a plastic cap over the other. You basically want to daisy chain them with the hydraulic hoses, I went from pump to the lift cylinder closest to it, on the outside connection. On that cylinder you'll have to remove the steel plug, because your next hose will go from that same cylinder to the next one. On the next cylinder leave the steel plug in place @ the outside, and just remove plastic cap & connect hydraulic hose to the inside.

Here's some pictures of the correct chain routing:

IMG_4008.jpg

See the little metal bar on the outside of the chain? That metal bar disengages the secondary locks anytime the chain has tension on it (which it should have at all times). If the lift cylinders were to fail suddenly (or anytime there is slack in the chain), it automatically engages the secondary lock.

When I installed mine, the chains were somehow routed on the OUTSIDE of that lever. Whether it was a factory defect or they got bumped around in shipping, who knows. So it was basically holding the secondary locks engaged at all times. In order to lower the lift, I had to manipulate the locks by hand (they're colored grey and BE CAREFUL, you don't want to get your fingers pinched) until I figured out that the chain needed to be moved to the other side of the lever. It was not pleasant but can be done. So your chain routing should be as pictured in the photo above.

Also how did you wire it there is nothing in the owners manual about it thanks.

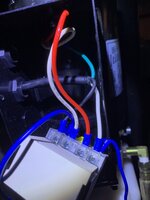
The wiring is stupid simple on these. There is a double pole single throw relay that switches current to the 240V motor. There is a simple single pole switch that interrupts current to the relay coil until you press the button. So when you press the button, the relay engages, which sends power to the motor. Nothing complicated about it and a cheap design if you ask me.

Hopefully this photo can help you out. The lift came shipped with a little pigtail of wire hanging out. Their pigtail had black, white and green wires. The black and white wire as shipped are where your two HOT legs will hook up. The wire you're connecting to it might be black and red, but they'll take the place of the black and white wires (i recommend you ditch the pigtail and wire in directly). Green is ground obviously and your ground should mount on the chassis screw inside the box.

My setup is certainly not code compliant as I just have a 12awg cord hooked up at the moment so I can run it off a generator. So if you can see where my wire comes in (in the photo), the black and white wires are where your two HOT wires will go. (outside connections on that side of the relay).

IMG_4012.jpg
 

Attachments

  • IMG_4012.jpg
    IMG_4012.jpg
    348.9 KB · Views: 2
Joined
Oct 24, 2022
Messages
5
Thank you. I got mine all working except need to adjust the cables to synchronize them better but I gave up.
 
Joined
Oct 24, 2022
Messages
5
The cylinders probably aren't the problem. They just drop in a hole in the baseplate and the chain rides on the pulley at the top.

Each cylinder had a steel plug on one side of the cylinder, and a plastic cap over the other. You basically want to daisy chain them with the hydraulic hoses, I went from pump to the lift cylinder closest to it, on the outside connection. On that cylinder you'll have to remove the steel plug, because your next hose will go from that same cylinder to the next one. On the next cylinder leave the steel plug in place @ the outside, and just remove plastic cap & connect hydraulic hose to the inside.

Here's some pictures of the correct chain routing:

IMG_4008.jpg

See the little metal bar on the outside of the chain? That metal bar disengages the secondary locks anytime the chain has tension on it (which it should have at all times). If the lift cylinders were to fail suddenly (or anytime there is slack in the chain), it automatically engages the secondary lock.

When I installed mine, the chains were somehow routed on the OUTSIDE of that lever. Whether it was a factory defect or they got bumped around in shipping, who knows. So it was basically holding the secondary locks engaged at all times. In order to lower the lift, I had to manipulate the locks by hand (they're colored grey and BE CAREFUL, you don't want to get your fingers pinched) until I figured out that the chain needed to be moved to the other side of the lever. It was not pleasant but can be done. So your chain routing should be as pictured in the photo above.


The wiring is stupid simple on these. There is a double pole single throw relay that switches current to the 240V motor. There is a simple single pole switch that interrupts current to the relay coil until you press the button. So when you press the button, the relay engages, which sends power to the motor. Nothing complicated about it and a cheap design if you ask me.

Hopefully this photo can help you out. The lift came shipped with a little pigtail of wire hanging out. Their pigtail had black, white and green wires. The black and white wire as shipped are where your two HOT legs will hook up. The wire you're connecting to it might be black and red, but they'll take the place of the black and white wires (i recommend you ditch the pigtail and wire in directly). Green is ground obviously and your ground should mount on the chassis screw inside the box.

My setup is certainly not code compliant as I just have a 12awg cord hooked up at the moment so I can run it off a generator. So if you can see where my wire comes in (in the photo), the black and white wires are where your two HOT wires will go. (outside connections on that side of the relay).

IMG_4012.jpg
Do you have both nuts together on the cables or one on each side.
 
OP
Q

quakerj

Well-known member
Joined
Nov 11, 2021
Messages
171
Location
Meade County, KY
Do you have both nuts together on the cables or one on each side.
You should have two nuts for each cable end, so a total of 8 nuts.

Put the cables on and get one nut tightened down on each side of both cables (roughly equally) until the cables feel reasonably tight. In other words, kind of "rough it in" to where both cables have equal tension and you have an equal amount of threads engaged on each side of the cable, or as close as you can get.

You'll probably find (like I did) that the cable will be quite tight by the time you get the first nut on all the way (at each side), and won't be able to thread the second nut on completely. That second nut just serves as a jamb nut to keep the other from backing off, so don't worry about it until you get everything the way you want it.

Run the lift up and down and listen for the side that clicks first. This is the part I can't remember, but I did a google search and found a video on Youtube which explained which specific nut to tighten, which depends on which side clicks first. Once I found that video I was able to equalize them in about 5 minutes flat (to where you only hear one click from both sides engaging), just from knowing which nut to tighten.

Once I was done, I still wasn't able to thread the second (jamb) nuts on completely, a couple would only go on about half way. If I kept tightening everything to get the second nuts on all the way, the cable was unreasonably tight. So I left it. After using the lift a few times, I've noticed the cable has lost a little tension, so I'll probably be able to tighten them up more (and re-equalize) and be able to get that second nut on all the way. Probably the cable stretched or settled a little during the first few uses.

I'm curious--- was your chain going on the wrong side of the lever like mine was?
 
OP
Q

quakerj

Well-known member
Joined
Nov 11, 2021
Messages
171
Location
Meade County, KY
Thanks. Yes it was ok wrong side. The directions for this lift were horrible.
Yes the instructions are useless, not sure I'd buy anything from Derek Weaver again after this experience. If they're going to resell the same Chinese lift as everyone else and simply add a markup to it, the least they could do is make up a decent installation manual. Oh and converting millimeters to feet/inches was fun too!

I had a few wasted hours the first evening trying to make sense of it. I took a vacation day off work the next day because I was that frustrated and just wanted to get the damn thing installed.

I'm still cleaning up hydraulic fluid off the floor where I had to remove a lift cylinder. Hopefully you were able to get your hands in there to reroute the chain without removing it.
 
To avoid these ads, REGISTER NOW!
Top Bottom