To avoid these ads, REGISTER NOW!

Above 1200 Sq/FT 40x56x14 Post Frame in Iowa.

Wokspaces above 1200 squarefeet.

fdrunner

Active member
Joined
Apr 2, 2017
Messages
42
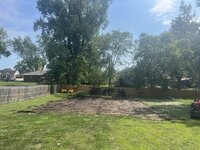
Hi everyone, I started to build my 40x56x14 in Des Moines, Iowa. I've been planning on this build for a long time and with lumber prices going down I decided to start it. The build will be a slow project due to I'm doing everything solo with exception of some family and friends helping me on the weekend when heaving lifting is required. My plan is to get the poles in and all the girts before winter starts and not going do the truss/roof till spring. When finished it'll have the following:
-Wrap around porch
-(5) 24"x48" window to let natural sunlight in
-(1) 18x12 Overhead garage door fully instulated
-(1) 8x7 Overhead Glassdoor on side wall
-(3) service door
-100Amp service
-radiant floor heating
-10x20 section will be dedicated for a "mancave" with 3/4 bathroom and small living quarters and mini split
 

Attachments

  • 68289334858__FD59F1E7-650E-49C9-A459-E2E40CAED0AB.jpeg
    68289334858__FD59F1E7-650E-49C9-A459-E2E40CAED0AB.jpeg
    1.9 MB · Views: 193
  • IMG_2860.jpeg
    IMG_2860.jpeg
    1.8 MB · Views: 108
  • IMG_2865.jpeg
    IMG_2865.jpeg
    1.4 MB · Views: 100
  • IMG_2868.jpeg
    IMG_2868.jpeg
    1.7 MB · Views: 89
  • IMG_2869.jpeg
    IMG_2869.jpeg
    1.5 MB · Views: 93
To avoid these ads, REGISTER NOW!

Jakemedic

Well-known member
Joined
Jul 26, 2013
Messages
722
Location
Cornfields of SE Iowa
Greetings from 60 miles from Des Moines! Have you checked with AW metal in Bloomfield? My son in law used them for his materials this past summer, and they did him right. Much better than the big box stores for sure. I used them for my materials for my shop 2 yrs ago, and had the Amish build the shell. Best 2000 I ever spent! In and out in 1.5 days. Would have taken me 3 months working alone. Just my 2 cents worth anyhow. Looking forward to seeing your progress!
 
OP
F

fdrunner

Active member
Joined
Apr 2, 2017
Messages
42
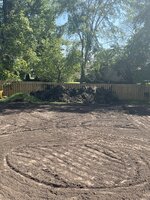
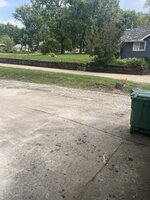
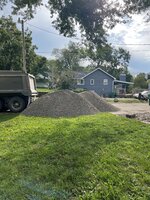
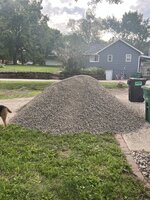
I thought about hiring it out, but I like doing projects on my own then I know the building inside and out and if doesn't look the way I want it then it's my fault. I ended up using Menards for all my material and when I go to picked out the lumber I will hand picked everything myself instead of them slapping all the material (wood) together and don't care how crappy one piece of board was. The main down fall on my building location is elevation change. I have about 3' elevation change from NE to SW....time to bring in some 1" road stone and machine. This is about 80T of stone, damn it was expensive. I told my wife we have some "white gold" in the driveway.


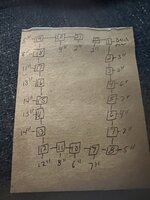
Here's my elevation change with not adding any 1" roadstone

Post 1- Bench mark (all the increments below is how much more fill I need to bring in to make it perfectly level)
Post 2- 3”
Post 3- 2”
Post 4- 6”
Post 5- 7”
Post 6- 9”
Post 7- 8 “
Post 8- 5’
Post 9- 7”
Post 10- 6"
Post 11- 8"
Post 12- 12”
Post 13- 14”
Post 14- 15”
Post 15” 14”
Post 16- 13”
Post 17- 11”
Post 18- 8”
Post 19- 5”
Post 20- 4”
Post 21-2”
Post 22- 2”
 

Attachments

  • IMG_2914.jpeg
    IMG_2914.jpeg
    556.1 KB · Views: 81
  • IMG_2912.jpeg
    IMG_2912.jpeg
    1.3 MB · Views: 81
  • IMG_2909.jpeg
    IMG_2909.jpeg
    1.7 MB · Views: 79
  • IMG_2887.jpeg
    IMG_2887.jpeg
    1.2 MB · Views: 78
  • IMG_2886.jpeg
    IMG_2886.jpeg
    1.9 MB · Views: 72
  • IMG_2885.jpeg
    IMG_2885.jpeg
    1.6 MB · Views: 68
  • IMG_2884.jpeg
    IMG_2884.jpeg
    1.5 MB · Views: 65
  • IMG_2883.jpeg
    IMG_2883.jpeg
    1.5 MB · Views: 77
  • IMG_2610.png
    IMG_2610.png
    406 KB · Views: 100
Last edited:
OP
F

fdrunner

Active member
Joined
Apr 2, 2017
Messages
42
I thought about hiring it out, but I like doing projects on my own then I know the building inside and out and if doesn't look the way I want it then it's my fault. I ended up using Menards for all my material and when I go to picked out the lumber I will hand picked everything myself instead of them slapping all the material (wood) together and don't care how crappy one piece of board was. The main down fall on my building location is elevation change. I have about 3' elevation change from NE to SW....time to bring in some 1" road stone and machine. This is about 80T of stone, damn it was expensive. I told my wife we have some "white gold" in the driveway.


Here's my elevation change with not adding any 1" loadstone

Post 1- Bench mark (all the increments below is how much more fill I need to bring in to make it perfectly level)
Post 2- 3”
Post 3- 2”
Post 4- 6”
Post 5- 7”
Post 6- 9”
Post 7- 8 “
Post 8- 5’
Post 9- 7”
Post 10- 6"
Post 11- 8"
Post 12- 12”
Post 13- 14”
Post 14- 15”
Post 15” 14”
Post 16- 13”
Post 17- 11”
Post 18- 8”
Post 19- 5”
Post 20- 4”
Post 21-2”
Post 22- 2”
 
OP
F

fdrunner

Active member
Joined
Apr 2, 2017
Messages
42
Side note, my neighbor is having his 50x80 post frame built the same time I'm doing mine, though he's having a company out of Bloomfield do it (I believe it's called Topline). They 2 did others people post frame in our neighborhood and the workers they had were all Amish. The cost for them to build mine was a little to rich for my blood. He said it'll be done with a couple days from start to finish.
 
OP
F

fdrunner

Active member
Joined
Apr 2, 2017
Messages
42
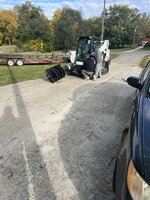
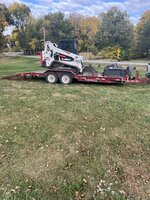
Well, used up all the 80T 1" road stone, and I'l low on the west side of building. I'm 6"-12" low at some location. I ordered my 3-Ply laminated columns to make up the difference and when the building is up I'll bring in more 1" road stone to bring everything up to grade. I picked up my friends Bobcat and 24" auger to do all 22 holes. Took me about 2 hours to do all the holes. Polk County wants 22x8 concrete biscuit on the bottom or can use pour concrete. I did cost comparison between buying concrete biscuits vs bags of concrete...huge price difference...so I deiced to buy 103 bags of 60# concrete bags...time to get my working gloves on!!
 

Attachments

  • IMG_3049.jpeg
    IMG_3049.jpeg
    1.3 MB · Views: 77
  • IMG_3048.jpeg
    IMG_3048.jpeg
    1.8 MB · Views: 75
  • IMG_2910.jpeg
    IMG_2910.jpeg
    1.6 MB · Views: 74
  • IMG_2909.jpeg
    IMG_2909.jpeg
    1.7 MB · Views: 74
  • IMG_3050.jpeg
    IMG_3050.jpeg
    1.4 MB · Views: 78
  • IMG_3044.jpeg
    IMG_3044.jpeg
    1.5 MB · Views: 91
OP
F

fdrunner

Active member
Joined
Apr 2, 2017
Messages
42
The special order 3-ply laminated columns, grade board, and 6 boxes of 30D galvanized ring shank nail came in and picked all the lumber for the girts and the bracing of the columns. My plan is to get in columns in next weekend and when I have time start putting up the wall girts which will be spaced 2'OC since I plan on sheathing the outside with 7/16 OSB.
 

Attachments

  • 68609422667__25ECA12F-E9EC-418D-9AF0-5457F761BCA0.jpeg
    68609422667__25ECA12F-E9EC-418D-9AF0-5457F761BCA0.jpeg
    1.4 MB · Views: 88
  • IMG_3045.jpeg
    IMG_3045.jpeg
    1.7 MB · Views: 88
Last edited:

MacTexas

Well-known member
Joined
Mar 25, 2005
Messages
1,673
Location
Granbury Texas
I go to the Knoxville Nationals every year so I am familiar with Iowa. Are you going to have help or you doing everything your self.
 
To avoid these ads, REGISTER NOW!
OP
F

fdrunner

Active member
Joined
Apr 2, 2017
Messages
42
I go to the Knoxville Nationals every year so I am familiar with Iowa. Are you going to have help or you doing everything your self.
I'm doing everything myself, besides family members helping me put the truss in the holes and plum brace them all up. When I get to the truss system more than likely I'll have someone assisting me as well.
 
OP
F

fdrunner

Active member
Joined
Apr 2, 2017
Messages
42
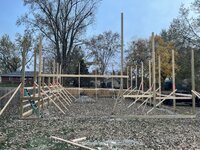
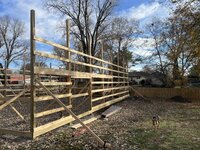
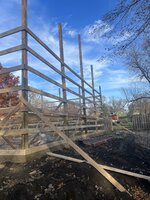
All the holes dug (24" auger) and mixed all 103 bags of 60# bags mixed. I put in 4.5 bags in each hole which gave me the required 6-8" footing pad. Took about 2 hours to auger all the holes and about 4 hours to mix all the concrete. Several days later, my brother, father in law, and brother in law set all the columns about in 5 hours...everything braced and ready for me to install all the girts 2" OC in the following days. Side note, I had a little "oppose" on one column I was dumping 1" roadstone into the hole..while I was lift the bucket more..the bucket caught the brac and lifted the column up...lucky there was only about 1' of rock in the hole...we unbraced it..lifted the column back out..removed all the road stone from the hole and installed it...that took about 1hr to do :(.
 

Attachments

  • IMG_3050.jpeg
    IMG_3050.jpeg
    1.4 MB · Views: 77
  • IMG_3051.jpeg
    IMG_3051.jpeg
    1.5 MB · Views: 63
  • IMG_3054.jpeg
    IMG_3054.jpeg
    1.3 MB · Views: 80
  • IMG_3061.jpeg
    IMG_3061.jpeg
    1.6 MB · Views: 80
OP
F

fdrunner

Active member
Joined
Apr 2, 2017
Messages
42
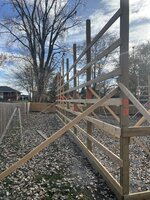
The weather is getting a little cold here in Iowa, making installing the wall girts less enjoyable. I can tell you, my arm is about to fall off after pounding those 30D 4.5" nails in for the gradeboard and girts. Had electrical stop by today, damn updating from 100A to 200A is expensive!!!
 

Attachments

  • IMG_3069.jpeg
    IMG_3069.jpeg
    1.7 MB · Views: 63
  • IMG_3070.jpeg
    IMG_3070.jpeg
    1.7 MB · Views: 91

Craig Balzer

Well-known member
Joined
Sep 21, 2005
Messages
867
Location
Colorado Springs
fdrunner

Looks like you are passed the planning stage and moving right on down the execution trail.
I have posted this several times on various threads where members are doing their own garage; sorry if this is repetitious. I used a GC for my build, so comments may not apply to your situation

I just finished up a 2300 Sq Ft Hobby Shop and am starting to populate it with stuff. I put these notes together during and after the build.
Hope these thoughts will help you. (Sorry -- my OCD kicked in and I got pretty detailed. I live 9 miles from the nearest O'Rielly's; hence the overkill on shop supplies):

GENERAL
• Build as big as you can afford/fit on your property (or you'll regret it).
• You gotta know your plan inside and out – when the builder asks to move something elsewhere, only you can visualize the impact on other things / stuff
• Be flexible when reality shows up – also be true to your overall plan
• Windows? PRO: natural light – CON: entry point for a$$holes
• Skylight(s)? PRO: natural light – CON: then no attic
• Keep the building dimensions in multiples of 4 feet – reduces wastage of wood
• A mezzanine is good for long-time storage of large or awkward items; plan for where the staircase is gonna be placed; plan how to get heavy items up there and back down

FLOOR
• Gonna place light(s) in floor under lift??
• First thing you lay down is 10 mil vapor barrier
• Then closed-cell insulation – 2 inches thick
• In-floor tubing goes in before concrete pour – plan carefully if a lift is planned. Should be thicker concrete and limit pex tubing near posts
• Thickness? 4” works. Except under lift – my pour was 9-12 inches thick under posts.
• Plan now for smoothness of finish on concrete - - epoxy covering?
• Gonna wash cars in there – floor drain(s)? Lot’s of environmental issues to learn
  • Lay some plastic conduit in the floor before concrete is poured from the circuit box to the three walls to allow future wiring to be run without tearing into walls or mounting conduit on the walls
WALLS
• 2x4 vs 2x6 construction. A 2x6 is pennies more per board and allows thicker insulation
• I have R19 in my walls (Colorado) and the building is noticeably cooler this summer and stays warm in winter during sub-freezing temps
• I have R49 blown-in above the ceiling
• Sheath with OSB vs Dry Wall. Dry wall looks prettier but to hang anything heavy requirements finding a stud or two. OSB has more industrial appearance but a shelf goes wherever you want to put it
• Windows – already covered
• Height of walls? 12 or 13’ allows most lifts to fit (I have 14’ ceilings in main room)
• Tall walls require more heating capacity, and costs more to heat

ELECTRICAL
• Plan where your 110v outlets are gonna be, then add 50% more of them (mine are 4 feet apart except where a window gets in the way)
• Are you gonna use 15- or 20-Amp circuits? (different wiring requirements and different fixtures)
• Place them 45-48” above the floor level so they aren’t hidden later by benches, toolboxes, etc
• Plan for outlet(s) on the exterior of each wall
• Plan for outlet(s) in ceiling for lift or drop light or other
• Plan for outlet(s) in ceiling for garage door opener
• Plan for outlets up high on wall: wall clock, TV, modern “smart” speakers, other
• Lights – fluorescent or LED? Dimmable? Dimmable LEDs are available and require different wiring and dimming switch
• Plan for exterior lights – Colorado Code requires a light above each man-door opening
• Plan for exterior lights – gonna have a patio nearby or BarBQ pit or horseshoe pit or Christmas lights?
• Plan for dedicated circuit for heater
• Plan for dedicated circuit for water heater
• Now plan where circuits are gonna start. Each can handle 8-10 outlets and each should start with a GFIC outlet
• Plan where your 220v outlets are gonna be. Consider welders, air compressor, lift, oven (powder coating), special tools, etc. Even if you won’t have these until the future, plan now to power them

WATER
• Gonna have water in the garage? A sink to wash up before going into the house is priceless
• Gonna have water in the garage? A sink to wash parts is useful
• A shower is priceless to avoid getting SWMBO’s towels and linens filthy
• Toilet?
• Hot water is nice to wash cars in the winter
• Plan a hose bibb on at least one exterior wall and maybe one inside

A/C

HEAT

• Gonna use in-floor PEX? -- see notes on concrete.
• If not, propane or electric heater will need power and proper placement
• See comments re height of walls

STUFF

What toys do you have? Do you plan to have? Sketch your floor plan to scale on gridded paper; don’t forget windows and doors. And then, to scale, place your toys. All of them. The easy ones are toolbox(es), benches, welders, air compressor, and the like. Did you remember to ID a place to store floor jacks? Creeper? Jack stands? Ladder(s)?

Find a place for everything:
o Welder
o Plasma Cutter
o Grinder
o Polisher / Buffer
o Powder Coating Oven
o Blast Cabinet
o Parts Washer
o Microwave
o Refrigerator
o Charging station for cordless tools
o Desk lamp
o TV
o Stereo
o Computer
o Phone
o Wall Art / Neon signs
o Other

Expanded details:

STORAGE
• Plan cabinet(s) to store hardware (nuts, bolts, washers, this and that)
• Plan cabinet(s) to store supplies, such as (paint, cleaners, paper towels, etc)

FLUIDS for the car
• Oil
• Oil Filters
• Fuel Filter(s)
• Gear Lube
• Differential Lube/Additive
• ATF
• Brake fluid
• Anti-Freeze
• Power Steering Fluid
• Marvel Mystery Oil
• Starting Fluid
• Lacquer Thinner
• Grease for ball joints/tie rod ends etc

CLEANING yourself
• Hand Cleaner
• Latex (or Nitrile) Gloves
• Shop Towels

CLEANERS for the Car/Engine/Garage/Floor
• Castrol Concentrated Cleaner
• Engine Cleaner
• Brake Cleaner
• Carb Cleaner
• Rust Remover
• Brushable Rustoleum
• Degreaser
• Acetone
• Mineral Spirits

BEAUTY PRODUCTS
• Polish
• Wax
• Touch-up paint
• Chrome Cleaner
• Chrome Kleener (Autosol)

WORKING on the Car
• Di-electric grease
• Bearing Grease
• 3-1 oil
• Silicon Spray
• Anti-seize compound
• Loctite
• Teflon tape
• Acousti-Seal, Exhaust System Sealing Compound
• Wellseal Gasket Compound / Gasket sealer
• Wire of various colors and sizes
• Electrical Connectors
• Masking Tape
• Duct Tape
• Electric Tape
• Contact Cement
• 3M Weather-strip Adhesive
• General Purpose Adhesive Solvent Part #: 051135-08984
• 3M Adhesive Remover (Ronson lighter fluid)
• PB Blaster or Kroil -or Knock’er Loose
• Wire ties
• Mechanic's wire
• Cotter pins
• C-clips
• E-clips
• Snap rings
• Hose clamps
• Roloc pads/grinding discs
• Die-grinder burrs/bits
• Buffing wheels/compound
• Razor blades
• Utility knife blades
• Sandpaper
• Emory cloth
• Scotch-brite
• Grease fittings
• Fuel line/brake line and fittings
• Rubber hose: windshield washer, heater, radiator, fuel, vacuum
• Spray paint
• JB Weld
 

Attachments

  • 20210425_151852.jpg
    20210425_151852.jpg
    641.3 KB · Views: 90
  • Balzer's Floor Plan PDF.pdf
    417 KB · Views: 20
OP
F

fdrunner

Active member
Joined
Apr 2, 2017
Messages
42
Man, you sure went into some detail. I suppose I'll add some detail in my garage:

I added some design pictures of my garage below...hopefully people will able to open the format.

Inside the building:
1.) There be an enclosed man-cave on one side of the garage...it'll be 10x20 8' ceiling height. Can access the area from a service door outside, or from the inside. In the area, will be a 8x7 garage door that'll lead open our pool. There be 6' wrap around porch.
2.) There will be a 3/4 bathroom inside that'll be connected to our septic system.
3.) I plan on building a mezzanine on side side which will be 10'x36'
4.) 2 post lift
5.) Mini Split in the man cave area and radian tube heating in the main area.
6.) 100 AMP service
7.) Shop section will be located on the back section of the garage
8.) Be fully insulated
9.)5-6" concrete floor
10.) What will be parked inside: 1.) my 2009 Subaru Legacy Work care 2.) my 2011 Silverado crew cab LML diesel w/snow blade
3.) Bayliner 3055

Side now in regards to electrical. In 2023 we are planning on going 100% electrical...there will be 31 panels on the house. We just signed the contract..said it'll b3 4-6 months before install...so I guess I have 4-6 months to at least get the roof on with the steel panel....I know I won't be doing much come winter when it comes to the roof.
 

Attachments

  • Perspectives.pdf
    139.6 KB · Views: 11
OP
F

fdrunner

Active member
Joined
Apr 2, 2017
Messages
42
Made some good progress the last couple weekend. My goals is have all the girls up prior to December than I'm done until spring comes. I thought about putting up the trusses/purlins up and brace everything down real good and come spring start the metal on the roof. I decided to leave it as it. I am going unbrace everything and check all 4 corner to make sure they're plum. This way I can at least start putting in the window frame (8 windows) and service doors (3 service doors).

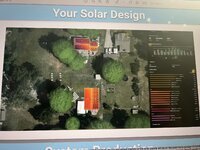
We received our solar panel designed as well. They said it usually takes 4-5 months from time we sign the contract to finishing the project. I did ask them if we sign the contract in November, so potential it'll be done would be...March/April....if for some reason I didn't have the roof done would there be any issues...They said no as long it's not a 4-5 month delay on my part. Wife and I signed on the dotted line...so come spring I definitely need to get the roof done...so they can install the panels.

Solar Panel System:
-39 Tier 1 panels (31 on the Post Frame roof and 8 on the garage on the house). I have potential to 8 more on the Post frame if we need more
-39 panels should produce 15.007 kwh
-30% rebate return when we do our taxes for 2023
 

Attachments

  • IMG_3130.jpeg
    IMG_3130.jpeg
    1.3 MB · Views: 54
  • IMG_3069.jpeg
    IMG_3069.jpeg
    1.7 MB · Views: 43
  • IMG_3070.jpeg
    IMG_3070.jpeg
    1.7 MB · Views: 42
  • IMG_3076.jpeg
    IMG_3076.jpeg
    1.7 MB · Views: 42
  • IMG_3077.jpeg
    IMG_3077.jpeg
    1.7 MB · Views: 40
  • IMG_3078.jpeg
    IMG_3078.jpeg
    1.5 MB · Views: 43
  • IMG_3088.jpeg
    IMG_3088.jpeg
    1 MB · Views: 48
  • IMG_3131.jpeg
    IMG_3131.jpeg
    691.7 KB · Views: 51
To avoid these ads, REGISTER NOW!
Top Bottom