
You are using an out of date browser. It may not display this or other websites correctly.
You should upgrade or use an alternative browser.
You should upgrade or use an alternative browser.
Craftsman Drill Press Information Belts, Bearings, Chucks, Keys, etc…1946-1984
- Thread starter 11b30b4
- Start date
After watching a mrpete222 video on Removing Drill Press Chucks (skip to 3:33) I dug around a bit more and found this 1974 Jacobs catalog on the http://vintagemachinery.org/ website. Looking at the highlighted image on the front, I'm thinking that this could certainly be a Jacobs 633C chuck. (now replaced by the Jacobs 34-33C)


FrankLee
Well-known member
Another outstanding post, Jeff. Thanks!
 www.garagejournal.com
I have a lot of respect for Mr Pete, but I think he really missed the boat on his removal tool. It's way too complicated to make for most of us.
Below are a couple of pin spanners I made a few years ago using only a drill press with materials I had on hand. You may recognize repurposed Craftsman parts in the second photo. I did have to buy set screws with FULL dog points. The larger spanner has an 8mm set screw, the smaller has a 5/16-18 set screw. I've used them both many times on frequently stubborn chucks.


Craftsman Drill Press Information Belts, Bearings, Chucks, Keys, etc…1946-1984
google rubber motor mounting ring
www.garagejournal.com
After watching a mrpete222 video on Removing Drill Press Chucks (skip to 3:33) I dug around a bit more and found this 1974 Jacobs catalog on the http://vintagemachinery.org/ website. Looking at the highlighted image on the front, I'm thinking that this could certainly be a Jacobs 633C chuck. (now replaced by the Jacobs 34-33C)
I have a lot of respect for Mr Pete, but I think he really missed the boat on his removal tool. It's way too complicated to make for most of us.
Below are a couple of pin spanners I made a few years ago using only a drill press with materials I had on hand. You may recognize repurposed Craftsman parts in the second photo. I did have to buy set screws with FULL dog points. The larger spanner has an 8mm set screw, the smaller has a 5/16-18 set screw. I've used them both many times on frequently stubborn chucks.
Last edited:

Piehammer, love that last pic and yes we need to get together to crack this dilemma.
FrankLee, I love all the jigs and tools you have made over the years to work on these tools. That grease jig for the water pump shaft bearing was amazing and shear genius.
FrankLee, I love all the jigs and tools you have made over the years to work on these tools. That grease jig for the water pump shaft bearing was amazing and shear genius.

Smokeshow69
Well-known member
Question on Bearings- I noted and have secured bearings for both my quill as well as the spindle pulley. My question is- what is the correct partnumber for My MSA bearings (factory) and also what would be the correct part number for the motor bearings? I am sure you have posted that elsewhere and will research that but folks may not be aware of the other threads? Thanks for all your hard work putting this thread together.
FrankLee
Well-known member
The original bearings on my most recent MSA were Norma 204P. I ordered Nachi 6204-2RS.
Which motor, 6962?
Which motor, 6962?
Last edited:
Smokeshow69
Well-known member

FrankLee
Well-known member
Here's bearing info for many Craftsman machines and motors including your model.
Smokeshow69
Well-known member
The original bearings on my most recent MSA were Norma 204P. I ordered Nachi 6204-2RS.

Which motor, 6962?

thanks! I appreciate it. I will be posting pictures of the refreshing as I go. Power bronze floor model with some gray accessories and an msa on top. A transitional model for sure with mixed paint colors. Motor has the rare spindle cover which is pretty coolHere's bearing info for many Craftsman machines and motors including your model.
Smokeshow69
Well-known member
Anyone have an extra 3/8 hub feed handle? One of mine is slightly bent. Doesn’t need to be perfect as my other 2 are not perfect.
Smokeshow69
Well-known member
Thanks. Doesn’t need to be perfect. My other 2 show wear/rust so it’s ok if it matchesSmokes, let me look this evening. I do not believe I have an extra but I will check and let you know.


Smokeshow69
Well-known member
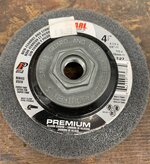
Got my motor all cleaned up and also got the column buzzed down with a wire wheel and then ran this fine polish abrasive wheel over it. It looks pretty good now. Before and after on each
Attachments
-
 FF2BEFA2-E7CF-49DB-9E5D-340A6174A2A4.jpeg774.3 KB · Views: 41
 -
 97BA826D-8A18-4868-8AC5-EA31F880439F.jpeg806.2 KB · Views: 38
 -
 6CBD3DE5-05FD-456F-A20E-5D80CABA7139.jpeg808.9 KB · Views: 35
 -
 0B2C53AC-6C51-481A-BA7B-01A6A91A9040.jpeg1.1 MB · Views: 38
 -
 5DAD9C73-F375-4D2A-AD03-2A51CA4CAE52.jpeg534.8 KB · Views: 41
scottmoe
New member
Hopefully now you now know what model drill press you have.
Next, if you do not already have one, this is the link to the Craftsman publications page on Vintage machinery. You should be able to find an Owner’s Manual for your drill press there.
Here are the sources for the replaceable parts:
All the parts below are broken down into four categories:
Feed Return Spring
- For use on all Craftsman 15.5” Drill Presses (King Seeley 100 & 150, Emerson Gen 1-5, Emerson Gen 3-4 Commercial).
- For use on specific Craftsman 15.5” Drill Presses (King Seeley 100 & 150, Emerson Gen 1 & 2).
- For use on specific Craftsman 15.5” Drill Presses (Emerson Gen 3-5).
- For use on specific Craftsman 15.5” Drill Presses (Emerson Gen 3 & 4 Commercial).
NOTE- The OEM feed return spring is no longer manufactured.
There are three spring sizes and types for the drill presses covered in this thread.
For all the King Seeley 100 and 150 models with the external tension knobs, the spring is a single loop (one end) and dog leg (other end) coil torsion spring about 4” long and about 5/8” in diameter. The wire is approximately 12 gauge (about 0.0770”) thick. There are approximately 51 coils in a right-hand wind on the spring.

Note: Not covered in this thread is the 80 drill press. The 80 series used a similar spring that was 5” long and had 64 coils.
For the late King Seeley 150 and all Emerson Gen 1-5 standard 15.5” drill presses, the spring is a double loop (both ends) coil torsion spring about 4” long and about 5/8” in diameter. The wire is approximately 12 gauge (about 0.0770”) thick. There are approximately 51 coils in a right-hand wind on the spring. So, the spring is the same spring as the 100 and 150 series except it has loops on both ends. This is because is it captured internally by hooking on a roll pin.


Note- it is possible to modify one of these double loop springs to work on an early 100 or 150 by cutting one of the loos and bending a dog leg on one end.
The third type of spring is the spring used on the Gen 3 and 4 Commercial drill presses. Seen in the picture below, the Commercial drill press feed return spring is on the right. The spring is a single loop on both ends, coil torsion spring about 6 1/4” long and about 5/8” in diameter. The wire is approximately 12 gauge (about 0.0770”) thick. There are approximately 67 coils in a right-hand wind on the spring.

Recently, I had a local spring manufacturer produce new springs for the 100, 150 and standard Emerson Gen 1-4 drill presses. I am selling them on the classified page.
https://www.garagejournal.com/forum...ftsman-drill-press-feed-return-spring.501051/
V-belt
For the 100, 150, Emerson Gen 1 and 2, the V-belt is a ½” x 45” V-belt. I prefer a cogged V-belt because it will move around the pulleys better and its quitter. I normally use the Drualast Cogged V-belt from AutoZone. Duralast V-belt series 17xxx is what I use. The 17450 is the ½” x 45” cogged V-belt but you can use any of the ½” V-belts between 43”-45”. Here is a link to the 17450. At my AutoZone its $8.99.
For the Emerson Gen 3-5 standard and commercial drill presses, the V-belt is a 3/16” x 45” V-belt. You can find lots of them on Amazon, eBay, etc.. just google 45” x 3/16” V-belt. Here is just one such belt on Amazon.
New Belt Sears Craftsman Drill Press Model # 113.24630 113 213 780 113.213780 - - Amazon.com
New Belt Sears Craftsman Drill Press Model # 113.24630 113 213 780 113.213780 - - Amazon.comwww.amazon.com
Jacob’s chuck
The OEM chuck look like this.

All Craftsman 15.5” (King Seeley and Emerson) drill presses have a #33 Jacob’s taper on the spindle as well as a threaded thrust collar. So, all of them are compatible with the Jacob’s 34-33C Chuck.
The original chuck was a “made in the USA” Jacob’s brand #33 taper chuck. The chuck is a plain bearing heavy duty keyed ½” chuck with a safety collar, Jacob’s part number 14451. The chuck is a 34 series chuck, Jacobs model number 34-33C. This is the same chuck that has been on all Craftsman 15.5” drill presses since the 1940s until 1986. The safety collar was not introduced until 1952 (although there is evidence of its use in 1951) so all previous chucks had a thread protector on the thrust collar. This thread protector looks just like the safety collar but is not connected to the chuck. It is also possible to see chucks and thread protectors where the sleeve is machined with panels and not smooth. Here is a picture of one of these paneled sleeves.

Replacement chucks can be ordered from Jacob’s or several other suppliers such as this link from Zoro (note often the picture shown is the paneled sleeve chuck without the safety collar, but it is the exact same chuck as the original and it comes with a key). Also, be advised that Jacob’s no longer makes chucks in the USA and any new Jacob’s brand chuck will be made in Asia. I have several of these Asian made replacement chucks and they are very high quality.
For some reason the link to the chuck does not work when I paste it here but go to Zoro.com and search for Jacobs 14451.
Jacob’s Chuck Key
The chuck key for the Jacobs model number 34-33C chuck is an 11 tooth 5/16” pilot key. Jacob’s sales the key as part number JCM2948 and model number S-K3C and is should look like this.

These keys will have a turned down (smaller) tip on the end of the key. This tip was designed to remove and install the threaded safety collar; however, it does not work well, and I have had the tip break off on several keys. I prefer a spanner wrench to install and remove the chuck (see below for spanner information). Also, the OEM key is likely not a self-ejecting key and was probably model number K3. The S in the model number means it is a spring loaded self-ejecting pilot and the C means it has the turned down tip for the safety collar.
You can order replacement keys from Jacobs and other suppliers such as this one from Grainger.
Bearings, Spindle Pulley Assembly (x2)

For all of these drill presses 100, 150, Emerson Gen 1-5 including the commercial models, the two spindle pulley assembly bearings are the largest. They are both 6205 bearings. They measure 25mm bore x 52mm OD x 15mm tall.

The OEM bearings are double shielded (often expressed with ZZ or 2Z in the part number), but you can use shielded (ZZ) or sealed (often expressed with 2RS or RR in the part number). I normally order my bearings from Accurate bearings, but a simple search will produce lots of options from various sellers. I prefer Japanese or American bearings over Chinese bearings. This is a link to a Nachi double shielded 6205ZZ bearing on Amazon. Remember you need two of them.
6205 ZZ C3 Nachi Bearing Japan 25X52X15mm 6205ZZ Double Shield: Amazon.com: Industrial & Scientific
6205 ZZ C3 Nachi Bearing Japan 25X52X15mm 6205ZZ Double Shield: Amazon.com: Industrial & Scientificwww.amazon.com
Bearings, Quill (x2)

On all of these drill presses except the commercial models, the two quill bearings are 6202 5/8” bore. A standard 6202 bearing has a 15mm bore so you need a special bore bearing. The 6202 5/8” bore measures 5/8” bore x 35mm OD x 11mm tall. (Note- some of the part diagrams only identify one bearing but there are two). Both of the OEM bearings are double shielded, but you can use shielded or sealed bearings. As I said, I order my bearings from Accurate bearing, but you can get them anywhere as long as they are the correct measurements. This is a link to a NSK 6202 5/8” bore double sealed ball bearing from Amazon. Remember, you need two of them.
6202-10-2RS 6202-5/8-2RS NSK Sealed Ball Bearing, 5/8" Bore Same Day Shipping: Amazon.com: Industrial & Scientific
6202-10-2RS 6202-5/8-2RS NSK Sealed Ball Bearing, 5/8" Bore Same Day Shipping: Amazon.com: Industrial & Scientificwww.amazon.com
For the Emerson Gen 3 & 4 Commercial models, the quill bearings are different.

The top quill bearing is a 6203ZZ bearing measuring 40mm x 12mm with a 17mm bore. The OEM bearing is double shielded, but a replacement can be shielded or sealed. Here is a link to a Nachi 6203ZZ bearing on Amazon:
6203-ZZE cm NACHI Brand Metal Shield Ball Bearing 17x40x12 6203 ZZ 6203Z: Amazon.com: Industrial & Scientific
6203-ZZE cm NACHI Brand Metal Shield Ball Bearing 17x40x12 6203 ZZ 6203Z: Amazon.com: Industrial & Scientificwww.amazon.com
The bottom quill bearing on the commercial models is a double row ball bearing. To remove it from the spindle you will need to drift the roll pin retaining the thrust collar and remove the thrust collar. (Note- thrust collars are unique on all craftsman drill presses and must be reattached exactly as they were removed in order for the proper gap of the Jacob’s Chuck safety collar to align). The bearing is a 5503 double row ball bearing, double shielded measuring 40mm x 17.5mm with a 17mm bore. Here is a link from eBay for a Nachi equivalent 5203ZZ bearing.
Spindle Washer (Rubber) & Quill Bumper (Rubber)

On all of these 15.5” drill presses (except the commercial models) there are two rubber washer/ O-Rings. Often these are in bad shape given the age of these drill presses. Garage Journal member FrankLee no longer sales these; however I am now selling them on the classifieds page.
SOLD SOLD SOLD FS Classic Craftsman Drill Press O-rings $15.00 per set shipped
SOLD SOLD SOLD I am all sold out. The information for you to order your own O-rings from McMaster-Carr is below. I am selling sets of: 1 Quill Gasket Square Profile Oil Resistant Buna-N O-Ring 1 5/8" x 2" x 3/16" McMaster-Carr part # 4061T292 1 Spindle Rubber Washer Oil-Resistant Buna-N...
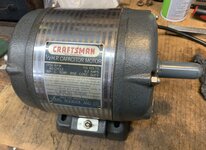
Note- if you are rebuilding a motor for your drill press, there is a lot of information about the various Craftsman motors here on GJ. I have a thread specifically about Craftsman vintage motors here:
The Vintage Craftsman GP Motor Thread
I was requested to outline some of my comparison information about Vintage Craftsman General Purpose Motors by a fellow GJ member. Most of this information was available on the forum prior to the 2021 forum update but has been lost or difficult to locate ever since. I am not an electrician and...
Additionally, here is a link to the craftsman page on Vintage Machinery. Along the top of this page there is a tab for publication reprints, and you can most likely find the Owner’s Manual for your motor:
Lastly, Vintage Machinery has a replacement bearing lists that also may be of use:
Quill Feed Replacement Rods
For all Craftsman 15.5” drill presses, there are two sized quill feed rods depending on what modle drill press you have. Often, I see members who purchased a used drill press with missing rods and/or knobs. Luckily, a Garage Journal member Oldironowner makes reproduction rods and I have purchased a set from him in the past. These are top quality at a great price. Here is a link to his sale thread:
For Sale - Reproduction Craftsman 100/150 Drill Press Quill Handles
Up for sale here are reproduction Craftsman 100/150 quill handles. CNC machined out of 316 Stainless steel. Available in sets of three only. Available in 3/8-16 thread or 1/2-13 thread. Knobs not included. $50 a set plus shipping. 73586C89-7978-49BD-9A29-088D44620401 by J Brauer, on Flickr...
Quill Feed knobs
On all of the King Seeley 100 and 150 series and the Emerson Gen1 (150) series drill presses the knobs are a reddish plastic similar to Bakelite. I have not found a direct replacement; however, this link may help you in finding a suitable replacement in black:
JW Winco | Home
Manufacturer and Distributor of Standard Machine Parts. Your Partner for Standard Machine Components and Assembly Hardware for Industry.www.jwwinco.com
Replacement decals and data plates
On all the models of drill presses and motors, if you are unable to clean up your badges and want to replacement them. Garage Journal member MattBlast can reproduce almost anything. I have used him for model number data plates, motor data plates and I am very pleased with the results. Here is his link:
Vintage Grinder Sticker Reproduction
A beat up old sticker on a newly restored grinder makes it look bad. Many restorations require that the label be removed (and destroyed in the process) to repaint. When I restore a grinder I go all out - sandblast, paint, new bearings, replace cord, replace rubber feet, etc. I want my old...
100 Series Engine Turned Panel
For all 100 series drill presses with the engine turned insert panel on the headstock. If your panel is missing or too damaged and you want to place it. You can purchase some engine turned vinyl and apply it to the original or cut out a replacement out of aluminum and apply the vinyl to it. The vinyl is available in small circles and large circles. I am not sure which is a closer match to the original panel but you can do a search for Engine Turned Vinyl and compare it to you original panel. Here is a link to some small engine turned vinyl.
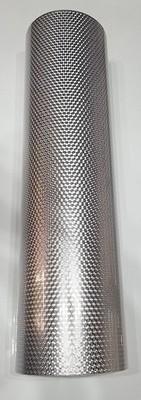
Silver Small Engine Turn Sign Plotter Cutter Vinyl | eBay
Find many great new & used options and get the best deals for Silver Small Engine Turn Sign Plotter Cutter Vinyl at the best online prices at eBay! Free shipping for many products!www.ebay.com
Other things you may need:
Spanner Wrench
The best tool I have found to install and remove the safety collar on the Jacobs Chuck is this GEARWRENCH 3/4" to 2" Adjustable Pin Black Oxide Spanner Wrench 3/16" Pin - 81861, made by Gearwrench Apex Tools, It looks like this.

These are available from several suppliers such as this link from ZORO.
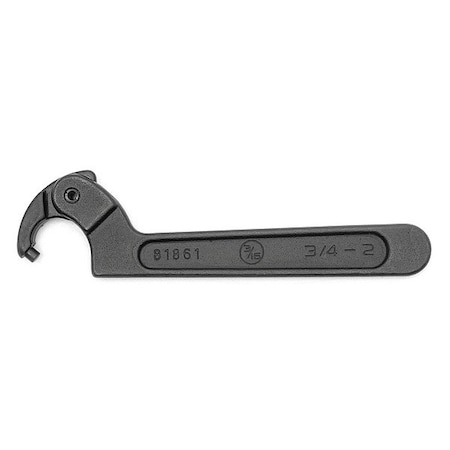
Gearwrench 3/4" to 2" Adjustable Pin Black Oxide Spanner Wrench 3/16" Pin 81861 | Zoro
Order Gearwrench 3/4" to 2" Adjustable Pin Black Oxide Spanner Wrench 3/16" Pin, 81861 at Zoro.com. Great prices & free shipping on orders over $50 when you sign in or sign up for an account.www.zoro.com
Drive Screws
These things are known as Drive Screws, Panel Screws, and Screw Nails. I use drive screws to reattach data plates to all my drill presses. They come in variety of sizes and the holes in the data plates and in the cast-iron will determine your needs. These things are cheap, so I tend to order several sizes but the size I use most is #4 ¼” long. A pack of 100 from McMaster-Carr is $4.00.
Column Pipe
I use a 6’ tall piece of 4” PVC sewer pipe with a cemented cap on one end to soak the column inside. Both the pipe and cap can be purchased at any big box hardware store.

Consumables I use:
Simple Green
After disassembly, I place all metal parts that do not have graphics in a bath of Simple Green for 24 hours to degrease and remove paint. HD has a good deal on 2.5 Gal for $20.00. Note, I only soak aluminum parts for 2 hours then rinse off.
Citric Acid
I mix 1 shot glass per gallon of cold water for my Citric Acid solution to remove rust. I place all metal parts that do not have graphics into a citric acid bath (outdoors) for 24 hours. I buy 10 lbs bags of Milliard brand citric acid from Amazon for $40.00. Note, I do not soak aluminum parts in citric acid.
Mother’s Mag & Aluminum Polish
I use Mother’s Mag & Aluminum Polish to polish all bare metal surfaces (other then the table) to a high shine Chrome like finish. You can find it at any of the Auto parts stores for about $10.00
Meguiar’s Liquid Cleaner Wax
I use Meguiar’s Liquid Cleaner Wax to clean and polish all plastic parts (knobs, belt cover, etc.) as well as all data plates.
PB Blaster Penetrating Catalyst
I use PB Blaster to loosen rusted and stuck parts during disassembly. You can get a 18 oz can from Lowes for $ 7.00.
Mystik No.2 JT-6 High Temp Grease with Moly EP #2
I use this grease to grease and pack my Jacobs Chucks. You can get a 14 oz tube from Grainger for $7.00
Super Lube Synthetic Grease NLGI 2
I use Super Lube Grease to grease and lube all moving parts in my drill presses. You can get a 14 oz tub from Amazon for $11.00.
Protexall Super Slick Stuff Lubricant
I use Protexall to lubricate all my bolts, nuts, washer and bare metal that does not get grease on all my drill presses. You can get a 11 oz can from Amazon for $ 8.00
SC Johnson Paste Wax
I use Johnson Paste Wax to wax and protect polished drill press columns and tables. You can get a 1lbs tub from Home Depot for $7.00.
Prime and paint
For all of my drill presses I prime the bare metal with a metal etching or self-etching primer and then paint. I prefer a hammered finish paint on my drill presses; however, in the interest of helping you all out here is some paint reference information.
For the 100 and 150 series, I am aware to two OEM color options.
Battleship grey, the closest color to the OEM that is available in a spray paint is Ace Hardware’s machinery grey spray paint.
Here is a pic by Garage Journal member Hoorn showing some motor parts painted with the Ace Hardware Machinery Grey.

Power Bronze, the closest color to the OEM that is available in a spray paint is Rust-Oleum champagne mist metallic spray paint.
Here is a pic by Garage Journal member Hoorn showing a 100 series floor base repainted with the champagne mist. The part sitting on top of the base is from a 1957 12” disc sander in the original power bronze.

For Emerson Gen 2-5 machines, the closets off the shelf match I found was is Krylon Tough Coat Rust Preventative Spray Paint in Gloss Blue/ Gray for Metal, Steel, 12 oz A01625007. I was getting these cans from Grainger, but the supply chain issues and Covid have made this next to impossible to get. This spray paint is very abrasive and chemical resistant making it a perfect choice for a drill press and the color is next to dead on. When it was available, I paid about $9.00 a can from Grainger. In this pic you can see a side by side OEM Craftsman paint (yellow circle) and the Krylon Tough Coat (red circle). The Krylon is more glossy but very close.

However, for Emerson Gen 2-5 machines I now use the same etching primer, but I use a mixed PPG paint and apply it with an air compressor HVLP gun.

PPG has automotive paint supply stores in most cities, and I got my spray gun from Harbor freight. The paint is the PPG Commercial Performance ALK-200 and the pre formulated color is (3134-Case-Gray-920255). I chose a stain finish for the paint and there is no mixing of a hardener required. This paint is very close to the OEM color. I purchased a gallon for about $75.00 but if you are doing only one drill press then a quart will be more than enough. I used less than 1” of the gallon on a Gen 4 Commercial Drill Press. In this pic you can see the PPG paint freshly painted and an OEM Craftsman Drill Press light bracket side by side.

Here are a few specs for the PPG paint.
One part paint (no mixing)
Can be shot HVLP
Acrylic Modified Alkyd Enamel Interior/ Exterior
Fast Drying (Air-2-3 Hours) 7 days full cure
Moderate chemical resistance
Pencil hardness D3363
Comes in 5 different finishes
Cost effective
Accessories
For the King Seeley 100 and 150 series and the Emerson 150 Gen 1 machines one problem I have discovered is the limited speeds available with the 4-step pulley. This was an issue back in the 1950s as well and Craftsman had a solution. Actually, two mechanical solutions were sold as accessories.

The Craftsman Vari-Slo Speed Control allowed the user to adjust the speed of the drill press on the fly. These are hard to find and often sell for $300.00. The Vari-Slo gave the user speed ranges from 300-3750 RPMs.
The Craftsman Multi-Speed Attachment (MSA) was an elegant solution of introducing a third pulley into the belt system of the drill press. Actual Craftsman MSAs are also hard to find and also run for about $300.00. The MSA gave the user speed ranges from 200-15,000 RPMs. Garage Journal member JZiggy makes an outstanding reproduction that he sales here on the forum. I own 3 of his “Slow Speed Pulleys and I love the design. Here is a link to his thread:
Vintage Drill Press Slow-Speed Pulleys
Price shipped USPS: $200 via PayPal 1/6/26 -- Almost 5 years supplying the upgraded kits with consistent positive feedback from customers. Slight price adjustment reflecting increased cost of materials. 10/9/21 -- I am kicking off my new and upgraded design! There are a couple ready to go and...
these are but a few of the accessories available, there are a lot more accessories and attachments for these amazing machines.

Well, I hope someone finds this helpful.
Thanks for the interest.
scottmoe
New member
11b, thank you for providing all this great and very valuable information. I have been neglecting my drill press for 30+ years since my brother-in-law gave it to me. It has had a easy life, being used primarily for woodworking projects. Everyone on this site have inspired me provide some TLC, so it's my next project. It's not in bad shape, but here are some before pic's. Question: is it unusual that it is equipped with a 3/4 hp motor, chain type table lift, or rotating accessory table?
Attachments


Scottmoe, you are in luck. I am doing a series of videos on this exact same drill press and the exact same accessories (pressmate table lift and tilting table). Oddly enough the commercial drill press I am working on also has a 3/4 hp motor but I am not sure its the same motor as yours. The motor you have is perfect for the commercial drill press. Just about anything between 1/2 and 2 hp and 1725 rpm is fine for most applications. I believe your drill press is a Gen 4.5 made between 1978 and 1983 but likely built in 1981 (the motor date is 1981). Although all the gen 4.5 in the catalogs have a 1/2 hp motor with them, there was an option to buy the drill press without a motor and I assume either some were equipped with the 3/4 hp motor from the factory or many sear dealers put 3/4 hp motors on them or some people purchased the motor separately. I have been unable to locate a gen 4.5 owners manual but the Gen 4 manual will have most of what you need. The only difference is the change from a single power switch on the gen 4 to a dual switch system on the gen 4.5.
Here is the link for the gen 4 manual
Here is the video I did on the pressmate table lift
And here is a link for the rebuild series of videos. I will have the first video out next Tuesday.
I forgot to add this spreadsheet for all the Emerson era drill presses with lots of good info.

 docs.google.com
Here is the link for the gen 4 manual
Here is the video I did on the pressmate table lift
I forgot to add this spreadsheet for all the Emerson era drill presses with lots of good info.
Craftsman Emerson Generations 1-4 1964-1984
docs.google.com
Last edited:
Smokeshow69
Well-known member
The rotor shaft cover is an elusive belittle bigger for most folks. I am excited to have it.Smokes, that column looks good and I am jealous of that rotor shaft cover on the motor.
scottmoe
New member
Wow, I am looking forward to watching the rebuild series. Thanks for the information about my press.Scottmoe, you are in luck. I am doing a series of videos on this exact same drill press and the exact same accessories (pressmate table lift and tilting table). Oddly enough the commercial drill press I am working on also has a 3/4 hp motor but I am not sure its the same motor as yours. The motor you have is perfect for the commercial drill press. Just about anything between 1/2 and 2 hp and 1725 rpm is fine for most applications. I believe your drill press is a Gen 4.5 made between 1978 and 1983 but likely built in 1981 (the motor date is 1981). Although all the gen 4.5 in the catalogs have a 1/2 hp motor with them, there was an option to buy the drill press without a motor and I assume either some were equipped with the 3/4 hp motor from the factory or many sear dealers put 3/4 hp motors on them or some people purchased the motor separately. I have been unable to locate a gen 4.5 owners manual but the Gen 4 manual will have most of what you need. The only difference is the change from a single power switch on the gen 4 to a dual switch system on the gen 4.5.
Here is the link for the gen 4 manual
Here is the video I did on the pressmate table lift
And here is a link for the rebuild series of videos. I will have the first video out next Tuesday.
I forgot to add this spreadsheet for all the Emerson era drill presses with lots of good info.
Craftsman Emerson Generations 1-4 1964-1984
Smokeshow69
Well-known member
Got a clean pile of parts here so I can start reassembly! The head is so clean the bores for the head locks still have the lower bronze paint in them. Sure is nice when you start out with a clean unit that’s not rough. I soaked all the non painted parts in simple green for 24 hours as the video recommended and it worked like a charm.
Attachments


Smokeshow69
Well-known member
Figured out I have a big problem. The base was all cleaned and looking great but the metal base is rusty. Cleaned up the metal rolling base and will be painting power bronze when the paint arrives. But it’s coming together
Attachments


Hi there. First time restoring any type of power tool (or anything for that matter) but had found this thread and Jeff's YouTube channel while looking for a drill press for myself and decided to take the plunge when I found a 113.24630 on Facebook for a decent amount. I've been slowly taking it apart but can't get the head off of the column. The drill press is quite rusty so I imagine they're rusted together and I've been pumping it full of PB Blaster but haven't gotten it to budge. Do any of you have any tips for someone new to this hobby?
Thanks,
-adpow
Let me know if there's more info or pictures I can provide to help too. Like I said, I'm new to this kind of hobby.


Thanks,
-adpow
Let me know if there's more info or pictures I can provide to help too. Like I said, I'm new to this kind of hobby.
Hoorn
Well-known member
@adpow I'm pretty sure I speak for all the members here who have had at least 10 or more drill presses run through their workshop, a couple of them will always have a head/table/base that is crazy hard to remove. You will have to resort to more than PB blaster or WD-40.
As for myself, I have resorted to dead blow hammers to move the head side to side and gradually work it up and off, or blocks of wood and sledgehammers for really stuck head/bases. I spent a couple hours of pounding away, busting one 4x6 after another, trying to remove one base in particular that felt like it was all but welded onto the base. It came off, but it was tough. Welcome to the club!
As for myself, I have resorted to dead blow hammers to move the head side to side and gradually work it up and off, or blocks of wood and sledgehammers for really stuck head/bases. I spent a couple hours of pounding away, busting one 4x6 after another, trying to remove one base in particular that felt like it was all but welded onto the base. It came off, but it was tough. Welcome to the club!
Last edited:
FrankLee
Well-known member
OMG, I've had many stuck parts on columns.
I've used two-jaw pullers, hydraulics jacks twice (one did not go well), threaded rods through the columns, the 2x4 with BFH technique many times and charcoal briquets with dry ice. I used the 2x4/BFH this past Sunday on a stuck Atlas base.
I have accumulated enough parts and puller tools along the way to make a very effective press that clamps onto the column.
Welcome @adpow!
What is the state of the rest of the machine?
Is the table loose?
Is the base loose?
Is the head dismantled?
I see in your second picture that the lock cylinders and handle are still installed. Even if the lock handle is loose, those lock cylinders can stick to the column. Remove the lock handle and knock out those cylinders with a punch from opposite sides.
Last edited:
Hello adpow and welcome to GJ. Also thank you for watching my YouTube channel. Hoorn and FrankLee are the two most knowledgeable people on drill presses that I know. Almost everything I know about drill presses was learned from them or they pushed me to learn it for myself.
Anyway, as I mentioned in the comments section of the video, my first 100 series had a stuck head.
www.garagejournal.com
Keep in mind that that rebuild was done before I knew about citric acid and simple green.
FrankLee mentioned that your lock cylinders were still in the head.
BE ADVISED THAT WHAT I WILL RECOMMEND COULD CAUSE SIGNIFICANT DAMAGE TO THE DRILL PRESS HEAD CASTING and there is a risk of injury.
My recommendation is as follows.
Disassemble the head and remove as much stuff from it as possible.
If the base and table will slide off then lift the column out of the base and remove the table, all you should have left is the column and the head.
Rotate the column 180 degrees so the head is on the bottom and place it in a plastic water tight container (like a garbage can).
Mix up a solution of citric acid 1 table spoon citric acid to one gallon water and full up the container so the head is complete submerged.
Let this sit for 3 days (do not cheat on the time)
Pull out the head and rinse it off.
Try to remove the head.
If the head is still stuck, place the base on a bench and slide the column though the base so that there is about a 1 foot gap between the base and the head.
Place a 2x4 on the base then a bottle (car) jack as close to the column as possible.
Place a 2x4 on top of the bottle jack and slowly crank the jack up until it meets the head.
Tap on the head and column with a hammer to make sure everything is broken free. Apply some PB blaster to the column to help the head slide.
Slowly crank the jack and hopefully the head will pop loose. (Most likely it will break loose with a loud bang).
I would let Hoorn and FrankLee comment about my recommendation before you do anything. They may see a better way or find an issue in my recommendation.
Good luck
Jeff
Anyway, as I mentioned in the comments section of the video, my first 100 series had a stuck head.
11b30b4’s Craftsman (100) 103.23130 & (150) 103.24531 15.5" Drill Press rebuild
11b30b4’s Craftsman 103.23130 & 103.24531 Drill Press rebuild All Pics have been fixed and uploaded to GJ. This thread covers the rebuilding of two drill presses. The first is a Craftsman 100 series (103.23130) and is mostly covered in the first two pages of this thread. The second drill...
www.garagejournal.com
Keep in mind that that rebuild was done before I knew about citric acid and simple green.
FrankLee mentioned that your lock cylinders were still in the head.
BE ADVISED THAT WHAT I WILL RECOMMEND COULD CAUSE SIGNIFICANT DAMAGE TO THE DRILL PRESS HEAD CASTING and there is a risk of injury.
My recommendation is as follows.
Disassemble the head and remove as much stuff from it as possible.
If the base and table will slide off then lift the column out of the base and remove the table, all you should have left is the column and the head.
Rotate the column 180 degrees so the head is on the bottom and place it in a plastic water tight container (like a garbage can).
Mix up a solution of citric acid 1 table spoon citric acid to one gallon water and full up the container so the head is complete submerged.
Let this sit for 3 days (do not cheat on the time)
Pull out the head and rinse it off.
Try to remove the head.
If the head is still stuck, place the base on a bench and slide the column though the base so that there is about a 1 foot gap between the base and the head.
Place a 2x4 on the base then a bottle (car) jack as close to the column as possible.
Place a 2x4 on top of the bottle jack and slowly crank the jack up until it meets the head.
Tap on the head and column with a hammer to make sure everything is broken free. Apply some PB blaster to the column to help the head slide.
Slowly crank the jack and hopefully the head will pop loose. (Most likely it will break loose with a loud bang).
I would let Hoorn and FrankLee comment about my recommendation before you do anything. They may see a better way or find an issue in my recommendation.
Good luck
Jeff
Smokeshow69
Well-known member
I can’t add anything to the comments above since they covered all the bases… time, heat, leverage, etc. A helpful tip I would try is to take a wire brush/wire whee and clean the area right where the head and column meet. Hopefully this would create a tiny channel for the penetrating fluid to sit in for a few days? I will give you this picture as motivation to keep going! There is light at the end of the tunnel.keep trying new things to get this loose and it will come off. ( inside view of mine I am currently working on)
Attachments

Last edited:
Smokes, I dropped the ball on getting back to you about the feed handle rod and I apologize. After looking, I do not have a feed handle to send your way. I thought I may have had one left over from my first 100 series but I tossed them when I ordered a set from OldIron here on the forum. Best option I can recommend is to order a set from him. I can say that his rods are very high quality and IMO worth the price.
Smokeshow69
Well-known member
I knew it was a long shot. I appreciate you looking. I will probably hit him up since the other feed handles will stick out like a sore thumb on this machine. Everything is cleaning up so nicely that I don’t want the other handles that have some rust to detract from it’s overall appearanceSmokes, I dropped the ball on getting back to you about the feed handle rod and I apologize. After looking, I do not have a feed handle to send your way. I thought I may have had one left over from my first 100 series but I tossed them when I ordered a set from OldIron here on the forum. Best option I can recommend is to order a set from him. I can say that his rods are very high quality and IMO worth the price.
Wow. Thanl you so much for the replies! I have tried some mechanical encouragement with a rubber mallet and that hasn't seemed to help at all.
The table is loose and I haven't checked the base yet. I think I can get everything else off the head so I will try the citric acid bath if I can find a bin the right size.
I have removed the lock cylinder already and I don't think that's where the head is getting caught up, but I'll make sure I remove it all the way before I continue.
I'll keep you all updated on how it goes and thanks for the quick replies and encouragement!
FrankLee
Well-known member
I would try a couple things before soaking...
- Move the table close to the head. Lay the drill press down on its side. Put your weight on the head casting sideways. You may need a helper to stabilize the column.
- Use the 2x4/BFH technique. Lay the drill press down on its front with the column resting on a support with the head above the floor. Use a solid hammer, not the rubber mallet. I use a 3 pound hammer.

- Then, a bottle jack... but VERY cautiously. If it doesn't move immediately, soak. I'm wondering how effective citric acid would be after using a penetrant.
Last edited:
Smokeshow69
Well-known member


Smokeshow69
Well-known member
Question - has anyone ever seen a power bronze unit with the 3/8 drive feed handles? I just double checked the thread pitch last night and these truly are 3/8. As far as I can tell everything on this unit is all original and un messed with aside from the stand and the motor bearings and power cord. I will note that this does have some gray painted accessories so I wonder if perhaps KS was using up whatever parts were on the shelf. Motor is dated ‘56.
Hoorn
Well-known member
@Smokeshow69 regarding the changeover from 3/8 to 1/2 threaded feed rods, I recalled FrankLee had posted a few observations on the original CDP thread. The two most relevant are as follows:
I'm not exactly sure when the feed handles switched from 3/8-16 to 1/2-13 threads. Once, I did have a very late original power bronze 100 with several of the 150 features including the 1/2-13 feed handles.
The 100 has 3/8-16 feed handles, the 150 has 1/2-13.
All the 150s that have come through my workshop had 1/2" threaded rods. All the 100s with black knobs had 3/8" feed rods. At some point during the changeover from blue-grey to power bronze the larger threaded rods became standard. But as we've seen time after time, changes always occurred gradually with old stock occasionally mixed with new providing some great head scratching combinations.
Smokeshow69
Well-known member
I remembered his thread having something about it in there. Thanks for finding that for me! I should have added that your PM yesterday is what prompted me to double check the threads. I have a local friend who may have one that I am going to see this weekend. I get to paw through his craftsman long c era spares and hopefully get a feed handle as well@Smokeshow69 regarding the changeover from 3/8 to 1/2 threaded feed rods, I recalled FrankLee had posted a few observations on the original CDP thread. The two most relevant are as follows:
I'm not exactly sure when the feed handles switched from 3/8-16 to 1/2-13 threads. Once, I did have a very late original power bronze 100 with several of the 150 features including the 1/2-13 feed handles.
The 100 has 3/8-16 feed handles, the 150 has 1/2-13.
All the 150s that have come through my workshop had 1/2" threaded rods. All the 100s with black knobs had 3/8" feed rods. At some point during the changeover from blue-grey to power bronze the larger threaded rods became standard. But as we've seen time after time, changes always occurred gradually with old stock occasionally mixed with new providing some great head scratching combinations.
")
Smokeshow69
Well-known member
Got my ‘56 floor model all finished up. Many thanks to the YouTube videos for help in a few tight spots! Especially in the bearing replacement steps. I have never replaced bearings in one of these before and now I realize it’s not as bad as I thought it would be. Granted I started with a heck of a great starting point but now it’s ready for another 70 years of service. I didn’t repaint it because the factory paint was too nice. Not perfect, but showing its true age. This one is an interesting mix of multiple eras. Early heritage with the gray accessories, power bronze paint and then the MSA belts are crown top logo.
Attachments
-
 7F667EF0-1573-473D-8197-B4EDDA9F588F.jpeg840.2 KB · Views: 32
 -
 DD6061AE-776F-4D0C-917B-D64037D9191C.jpeg831.8 KB · Views: 30
 -
 B236F20B-2F55-465C-9755-48837FB58B42.jpeg724.6 KB · Views: 32
 -
 902E3214-47D1-489F-B7C1-CF1EECAD5119.jpeg789 KB · Views: 36
 -
 3D957224-A46D-4D82-A5DB-D4678497ACD0.jpeg711.4 KB · Views: 34
Last edited:
Hoorn
Well-known member
@Smokeshow69 badass DP smokes. I always felt the power bronze color aged the best of all the Craftsman colors, and the P-B 100 is my fav of them all. I like your patina a whole lot.
