To avoid these ads, REGISTER NOW!

1940's Duro Drill Press V-3080 Restore

Joined
Jan 16, 2023
Messages
6
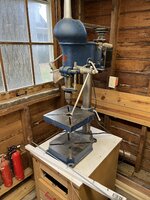
Hi Everybody! I'm the new owner of a sweet vintage drill press. Kindly given to me from a neighbor.

As best I can tell, it's a Duro from the 1940's, model V-3080 benchtop style.

Overall it was in great shape, but clearly needed some TLC as it ran but quite loudly. My first step has been to rehab the very old motor (including my first bearing replacement!) and that is now complete.

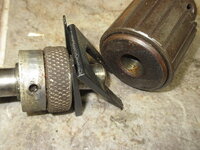
Now I'm disassembling the mechanical parts and am stuck at the chuck. It's a Jacobs 6A with morse taper. But this is the style with a knurled collar that is supposed to somehow help keep the chuck on? I don't have a proper spanner yet, but was able to get the collar spinning with an allen wrench and elbow grease. But now I'm stuck. I can spin it until it drops enough to contact the chuck, but then it seizes. From research, I think the idea is I need to keep spinning this collar (in the direction I show in the photo) until the collar comes off the threads and 'pops' the chuck off the taper for me?

Before I proceed with that step and applying a lot more pressure, I'd love for somebody to confirm for me I'm on the right track. Anybody have some experience with this?
 

Attachments

  • IMG_2180.JPG
    IMG_2180.JPG
    1,019.1 KB · Views: 37
  • IMG_E2535.JPG
    IMG_E2535.JPG
    2.4 MB · Views: 38
To avoid these ads, REGISTER NOW!

seagiant

Well-known member
Joined
Sep 16, 2011
Messages
305
 
To avoid these ads, REGISTER NOW!
OP
P
Joined
Jan 16, 2023
Messages
6
That style of chuck generally requires wedges to force off the chuck.

52316353822_16671cd3bf_w.jpg 52316353412_28b21ea2df_w.jpg
OH that is helpful, FrankLee. I thought I had the version of chuck where the collar is a part of the chuck assembly itself. Going by your picture, the collar is a separate piece. I guess it would still help drive off the chuck as I turn it?

So on the chuck models with collar attached, I understand the collar helps to secure the chuck against perpendicular force. But with the style collar you have shown, what purpose is the collar serving since it isn't a part of the chuck?
 

FrankLee

Well-known member
Joined
Sep 13, 2010
Messages
3,618
Location
seMI, 48317
The separate collar is there to protect the threads on the thrust collar. There are optional attachments that thread onto the thrust collar/taper.

The danger in forcing the chuck off with that collar is that once the collar contacts the chuck, sometimes the thrust nut is on the collar with only one or two threads. Often times, it takes considerable force to remove the chuck. The threads can get farked up. I did have one once where the nut unthreaded all the way off the collar before it came in contact with the chuck. It just spun around the spindle.

You could insert shims or washers between the nut and the chuck to provide more thread overlap. But really, wedges are the more appropriate tool. Some manufacturers of pre-'51 drill presses actually supplied one or two wedges with their machines.

When using a pin spanner, insert the short arm of a large allen wrench in the chuck. Clamp the long arm of the allen wrench in a vise. You can apply much more leverage.


What is your general location?
 
Last edited:
OP
P
Joined
Jan 16, 2023
Messages
6
The separate collar is there to protect the threads on the thrust collar. There are optional attachments that thread onto the thrust collar/taper.

The danger in forcing the chuck off with that collar is that once the collar contacts the chuck, sometimes the thrust nut is on the collar with only one or two threads. Often times, it takes considerable force to remove the chuck. The threads can get farked up. I did have one once where the nut unthreaded all the way off the collar before it came in contact with the chuck. It just spun around the spindle.

You could insert shims or washers between the nut and the chuck to provide more thread overlap. But really, wedges are the more appropriate tool. Some manufacturers of pre-'51 drill presses actually supplied one or two wedges with their machines.

When using a pin spanner, insert the short arm of a large allen wrench in the chuck. Clamp the long arm of the allen wrench in a vise. You can apply much more leverage.


What is your general location?
Thanks Frank. I'm in Kentucky.
 
OP
P
Joined
Jan 16, 2023
Messages
6
UPDATE: I was able to remove the chuck. Used a cheap adjustable spanner wrench and WD-40 to get the nut moving. An allen wrench in the side chuck holes kept the chuck from spinning when braced against my workbench. Slow progress and finally popped off. There was tons of dried up grease gunk from the Truman administration in the chuck and on the taper.

Next step is to take apart the chuck as well as the spindle assembly. Question for anybody: When I put the spindle assembly back together, should those parts be oiled or greased? The bearings are sealed type. The main spindle body has a little hole that I guess is for periodic oiling?
 
To avoid these ads, REGISTER NOW!
Top Bottom