To avoid these ads, REGISTER NOW!

Between 265 & 485 SQ/FT The Time Machine: Rebuilding a PNW 1.5 car garage from 1946

Workspaces sized between 265 and 485 squarefeet.

SRU1436

ALLIANCE MEMBER
Joined
Apr 1, 2017
Messages
592
Location
Bay Area, CA
Best pic I got is of the whole lot:
IMG_2003.jpeg

The heater and the Oil Pressure gauge will be for the ‘32. I’ve slowly been collecting a set of Twin Blues, trading out for better ones as they come along. I’ve gotten reasonably good at amateur restoration on them - this picture was before I pulled them apart.

IMG_2086.png

Tonight’s sighting - I missed a group of 5 juvenile bald eagles hanging out in a tree together, and an older vs younger fight in the air… I’m gonna have to get quicker on the draw setting up the scope, tripod, and camera. This shot is from about 300yds out. I love this scope! Gonna try again early tomorrow morning.
IMG_2081.jpeg
I like the look of the gauges. Those heads should be good for whatever they are going on.
 
To avoid these ads, REGISTER NOW!
OP
T

Tim_with_a_T

Well-known member
Joined
Dec 30, 2013
Messages
220
Location
Vancouver, WA
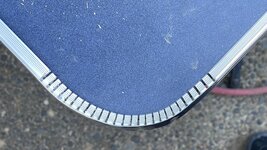
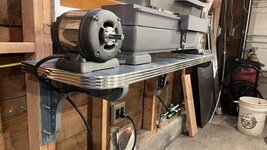
Been distracted with that new scope- been getting some great shots of stuff 300+yds out. But back to the garage. I finally got brave enough to attempt the laminate countertop. First attempt was a massive fail, but second attempt worked great. GF and I sprayed 3M 90 contact adhesive to both the table and laminate, placed laminate on the floor, then lined up the table and plopped it down. Once cured, I used a flush trim router bit to trim the edges. After that, a 1/8” slotting bit to cut the channel for the edge banding. Lastly, death wheeled the edge banding through the bend areas, and got it wrapped around. I’ll need to find some sort of adhesive to keep it together, but for a first pass I’m happy.

IMG_2110.jpegIMG_2111.pngIMG_2130.jpegIMG_2131.jpegIMG_2133.jpegIMG_2141.jpegIMG_2142.jpegIMG_2143.jpeg
 

drivesitfar

Well-known member
Joined
Oct 23, 2013
Messages
36,207
Location
Pacific Northwest
Tim: I was the thinking the same as Lou until you put your restored Craftsman joiner on it. WOW!!

Nicely done.

I did a ton of Formica for my brides business about 40 years ago and haven’t done any since cause it seems that tile or wood or old metal were better options for us.

Keep up the great work!!
 
OP
T

Tim_with_a_T

Well-known member
Joined
Dec 30, 2013
Messages
220
Location
Vancouver, WA
The mystery is solved! I was completely baffled as to why you put so much creativity, complexity, and effort into what seemed to be "just a shelf." Great job! It should securely hold your joiner and it complements the design of the machine as well.

Lou Manglass

Tim: I was the thinking the same as Lou until you put your restored Craftsman joiner on it. WOW!!

Nicely done.

I did a ton of Formica for my brides business about 40 years ago and haven’t done any since cause it seems that tile or wood or old metal were better options for us.

Keep up the great work!!

Thanks guys. The reason for the extra detail, specifically the Formica and edge banding, is to firstly blend in with the 1940s time period and secondly to get good practice for the house, should I go this route for countertops. I've managed to find about 3/4 slab of empress green marble, which would look much nicer and still fit the period, but I need to find another full slab to complete the kitchen and dining room, and likely hire out the fabrication (unless I get real brave), so I'm not sure on all that yet. Anyway, all that to say, I feel it's important to get honed in on the details early on, so this was one of the first visual representations of that.
 
OP
T

Tim_with_a_T

Well-known member
Joined
Dec 30, 2013
Messages
220
Location
Vancouver, WA
Tonight I worked on fine tuning the jointer. I had some snipe to work out - the outfeed table was too low. I also had one of the cutting blades a little taller than the other two, causing a little chatter. Lastly, the casting for the slider fence was proud of the infeed table, causing the board to dive into the cutter initially. I addressed these 3 things, as well as cut a chute in the bench for chip relief. The jointer works great now! I’m really happy with the results.IMG_2152.jpegIMG_2153.jpegIMG_2156.jpeg
 
OP
T

Tim_with_a_T

Well-known member
Joined
Dec 30, 2013
Messages
220
Location
Vancouver, WA
The jointer looks outstanding; FWIW the rotating keyed shaft could be a safety concern.
If a person leaned over focused on the jointer process and got their shirt or shop apron caught up in it, that would be bad.
Please be careful!

Point taken. I put the motor on the outfeed side of the table for that reason, but I understand fully what you mean. I didn't place the motor underneath the table as I need that real estate for cars to sneak under, but I may need to set up a dog house machine guard or something. I'll think about it.
 
OP
T

Tim_with_a_T

Well-known member
Joined
Dec 30, 2013
Messages
220
Location
Vancouver, WA
Wow what a mess!

As close as that is to the outside wall, could you have a bottom discharge chute turn out thru the wall and blow into a covered bin that's on the outside of the garage?

I’ve got plans for the space outside this wall- for the wood chips management, I’m planning to make some slide rails underneath the table for a 5gal bucket to mount up to. I just wanted to get these two boards shaved down so I could proceed with the window frames.
 
To avoid these ads, REGISTER NOW!

drivesitfar

Well-known member
Joined
Oct 23, 2013
Messages
36,207
Location
Pacific Northwest
I collect my planing sawdust into 32 gallon plastic garbage cans with lids and use it to cover the weed felt each winter in our garden and planting areas.

Great to see you’ve got the little planer adjusted and working great and I bet the boards will work perfect for your window trim.
 
OP
T

Tim_with_a_T

Well-known member
Joined
Dec 30, 2013
Messages
220
Location
Vancouver, WA
Clean chips like that make great mulch.

I collect my planing sawdust into 32 gallon plastic garbage cans with lids and use it to cover the weed felt each winter in our garden and planting areas.

Great to see you’ve got the little planer adjusted and working great and I bet the boards will work perfect for your window trim.

And here I was thinking kindling lol

I went the kindling route lol. I had a bunch of scraps to burn up before summer - we've had some drizzly past couple days so I'm taking advantage of them. I'll post a pic of the stove, with a story in a bit. I tell you what, though - those jointer chips burn NICE. A handful of that stuff and a match is all you need . I don't have time or a place to collect mass quantities of it for garden use - if I end up doing more woodworking later in life, I'll definitely give it a go.
 
OP
T

Tim_with_a_T

Well-known member
Joined
Dec 30, 2013
Messages
220
Location
Vancouver, WA
IMG_2226.jpeg


So this stove is pretty beat up, but it has a story. My grandparents, dad, and uncle relocated from Southern California to Notus, Idaho in 1964, when my dad was 5 or 6. My grandma's family was not a fan of my grandpa, for a multitude of reasons, including knocking up my grandma at the age of 16, which is how my dad came to be. The story goes that my grandpa's brother (my great uncle) funded this move in the interest of keeping his brother alive. The grand plan they came up with was my grandpa raising pigs to farm. From what I've been told, this was a rough upbringing for my dad and uncle. Years of abuse, extremely poor, very little hope. The home they lived in was a 400sq ft, cinder block wall, basement house with an uninsulated roof on top. My dad and uncle's "bedroom" was a couple twin beds up in the uninsulated "attic". There was no heat when they moved in, so the story goes, allegedly, my grandpa traded a stolen shotgun to an antique shop for this 1870s Great Western parlor stove in Nyssa, OR (just across the Idaho/Oregon border). This was their only heat, and Idaho can have some GNARLY winters. My dad and uncle have both told me that the stove pipe coming through the attic was the only heat in their "bedroom", frequently waking up to their glass of water by the bed frozen solid. From what I was told, they more or less lived outside in the summer due to the extreme heat.

Anyway, this stove has a storied past. My grandpa loaded it clear full of coal at one point and blew the backside of the stove all to hell. Some farmer stick welded it half-*** back together, but it is beat up. From what I was told, it was beat up when they got it initially. My grandma painted the flaking nickel-plated decorative pieces every year with silver paint to try to keep it presentable. Years later, my grandpa left - the story goes that my dad at 12 years old ran him off at gun point, after he was seen beating my aunt, who was just a baby at that time. My grandma stayed in that home until she eventually remarried in the early 1990s, this time to a much more kind man, my step grandpa. I remember going to her house as a young child before she moved out , and I remember that stove. The basement house and farm were to be sold off, with the house to be demo'd. My uncle went there before the demo and grabbed the stove. This stove lived in his storage shed in Bakersfield, CA for awhile, and made the move to Parma, ID when he moved back.

When I bought my house in Vancouver, WA in 2017, I asked if I could have the stove. Initially I wanted to restore it and use it inside, but I guess Washington isn't a fan of wood burning stoves, and like I said, this stove is pretty beat up. So.... it lives outside on my patio, somewhat protected from the elements by a large fir tree and a dogwood. It's a connection to my family's sordid past. It's a reminder of how good my life is in comparison to prior generations of my family. My grandpa sorta got his **** together later in life, so my brother and I never saw him for what my dad and uncle did. I'm grateful for that. My aunt, grandma, grandpa, and step grandpa are all gone now, but this stove still puts out heat when it is needed, and it reminds me of them. We really enjoy spring, fall, and occasional winter fires out on the upper patio. Anyway, that's the story of the stove.
 
Last edited:

thammel

Well-known member
Joined
Oct 3, 2005
Messages
2,264
Location
Maryland
IMG_2226.jpeg


So this stove is pretty beat up, but it has a story. My grandparents, dad, and uncle relocated from Southern California to Notus, Idaho in 1964, when my dad was 5 or 6. My grandma's family was not a fan of my grandpa, for a multitude of reasons, including knocking up my grandma at the age of 16, which is how my dad came to be. The story goes that my grandpa's brother (my great uncle) funded this move in the interest of keeping his brother alive. The grand plan they came up with was my grandpa raising pigs to farm. From what I've been told, this was a rough upbringing for my dad and uncle. Years of abuse, extremely poor, very little hope. The home they lived in was a 400sq ft, cinder block wall, basement house with an uninsulated roof on top. My dad and uncle's "bedroom" was a couple twin beds up in the uninsulated "attic". There was no heat when they moved in, so the story goes, allegedly, my grandpa traded a stolen shotgun to an antique shop for this 1870s Great Western parlor stove in Nyssa, OR (just across the Idaho/Oregon border). This was their only heat, and Idaho can have some GNARLY winters. My dad and uncle have both told me that the stove pipe coming through the attic was the only heat in their "bedroom", frequently waking up to their glass of water by the bed frozen solid. From what I was told, they more or less lived outside in the summer due to the extreme heat.

Anyway, this stove has a storied past. My grandpa loaded it clear full of coal at one point and blew the backside of the stove all to hell. Some farmer stick welded it half-*** back together, but it is beat up. From what I was told, it was beat up when they got it initially. My grandma painted the flaking nickel-plated decorative pieces every year with silver paint to try to keep it presentable. Years later, my grandpa left - the story goes that my dad at 12 years old ran him off at gun point, after he was seen beating my aunt, who was just a baby at that time. My grandma stayed in that home until she eventually remarried in the early 1990s, this time to a much more kind man, my step grandpa. I remember going to her house as a young child before she moved out , and I remember that stove. The basement house and farm were to be sold off, with the house to be demo'd. My uncle went there before the demo and grabbed the stove. This stove lived in his storage shed in Bakersfield, CA for awhile, and made the move to Parma, ID when he moved back.

When I bought my house in Vancouver, WA in 2017, I asked if I could have the stove. Initially I wanted to restore it and use it inside, but I guess Washington isn't a fan of wood burning stoves, and like I said, this stove is pretty beat up. So.... it lives outside on my patio, somewhat protected from the elements by a large fir tree and a dogwood. It's a connection to my family's sordid past. It's a reminder of how good my life is in comparison to prior generations of my family. My grandpa sorta got his **** together later in life, so my brother and I never saw him for what my dad and uncle did. I'm grateful for that. My aunt, grandma, grandpa, and step grandpa are all gone now, but this stove still puts out heat when it is needed, and it reminds me of them. We really enjoy spring, fall, and occasional winter fires out on the upper patio. Anyway, that's the story of the stove.
Darn - Now I REALLY feel old....Your father was 5 or 6 in 1964. Sheesh - I was 14 turning 15 in 1964!!!! But what a story of your ancestors!! We are fortunate to not have to live like they did!
 
OP
T

Tim_with_a_T

Well-known member
Joined
Dec 30, 2013
Messages
220
Location
Vancouver, WA
IMG_2229.jpeg

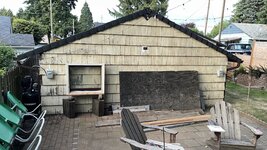
Well it’s been a massive struggle to get these windows going, but I’m finally making progress (also you can see my burn pile… this is day 6 of cutting things up small enough to fit in the stove). I got the jambs made up on the jointer, then more or less replicated what I did on the first windows. I decided not to have the rear windows open, for security reasons, so I used only the bottom sashes, basically boxing them in. I’ll use the top sashes for the carriage doors, and keep the extra tracks, hardware, and seals around in case I need parts for the other windows. The windows will be roughly in this location on both sides, allowing wall cabinets on the adjacent walls, and a large shelf between the two windows for woodworking stuff. I’m hoping to stay motivated and see this part of the project through. Ready to move on to the next projects…
 

drivesitfar

Well-known member
Joined
Oct 23, 2013
Messages
36,207
Location
Pacific Northwest
Nice work on the windows and best of luck on the installation.

If you like watching eagles and osprey fly and catch fish if you can’t see any locally msmithphotos.com has more than a few and his instagram page is one of my favorites.

Looks like we will have over a week without drizzle too so great time to cut a couple holes in your garage.
 
OP
T

Tim_with_a_T

Well-known member
Joined
Dec 30, 2013
Messages
220
Location
Vancouver, WA
Nice work on the windows and best of luck on the installation.

If you like watching eagles and osprey fly and catch fish if you can’t see any locally msmithphotos.com has more than a few and his instagram page is one of my favorites.

Looks like we will have over a week without drizzle too so great time to cut a couple holes in your garage.

Thanks, my gf sends me Mark Smith clips/photos all the time lol.
 

xtremek

Well-known member
Joined
Apr 13, 2012
Messages
11,603
Location
St. Johns, Mi
When I was a teen, we heated the old drafty farmhouse we called home with a Franklin stove and yes, the water had a thin coat of ice on the top of the glass when we woke up in the morning. Anyway, that was a wild story. Thanks for sharing it.
 

drivesitfar

Well-known member
Joined
Oct 23, 2013
Messages
36,207
Location
Pacific Northwest
Tim: I really enjoy watching almost all the birds (except crows and seagulls around here can be a bit much). We are lucky to have eagles and a few hawks, a falcon or two, woodpeckers, and hummingbirds to name a few that fly around our home. I figured you might know about Mark Smith.

Here’s a pelican I saw on a recent trip to California on the pier in Santa Cruz.
 

Attachments

  • IMG_8831.jpeg
    IMG_8831.jpeg
    553.7 KB · Views: 19
OP
T

Tim_with_a_T

Well-known member
Joined
Dec 30, 2013
Messages
220
Location
Vancouver, WA
I’ve been battling the clutter lately, finally biting the bullet to sort the storage totes, filter out the small stuff, and move them to storage cases. I plan to take pictures of each case when finished, mark where they live in the attic, and create an album on my phone for easy locating of parts. Since my gf is visiting home for a couple weeks, I cozied up in the living room and got after it.

IMG_2308.jpeg

And since we’re here, I need to share the absolutely massive inspiration @Norwell Equipped posted on Instagram earlier this week.


IMG_2324.png
 
OP
T

Tim_with_a_T

Well-known member
Joined
Dec 30, 2013
Messages
220
Location
Vancouver, WA
Small update time. I've been pushing to get the windows installed on the back wall, but rather than tripping over everything to do so, I've been on a mass organization campaign for tools and car parts. My last post shows the car parts side of things - that's going pretty good actually. The storage cases have been a great investment, and as of right now, all the small stuff is out of the totes, and out of the interior/trunk spaces of the cars. I'm starting to reap the rewards of the attic, separating the space into quadrants: house stuff, misc. hot rod stuff, T specific, and 32 specific. Once I get that handled, I'll update with a photo. I got quite the workout this weekend going up and down the ladder!

With the windows being one of the last items to go in before walls and insulation, I've been spending some time reviewing the layout, attempting to optimize every square inch. Workbenches, cabinets, pegboard, shelves, and cart(s) are all being considered. One of the main challenges is tool storage. With every project comes an arsenal of tools, and I've got a lot of projects. The past couple weekends, I've forced myself to remove all of the tools from the garage as part of the rehoming process. I'll save the photos for a later date when there's less chaos and more complete-age. The layout hasn't changed too much since my last snip, and there's still quite a bit of unknown, but it's getting there. Most notable additions are the pegboard on walls (framed rectangles) and wall cabinets in first image, and u-shaped workstation in the SE corner of the garage in second image (I've rotated the second snip so North is up, first snip shows East wall).

1748964110695.png

1748964362674.png

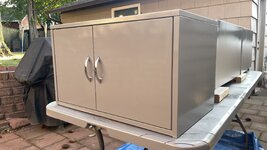
The wall cabinets - I wanted something that was inexpensive, that I could get in quantity, and I want them to be made of metal. This rules out me making them, so I began the search. I live about 15mins from an IKEA, and I totally forgot about them as a possibility until I was driving my gf to the airport (IKEA is right by PDX). The closest thing I could find that fit the measurements I needed were these:
1748967143603.png

I didn't like the color, the door pulls, or the legs, but the price was right. I decided to take a chance and bought a few to try. They went together easy enough and seem to be up to the task - I will use them to store things like spray paint, solvents, and fiberglass resins as I don't want those things up in the attic. After a quick scuff and shoot, along with a door pull delete and handle add, they look presentable. The pic is picking up the red from the bricks in the reflection, but the color is Rustoleum Gloss Smoke Gray, sprayed out of a gun, thinned with acetone and a spritz of single stage paint hardener added.
IMG_2358.jpeg
 
OP
T

Tim_with_a_T

Well-known member
Joined
Dec 30, 2013
Messages
220
Location
Vancouver, WA
Nice cabinet conversion. What are the dimensions and what does inside look like?

Is inside floor level with the opening (so stuff slides out) or is floor dropped so can’t slide out?

Here is the link if interested.

Dimensions:
1748983382346.png

Inside floor level is flush with the opening.

They have some other cabinets that came close to making the cut, but the main thing I need these for is paint/solvent/resin storage, so I was looking for the smallest footprint, least expensive, of what could fit those items.
 
OP
T

Tim_with_a_T

Well-known member
Joined
Dec 30, 2013
Messages
220
Location
Vancouver, WA
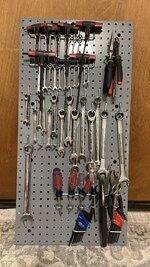
Part of the tool organization involved moving prior drawer tools to pegboard. I found some metal pegboard from Lowe’s that came in a flat black color- I scuffed and shot them to match the cabinets. Here’s the first couple nearly done- it will get a framed border to finish it off. The metric wall has a few missing wrenches I’ll need to keep an eye out for at estate sales etc.IMG_2440.jpegIMG_2441.jpeg
 
Last edited:
OP
T

Tim_with_a_T

Well-known member
Joined
Dec 30, 2013
Messages
220
Location
Vancouver, WA
Ok guys, today I gotta find infinite motivation- plan is to empty the garage, pressure wash, refinish walls and floor, push everything back inside once dry. I’ve got a bucket list tool coming next week and I don’t want to be refinishing the floor later around it (too heavy to move most likely). So here I am posting to hold myself accountable. Metal playlist and rare earth mineral some call caffeine incoming in 3…2…1….
 
To avoid these ads, REGISTER NOW!
Top Bottom