To avoid these ads, REGISTER NOW!

Between 265 & 485 SQ/FT Weisenheimer's Bicycle Haus

Workspaces sized between 265 and 485 squarefeet.
OP
M

manbike26

Well-known member
Joined
Sep 23, 2015
Messages
224
Location
Boise ID USA
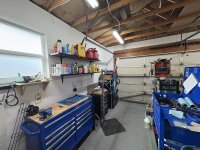
I had a couple of work cancellations this week, so I decided to tackle an area that needed improving. Just above my primary work bench are a couple of shelves that I had put up a few years back. As we all know, open shelves are dust collectors. I also feel like it's a bit unsightly. Plus, there is a whole upper space that is unused.

I decided to tackle some wall cabinets to replace the shelves and get more of my stuff that is "less used" out of sight.

This is my before picture:
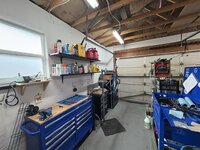
54854319496_272b376db4_b.jpg

The goal is to replace the shelves with 24" tall, 15" deep cabinets that will stretch from the corner to the window. The base of these should be 72" high so I don't hit my head when I walk under them. Total length of the area is 118".

Also a goal is to keep some space above the cabinets for storage of gas cans and other various items that aren't a good fit for the interior of the cabinets. For example, I have a tile saw that I purchased about 10 years ago that I use about every 3 years...I'm OK with that tool being tucked away and tough to access.

Because the garage door track is right there, the doors must be sliding doors. Shout out to The 12-Gauge Garage for inspiration there.

Moved all of the stuff out of the way and removed the shelves:
54854319491_2af95b79e1_b.jpg

Before I got too deep into building and cutting and so on, I figured I'd prove the concept out with one cabinet in the far corner (the most awkward area). I much prefer cutting wood outside of the garage for dust.

I set-up a work area in my front yard since the weather was nice and the sun wasn't too strong. I highly recommend the trick of cutting plywood down on a 4x8 piece of foam insulation.
54853585797_39d12fa220_b.jpg

After some cutting, drilling and a couple of rounds of assembling, we have success. Cleat on the wall:
54854319461_57689b92ca_b.jpg

Sample cabinet hanging!
54853453242_73ebba80df_b.jpg

It took a few rounds of hanging and adjusting to get it just right, but I'm happy with the size and position.

More to come. Thanks for reading.
 
Last edited:
To avoid these ads, REGISTER NOW!
OP
M

manbike26

Well-known member
Joined
Sep 23, 2015
Messages
224
Location
Boise ID USA
With the sample cabinet in place, I decided my next work day would be used to make the rest of the boxes and the doors/frames. It was a rainy morning, so I didn't take much in the way of pictures. Not that cutting lots of plywood makes for exciting photos.

I will sing the praises of a table saw with a dado blade for a moment. I had purchased a dado blade set like THIS ONE a while back and finally put it to use.

It's not the right tool for most jobs, but when it is the right tool...it's really, really fantastic. I tested it out with a 23/32" cut for the plywood and again to make a sample track for the 1/4" plywood doors.

Just the cut:
54854562489_43c343d5f1_b.jpg

3/4" plywood joint fitment:
54854572833_ab553a21fe_b.jpg

I kept cranking on other parts too. The corner most shelf needed a trim piece to seal up the end, so I put that in there. Here it is installed:
54856784393_70dc0b92d6_b.jpg

Finally, all four boxes up and mounted:
54855673607_68bc4d5505_b.jpg

More to come.
 
Last edited:
OP
M

manbike26

Well-known member
Joined
Sep 23, 2015
Messages
224
Location
Boise ID USA
Quick post of the doors installed. I'm still working on cleaning the space up and re-organizing some stuff. So it'll be a couple days before it's back to fully functional.

I cut the sliding door channel with the dado blade:
54855673622_7912d45b11_b.jpg

Doors installed!
54855673612_5f8faf3356_b.jpg

I'm going to paint the cabinets a bright white. I'll probably paint the drill press cabinet I built in post #241 to match as well. I don't really care for the color of the floor with that gray. I picked out some various white colors from Home Despot and was surprised just how tough it was to find a white that made me happy.
 
OP
M

manbike26

Well-known member
Joined
Sep 23, 2015
Messages
224
Location
Boise ID USA
I still haven't laid down any paint on the cabinets, nor made much progress in using them to better organize the garage. I got distracted by two things. First, I had ordered some Bridgestone decals and they showed up in the mail. I think it looks pretty good overall, especially considering my lack of skill.
54906916779_89a2eae806_b.jpg

The decals are pretty thin, so I'm going to clear coat over the whole thing. I have to run to the store to get another can of clearcoat. Hopefully this week.

Second distraction was more involved and has nothing to do with bikes. I have a hot-tub that is older and occasionally troublesome. When we got it, it had a known "slow leak" that "hasn't gotten worse". You can probably see where this is going. The leak became less "slow" and more "worse"...so it was time to take a shot at repair. It turns out that this particular hot tub is LOADED with foam and is a pain to work on. So the options for repair are:

1) Someone comes and takes their best guess at where the problem might be, charges you a small amount of money and says they'll charge you a four digit sum to replace what may be the cause. They may or may not call back, reply to texts, etc. No guarantee it gets fixed.

2) Someone comes and takes the tub to another location and you pay them a four digit sum up-front and they'll get to it in a couple weeks.

3) DIY.

You can guess which way I went.

I had let it leak down to a point where I figured it was one of two jets. The first one was the easy one and had previously been examined by a tech. Much of the foam was loose inside, which was nice. I dug a little further and couldn't find any wet spot. That deep hole allows me to reach the bottom of the jet housing. It's dry as a bone in there.
54906976540_e6e8250fd6_b.jpg

So, I decided tried the jet to the left of it. As much of a pain as the first one was to access, this was even worse.
54905792442_b5c03bd771_b.jpg

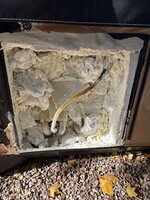
After some thinking, I decided to check the area the previous tech didn't want to touch. As soon as I pulled the exterior panel, I was confident I'd found the source. Water was leaching up the paper in the corner.
54905792462_e7cbdec9a0_b.jpg

I removed the plywood and the foam behind it was warm and wet, so I'd found the issue. As I dug more and more damp foam away, I exposed three PVC elbows that feed a massage type of jet. Eventually, I'd found the root.
54906891353_3e7a3d84cd_b.jpg

I presumed that these were unique parts to the tub, but when I started looking at diagrams, there was nothing. I noticed this marking and realized it's just regular plumbing PVC.
54906891223_f51c4cc0bb_b.jpg

After going by my local plumbing supply, I had an adapter for most every scenario. After some very careful cutting and trimming with an oscillating tool, I was able to plug it all back together. No more leak!
54906665441_c897565c61_b.jpg

I tested it hot, cold, with and without pressure. It held in each case.

To be honest, I feel like this outcome was about 80% luck and 20% skill.
I'm writing this out and highlighting it so that I remember not to get confident with this type of project.

Thanks for reading. More to come.
 
OP
M

manbike26

Well-known member
Joined
Sep 23, 2015
Messages
224
Location
Boise ID USA
Since I was only feeling lucky and not confident, I decided to make future services easier on myself. The way I did that was by stuffing loose, dry foam back in for insulation and tacking it in place with great-stuff spray foam. I didn't re-use any of the wet foam, so there is a decent gap near the repair.
54906665436_9841bb9ce4_b.jpg

Then I used rigid board foam to attach to the plywood behind the decorative panels. Remember the foam I used to cut up my plywood? It is now a little shorter so I could make these insulated panels. They replace a thin spray foam that kind of glued the plywood in place.
54906665326_4248db808f_b.jpg

That hose in the first picture above was resting on the plywood structure when I took the panel off. So I left it in place and trimmed back some of the rigid foam to minimize stress on it.
54906891578_a06ea974ed_b.jpg

Et Voila! All back together, sans decorative exterior panel.
54906891563_805afcb36a_b.jpg

I am a little worried about warm air leaking out from the gap at the very top. If there is condensation around the area in the morning, I'll probably hit the area with some spray foam. But for now, it's good enough.

I hope to return fully to garage and bike programming with the next post.

Thanks for reading.
 

Just Puttering

Well-known member
Joined
Oct 28, 2018
Messages
249
Location
Vancouver, Canada
After some very careful cutting and trimming with an oscillating tool, I was able to plug it all back together. No more leak!
Nicely done!

You should count your blessings that it was a side jet. Mine was the bottom drain, so I had to jack the tub up on 4 jackstands and cut the foam out from underneath. Fully foamed tubs sure are a pain.

Decals on the bike look great 👍
 
OP
M

manbike26

Well-known member
Joined
Sep 23, 2015
Messages
224
Location
Boise ID USA
Finally made the time to throw some clear coat onto the Bridgestone!

54978013654_a022b5c7a5_b.jpg

54977766131_b2cbf54bda_b.jpg

54978061095_af6691bb5c_b.jpg

There are still plenty of nicks and imperfections, but I'm satisfied anyway. Guess what is going to happen during assembly and riding? I'm going to add additional nicks and imperfections!

I'm one of those people who believes the machine has a soul. I think it's because of the imperfections of the person who creates the machine and user of the machine. A tool used with purpose is more beautiful than any showroom piece.

Or maybe that story is my excuse for the places I cut a corner. I'm not sure.

Thanks for reading. More to come.
 
OP
M

manbike26

Well-known member
Joined
Sep 23, 2015
Messages
224
Location
Boise ID USA
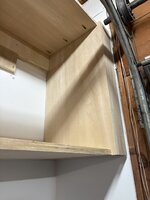
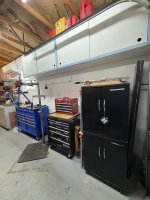
Cabinets painted!

54980489043_caa6876f3f_b.jpg

Honestly, I don't care for the blue color on the trim...I thought it would be a gray closer to the floor. Whatever.

Remember, this was the starting point:
54854319496_272b376db4_b.jpg

This is today:
54986323386_9e8d90e3ae_b.jpg

I had fun building them. It's a big visual improvement and I'm already better organized, so it's an overall win.
 

aquinob

Well-known member
Joined
Oct 7, 2014
Messages
238
Location
Portsmouth, VA
Cabinets look very nice. But I gotta post a comment about the hot tub.

A couple of years ago I had to fix a leak in a Jacuzzi we had bought back in about 2003. I had replaced the rotted exterior wood years earlier and then the electronics fried due to a leak by the heater. I replaced the board and control with aftermarket but it started to leak quite a bit. Long story short I had to stand the tub on its side to get at the bottom.

1765827290282.png

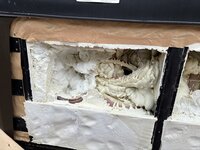
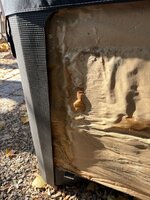
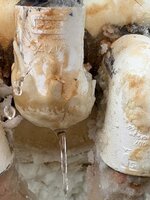
It had been home to a bunch of mice (nice heat in the winter) and they chewed and peed all that foam up. I shoveled out a garbage cans worth and dug into it and found the broken pipe (winter freeze damage). But while I had the thing on end, somebody else came out to say hi.

1765827328409.png

A 6 foot long black snake that had taken up residence and fed on the mice. I escorted him off the property and he actually came back.

1765827407773.png

I got him out again and lucky for him he didnt show his face again. I fixed the leak and patched it up as best as I could and used the tub for another year or so. But my wife would never get in it again. I ended up giving it away for free which is a whole nother story.

Resided it with PVC sheet material

1765827585665.png


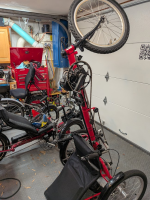
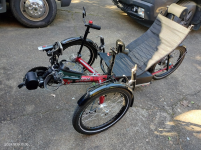
And since you're a bike guy, this is what I keep in the garage currently, all recumbents with mid drives.

1765830996956.png


1765831034311.png
 

Attachments

  • 1765830974585.png
    1765830974585.png
    1.3 MB · Views: 3
Last edited:
OP
M

manbike26

Well-known member
Joined
Sep 23, 2015
Messages
224
Location
Boise ID USA
But while I had the thing on end, somebody else came out to say hi.

Oh hell no.

I think snakes are really cool and I wish I had more around to eat the various mice and such...but that creature can go back into the loch.

Separately, I love the bikes! Is that Greenspeed using a Bosch system?
 

aquinob

Well-known member
Joined
Oct 7, 2014
Messages
238
Location
Portsmouth, VA
Oh hell no.

I think snakes are really cool and I wish I had more around to eat the various mice and such...but that creature can go back into the loch.

Separately, I love the bikes! Is that Greenspeed using a Bosch system?
You and my wife share a the same feelings about the critters.

As for the GS, it was the first recumbent I got and I put a TSDZ2 on it about 3 years ago. All the bikes have aftermarket motors, I cant justify the expense of Bosch or other OEM motors that are 4x the cost. On this bike it works well enough to get my speed up to about a 12mph cruise and still give me the feeling of getting a workout, I just get to go faster. With the 20" wheel in the back I was limited to about 15 so about a year ago I got a used SRAM 3 speed IGH and built a new wheel for it. That gave me back the range I lost with the single crank motor. I fabbed the battery mount for it out of some aluminum angle and used that same method for 2 other bikes as well.

1765890245132.png

I got the GS during Covid and paid a premium for it. The other bikes in the fleet are much cheaper, maybe with the exception of the Kettwiesel (Delta standing on end). 2 wheel recumbents are going for pretty cheap money these days if you are willing to wait for a bargain to pop up. Nobody seems to want them anymore. Since I got the GS, I picked up a Rans Stratus and several others that I've enjoyed for a bit then moved on. The last one I put a motor on was an older Sun with 20" wheels that I'm going to use when we go camping. Its a fun little bike to ride and I put another Tongsheng motor on it same as the Greenspeed.

1765890842727.png

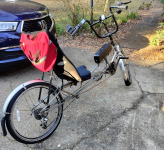
So far I've got 3 bikes with Tongsheng motors, the red delta trike has a TSDZ8. The Rans stratus is the only one with a bafang and that was the second bike after the GS. That bike is so long it won't fit in most bike carriers. That does tend to be a problem with recumbents, they don't travel well.

1765891083414.png

I even build a bike for my Snake hating bride. She's not into bikes and she had one of those very heavy Lectric monsters that I hated with a passion. We ended up selling it for not much less than we paid for it and I got her a Townie and put a T0Seven motor on that. I get extra battery mounts so I share batteries between bikes. On this one I mounted it to a rack on the back, there was no real good place to put it otherwise.

1765891439065.png
 
To avoid these ads, REGISTER NOW!
OP
M

manbike26

Well-known member
Joined
Sep 23, 2015
Messages
224
Location
Boise ID USA
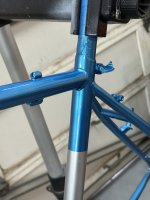
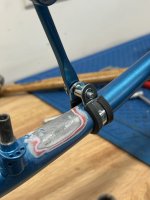
Had a "can't win 'em all" kind of day with the Bridgestone. You may remember that I was adding some rack mounts to the fork with JB weld. I have done this before on other bikes, and repeated it again with the underside of the top tube on the Bridgestone frame.
54599204082_7a6d101804_b.jpg

54293442263_fe5062a673_b.jpg

But it didn't pan out how I'd hoped. I previously test mounted the rack and all looked good. Earlier this week, I had one of the mounts fail while installing the rack. Of course, I already had painted the fork. Frustrated doesn't really describe it. I didn't throw a tantrum, but I stop immediately and go inside.
54992592239_008722939a_b.jpg

Yesterday, I decided to face reality again. I thought about what to do for a while and decided that testing the other side for strength was a good idea. It failed with less effort than I expected.
54992331011_82e33914f9_b.jpg

Ultimately, I think the JB weld isn't up to the task of rack mounts. So I knocked off all of the remaining JB weld and sanded it down. I confirmed the clamps work fine...I'll repaint the fork soon.
54992512448_3609691ec9_b.jpg

More to come.
 
OP
M

manbike26

Well-known member
Joined
Sep 23, 2015
Messages
224
Location
Boise ID USA
Yesterday wasn't bad. Besides finding a workable solution to the rack mounts, I tested out some of the dynamo-powered lights and those worked well. Here is the tail light all mounted up:
54992512473_261696d1fb_b.jpg

54991449237_d1835c01dd_b.jpg

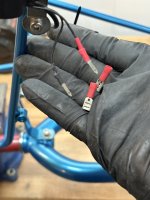
The headlight is a PDW brand light, that has an output for a taillight. I just so happened to have the right female plugs to match up.
54992628855_53de4d364a_b.jpg

I didn't snap any pics of the front light, but it is mounted to the rack, just out of the way of the cargo area. The hub isn't built into a wheel yet, but will be soon.

I found some NOS Bontrager Clyde rims (from the 90s!) that I'm going to use. They were on ebay and about the same price as a single new rim of good quality...so I took the plunge! I'll snap some pics when they arrive. Still have to calculate spoke lengths and decide on a rear hub option.

More to come. Thanks for reading.
 
OP
M

manbike26

Well-known member
Joined
Sep 23, 2015
Messages
224
Location
Boise ID USA
I did a little shopping on ebay and at my local bike co-op over the last two weeks. I came away with some irresponsible parts purchases that I'm pretty excited about.

First up is some vintage 90s Bontrager Clyde rims. Ordinarily, I'd steer well clear of old rims...but the price was pretty good and they've never been laced up.
55042935214_838069c46a_b.jpg

I also came across some vintage Dura-Ace parts. The 7400 era of Shimano Dura-Ace was the premier road race group. I sourced a hub, freewheel and rear derailleur. Added in some 7-speed bar-con shifters, too!
55042857268_839c0d2c1d_b.jpg

Way back in post 307, I vowed to use an internal gear hub on this bike. But, I struggled to find a hub that was going to fit well and wasn't wildly inappropriate. This all started because the frame lacks a rear derailleur hanger as seen in this photo:
54263710620_fdd786476b_b.jpg

Well, at the local co-op, I found about the nicest rear derailleur axle mount one could hope for. It's a clean, stamped steel Shimano model.
55042681416_66d9a3b771_b.jpg

I also found a beautiful, unused Shimano 42t chainring that would fit some polished Truvativ cranks I had laying around. This bike is quickly becoming a 26" wheeled road bike.
55041780147_e1685e9ff7_b.jpg

That may be a little tall for some hills, but I'm going to see if I can tough it out. Most of my riding on this type of bike tends to be flatter trails along the river anyway. That freewheel is a 13-21 range, 7-speed stack. With a 42t ring up front, I've got a range of about 50-80 gear-inches. Most of my single-speeds run around 60-65 gear inches.

More to come...wheel build time is close!
 

fishwatcher

Well-known member
Joined
Jan 26, 2023
Messages
759
I did a little shopping on ebay and at my local bike co-op over the last two weeks. I came away with some irresponsible parts purchases that I'm pretty excited about.

First up is some vintage 90s Bontrager Clyde rims. Ordinarily, I'd steer well clear of old rims...but the price was pretty good and they've never been laced up.
55042935214_838069c46a_b.jpg

I also came across some vintage Dura-Ace parts. The 7400 era of Shimano Dura-Ace was the premier road race group. I sourced a hub, freewheel and rear derailleur. Added in some 7-speed bar-con shifters, too!
55042857268_839c0d2c1d_b.jpg

Way back in post 307, I vowed to use an internal gear hub on this bike. But, I struggled to find a hub that was going to fit well and wasn't wildly inappropriate. This all started because the frame lacks a rear derailleur hanger as seen in this photo:
54263710620_fdd786476b_b.jpg

Well, at the local co-op, I found about the nicest rear derailleur axle mount one could hope for. It's a clean, stamped steel Shimano model.
55042681416_66d9a3b771_b.jpg

I also found a beautiful, unused Shimano 42t chainring that would fit some polished Truvativ cranks I had laying around. This bike is quickly becoming a 26" wheeled road bike.
55041780147_e1685e9ff7_b.jpg

That may be a little tall for some hills, but I'm going to see if I can tough it out. Most of my riding on this type of bike tends to be flatter trails along the river anyway. That freewheel is a 13-21 range, 7-speed stack. With a 42t ring up front, I've got a range of about 50-80 gear-inches. Most of my single-speeds run around 60-65 gear inches.

More to come...wheel build time is close!
Nice!! Can’t wait to see the final build outcome!
 
OP
M

manbike26

Well-known member
Joined
Sep 23, 2015
Messages
224
Location
Boise ID USA
A little while back, I ordered spokes for the wheels on the Bridgestone. I knew when I picked up this frame that I'd be building wheels and, frankly, that was part of the appeal to me. I used a free online spoke calculator from prowheelbuilder.com and also ordered my spokes from them. I didn't have any specs on these hubs, so I was left to measure everything. Rims had ERD printed right on them. After entering all the data, it spits out spoke lengths for you.
55041793877_732f6c30be_b.jpg

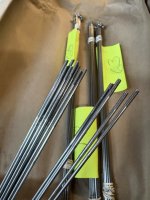
And, today, I got started on the build after several days of work, waiting, excuses, etc. Spokes showed up earlier this week and were nicely packaged.
55071867950_623d67b106_b.jpg

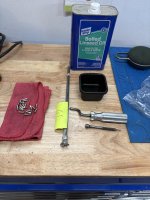
I got my workstation set up and picked up the first 16 spokes for one side of the wheel.
55071756054_376527596a_b.jpg

I use Linseed oil for assembly. I used to use spoke prep in my shop days, but have been satisfied with linseed oil. It lubricates well enough to add tension, but gives enough resistance once built to keep stuff from coming loose. Plus I have a ton of it!

I realized how rusty I am once assembly began. I started with the rear wheel. I messed up the lacing of the rear wheel...twice! No huge mistakes, but I would have been embarrassed if someone was watching. I am not as smooth with my movements as I once was. If the rims had been painted or even black anodized, I think I'd have some scratches to explain.

Thankfully, all silver parts (with plenty of existing scratches) and I have nothing to worry about besides getting the job done to "good enough" standards. I'm probably being a little hard on myself. I remembered the principles, but mostly it was the practice that was the issue. Here is the rear laced up and ready for some additional tension.
55071756029_daf7883b0a_b.jpg

I even took a cool guy shot of the hub logo showing through the valve hole!
55071756019_6f2206eeab_b.jpg

When working on the front wheel, I ran into a snag. One of the 261 spokes (drive side) wasn't threaded correctly. You can see how much smaller the threaded area is. These threads are rolled (and that is part of the structural integrity) so I'm not messing with that.
55071509946_73fa37c6ae_b.jpg

I emailed the supplier and expect to get a replacement soon. I'm not in a rush for completion, so it's not really a big deal.

For now, both wheels are laced, but without any real tension. And the front wheel is missing its final two spokes.
55071867975_3e95462057_b.jpg

More to come. Thanks for reading!
 
OP
M

manbike26

Well-known member
Joined
Sep 23, 2015
Messages
224
Location
Boise ID USA
@boyboi I learned some attention to detail and some perfectionism from my time working with techs who were much better than I am. Or at least operated differently.

One of my favorite rules was "no tool salad" on the workbench. Since customers could see you, all tools were parallel or perpendicular to bench edge. Push-ups assigned for each tool left askew. I carried that from the race-truck over to my last job working at a bench.

In fact, I still mostly follow that rule to this day, even when customers aren't looking. Mostly, haha.
 
OP
M

manbike26

Well-known member
Joined
Sep 23, 2015
Messages
224
Location
Boise ID USA
I was able to do two small parts of the Bridgestone build while I waited for the replacement spokes to show. First was bringing the rear wheel up to proper tension. This can be done by feel, by sound or by measuring. No surprise, I like measuring.

Most wheels are built to around 100-120 kilograms of force (KGF) on average. This is measured with a spoke tensiometer or tension meter. There are fancy ones, but I just use a Park Tool version. Before that one was introduced, I used (and still own!) a Wheelsmith model from about 2000.

They're accurate enough for my purposes. I do rely on feel and sound a bit, but not a ton. Building a wheel is basically a torque pattern like installing the head on an engine...or anything else. These wheels are 32 hole, 3-cross laced, so you have 8 'sets' of triangles to work with. As I add tension, I start at the valve. I go forward 4 sets and add tension about 1/2 turn at a time. Then I go back 3 sets and do the same. I keep that pattern going until the wheel starts to hold its shape, then I start checking for roundness and trueness in the stand. I lock the door and don't talk to anyone so I don't lose my place. I didn't take any pictures of this process.

But, then I mounted up a tire (which lowers the overall tension of the wheel) and decided to snap a few pics of the action. Measuring the spoke tension on the drive-side of the wheel...23!
55079071493_5003074065_b.jpg

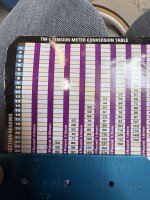
"All right, but what the hell is 23?!", you ask. You use your supplied decoder chart for that. I'm using Sapim double butted spokes with a 1.8mm center, so 23 is 131 KGF. The average reading of the drive-side of the wheel was actually 24...so call it 148 KGF.
55077973562_88e2d0d841_b.jpg

Repeat for the non-drive-side. We get a reading of 18 this time.
55079071488_b8d8a9ebdd_b.jpg

That was the lowest point on the whole wheel...the non-drive-side average was 19 for a KGF reading of 85. Bringing the wheel's average to about 116 KGF.
55079129344_d2849a2a6c_b.jpg

With a tire installed, that's pretty good, maybe a little high. But I will be riding it and not really messing with it...so it will only go down from there over the years.

After that, I utilized the unusually warm afternoon to lay down some paint on the fork to repair the damage I had done before. I'd say it turned out decent.
55078872271_4bd661819c_b.jpg

If it looks good as I ride by, that's good enough.

More to come, thanks for reading.
 
OP
M

manbike26

Well-known member
Joined
Sep 23, 2015
Messages
224
Location
Boise ID USA
The replacement spoke arrived for the front wheel on Monday. After lacing that in, it was a breeze to get the wheel tensioned up. Most of the bike came together quickly after that. Here it is assembled, but without brakes or bar tape finished. Honestly, it looks better than I anticipated!

55087666272_9e39b46563_b.jpg

There is always some hiccup that wasn't foreseen and in this case it is the front brake / front rack interaction. My original plan was to run v-brakes on this bike, I had a nice pair of Cane Creek brakes hanging around. But with the use of road levers, the brakes were changed over to cantilever...nothing fancy, just some $5 models I got at the local co-op.

The front rack has most of the load taken by the dropout and fork blade mounts...but there is a stabilizing brace that reaches from the fork crown to the center of the rack platform. That is right in the path of a center pull (cantilever) brake. One can probably envision the conflict best with this photo:

55088920940_8cbd643717_b.jpg

Another view of the conflict.

55088920895_7259848104_b.jpg

I measured the distance beneath the brace and there was ample room for cable travel...so I just drilled a small hole. Et voila!

55088816094_248a4b894c_b.jpg

I took it for a little spin around the block and must say it's fun. I don't care for the appearance of the bar/stem and I'd like to get a wider gear set on there. The range with a single front ring is narrow, but I'll just deal with these things for now and enjoy the bike.

Thanks for reading.
 
OP
M

manbike26

Well-known member
Joined
Sep 23, 2015
Messages
224
Location
Boise ID USA
I took the time to update the bar/stem on the Bridgestone to something a little more comfy and also a little better looking. I broke down and ordered a proper Nitto stem and a Velo Orange porteur style handlebar. I also found these super cool Dia-Compe brake levers to follow the curve of the handlebar! Dia-Compe DC159 Link. The trouble I ran into is that the levers are a LONG way from the handlebar, and there is no reach adjustment available. You can see the trouble here on the right hand lever.

55380215640_5e7f481f3e_b.jpg

I have fairly average hands and, even without grips installed, I couldn't safely grab that lever at all locations on the bar. In fact, I could barely brush my fingers against it. The left hand lever is set to a more "normal" reach for me. It's a big difference. Again, there is no reach adjustment available, so I had to get creative.

The clamp bolt passes through the red plate pictured below. It is accessed like a road shifter clamp would be with a Phillips head screw driver.

55380001809_bff461a8b0_b.jpg

55380216285_ab79041ffb_b.jpg

This red plate also kind of serves as a return stop for the lever. So I figured that if I were to build that area up with something like a washer, it should keep the lever from returning beyond my reach.

I tested my theory with this washer that I ground down on two sides to fit inside the lever body.

55380006069_6283fbd283_b.jpg

It wound up working about perfectly! Finished result with bars taped:
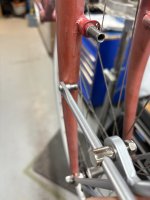
55380216195_806837c9f5_b.jpg

And a glamour shot during a ride this spring.

55379945933_688bc59ca3_b.jpg

Thanks for reading.
 
To avoid these ads, REGISTER NOW!
Top Bottom