To avoid these ads, REGISTER NOW!

Between 265 & 485 SQ/FT Weisenheimer's Bicycle Haus

Workspaces sized between 265 and 485 squarefeet.

manbike26

Well-known member
Joined
Sep 23, 2015
Messages
224
Location
Boise ID USA
Hey gang. Lurker --> Poster here!

It is time to start a thread on this cool site. As a life-long bicycle rider and mechanic, I've always had a very nice workspace. But until fairly recently, it was a company-funded professional space. I worked at bike-shops and then for a manufacturing company for over a decade. I jumped into the e-bike thing pretty heavily, too.

But life changes, and I'm in the midst of changing careers...so now the workspace is ONLY my own.

I articulated some goals in a later post…moved here for convenience:

Year-round comfort: Boise is hot in the summer. It's pretty cold in the winter, too. I need a way to get a little heat + AC in and keep it there.

Visual cleanliness: I did a pretty good job with the layout when we moved back in this summer. Most of my benches and racks are on wheels, so functionality and adjustability are high. But, I don't like the look of all the various colors of various bins shoved under benches and visual clutter.

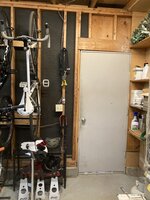
Bike access improvement: The bikes on the wall are hard to access. If I want to ride the blue one in the center to a restaurant, I have to move at least four bikes to get to it. I do like having the e-bikes ready to go in an instant though. It's also tough to take a bike from the rack and get it to the work area.

Flex-space: I like being able to switch from working on bikes to an oil-change on the truck to working on a house project in minutes. I am OK with this for now...but want it to be better.

Ease of movement: Related to the above...it's *just* a little tight in there. I think more stuff has to go.

Additional Electrical: There is no 220v service in the garage that is unused. I've always wanted to get decent at welding.

More thoughts will be added as they come to me. Keep me humble. Please chime in with your thoughts and wisdom!
 
Last edited:
To avoid these ads, REGISTER NOW!
OP
M

manbike26

Well-known member
Joined
Sep 23, 2015
Messages
224
Location
Boise ID USA
Some history + background:

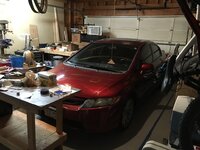
House was purchased in 2015. It's a late 70s run-of-the-mill house that needed some work. HVAC and water heater are in the attached 2-car garage. Originally, it had one 60w lightbulb for each car. At some point before 2020, I put in 4 florescent light fixtures so I could see SOMETHING while working. I really just used the garage as a messy catch-all and workspace for the project du-jour.

**Tangent alert** - back in 2012, I lived in Colorado and did an engine swap on my F150 pick-up. It was both the smartest and the dumbest thing I ever did. You can read that thread HERE if you like trucks and cars and diesel stuff. **End tangent**

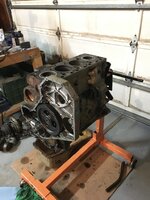
In 2017, I undertook a rebuild of that motor and have some pics from that so you can get a sense of the space.

Door is uninsulated and original wood.
33827358195_218f9c6b73_b.jpg

Too much scrap wood and junk laying around.
39958414665_9554c54462_b.jpg

This picture shows the amount of disorder I can create during a fairly simple task like painting cabinet doors.
52567858146_772e1425cf_b.jpg

I did at one point fit a car in the garage! That didn't last. I'd rather have a workspace and just deal with a cold car.
52568302865_86d563bb15_b.jpg

More current pictures coming shortly.
 
Last edited:
OP
M

manbike26

Well-known member
Joined
Sep 23, 2015
Messages
224
Location
Boise ID USA
Here are pictures as of December 2022.

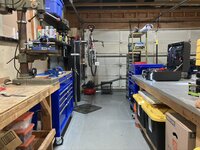
Western wall, on the left, is drywalled and insulated. Not what I'd call quality work, but it's suitable. There is an original window on this wall that I cover with cardboard.

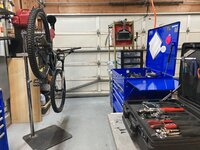
The 'walkway' between the benches is tight. Probably 32 inches or so. Most hand-tools and my bike workstand are here.
52567477232_a5c999ce0e_b.jpg


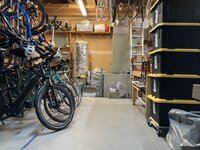
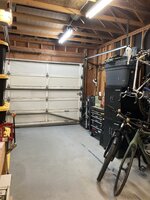
The eastern wall is unfinished. Bikes hang here for now, garden tools, lawn mower, etc all store on this side. Here you can also see, the ceiling is mostly open. I put down a small amount plywood years ago for storage. It's easily accessed with a ladder.
52568388815_b478c9b1dd_b.jpg

The nice thing about the bike parking is that you can wheel bikes right out of the garage door when you want to ride. Grab a bike, roll out, close the door. Easy.
52571493550_bbe88bf774_b.jpg

You can also see in that last picture that the Furnace and Water Heater are in the garage up against the living space. Anytime you do anything stinky in the garage, the whole house smells like whatever it is.
 
Last edited:
OP
M

manbike26

Well-known member
Joined
Sep 23, 2015
Messages
224
Location
Boise ID USA
Welcome to the site mate.

Nice setup, I am also a bit into cycling but not to your level.

Thanks for the welcome!! I started riding very young and it was my livelihood for over 20 years. The business and wrenching side was anyway.

I have relatively average talent once I'm forced to ride the bike. But, man riding is always a TON of fun...that's really what it's all about. There are lots of people who ride way more, faster, better than you or I ever will. But that doesn't make their smiles bigger or their post-ride beers any colder.

Plus, western NC has some of the best biking (on or off-road) anywhere in the US. I've taken several vacations to the Asheville Area and still have bike friends there.
 
Last edited:
OP
M

manbike26

Well-known member
Joined
Sep 23, 2015
Messages
224
Location
Boise ID USA
So where to go from here?! I'll try to consolidate my thoughts.

Year-round comfort: Boise is hot in the summer. It's pretty cold in the winter, too. I need a way to get a little heat + AC in and keep it there.

Visual cleanliness: I did a pretty good job with the layout when we moved back in this summer. Most of my benches and racks are on wheels, so functionality and adjustability are high. But, I don't like the look of all the various colors of various bins shoved under benches and visual clutter.

Bike access improvement: The bikes on the wall are hard to access. If I want to ride the blue one in the center to a restaurant, I have to move at least four bikes to get to it. I do like having the e-bikes ready to go in an instant though. It's also tough to take a bike from the rack and get it to the work area.

Flex-space: I like being able to switch from working on bikes to an oil-change on the truck to working on a house project in minutes. I am OK with this for now...but want it to be better.

Ease of movement: Related to the above...it's *just* a little tight in there. I think more stuff has to go.

Additional Electrical: There is no 220v service in the garage that is unused. I've always wanted to get decent at welding.

More thoughts will be added as they come to me. Please chime in with your thoughts and wisdom!
 
Last edited:

thammel

Well-known member
Joined
Oct 3, 2005
Messages
2,253
Location
Maryland
Cool! How was cycling your livelihood? I've been a road cyclist for over 30 years now for exercise. At 73, knees aren't great so I bought a Specialized turbo creo sl expert this year. Oh, it is so nice and really helps to get back to some longer rides! I also do all my own maintenance, and upgrades. You have quite a collection! I'm guessing you're more into off-road riding than road?
 
OP
M

manbike26

Well-known member
Joined
Sep 23, 2015
Messages
224
Location
Boise ID USA
Cool! How was cycling your livelihood? I've been a road cyclist for over 30 years now for exercise. At 73, knees aren't great so I bought a Specialized turbo creo sl expert this year. Oh, it is so nice and really helps to get back to some longer rides! I also do all my own maintenance, and upgrades. You have quite a collection! I'm guessing you're more into off-road riding than road?
Yeah, I trend towards mountain bikes and commuting. I started riding and wrenching pretty young. By the time I was about 21, I figured out that I wasn't going to be a professional rider. I simply didn't have the guts or talent. I had worked at bike shops through college, and decided that bikes would be a fun way to make a living. I started working on the supplier side in my early 20s and moved a few times. Just before I turned 40, I realized that the options that remained for me in the bike business weren't exciting or interesting. So I decided to change it up.

The Turbo Creo is a cool bike. I've owned a couple of Specialized bikes over the years. They pretty much all rocked.
 
Last edited:
OP
M

manbike26

Well-known member
Joined
Sep 23, 2015
Messages
224
Location
Boise ID USA
Funny, I got the bug to start this thread while I was sick. Initially I just came to drool and dream with all my excess time on my hands. After reading some threads and seeing how life intertwines in so many...I thought:

"I should participate rather than just using the resource."

I should give a shout out to several folks on here whose threads were a source of inspiration to participate:
Gregor's Mid Century
Gruntled's Bald + Beautiful
Nick's 2-car detached
Woody's Works Garage
There were many more. Just because I didn't list it here, doesn't mean its not awesome. Thanks to all who share!

ANYWAY.
As of yesterday, I'm much less sick than I was. But I can't go to work. So my available time is high, funds are low, but my desire to DO SOMETHING is high. Bad combo. I spent some time thinking of a reasonable, useful project I could do. Electrical.

I tackled some electrical yesterday! Two major goals: Goal 1) I've always disliked that theres really only two useful outlets...so fix that. Goal 2) You may have noticed in this photo that the area where the bike is darker than the rest. The reason for this: the shop lights don't go all the way to the garage door, they are focused toward the back wall. Fix that too.

52567477232_a5c999ce0e_b.jpg


I think the relative darkness is also apparent in this picture.
52571574083_794ed736a6_b.jpg

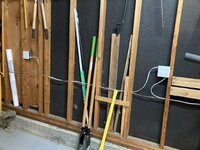
I had some extra Romex, outlets and other supplies hanging out. That exposed eastern wall has holes in the studs for the exterior light on the house. Maybe it won't be too challenging...right?

Step 1) Move this stuff so I can access the wall behind it. This is the wall that will receive the outlets. Also...notice it is darker over here, too.
52571493425_dd6115a208_b.jpg
 
Last edited:
OP
M

manbike26

Well-known member
Joined
Sep 23, 2015
Messages
224
Location
Boise ID USA
Area cleared out. I love having most of the cabinets and tables on wheels. Access to this wall happened in about 2 min.
52571493675_352f07f544_b.jpg

Step 2) Can I actually fit some additional Romex through that same hole in the studs?
If so, tie it into the box here and mount some outlets!
52571044236_48186cd69f_b.jpg

Step 3) The easy part. Et Voila! Two outlets installed! Now I can also have power on the small black cart. Less run for extension cords. And so on. You guys get the benefit of easy access to power, I don't have to sell you.
52571574753_a381b26805_b.jpg

I was pleasantly surprised at just how fast it went and how much energy I had. It was like moving around the garage made me forget I was sick. Anything worth doing is worth overdoing. I should add some lights. How hard could that be?
 
Last edited:
OP
M

manbike26

Well-known member
Joined
Sep 23, 2015
Messages
224
Location
Boise ID USA
Steps 4-10) Quit taking pictures and get that nose to the grindstone...because you're in over your head. The install did go pretty smooth and now the lighting is MUCH better. I don't think the photos capture the improvement.
52571320044_46aacdeb0e_b.jpg

The bike work area is where the improvement is most noticeable. I noticed the difference even during clean-up of the garage.
52570578162_91ee78ceae_b.jpg

And a contrast to the earlier, pre-outlet photo. More power, more light.
52571494475_858f7e370e_b.jpg

And just like that...I was worn out. But I was pleased with the results of a day's work. Hopefully, I can get back to work this week so I can make money and keep paying the mortgage. Thanks for reading.
 
OP
M

manbike26

Well-known member
Joined
Sep 23, 2015
Messages
224
Location
Boise ID USA
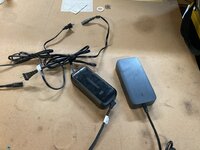
With the weather being kind of crappy, I didn’t wind up working today. So some time in the garage was the answer. I mostly did some cleaning and consolidating. I moved some storage bins up to the rafters which freed up some space on shelves. I did build one cool item: a wall mounted holder for the e-bike chargers!

When the bikes need a charge, I used to have to go get the chargers out and move the bikes near an outlet. Since I had just added outlets, I took it a step further.

Chargers for each bike on the bench.
52581808032_514bacfce1_b.jpg

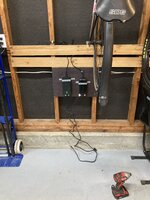
I used a couple of small angle brackets to hold the bottom of each charger and some metal strapping that I bent to fit.
52582533559_f6ecdbb370_b.jpg

Mounted it all up on a piece of scrap wood and then put it on the wall behind the bikes.
52581808087_9402fcdcc2_b.jpg

Now I can just plug the bikes in when I park them. No bikes in the way, no moving stuff around and chargers are neatly out of the way.

Thanks for reading!
 
OP
M

manbike26

Well-known member
Joined
Sep 23, 2015
Messages
224
Location
Boise ID USA
The various respiratory bugs that are going around finally caught up to my lovely wife this weekend. Mid-day rest for her = garage time for me. Time to replace the tubeless sealant in the mountain bikes.

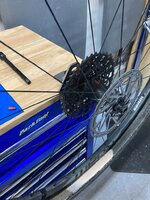
Sometimes low cost tools are the most impactful. Here is a tool from Park that embodies great value: the wheel holder

It’s great for lacing spokes on heavy e-bike wheels, too. Park also makes a version that has a 45 degree angle.

Anyone who has ever done tubeless tire Installs with sealant (especially on older wheels like these) will confirm: it’s a messy PITA. But check out how nicely the wheel is held up with one bead seated on the tire!
52600418420_bdf3c41c45_b.jpg


The mess! You can see the sealant oozing out of the wheel after inflation.
52600396250_9b20bfe537_b.jpg


And a pic of the wheel holder itself. I attached it to the top of my bench with a wing bolt for quick removal.
52601722085_238e098566_b.jpg

52599479957_d69fec3f4f_b.jpg

Total mess was only about 3-4 drops of sealant. Total time was less than 30 min. I was certainly pleased with that!
 
Last edited:

Sumboodie

Well-known member
Joined
Mar 20, 2021
Messages
10,762
Location
AK
Area cleared out. I love having most of the cabinets and tables on wheels. Access to this wall happened in about 2 min.
52571493675_352f07f544_b.jpg

Step 2) Can I actually fit some additional Romex through that same hole in the studs?
If so, tie it into the box here and mount some outlets!
52571044236_48186cd69f_b.jpg

Step 3) The easy part. Et Voila! Two outlets installed! Now I can also have power on the small black cart. Less run for extension cords. And so on. You guys get the benefit of easy access to power, I don't have to sell you.
52571574753_a381b26805_b.jpg

I was pleasantly surprised at just how fast it went and how much energy I had. It was like moving around the garage made me forget I was sick. Anything worth doing is worth overdoing. I should add some lights. How hard could that be?
Don't forget to staple the romex. I believe code is within a foot of the box.
 
OP
M

manbike26

Well-known member
Joined
Sep 23, 2015
Messages
224
Location
Boise ID USA
Since that first one went so well, I decided to tackle a larger project on the other bike: fix the annoying tick in the rear suspension movement.

If you’ve never chased a noise on a bicycle, it’s an ordeal. Unlike motorcycles or cars, they are very light, very hollow and have a tendency to echo. Plus, they’re quiet…so every little noise shows up. This ticking had been bugging me for most of my rides in September and October.

I knew from on-trail trouble shooting that it was either in the cranks or in the linkage. Since I have ample time, they would both come apart. Here is my reminder photo for linkage position.
52600232869_90744c6592_b.jpg


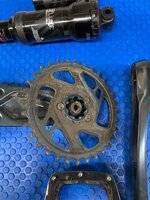
Crankset off, bike wiped down for disassembly. I think some dust accumulated where I couldn’t reach!
52600304039_2010b4a06c_b.jpg

52599972606_0cbe5c7e3b_b.jpg


I wonder if that’s why my shifting was spotty?
52600232844_36317b5cdf_c.jpg


Clean and shiny reassembly of linkage. Passed the noise test in the garage. Will have to wait until spring to know if it’s quiet on the trails.

52601295736_d6244577a9_b.jpg

52601812173_ecb8b16d30_b.jpg

Done for the day. Thanks for reading.
 
Last edited:

Robey5

Well-known member
Joined
Jan 18, 2010
Messages
406
Location
North of Detroit, Mi
Dope space, man! Lots of bike **** here to come, I am sure. I like the Alchemy - she looks like a ********* rig to tackle the hard-core. I also like that Park wheel tool (thank you for reminding me that I need one). Curious about the sealant type you use. I’ve had great success with Stans, but I have heard that many riders like the orange glitter stuff (“orange-seal”). Frankly, it doesn’t matter what you use when the task is to clean the stuff. I don’t care if it is new, old, no-name - that stuff is just a mess any way you add it up.

Idaho is one of the last 4 states I have on my list to ”complete my list” in the 50. A trip was planned to rip sunshine back in 2020, but thanks to the world “closing” - our trip was canceled. I guess in some ways, the pandemic brought good change to the world, but I really wanted to go. That is on the list for “some time in the future” now.

One thing that I notice in your space is that I have never seen a garage door strut shaped like that - quite interesting!
 
OP
M

manbike26

Well-known member
Joined
Sep 23, 2015
Messages
224
Location
Boise ID USA
Dope space, man! Lots of bike **** here to come, I am sure. I like the Alchemy - she looks like a ********* rig to tackle the hard-core. I also like that Park wheel tool (thank you for reminding me that I need one). Curious about the sealant type you use. I’ve had great success with Stans, but I have heard that many riders like the orange glitter stuff (“orange-seal”). Frankly, it doesn’t matter what you use when the task is to clean the stuff. I don’t care if it is new, old, no-name - that stuff is just a mess any way you add it up.

Idaho is one of the last 4 states I have on my list to ”complete my list” in the 50. A trip was planned to rip sunshine back in 2020, but thanks to the world “closing” - our trip was canceled. I guess in some ways, the pandemic brought good change to the world, but I really wanted to go. That is on the list for “some time in the future” now.

One thing that I notice in your space is that I have never seen a garage door strut shaped like that - quite interesting!
I bought the Alchemy during the 2021 bike shortage. It’s tons of fun. It’s only got 120mm of rear travel, but its nicely balanced. Currently running Orange Endurance sealant. When I first built this bike up in late 2021, I used E13 sealant. Also worked well. I’ve always had fine luck with Stan’s as well.

I always go for the longer lasting stuff and avoid race sealants. Like you said, it’s messy. if I can make fewer messes and ride more during a season, I’m all for it!

Idaho is a fun state. Come on out anytime, we’ll go ride. Boise is really hot in the summer, though. If you’re into really big rides, check out the Stanley area.
 
To avoid these ads, REGISTER NOW!
OP
M

manbike26

Well-known member
Joined
Sep 23, 2015
Messages
224
Location
Boise ID USA
Spent some time in the garage today improving my air hose situation. Related to my ease of use goals, it was hard to inflate a tire unless the bike is in the workstand. The hose was short-ish and ran along the western wall of the garage:

52571574083_794ed736a6_b.jpg


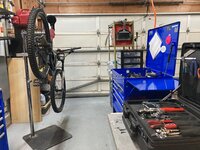
Initally, I thought running the hose into the rafters was a good solution, but that orange hose tangles easily and was in the way as often as it was convenient. You can see the orange hose dropping on the right side of the blue tool cart here. Inflator is hanging just to the right of the dustpan.

52601812173_ecb8b16d30_b.jpg


I thought about a reel, but could see the wife getting frustrated with that if she had to use it while I was traveling. So I opted for the spiral hose solution.

52611522894_d350fa9651_b.jpg

Now, it moves easily from workstation to the bike storage area. Toss a bike in a stand, or even lay it flat on the floor and the inflator is handy.
 
OP
M

manbike26

Well-known member
Joined
Sep 23, 2015
Messages
224
Location
Boise ID USA
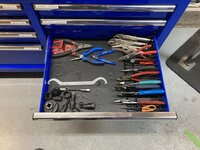
I also took some time to organize a couple tool drawers better. I’m not satisfied yet, to be honest.

Before:
52611538139_3552981e52_c.jpg

After, with plier rack. Need to organize my BB drivers still. Several of these live in a different tool box, too.
52610770202_1d3a7e1bcc_c.jpg

Before:
52610769967_d75171c703_c.jpg

After:
52610770047_c8ff8a8559_c.jpg

I think what I need to do is really think about how often I use the tools for ”purpose X” or “purpose Y” and then go from there. Right now, I don’t have much wasted movement or redundancy. I just want it to be tidy and organized.
 

kjdhawkhill

Well-known member
Joined
Jan 19, 2015
Messages
822
Location
Flyover state #4
I wonder if that’s why my shifting was spotty?
I just had my boys out on their 20" bikes in the midwestern January mud and slop. #2 couldn't get consistent shifting. Lets just say your housing is near mint compared to his cable and housing. Because, you know, the 100% frayed cable shouldn't be visible mid-cable-run.

*Adds full MTB cable kit to shopping list, wonders how the heck it got that bad before I noticed.
Totally here to watch this develop. No e-bikes here in the flatland for me, but glad to see they're expanding use.
 
OP
M

manbike26

Well-known member
Joined
Sep 23, 2015
Messages
224
Location
Boise ID USA
the midwestern January mud and slop. #2 couldn't get consistent shifting. Lets just say your housing is near mint compared to his cable and housing. Because, you know, the 100% frayed cable shouldn't be visible mid-cable-run.

I’m definitely guilty of holding a kids bike at a much lower standard when it comes to shift function. Brakes and structure are held to the highest standards (always), but shifting, appearance, non-critical wear items just don’t matter as much for kids.

On my own bikes, it had better go into each gear, as the shifter clicks, every time. I’m picky.
 
Last edited:
kjdhawkhill

Well-known member
Joined
Jan 19, 2015
Messages
822
Location
Flyover state #4
I’m definitely guilty of holding a kids bike at a much lower standard when it comes to shift function. Brakes and structure are held to the highest standards (always), but shifting, appearance, non-critical wear items just don’t matter as much for kids.

On my own bikes, it had better go into each gear, as the shifter clicks, every time. I’m picky.
Yeah, there was a traumatic incident somewhere, that I was not party to, otherwise I'd have conducted a WAY more serious inspection. The split cable and housing were actually routed so wrong that it had to be a total yard sale... And gripshifters have always been... not as nice as my entry-level road or mtb stuff, so the complaints from the 6 year old are likely to be discounted... Not that I even remember a complaint....
 
OP
M

manbike26

Well-known member
Joined
Sep 23, 2015
Messages
224
Location
Boise ID USA
I took a little time yesterday and today to improve this drawer specifically:

52610770202_1d3a7e1bcc_b.jpg

I liked how the plier rack improved the situation, but all the various BB drivers now look like ****. Scrap wood to the rescue!

Mapped out and drilled out.

52616346600_ab9d5dd759_b.jpg

52615402632_be2cb350d1_b.jpg


Painted and installed!

52618445640_e3d7f81211_b.jpg

I’ll probably change out some less relevant ones in the future. For now, I’m happy with the improvement.
 
Last edited:
OP
M

manbike26

Well-known member
Joined
Sep 23, 2015
Messages
224
Location
Boise ID USA
After replacing the sealant in my mountain bike, I noticed the rear tire kept going flat. No leaks around the bead anywhere, but today I noticed wetness at one of the spoke *******. Ruh-roh.

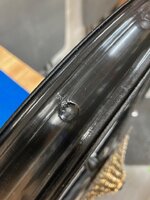
I pulled the tire off and found the source, damage from some dumb mechanic who scratched the rim tape. I 100% fully deny responsibility.
52635334327_5d7a2f172d_b.jpg

Tell-tale sealant inside the rim. Probably this was the culprit.
52635848531_200f71317b_b.jpg

Fresh tape! This stuff is a bit sturdier than the factory tape.
52635848481_b02194e7fe_b.jpg

For the bike folks following along, have any of you tried Cush Core inserts? This is my first bike with them. I'm pretty happy with how they ride. Where I notice the benefit most is rougher trails...even though Boise doesn't have a ton of rough stuff. I never rode the bike without them, but my subjective feel is that they keep it quieter than normal and move the traction envelope up just a tick or two. You can read about the theory behind them here: https://cushcore.com/how-it-works/

I've always tended toward higher suspension pressures and lower tire pressures, so the inserts suit my riding style and set-up well. Even with 2.3 tires and 120mm of travel, I don't struggle to keep most of my friends in sight on the downhills. I also don't feel like the extra weight or reduced tire pressures hold me back on the uphills. I have the XC model in both front and rear.
52635848616_32ba7237b0_b.jpg

Always align the valve and the logo to look professional. My motto is: "I may not ride fast, but I can look fast."
52636289475_f9c77c3bb8_b.jpg

Thanks for reading!
 

kjdhawkhill

Well-known member
Joined
Jan 19, 2015
Messages
822
Location
Flyover state #4
Never tried Cush cores. But I'm 95% of time on a CX bike and people just started using them in the gravel world two, maybe three years ago. Not worth my hassle at this point in my life, but if they came installed on my next wheel set I'd be curious. (Both my "MTBs" still have QR levers, so I'm not exactly an early adopter)

Scratched tape like that would just call for a six inch tape-over-patch in my garage... Assuming I had the same tape available.
 
OP
M

manbike26

Well-known member
Joined
Sep 23, 2015
Messages
224
Location
Boise ID USA
Never tried Cush cores. But I'm 95% of time on a CX bike and people just started using them in the gravel world two, maybe three years ago. Not worth my hassle at this point in my life, but if they came installed on my next wheel set I'd be curious. (Both my "MTBs" still have QR levers, so I'm not exactly an early adopter)

Scratched tape like that would just call for a six inch tape-over-patch in my garage... Assuming I had the same tape available.

Hahaha, I hear you on the early adopter. Having the latest gear or whatever has rarely made my smile more.

It's kinda like cars: way more fun to drive a slow car fast vs. driving a fast car slow. Miata > Porsche. That's actually why I have a shorter travel bike despite my preference of descending vs. climbing!

That tape was the factory tape from either Alchemy or I9...it was pretty thin and I didn't trust it. I could see that same knucklehead mechanic poking a new hole in a different spot!
 
OP
M

manbike26

Well-known member
Joined
Sep 23, 2015
Messages
224
Location
Boise ID USA
Got to spend some time in the garage today. Lately when my truck is idling and still, I’ve noticed an exhaust smell in the cab. I did some digging and found a broken stud on the exhaust manifold/turbo mount. I had a full-day of nothing planned so I decided to tackle it.

The engine bay is pretty roomy, but the turbo is buried. So the battery, intercooler piping and intake comes off.
52673837766_44426b0da0_b.jpg

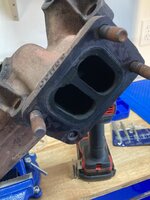
The broken stud is in the hardest to reach spot, so I decided to remove the exhaust manifold. Note the soot where the exhaust leak is!
52673341687_f3fe362725_b.jpg

52674336458_1709d678bd_b.jpg

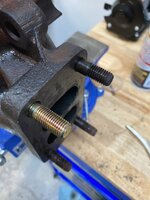
It was an absolute ordeal. Several broken extractors and even a broken tap handle. Ooof!

In the end, the new stud was installed, albeit a different thread pattern...10x1.25mm instead of Cummins 10x1.5mm.
52674336483_74c5e981f9_b.jpg

Ready to go back on.
img.jpg

And mostly installed. He started right up, but I’m leaving the test drive until tomorrow.
52673341737_4d8b486e55_b.jpg
 

Attachments

  • 52673340147_9fded20c37_b.jpg
    52673340147_9fded20c37_b.jpg
    199.4 KB · Views: 14
Last edited:
OP
M

manbike26

Well-known member
Joined
Sep 23, 2015
Messages
224
Location
Boise ID USA
Since my exhaust repair, the truck has been running pretty well. Work has been slow, so that means garage time, but tight funds.

Recently, it's started feeling like spring is around the corner.

The wife and I started talking about setting up a couple of garden boxes in the backyard. We had a couple of these when we lived in Colorado and, while it can be a pain to take care of, it was really nice having fresh produce in our yard. Then, my wife sent me a rabbit hole of a site: manabouttools.com -- Specifically the section where he cast his own concrete garden box panels.

I have long wanted to learn to cast concrete (countertops, patio pavers, etc) and it's actually cheaper to use concrete than cedar. Learning something new and building something useful for less money is pretty much ideal. So the project begins.

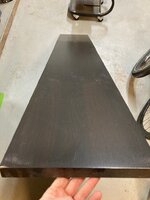
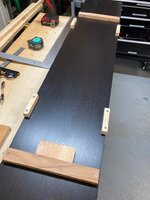
I have enough scrap wood laying around from various projects that I could get to building a test mold right away. This board is from an old IKEA bookshelf and, with its high gloss finish, should make for easy release of the concrete.
52688342943_e20c173d45_b.jpg

I had a few boards leftover from a stand-up desk I had worked on before as well. They have a nice coat of poly on them and should also make for an easier release from the mold. I cut them length-wise with my new circle saw guide from Harbor Freight.
52688125444_c562a6e866_b.jpg

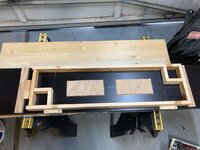
Finally, I attached some guides onto the base of the mold so that the vertical portions can stay square and consistent. They are a snug fit, but short enough that clamps should have no trouble clearing them.
52687849116_20b011301e_b.jpg

There are a few tasks left. I want to glue some squares to the bookshelf so my concrete will have a nice aesthetic when removed. In some of

I also need to shorten the mold's height. I forgot that I have to drag a board over the top to screed the concrete...which requires a level top! It's obvious to me now...but wasn't when I was tinkering with making the mold, haha! All in all, a good afternoon of learning and using the garage.

More to come. Thanks for reading.
 

nadogail

Well-known member
Joined
Jan 23, 2009
Messages
32,057
Location
Coronado, CA
Glad to see a Wheelman posting in this Forum.

I became a Life Member of the League in 1978, if I recall correctly, my legs and heart will no longer allow cycling.
 
OP
M

manbike26

Well-known member
Joined
Sep 23, 2015
Messages
224
Location
Boise ID USA
Glad to see a Wheelman posting in this Forum.

I became a Life Member of the League in 1978, if I recall correctly, my legs and heart will no longer allow cycling.

I hope you have a wonderful set of memories from your years in the saddle. We're all headed "downhill" in some way...I certainly can't ride the same way I did when I was 18. Even so: Once a cyclist, always a cyclist.
 
OP
M

manbike26

Well-known member
Joined
Sep 23, 2015
Messages
224
Location
Boise ID USA
Progress on the concrete molds!

I made the "negative" rectangles from some thin plywood I had around the garage. I cut the edges with a 30 degree angle so it should release more easily. Then, I glued it down to the mold base and coated it with some gloss polyurethane.
52689725264_b1b0cdcede_b.jpg

Next, I busted out the table saw for the first time in a while! I cut down all my boards to be 2" tall, so that I can pour to the top of the mold and level effectively with a float.
52689725029_8da276198e_b.jpg

Finally, I cut some 7/8" holes in the end and ran some 1/2" PVC pipe through. This will get replaced with 1/2" rebar when I go to stake it into the ground and/or stack them up.
52689454606_832dc77902_b.jpg

I'm going to wait for all the poly to dry, then I'll caulk the edges and be ready to do some mixing and pouring.

I also went by Home Depot and picked up my fixins for the concrete mixture. One potential hiccup: I could only find perlite, not vermiculite. It seems like it may be a little chunkier. We'll see how it goes.
 

Greenlawnracing

Well-known member
Joined
Oct 4, 2017
Messages
324
Location
Edmond, OK
Following. I have a three car (cramped, builder spec) that holds three cars + my road bike, my crit bike, and what is beginning to be a small woodworking shop. Used to spin a lot of wrenches, not a ton these days. Thanks for sharing!
 
OP
M

manbike26

Well-known member
Joined
Sep 23, 2015
Messages
224
Location
Boise ID USA
Had a chance today to tackle some concrete pouring! I had never worked with concrete before. I think I used too much water, but we'll see how it responds as it dries...if it dries, hahaha!

I had caulked all the edges of the mold a couple days ago between work. It looked good and I was pumped to get to work today.
52701814704_15a7574e40_b.jpg

Unfortunately, when I went to inspect it today, the edge of one of the "negative" rectangles had peeled up. Enough that it would allow concrete to seep under. I decided to pull both of them and not deal with it. I was frustrated...so I didn't take any pictures of that.

I mixed up a batch of 1 part portland cement, 1 part sand, 2 parts perlite and got to mixing. I wound up with just about the right amount, but maybe a little too wet. I poured about half in and then paid a metal screen in for reinforcement. Then I poured in the rest and used a piece of scrap wood to level the top. I used the sawzall without a blade to help settle the mixture and get bubbles out.
52701036362_8a83610ed7_b.jpg

Finally, I laid some plastic wrap over it and will let it cure for a couple days.
52701557746_b6c4532d18_b.jpg

Fingers crossed!
 

Xti04

Well-known member
Joined
Nov 11, 2016
Messages
2,364
Nice! Need to build some planter type boxes to separate the driveway from my wifes new salon entrance and this might be better than a cedar planter box I was planning on. Just need the wood to make a frame and and a plug for the inside. Love the bike shop! Storing my wifes ebike and the kids bikes is the hardest for me. I had mine hung from the ceiling on a kayak lift. Kept them safe and out of the way. When the new garage gets here I will have lots of planning to do to get it laid out how I want. Keep up the good work!
 

fishwatcher

Well-known member
Joined
Jan 26, 2023
Messages
759
The various respiratory bugs that are going around finally caught up to my lovely wife this weekend. Mid-day rest for her = garage time for me. Time to replace the tubeless sealant in the mountain bikes.

Sometimes low cost tools are the most impactful. Here is a tool from Park that embodies great value: the wheel holder

It’s great for lacing spokes on heavy e-bike wheels, too. Park also makes a version that has a 45 degree angle.

Anyone who has ever done tubeless tire Installs with sealant (especially on older wheels like these) will confirm: it’s a messy PITA. But check out how nicely the wheel is held up with one bead seated on the tire!
52600418420_bdf3c41c45_b.jpg


The mess! You can see the sealant oozing out of the wheel after inflation.
52600396250_9b20bfe537_b.jpg


And a pic of the wheel holder itself. I attached it to the top of my bench with a wing bolt for quick removal.
52601722085_238e098566_b.jpg

52599479957_d69fec3f4f_b.jpg

Total mess was only about 3-4 drops of sealant. Total time was less than 30 min. I was certainly pleased with that!
The various respiratory bugs that are going around finally caught up to my lovely wife this weekend. Mid-day rest for her = garage time for me. Time to replace the tubeless sealant in the mountain bikes.

Sometimes low cost tools are the most impactful. Here is a tool from Park that embodies great value: the wheel holder

It’s great for lacing spokes on heavy e-bike wheels, too. Park also makes a version that has a 45 degree angle.

Anyone who has ever done tubeless tire Installs with sealant (especially on older wheels like these) will confirm: it’s a messy PITA. But check out how nicely the wheel is held up with one bead seated on the tire!
52600418420_bdf3c41c45_b.jpg


The mess! You can see the sealant oozing out of the wheel after inflation.
52600396250_9b20bfe537_b.jpg


And a pic of the wheel holder itself. I attached it to the top of my bench with a wing bolt for quick removal.
52601722085_238e098566_b.jpg

52599479957_d69fec3f4f_b.jpg

Total mess was only about 3-4 drops of sealant. Total time was less than 30 min. I was certainly pleased with that!
Looks like you like this tool ( Park Tool WH-2 ) a lot. When you put a through axle wheel in vertically.. does it lock in place? If not.. is that an issue? Thx!
 
OP
M

manbike26

Well-known member
Joined
Sep 23, 2015
Messages
224
Location
Boise ID USA
Nice! Need to build some planter type boxes to separate the driveway from my wifes new salon entrance and this might be better than a cedar planter box I was planning on. Just need the wood to make a frame and and a plug for the inside. Love the bike shop! Storing my wifes ebike and the kids bikes is the hardest for me. I had mine hung from the ceiling on a kayak lift. Kept them safe and out of the way. When the new garage gets here I will have lots of planning to do to get it laid out how I want. Keep up the good work!
Thanks for reading! When I went by the big box stores, I was shocked at how expensive cedar was. I wouldn’t have expected concrete to be more affordable from a material standpoint, but it sure seems like it will save some coin.

My neighbor/buddy is also watching me for a similar edging type of project. Maybe I’ll wind up casting lots of stuff at once!
 
To avoid these ads, REGISTER NOW!
Top Bottom