To avoid these ads, REGISTER NOW!

Below 265 SQ/FT DRIVESITFAR IS GETTING ORGANIZED in his 9x15 portion of 2 car garage. DIY’s & COOL VI

All workspaces below 265 squarefeet.
OP
D

drivesitfar

Well-known member
Joined
Oct 23, 2013
Messages
36,098
Location
Pacific Northwest
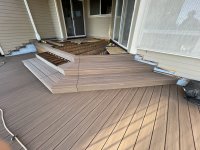
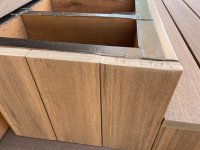
I spent most of the day yesterday learning how to do folded corners with Timbertech. Getting the saw depth figured out, then angle and the pvc glue and activator has a learning curve that is for certain.

Since my technique isn’t exact yet we’ll see how everything looks once installed. I still need to trim everything so there is a continuous gap line coming down the steps sort of like a waterfall but it’s progress.

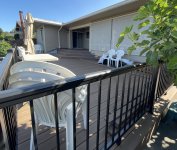
Have a grand day all while I get a haircut and start looking for some good deck furniture. IMG_1256.jpegIMG_1255.jpegIMG_1257.jpegIMG_1258.jpeg
 
To avoid these ads, REGISTER NOW!
OP
D

drivesitfar

Well-known member
Joined
Oct 23, 2013
Messages
36,098
Location
Pacific Northwest
Making this corner waterfall look happen sure has a lot of moving parts so marking cutting and screwing in each step is just hoping after I cut each piece it looks ok (and that my bride approves). I’m looking forward to getting it done.

My ears are officially lowered for summer now and after our shopping experience I might need to start a go fund me page for new quality deck furniture. Or maybe learn how to build furniture is the other option.
Anybody want to comment on sunbrella fabric or their favorite table and chairs for outside eating furniture please do.

It’s sunny in the PNW so my day is great snd hope yours is grand tooIMG_1259.jpeg
 
Last edited:
OP
D

drivesitfar

Well-known member
Joined
Oct 23, 2013
Messages
36,098
Location
Pacific Northwest
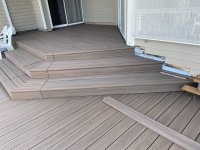
Another day and some more progress. I won’t be doing this for a living that is for certain but the steps are coming along nicely. I cut and installed the corner pieces (we are calling it a waterfall) and finished cutting and installing one side of a step.

Hopefully I’ll have both steps installed tomorrow.

Have a grand day everyone!!IMG_1262.jpegIMG_1261.jpegIMG_1260.jpeg
 
OP
D

drivesitfar

Well-known member
Joined
Oct 23, 2013
Messages
36,098
Location
Pacific Northwest
Ollie: thanks for the good words and glad you like how my deck is looking. This deck project is taking more than a little time and working with my bride as my only helper (except her BBF for a few days screwing in blocking and deck boards) it really is coming together. Also living through this with your other half really has further improved our relationship too. Keep checking in cause we should be done soon but lots of projects on the to do list.

Jon: thank you!!

Jay: I’ve never been a big fan of stringers so one of my contractor friends almost 40 years ago no helped me build 3 similar steps out of treated wood and we decided 2 steps was plenty now that we don’t have 5 kids using it daily. There’s a ton of moving parts but my bride has great ideas and a good eye and my OCD and attempts at perfection might have our deck looking good. Thanks for posting a few good words cause you’ve always been positive so keep it up!!

P: thanks and at least I still have all my fingers cause I think I’ve used more than a few of my cutting tools on this deck rehab. I have to give a big shout out to my bride for always pushing me to do what looks best and to all the guys on YouTube that took the time to post some great ideas and how to do it.

52: thank you and it’s mostly my bride that has me doing this when I kinda mention a video or picture looks great and then scratching my balding head more than a few times trying to figure out how to make it happen. Thanks for stopping in.

All: with all the moving parts having the right side of the steps framing not quite level (in the bubble but to the edge of one side) it created some pretty interesting discussions. I was close to taking it somewhat apart and rebuilding it then thought maybe I could fix it with a few shims under the decking. We picked up a 300 pack of plastic shims from 1/32 to 1/4 so I screwed in a few onto the framing and we both are pretty happy with the result.

When working somewhat slow at my 70 year old pace and having my OCD and my bride notice when things are off 1/32 or a 1/16th is interesting but in the end I hope it will last us another 20+ years or until we sell or hopefully go to a finished golden deck elsewhere.

Today steps should be finished and the upper deck will get boards on it.

Have a grand day everyone


IMG_1262.jpegIMG_1264.jpegIMG_1266.jpegIMG_1265.jpegIMG_1267.jpeg
 
OP
D

drivesitfar

Well-known member
Joined
Oct 23, 2013
Messages
36,098
Location
Pacific Northwest
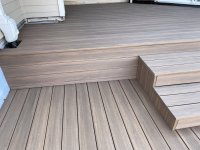
The steps are finally finished and the top deck has started to look like a real deck again.

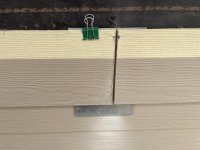
When I installed this 12 inch trim piece on the side of the steps a couple days ago I knew I should have trimmed it an 1/8 to allow for it being an 1/8th to high above the deck and step framing. We don’t like big gaps and there would have been one once the first piece of decking sat on this trim piece. So I thought about removing it, belt sander or even a skill saw but decided to put a new metal cutting blade on my old fien and hand cut it in place. To hopefully give me a guide and keep the surrounding pieces and g tape undamaged I taped on a couple pieces of thin galvanized steel. I could have maybe done a bit better in the cut if I had younger eyes but it worked ok and I got rid of the protruding 1/8th so decking went on nicely. It’s far from perfect but my bride loves it so I’m happy it’s moving forward. I think it looks a lot better than it would have if I hadn’t cut off the 1/8th.

We started the top deck and figured out the angle (43 degrees) to make the gap on the angled pieces look great. Only 17 more boards to cut and install. Also most of the blocking I did on the lower deck framing had joists ending up 12-13 inches on center and it’s super solid. The upper deck framing was going the correct fit for our new decking and even though it’s 16 inches on center it’s very adequate and solid too.

Hope you all enjoy your day cause I know I will finishing up this project. IMG_1267.jpegIMG_1269.jpegIMG_1268.jpegIMG_1272.jpegIMG_1273.jpegIMG_1279.jpegIMG_1275.jpegIMG_1281.jpeg
 
Last edited:
OP
D

drivesitfar

Well-known member
Joined
Oct 23, 2013
Messages
36,098
Location
Pacific Northwest
P: Thanks!!!

So this upper deck installation is going great so far. The angle stayed consistent even when turning the opposite direction. The point miraculously met at the corner do I didn’t have to cut a double sided piece and the full board pattern only had me notching one board on one of the two sides of the partial wall. My bride wanted me to use a scrap 3 foot piece of timbertech for a pattern but since I’ve got a few cardboard scraps I made one out of that. First attempt after transferring the pattern with my whit marker and cutting with my old black and decker 6.5 inch skill saw worked great.

Only 5 boards left to cut and install today on top deck and trim out my brides bottom Garden work area with Timbertech and I’ll go shopping for a few pieces of hardie plank siding and trim to finish the deck.

We still have a little down time to do a few puzzles and of course eat a good meal or two. I’m putting Les’s or no syrup on my crapes and pancakes and I’ve lost 5 of the 15 pounds I’d like to lose before September.

Hope you all have a grand day!!IMG_1288.jpegIMG_1289.jpegIMG_1290.jpegIMG_1287.jpegIMG_1286.jpeg
 

patlun

Well-known member
Joined
Apr 12, 2015
Messages
244
Location
Värmland, Sweden
I looked in now as I had not get any notifications from it for a while. Great process with the deck. Some new tools too and some tasty food pictures.

I also like my corded Makita track saw, the last year I have bought some 18V Makita tools, but I will also keep my old Ryobi tools until they dies. I am using my 12V Bosch Professional tools for most things in either case. The heavier 18V tools are only used when I need some more power and don't will bother with cords.
 
OP
D

drivesitfar

Well-known member
Joined
Oct 23, 2013
Messages
36,098
Location
Pacific Northwest
Patlun: Great to see a few good words from you!! I agree Makita tools are amazing and our one armed Mensa gal had an 18 v Makita 18v impact that weighed about half of my Ryobi 18v and it had plenty of power and it was a bit smaller to get into tight spots. I might start slowly upgrading to Makita as my old dewalt and Ryobi batteries wear down. Keep filling along cause now that my bride is fully retired too my to do lists have a ton more honey do’s on it.

All: well the heavy lifting and cutting (and screwing and plugging and…) is done with our deck. Just a bit more than sore but smiling for certain. My notching went great with double and triple measurements and cardboard templates so the upper deck and deck only lacking a bit of trim now.

I’m picking up these great puzzles off Craigslist and other places so started another one. I had a bought of gout a few months ago and we are not going to just go to doctor and ask for pills do after research my old joints (doctors call it arthritis) have been filling up with uric acid. No surprise cause I have a big one or two sweet teeth. Several non medical options are drinking or eating tart cherries or cherries when in season, baking soda in water (figure out your personal doses) and apple cider vinegar in a glass of water.

I’m off to buy some trim and figure out a way to finish off this deck so my day is going to be busy and hope you all have a grand day too. IMG_1292.jpegIMG_1293.jpegIMG_1302.jpegIMG_1294.jpeg
 
OP
D

drivesitfar

Well-known member
Joined
Oct 23, 2013
Messages
36,098
Location
Pacific Northwest
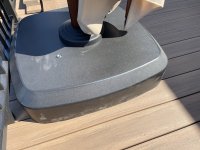
We’ve been looking for some decent options for shade for our new deck and the $100-300 umbrellas were always only lasting a couple summers and barely provided any shade. So my awesome bride has been search for options and found this 10x13 purple leaf umbrella with its 250-300 pound stand on wheels that both crank up and down easily with the same removable crank tool. It has been awesome to get done shade while finishing up our deck the last week or so. Yes it’s not she’s cause one price for umbrella with sunbrella material (anybody want to mention this because it’s got tremendous reviews), add the cover price, and then the stand with 4 removal containers to add sand and or water. I bought 100 pound bags of sakrete sand cause their other sand is gravely and didn’t fill water to top after putting in about 50 pounds in each container. We didn’t fill water to top cause it can freeze and we don’t want these to break. Once it’s on wheels it is amazing how easy it is to move. Also umbrella is perfect size for our deck and it goes up and down super easy. I think it’s rated for up to about a 30 mph breeze. Not cheap by any means but we have both been smiling for days with how well it looks and works for us. BTW we like it do much we were thinking about getting two of them but this model of stand and umbrella is sold out everywhere currently. I think we will put up some sort of sail over the south end of the deck. If you’d like model numbers of umbrella just ask and if you know anything about sunbrella or high quality deck furniture we are all ears.

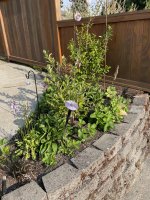
Our plants and lawn are growing like crazy with a bit of water and a weeding day or two is in our future but we love grow some of our own food. Speaking of food after the tubers drink to start our day and cherries a simple egg and potatoes works for us.


IMG_1297.jpegIMG_1298.jpegIMG_1295.jpegIMG_1291.jpegIMG_1303.jpegIMG_1296.jpeg
 
Last edited:
OP
D

drivesitfar

Well-known member
Joined
Oct 23, 2013
Messages
36,098
Location
Pacific Northwest
I mentioned these a few times and some of you like other types or make your own wood ones like I have in the past.

That said I found 300 of these plastic shims in 1/32 to 1/4 sizing and different colors to make it easier for I think in the $20-30 range. They sure come in handy so I made up a box to store them until they get a dedicated drawer.

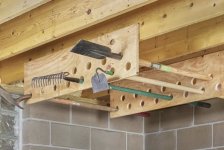
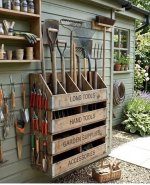
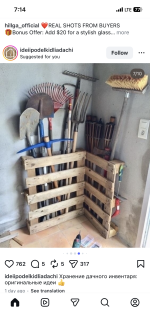
I also saw this very handy storage idea to store yard tools that I’m hoping to find a way to use one that might help some of you with storage space issues.

It’s sunny here in the PNW and loving it. Hope you are all smiling in your part of the world.
IMG_1306.jpegIMG_1305.jpeg
 
OP
D

drivesitfar

Well-known member
Joined
Oct 23, 2013
Messages
36,098
Location
Pacific Northwest
Since I’ve only posted from my cell phone since my old laptop died about a year ago I’m not sure how to do it but maybe I can get my bride to help and get it for you. Search big “A” in the meantime cause that’s where I found them. Also when I was cutting off deck ends 1/16 and up I kept the small pieces to add to my shim box.

Are you enjoying the deck build and ready for a new project? Or busy doing yours? Thanks for always following along with my doings.

Speaking of links to good products find your local lumber supplier and this is what we ended up with. Timbertech azek English walnut that is working out well with our current house color and should work well if we re paint it grey or blue or …


IMG_1307.jpegIMG_1308.jpeg
 
Last edited:
To avoid these ads, REGISTER NOW!
OP
D

drivesitfar

Well-known member
Joined
Oct 23, 2013
Messages
36,098
Location
Pacific Northwest
Gear: thanks for following along and happy to answer your question. All the black aluminum timbertech railing we need has been installed. The little area from the upper deck is only 19.5 inches from the lower deck so legally no railing is needed, but since we have more than a few young grandchildren my bride has plans for a work area there for her garden. I’m guessing we’ll buy a nice pvc type cabinet or I’ll build one out of cedar.

I did frame in for a couple posts in case we change our mind later for a 5 foot railing.

Yesterday was more clean up and research for trim material. Big box stores have a 3.5 inch by 3/4 composite trim that could work but the lumberyard hardware store we bought our decking from has 3/4 and one inch azek pvc trim that is a bit spendier but I can buy 9.25 inch wide material and rip it to 4 inch so there will only be a 1/16th or 1/8 gap that we like better. IMG_1331.jpegIMG_1093.jpeg
 
OP
D

drivesitfar

Well-known member
Joined
Oct 23, 2013
Messages
36,098
Location
Pacific Northwest
The last couple weeks I found a tree cutter with excess firewood to sell. Since our one armed friend heats with wood I picked up and stacked 2 trailer loads at her place last week and the tree cutter had some black locust he split a couple years ago that he let me have (I traded my old Stihl chainsaw that I wasn’t using) for us for emergencies or romantic fires so I picked it up and stacked it yesterday. My dream girl helped me unload but she with no doubt that this was the last load she’d help unload. We will see about that but I think we and our friend is set now.

Thunderstorms today and quite a show going on and happy that deck is just needing trim work.

Enjoy your day and got all those avoiding the fires we wish you the best and prayers sent!!IMG_1337.jpegIMG_1337.jpeg
 
OP
D

drivesitfar

Well-known member
Joined
Oct 23, 2013
Messages
36,098
Location
Pacific Northwest
BN: thank you!!

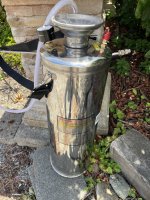
Just an fyi. We bought what I thought was a nice stainless steel tank sprayer and it worked with our vinegar/salt/dawn dish soap weed killer nicely last month. Other than laying down concrete without and gaps I think we all will have to learn to remove weeds as a lifelong home owner.

So I put in the second batch of ingredients (gallon 30% vinegar, gallon 5% vinegar, 2 cups salt and 1/4 cup dawn dish soap and tightened the cap. After one pump the tank started shooting vinegar at me from more than a few pinholes. Sadly the return possibility left a few days ago cause we are past our 30 days so this what looked to be nice sprayer for $50 is off to the dump now.

We put the solution in smaller older container and sprayed the weeds. This formula works great and maybe better than the old roundup and it’s hell on stainless tanks too.

I’m still cleaning up and preparing for new trim and siding to finish deck but lots of to do’s in my future with this great weather.

August is usually are most dependable sunny and no rain month but July is looking good for a while now. IMG_1349.png

Have a great day above dirt.
 
OP
D

drivesitfar

Well-known member
Joined
Oct 23, 2013
Messages
36,098
Location
Pacific Northwest
P: I agree. I suppose only paying $50 when other manufacturers sell theirs for $200 you get what you pay for. Also before tossing it in the trash I tried to take off some of the parts and couldn’t but no biggie cause not sure I would use them for anything. Now I’ll have to see if I can find the stainless sprayers I bought 40 years ago cause pretty sure I didn’t toss them.

MB: what’s funny is that I have used 5% vinegar in the past to remove rust from tools and if I didn’t rinse off thoroughly with water and dry even that percentage of vinegar would keep eating old cast iron. So guessing 30% would maybe eat metal. This weed killing recipe sure does work though cause it only takes a few hours and looks like weeds are dead.

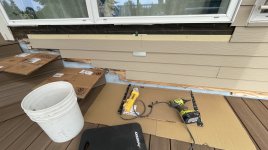
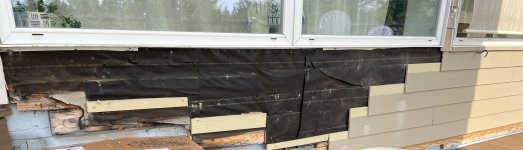
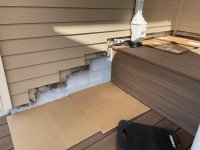
All: my house is concrete block but after we moved in I glued and nailed on the old LP siding. Since LP was not a great product the PNW some of it failed so a few years ago I removed it and had my brother in law and his son help me install hardie plank 6 inch boards with the cedar pattern that is a cement type product.

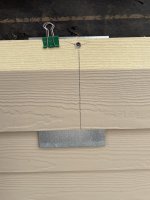
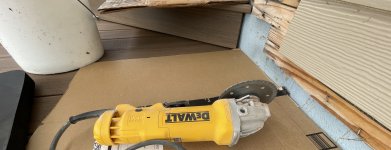
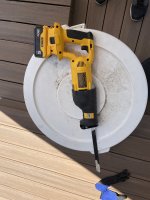
So as I am getting ready to install Azek pvc trim I need to fix the siding to our new steps I changed from 3 steps to 2. Since I gave the hardie plank trimming tool to my brother in law I thought I could use my dewalt 4.5 inch hand grinder with a diamond blade on it. I clipped on a piece of thin galvanized steel behind the piece I was cutting to keep from cutting the piece under it and it worked pretty well. I need to prep the other side and pick up a few new pieces of siding and azek trim too.

My bride’s green thumb has been working pretty well but she was upset that maybe the wild rabbits or squirrels or birds were eating all her strawberries and blueberries. She hung old DVD’s and had these little gift bags left over from one of our kids wedding that has saved her berries and looks like it might keep figs from the critters too. IMG_1355.jpegIMG_1354.jpegIMG_1357.jpegIMG_1356.jpegIMG_1358.jpegIMG_1359.jpegIMG_1361.jpegIMG_1360.jpegIMG_1353.jpegIMG_1352.jpeg
 
OP
D

drivesitfar

Well-known member
Joined
Oct 23, 2013
Messages
36,098
Location
Pacific Northwest
It was over 90 today so didn’t work too long outside even though we don’t have AC it was still about 20 degrees cooler inside our house.

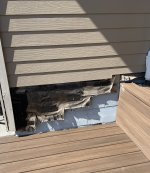
Taking this little section of siding off to fill in my brides wall on her new garden work area was a piti cause I couldn’t cut thru the little 3/4 inch screws to remove the top piece I needed to take out.

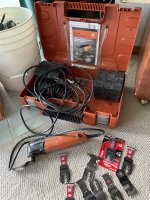
I tried the crappy Milwaukee long sawsall blade that only seemed to scratch the screws. Then I used my diamond blade on my dewalt 4.5 inch grinder to cut off the bottom 4 inches of the 6 inch piece so I could try cutting screws with my fien and new carbide blade which also didn’t work.

Finally managed to break off 2 inch piece of siding off screws to get hardie plank removed and I’ll see if I can cut screws with something else now that I can almost see them. Or I’ll just notch new piece to go around screws and brad nail this top piece or somehow screw it in place. I need to put some 1/4 wood backing on concrete block first and we’ll see how it goes.

I found a few pics of some more tool holders that I might build or maybe you will and post about it. IMG_1362.jpegIMG_1363.jpegIMG_1364.jpegIMG_1366.jpegIMG_1367.jpegIMG_1373.png
 

Denwood

Well-known member
Joined
Sep 22, 2014
Messages
4,236
Location
Thunder Bay, Ontario, Canada
Another day and some more progress. I won’t be doing this for a living that is for certain but the steps are coming along nicely. I cut and installed the corner pieces (we are calling it a waterfall) and finished cutting and installing one side of a step.

Hopefully I’ll have both steps installed tomorrow.

Have a grand day everyone!!IMG_1262.jpegIMG_1261.jpegIMG_1260.jpeg
This is looking amazing Drives...nice work!!
 

Denwood

Well-known member
Joined
Sep 22, 2014
Messages
4,236
Location
Thunder Bay, Ontario, Canada
It was over 90 today so didn’t work too long outside even though we don’t have AC it was still about 20 degrees cooler inside our house.

Taking this little section of siding off to fill in my brides wall on her new garden work area was a piti cause I couldn’t cut thru the little 3/4 inch screws to remove the top piece I needed to take out.

I tried the crappy Milwaukee long sawsall blade that only seemed to scratch the screws. Then I used my diamond blade on my dewalt 4.5 inch grinder to cut off the bottom 4 inches of the 6 inch piece so I could try cutting screws with my fien and new carbide blade which also didn’t work.

Finally managed to break off 2 inch piece of siding off screws to get hardie plank removed and I’ll see if I can cut screws with something else now that I can almost see them. Or I’ll just notch new piece to go around screws and brad nail this top piece or somehow screw it in place. I need to put some 1/4 wood backing on concrete block first and we’ll see how it goes.

I found a few pics of some more tool holders that I might build or maybe you will and post about it. IMG_1362.jpegIMG_1363.jpegIMG_1364.jpegIMG_1366.jpegIMG_1367.jpegIMG_1373.png
This type of thing is a good application for an oscillating multi-tool. With diamond blades, (for masonery), metal and wood blades, they are quite good for reno/trim applications like this. Also nice to sneak under siding to cut nails....

Also maybe the loudest tool ever created in operation...ha.

1784725896802.png
 
OP
D

drivesitfar

Well-known member
Joined
Oct 23, 2013
Messages
36,098
Location
Pacific Northwest
Woody: thanks as always for checking in on my doings and for posting a few good words too.

Maybe I didn’t explain myself correctly but I already own 2 Fein Multy tools and maybe a 18v Ryobi too. The issue is finding a great metal and especially screw cutting blade. Diablo seems to make decent ones for nails and wood but I can burn thru blades quickly trying to cut a few screws.

Anybody have suggestions please post them here and I’ll buy a few and give them a test. I think my diamond blade on my Dewalt 4.5 grinder would work but since screws are behind siding I’m not sure of kickbacks if I can’t see screw.

It’s hot here (96) today so watered lawn and light duty stuff for this old guy cause it will be under 80 tomorrow.

Enjoy your day IMG_1378.jpegIMG_1379.jpeg
 

Prospecter

Well-known member
Joined
May 16, 2015
Messages
2,483
Location
Maine
Removing fasteners from under siding is always nasty work. No suggestions, but following along with interest.

96! :cool: Anything over 80 slows me down!
 
OP
D

drivesitfar

Well-known member
Joined
Oct 23, 2013
Messages
36,098
Location
Pacific Northwest
P: I agree 100%. Another option I thought of since these screws are only 3/4 inch long is to take a pliers and hand unscrew the 4 or 5 screws.

When it’s this hot it’s a great idea to go for a drive with AC and do a little shopping. We are eating some awesome peaches at the minute.
 

Prospecter

Well-known member
Joined
May 16, 2015
Messages
2,483
Location
Maine
If you don't need to save the siding, maybe you could use a hole saw to cut around the fasteners, remove the siding, and then attach the screws? Just spitballing.
 
OP
D

drivesitfar

Well-known member
Joined
Oct 23, 2013
Messages
36,098
Location
Pacific Northwest
Thanks for the suggestion but I’m trying to save the piece that is above the 4-5 screws and slide a new longer piece of siding under it.
Then either screw and paint screw heads that would be showing or exposed or maybe do a bunch of brad nails at the upper edge.
Maybe If I can’t find a safe way to cut the screws I’ll notch the siding and pin nail that piece.
 
Last edited:
OP
D

drivesitfar

Well-known member
Joined
Oct 23, 2013
Messages
36,098
Location
Pacific Northwest
P: hopefully I’ll figure out something that will look ok.

One thing I’ve always loved about our weather here is that you never can wake up and say oh another sunny day. Yesterday it was actually approaching evening with temps around 90 and clouds appeared and it started pouring rain. Felt like we were in Hawaii or tropics. Anyway our mini heat wave is over and back to mid 70’s which is ideal for us.


IMG_1383.pngIMG_1380.jpegIMG_1381.jpeg
 
To avoid these ads, REGISTER NOW!
Top Bottom