To avoid these ads, REGISTER NOW!

rattle_snake's random shop projects v0.1

PhantomEB

Well-known member
Joined
Feb 6, 2006
Messages
6,889
Location
Medicine Hat, AB, Canuckistan
Dude….I need to win the small 2M lotto up here just to be on your level. All I can do is pay bills until the shutdown at the plant hits…..I am one of those guys let it go the full 7 weeks. I can even go 9 or longer dependent on if I sent to Vancouver for a delegate meeting.
 
To avoid these ads, REGISTER NOW!
OP
R

rattle_snake

Well-known member
Joined
Jun 25, 2015
Messages
5,270
Location
Chandler, AZ
Looking forward to seeing the next stage of the truck build Justin. :3gears:
I think it is called 'in pieces'.

Trying to decide where to stop on the front end. Would like to make nice looking inner fenders and a custom core support. Incurs a lot of other small changes. Radiator, battery mount, wiring, hood hinges, etc. Probably bad timing. Should section the fenders with it assembled.

Waffled on how to start off phase 2 of the build. Decided to skip the lift and working underside. Instead leave the truck on the ground and start with removing the front clip. Had to cut up the radiator support to get the AC condenser out with lines intact.
yPPHJqpAnvRjcqY-Tusw=w1214-h911-s-no-gm?authuser=1.jpg

The engine doesn't have to come out, it is a lot of work to do so, but might be easier with it gone. But before it comes out have to measure where it sits, or make some type of temporary support to hold it in place when the cross member is cut out.
zLg2KAlQ584UQZpIzf6g=w1214-h911-s-no-gm?authuser=1.jpg
 
OP
R

rattle_snake

Well-known member
Joined
Jun 25, 2015
Messages
5,270
Location
Chandler, AZ
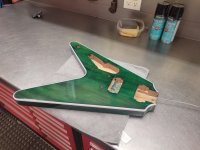
Tried to save the translucent finish on the guitar project. I mixed the die to strong and it left marks, but even beside that the color was dark and dull. No life. Tried sanding the color off, but it seemed to burn and get worse. Tried wiping it off with solvent, and that worked well except where I had tried to sand. Sanded through some of the sealer. Banged up the neck reworking it 3 times. So not going to be perfect. Put some more sealer on the sand thru areas and decided to try a different color.

Not sure what the wood is exactly, but it has a red hue to it. I realize I'm not going to get a pure blue color from it. The opposite direction is to add yellow (to green instead of purple), so I dumped some unmeasured amount into the leftover blue/black I had already. Die went to full green. Decided to go for it, put a green coat on front and back. Wow, now it pops. The front sealer was partially sanded through all over, and took the die differently. Put a coat of clear over the die on the front. Needed more color to hide the prior mistakes, so used the straight blue. Better, did another clear on the front only. Then finally a 2nd straight blue. This yielded a dark green, looks to me like an apple Jolly Rancher candy. So sour apple it is, but at least it has depth and a soul. The hardware is gold, and this dark green should go well with it. Bought some gloss polycrylic spray and put down a heavy topcoat. Sanded, another layer, then removed the binding mask and put one final coat of clear on the whole thing.
8W0bDeMhTTU7-QZhYx7A=w1214-h911-s-no-gm?authuser=1.jpg

In the sun you can see the blue topcoats over a green at the bottom. Next step is glue the neck on.
 
OP
R

rattle_snake

Well-known member
Joined
Jun 25, 2015
Messages
5,270
Location
Chandler, AZ
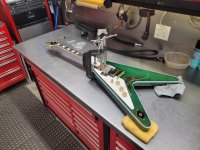
Didn't learn from the last build to be patient with the process. I did manage to let the finish sit for 2 days before rushing final assembly. Maybe the neck should have been glued in first, I don't know, but clamping soft acrylic isn't the best idea. I used some sheets of Teflon to protect the finish from the C-clamps. And while the glue was drying, final assembly as that is the most fun part.
yRZwSurXqcXqHmL5ra6w=w1214-h911-s-no-gm?authuser=1.jpg

Finish on the back isn't perfect, can still see some of the initial problems.
yg6b7xrD0-ovjk2mFpmg=w1214-h911-s-no-gm?authuser=1.jpg

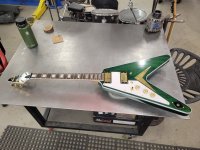
Headstock is just black spray paint in between water based acrylic.
Wz7z-bdci5gr6OzTZn15Q=w683-h911-s-no-gm?authuser=1.jpg

Figured I should wait a day for the glue to fully cure before putting the strings on and tensioning the neck
YlKuA1n0q4KI5WHVGwm5g=w683-h911-s-no-gm?authuser=1.jpg

The water based polycrylic spray cans are mixed thick, and will not lay flat. Lots of orange peel. At least at 80* and minimal humidity. No amount of sanding will fix the next coat. Dries to touch in 15-20 min. Would have to thin manually and use HPLV gun to get it better.
4eFJefEht-xQnS9MUemg=w1214-h911-s-no-gm?authuser=1.jpg

Next step is to string it, and do a basic setup of bridge and action. Then start to tune and tweak things into a finished product.
 
OP
R

rattle_snake

Well-known member
Joined
Jun 25, 2015
Messages
5,270
Location
Chandler, AZ
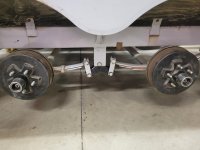
Kids are asking to go water skiing so time to get the boat out. Been many years since I have inspected the trailer, last job was replace everything. Axles, brakes, hubs, bearings, seals all new. So add one more project to the queue.
I try to do preventative maintenance instead of roadside repair. At least it fits in the lift bay to avoid working outside in the brutal heat.
WNTAcCnz2jZnzDgjx-EA=w1214-h911-s-no-gm?authuser=1.jpg

One of the four wheels had a leaking rear seal, so going to do all the seals. The grease was grey instead of blue, so it got hot or water in it. The tires still look OK. Gave them a spin slightly off the ground to check for out-of-round, and a thorough visual inspection. Oldest tire is from 2017 so they are pretty much at my age limit.
oCXvdyOHfhaORvDCgvuEw=w683-h911-s-no-gm?authuser=1.jpg
 

ntsqd

Well-known member
Joined
Jan 22, 2005
Messages
1,019
Location
Lower left coast
Thoughts on "Bearing Buddies"? One of my trailers came to me with them installed. The only deep water that trailer should ever see is stream crossings. I've read that they can push the seal out completely.
 
OP
R

rattle_snake

Well-known member
Joined
Jun 25, 2015
Messages
5,270
Location
Chandler, AZ
The trailer came with bearing buddies, but I wouldn't buy them. I use them more like a regular cap.
If you pump them up enough to compress the spring, it will push the grease out the rear seal, into the brakes.

So I try to run them at the zero/lowest pressure without air pockets. I fill the hub cavity with grease and do my best to get most of the air out. Fill the bearing buddy with grease. Then install the cap. The diagram should be bottomed out. Add grease Just enough to move the diaphragm off the stop a tiny bit. Drive cycle, check again.
 
OP
R

rattle_snake

Well-known member
Joined
Jun 25, 2015
Messages
5,270
Location
Chandler, AZ
I had added a rubber 'bumper pad' under the forward axle shackle to mitigate the loud BANG! every time the brakes are applied. It fell off. Maybe there is a better solution.

The problem is that the equalizer pivot between the shackles get a torque applied when the trailer brakes engage. Then it slams the forward axle's rear spring eye up into the frame, hard. Adding brakes to the forward axle made it worse, force from both springs combined. The frame is being damaged.

How necessary is the equalizer pivot in a dual axle config?

Another option is to lower the equalizer by extending the mount, such that when full pivoted the spring can't contact the frame. The shackle would contact the mount in a parallel fashion. The tires have very little clearance to the fenders as is, so a slight height addition is OK.

Or another way to limit the equalizer travel?

1785274638570.png
 
Last edited:

WoodsTruck

Well-known member
Joined
Jan 12, 2013
Messages
1,032
I'm shopping for an equalizer linkage setup for my work trailer right now. You should be able to buy a taller equalizer to push the spring mounts a bit lower, or use shorter links.
The equalizer, at least the way I see it, keeps the weight split onto both axles when a wheel rides up over a bump instead of the "high" tire/axle taking all the weight until it settles back down. Also helps with a high or low tongue mount so all weight is shared on both axles.
My trailer has thousands of miles on logging roads and is egging out the holes so the links pound on the frame. Time for some new parts.
 
To avoid these ads, REGISTER NOW!

WoodsTruck

Well-known member
Joined
Jan 12, 2013
Messages
1,032
I was surfing around needatrailerpart.com for the equalizer parts. Decent supply for different dimensions of parts. Some kits, some individual pieces.
 

M.Brane

ALLIANCE MEMBER
Joined
Feb 11, 2024
Messages
1,867
Location
1 hr N/W of LA LA Land
Didn't learn from the last build to be patient with the process. I did manage to let the finish sit for 2 days before rushing final assembly. Maybe the neck should have been glued in first, I don't know, but clamping soft acrylic isn't the best idea. I used some sheets of Teflon to protect the finish from the C-clamps. And while the glue was drying, final assembly as that is the most fun part.
yRZwSurXqcXqHmL5ra6w=w1214-h911-s-no-gm?authuser=1.jpg

Finish on the back isn't perfect, can still see some of the initial problems.
yg6b7xrD0-ovjk2mFpmg=w1214-h911-s-no-gm?authuser=1.jpg

Headstock is just black spray paint in between water based acrylic.
Wz7z-bdci5gr6OzTZn15Q=w683-h911-s-no-gm?authuser=1.jpg

Figured I should wait a day for the glue to fully cure before putting the strings on and tensioning the neck
YlKuA1n0q4KI5WHVGwm5g=w683-h911-s-no-gm?authuser=1.jpg

The water based polycrylic spray cans are mixed thick, and will not lay flat. Lots of orange peel. At least at 80* and minimal humidity. No amount of sanding will fix the next coat. Dries to touch in 15-20 min. Would have to thin manually and use HPLV gun to get it better.
4eFJefEht-xQnS9MUemg=w1214-h911-s-no-gm?authuser=1.jpg

Next step is to string it, and do a basic setup of bridge and action. Then start to tune and tweak things into a finished product.
I see you did the gold hardware thing. Not usually a fan of that, but it looks good here!

Hopefully it plays nice.
 
OP
R

rattle_snake

Well-known member
Joined
Jun 25, 2015
Messages
5,270
Location
Chandler, AZ
I see you did the gold hardware thing. Not usually a fan of that, but it looks good here!

Hopefully it plays nice.
The left handed no-name V kit I bought was only available with gold hardware. Wouldn't have chosen that but lefty stuff is limited. My engineering brain tends to pick plain and repetitive things. Green and gold is not one of them.

I got the guitar strung, basic tune, but forgot to ground the bridge. :confused:

Had a lot of noise and feedback. The pickguard is the access to the electronics, however it was half under the bridge. So had to remove the bridge and modify the pickguard to be removable on it's own. The pickguard also limited how low the bridge could be set, and I was at that limit. So it needed to be done anyhow.

There was a pre-drilled hole for a wire into one of the bridge posts. Posts aren't coming out without likely damage so I did a hack and made a spring loaded contact pin to contact the bridge post. Seems to work OK as far as conductivity.

Retuned but still have noise issues and lots of feedback. If I turn the tone knob to cut out the high frequencies the issues mostly go away. This is with very high gain settings, however the other three 6-strings play just fine (all are passive).

The bridge is grounded and when strings touched the noise is attenuated as expected. I double checked to polarity of the output jack. The pickups are humbuckers already. Not sure where to go from here, moved on to the next project and will have to circle back to resolve.

The V shape is not as comfortable to play sittings down, but it looks so damn cool....
 
Last edited:
OP
R

rattle_snake

Well-known member
Joined
Jun 25, 2015
Messages
5,270
Location
Chandler, AZ
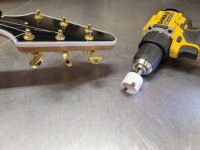
Stringing a guitar is a fun job. Watched some pieces of some videos for some guidance, and there are little handled cranks for the tune pegs as they have to be turned a lot of rotations. Decided to make a powered version with a drill and a PVC fitting. Works great, especially the 2nd time I had to tension all the strings.
YrFYxX5rUIYfRYc32Ssw=w1214-h911-s-no-gm?authuser=1.jpg
 
OP
R

rattle_snake

Well-known member
Joined
Jun 25, 2015
Messages
5,270
Location
Chandler, AZ
Boat trailer axle seals arrived and I was able to re-grease and install all of them. Messy job, grease gun ran out on last pump. All the brakes look good so ready for service.

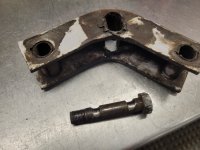
Pondered what to do exactly with the equalizer pivot and mount. Decided to take one side off and inspect as step #1.
PTg2uo4RaHePs_S0K9mg=w1214-h911-s-no-gm?authuser=1.jpg

Ok some slight wear. Perhaps explains the noises. Egged out hole allows the shackle to sit higher.
So the sleeve failed and put all the load on the material edge to saw through the bolt. Fantastic.

I see that I can buy equalizers for cheap, under $40. Cast with plastic bushing. Looks like garbage that won't last. The other option are $300 gimmicks. Bumpers, cushions and such sold to old people who don't know any better. The RV parts world is all about taking advantage of elderly with money. But nothing in the middle. Just want a quality part with robust bushings. Don't exist.

Trying to get out to the lake this weekend, so time is a factor. The springs and equalizer are 1.75" wide so making something new is more difficult than a standard size like 2" sq tube. So try to reuse the existing piece. Poly bushed sleeves would be ideal, but not in time and would be $150+ for six of them. I found some 9/16 x 1" DOM I had on hand. Fits bolts perfectly, and should work OK if they stay lubed.

I press out the thin sleeves and bushing and hogged the holes out to 1". Pressed in the new DOM sleeves. Going to weld them in and drill for a grease zerk.
uWVywgM1LqG5UPdF6RMA=w1214-h911-s-no-gm?authuser=1.jpg

For the center pin, I am hesitant to raise it up too high. I could just weld the bushing on top and be done. However this changes the dynamics of the system. In general things like this like to be stable, in tension. The shackles are in tension, and self align with gravity. The equalizer is not, it is under compression and will flip/flop one way or the other unless balanced by something else. So ideally the equalizer should be upside down, with center pin at the bottom not the top.

It is possible for a dual axle equalizer to go past center and flip one shackle, because the system is not inherently stable. You can buy an equalizer flip kit that spaces down the center pin mount and puts pivot in tension. But the packaging ***** and it hangs down low, more expensive. Mount is long and un-supported. But it solves those issues.

The angle of the shackle on a leaf spring effects the spring rate. The shackle will either push or pull on the spring length wise which makes it deflect. The equalizer is similar, if it was flat it would have no effect on the system. The taller it is under compression, to more unstable it becomes, and moves both shackle pins fore and aft in relation to the mount. Elongating one leaf and shortening the other, effectively lower spring rate of one and increasing the other.

So plan is to put the center pin slightly higher but not significantly. Weld up the old holes. Put it back together.
 
Last edited:
OP
R

rattle_snake

Well-known member
Joined
Jun 25, 2015
Messages
5,270
Location
Chandler, AZ
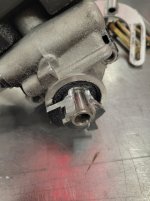
Spent some time trying to remove the pulley from the power steering pump on the F100. I bought a new pump, with a new reservoir and pulley, AN fittings and so on. The cast pulley material is complete **** and broke immediately as you have to move the pulley to tighten the output fitting. Or remove the reservoir completely. I was able to find an older pulley of same brand, that is made of decent metal. But first to remove the old. Had to slow cut away a 1/4 of the hub and then try to pry it off. Ended up smashing the bearing dust seal a bit. Probably OK will see what happens. I would guess the front bearing is the last piece to come out of the housing.
I30Gygj1FOY4C_M1wk8-A=w683-h911-s-no-gm?authuser=1.jpg
 

M.Brane

ALLIANCE MEMBER
Joined
Feb 11, 2024
Messages
1,867
Location
1 hr N/W of LA LA Land
The left handed no-name V kit I bought was only available with gold hardware. Wouldn't have chosen that but lefty stuff is limited. My engineering brain tends to pick plain and repetitive things. Green and gold is not one of them.

I got the guitar strung, basic tune, but forgot to ground the bridge. :confused:

Had a lot of noise and feedback. The pickguard is the access to the electronics, however it was half under the bridge. So had to remove the bridge and modify the pickguard to be removable on it's own. The pickguard also limited how low the bridge could be set, and I was at that limit. So it needed to be done anyhow.

There was a pre-drilled hole for a wire into one of the bridge posts. Posts aren't coming out without likely damage so I did a hack and made a spring loaded contact pin to contact the bridge post. Seems to work OK as far as conductivity.

Retuned but still have noise issues and lots of feedback. If I turn the tone knob to cut out the high frequencies the issues mostly go away. This is with very high gain settings, however the other three 6-strings play just fine (all are passive).

The bridge is grounded and when strings touched the noise is attenuated as expected. I double checked to polarity of the output jack. The pickups are humbuckers already. Not sure where to go from here, moved on to the next project and will have to circle back to resolve.

The V shape is not as comfortable to play sittings down, but it looks so damn cool....
The white Gibson V in the above pic has EMG 89s. It was my main guitar for a couple decades. Very versatile pickups, and zero noise. Just gotta change out the battery when they start coughing. I actually broke the neck off it once, and discovered it had an air bubble in the joint. Played/sounded better after I re-glued it.
 
OP
R

rattle_snake

Well-known member
Joined
Jun 25, 2015
Messages
5,270
Location
Chandler, AZ
89 is an interesting setup. Didn't realize there is a whole world for modifying electric guitars. It has been fun to learn about all the different aspects of the hobby. Easy to spend a lot of money.....
What do you think of the solderless/connector based electronics? That type of 0.100 header/connector is very common in electronics. There is also a compatible version in a locking style.

Didn't have any time to debug the guitar noise issue. Not sure it is the pickups, the issue is the same if I use one or the other, so it appears to be downstream of the selection switch. But that is just the tone knob and jack. I designed a preamp for a guitar that I could build, but first understand the issue.
 
OP
R

rattle_snake

Well-known member
Joined
Jun 25, 2015
Messages
5,270
Location
Chandler, AZ
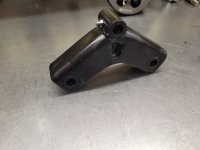
Finished out the trailer equalizer repair/improvements. Moved the center pin up about an inch.
For Mk I I used a piece of material to fill the holes.
sNGJvj4NKjSj6D_ddlEQ=w1214-h911-s-no-gm?authuser=1.jpg

I did not fully weld the sleeves, but the heat still distorted them such that the bolts no longer fit well. After drilling and tapping for a grease zerk I ran a 9/16 drill through them for a proper clearance.
XVIcJfvigPXsaE8uKXLPQ=w683-h911-s-no-gm?authuser=1.jpg

The reason the shackles were hitting the frame was due to the equalizer center hole being egged out, and everything sitting lower. With that resolved shouldn't make noise or contact.
Ti7enbj20SG4jgKba-Iw=w1214-h911-s-no-gm?authuser=1.jpg

The spare tire is dated 2011, so it is time to replace it even though it 'looks ok'.
 

Attachments

  • XVIcJfvigPXsaE8uKXLPQ=w683-h911-s-no-gm?authuser=1.jpg
    XVIcJfvigPXsaE8uKXLPQ=w683-h911-s-no-gm?authuser=1.jpg
    88.9 KB · Views: 3
  • Ti7enbj20SG4jgKba-Iw=w1214-h911-s-no-gm?authuser=1.jpg
    Ti7enbj20SG4jgKba-Iw=w1214-h911-s-no-gm?authuser=1.jpg
    165.9 KB · Views: 3

M.Brane

ALLIANCE MEMBER
Joined
Feb 11, 2024
Messages
1,867
Location
1 hr N/W of LA LA Land
89 is an interesting setup. Didn't realize there is a whole world for modifying electric guitars. It has been fun to learn about all the different aspects of the hobby. Easy to spend a lot of money.....
What do you think of the solderless/connector based electronics? That type of 0.100 header/connector is very common in electronics. There is also a compatible version in a locking style.

Didn't have any time to debug the guitar noise issue. Not sure it is the pickups, the issue is the same if I use one or the other, so it appears to be downstream of the selection switch. But that is just the tone knob and jack. I designed a preamp for a guitar that I could build, but first understand the issue.
I rebuilt that V back in the early '90s before the solderless stuff was introduced. Don't see any complaints about them. If I ever do another with EMGs I'll go that route. Makes swaps so much easier.
 
To avoid these ads, REGISTER NOW!
Top Bottom