
You are using an out of date browser. It may not display this or other websites correctly.
You should upgrade or use an alternative browser.
You should upgrade or use an alternative browser.
Between 705 & 1200 SQ/FT The Texas Barn in PA
- Thread starter madison069
- Start date
Workspaces between 705 and 1200 squarefeet.
bakmopar
Well-known member
The shed looks awesome. And it is great that you had a helper.
So, do you call the shed, a Texas Mini Barn?
So, do you call the shed, a Texas Mini Barn?
OP
madison069
Well-known member
For some reason PA Barn comes to mind every once in awhile when I look at it.The shed looks awesome. And it is great that you had a helper.
So, do you call the shed, a Texas Mini Barn?


OP
madison069
Well-known member
Nice dress up on that shed! That really transformed that thing!
Big improvement on the shed and it looks great matching the barn.
Thanks guys! I know it’s been garnering some attention in the neighborhood. One down side to having no privacy in the back yard is everyone sees what I’m doing. Some folks didn’t notice the shed til I started the work.Shed looks 100% better!

Last edited:
Gordonjuan
Member
Well, PA has a lot of Bank Barns...and there's a bank/hill next to it, so I think you're good!For some reason PA Barn comes to mind every once in awhile when I look at it.

OP
madison069
Well-known member
Talk about a time consuming side that front was!
But it’s done, just the upper pieces for the side of the shed is left.


But it’s done, just the upper pieces for the side of the shed is left.
You would think I had the sense to think of that at the time, but unfortunately other than the breaker that’s the only switch in the garage for it. I usually leave the light on in the bunker to remind myself to switch the air off at night, so I flip the switch on the compressor for now. I was hoping to do something smart so I wouldn’t have to run wires. You have a suggestion from the smart home auto system world? Just something simple without a subscription?
This was my solution for a wireless relay to turn power to the compressor on/off
The app is free and seems to work well but I don't use it, just put the button on the wall next to the door into the house.
Small enough it fits into a junction box... Going on a year and no issues so far! Need to finish the execution and at least put a larger LED light on so it's easier to know if the outlet is hot or not ... Haven't got there yet

OP
madison069
Well-known member
I just ordered the stuff to make up what you got there! When I upgrade to a 240V I might can put this to another 120V equipment so it can be used still.This was my solution for a wireless relay to turn power to the compressor on/off
The app is free and seems to work well but I don't use it, just put the button on the wall next to the door into the house.
Small enough it fits into a junction box... Going on a year and no issues so far! Need to finish the execution and at least put a larger LED light on so it's easier to know if the outlet is hot or not ... Haven't got there yet
zmotorsports
ALLIANCE MEMBER
The shed turned out great Cody. Nice refresh. 
OP
madison069
Well-known member
Thanks!The shed turned out great Cody. Nice refresh.
Now it’s time to build the doors. It’s nothing wild, will just be painted plywood and 2x4. Will closely match the old doors design but will be sealed with caulk and painted to hopefully repel water better.
jon72vega
Well-known member
The shed looks good!
cccoltsicehockey
Well-known member
Awesome. I was trying to see if I could find a non smart version for him when I mentioned it but never stumbled on this. Glad someone else already had found one.This was my solution for a wireless relay to turn power to the compressor on/off
The app is free and seems to work well but I don't use it, just put the button on the wall next to the door into the house.
Small enough it fits into a junction box... Going on a year and no issues so far! Need to finish the execution and at least put a larger LED light on so it's easier to know if the outlet is hot or not ... Haven't got there yet
OP
madison069
Well-known member
Still needs a little tweaking but the doors are built now.
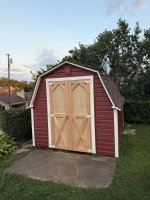
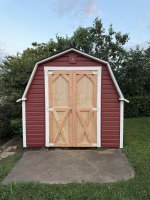
Once I finish the tweaking, I’ll take them down to caulk and paint.
Once I finish the tweaking, I’ll take them down to caulk and paint.
M.Brane
ALLIANCE MEMBER
That almost makes me ashamed of my shed, but then I didn't build it.
SilverJimmy
Well-known member
I wasn’t going to say it but “tweeking” means a whole lot different out here in the West!
OP
madison069
Well-known member
Oh it can mean the same thing here, so maybe modifications or adjustments would have been the better words. But I know it wasn’t twerking!
cccoltsicehockey
Well-known member
One heck of a transformation there. Nice work.
txvwnut
Well-known member
That comes after you've finished the project.But I know it wasn’t twerking!
Doors are gonna look nice.
OP
madison069
Well-known member
One heck of a transformation there. Nice work.
That comes after you've finished the project.
Doors are gonna look nice.
Thanks guys! It’s been a project I’ve wanted to do since I started the siding of the Texas barn. Using up most of the siding small pieces is making it easier to store the left over pieces in the bunker now. Soon the side along the wall by the camaro will be cleared of all of the siding stuff.
OP
madison069
Well-known member
Got a few things done during lunch time.
One item was to plane the inside door area so they close without hitting one another. If you’re a planer purist who cringes when someone might use a planer incorrectly, look away.
I brought out the 9” planer I have and shaved the door jamb down so I got a 1/8” gap between the doors now. It’s twerking now!
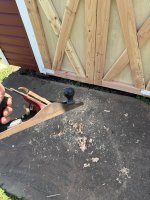
I also installed the door latch and drilled their holes.

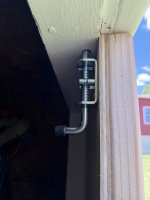
I installed the gooseneck solar light above the door. I’m debating to paint it white but black does look good here.
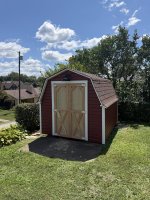
Then I did the caulk job to fill in the gaps. The 2x4 is glued to the plywood along with screws all along the back of the door is holding the 2x4 to the plywood. So I wanted to reduce the amount of water that can get in between the two woods. I see I missed a spot so I’ll get it before I paint it.

Maybe I can get the wife to paint the doors?
Oh well it will have to wait til tonight.
One item was to plane the inside door area so they close without hitting one another. If you’re a planer purist who cringes when someone might use a planer incorrectly, look away.
I brought out the 9” planer I have and shaved the door jamb down so I got a 1/8” gap between the doors now. It’s twerking now!
I also installed the door latch and drilled their holes.
I installed the gooseneck solar light above the door. I’m debating to paint it white but black does look good here.
Then I did the caulk job to fill in the gaps. The 2x4 is glued to the plywood along with screws all along the back of the door is holding the 2x4 to the plywood. So I wanted to reduce the amount of water that can get in between the two woods. I see I missed a spot so I’ll get it before I paint it.
Maybe I can get the wife to paint the doors?
Oh well it will have to wait til tonight.
OP
madison069
Well-known member
They got the first coat on while I was busy with other stuff. Will put a second coat on this weekend.
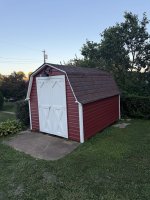
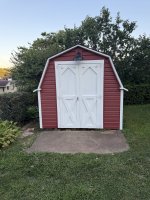
And my little goose neck solar lamp above the door adds a nice ambiance at night.
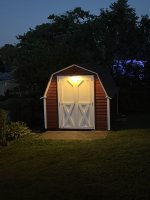
So add the little strip on the side, second coat of paint on the doors, and put the vent in the rear.
Then it’s remove everything inside and clean it for painting.
And my little goose neck solar lamp above the door adds a nice ambiance at night.
So add the little strip on the side, second coat of paint on the doors, and put the vent in the rear.
Then it’s remove everything inside and clean it for painting.
cccoltsicehockey
Well-known member
Well done on the transformation. Should last you many years.
If you make the light white, it will get dirtier faster. I think it looks good in black personally.
If you make the light white, it will get dirtier faster. I think it looks good in black personally.
OP
madison069
Well-known member
A buddy of mine said the Birds will make it white for me soon enough.Well done on the transformation. Should last you many years.
If you make the light white, it will get dirtier faster. I think it looks good in black personally.
bakmopar
Well-known member
It looks great. You do nice work.
OP
madison069
Well-known member
Well, I got the inside cleaned out and took out all of the junky shelves.
Junky shelves.

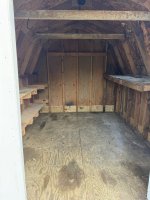

Without the shelves,

After spraying the walls three coats of latex paint it wasn’t covering the walls very well. That wood was soaking up the paint. It would look good as I was spraying it but then I look back at the area and it would be soaked dry and almost looked unpainted.
The floor I rolled the paint on. If I paint the walls again I’ll either just bust out a big brush or try a different sprayer.
But the walls will just have to be what it is.

With the rain coming tomorrow I need to let this dry and get the stuff back into the shed tonight.
Not proud of the inside but atleast it’s ok.
Junky shelves.
Without the shelves,
After spraying the walls three coats of latex paint it wasn’t covering the walls very well. That wood was soaking up the paint. It would look good as I was spraying it but then I look back at the area and it would be soaked dry and almost looked unpainted.
The floor I rolled the paint on. If I paint the walls again I’ll either just bust out a big brush or try a different sprayer.
But the walls will just have to be what it is.
With the rain coming tomorrow I need to let this dry and get the stuff back into the shed tonight.
Not proud of the inside but atleast it’s ok.
SilverJimmy
Well-known member
You had a really great start on a fine Chicken-Coop-DeVille, but you took down all the roosts and nesting spots! Poor birds, now they’ll be homeless living under a bridge or maybe in your bunker!!!
OP
madison069
Well-known member
Good they leaving before I cooked them for dinner.You had a really great start on a fine Chicken-Coop-DeVille, but you took down all the roosts and nesting spots! Poor birds, now they’ll be homeless living under a bridge or maybe in your bunker!!!