To avoid these ads, REGISTER NOW!

Between 485 & 705 SQ/FT Mid-Century Moto Mecca Makeover

Workspaces between 485 and 705 squarefeet.
To avoid these ads, REGISTER NOW!

Grant Gunderson

Well-known member
Joined
May 17, 2013
Messages
2,343
Location
Bellingham, WA
Gregor, your going to look back some day at the time you spent biking with the kids as some of the best quality time you had with them growing up.

It’s so good that they are taking to it and learning to work on their bikes, soon they are going to be like I want to change this or that to make it better. Once they can start customizing it themselves so it’s really dialed in for how they like it they’re going to take to it even more. It’s a really cool process to watch. I feel a proper fitting bike with good geometry is half the battle in getting kids into it. The other half is getting their friends into it as well so they have the social aspect too. So it’s amazing the racing club has taken off so well for them.

You guys should come ride in Bellingham. Especially once we start to get a little moisture again this fall. You should also put the TuneUp festival on your calendar for next summer. It’s a big enduro on Galbraith with a 3 day concert and everything bikes mixed in, including some amazing dirt jump contests to watch as well as some impressive trials riding.
 
OP
S

sakurama

Well-known member
Joined
Oct 10, 2010
Messages
1,466
Location
Portland - the cool one.
As Ron mentioned, I left out the pizza popup. Partly because it's happening so fast I don't think we're ready. Last summer the kids and I took an opportunity to do a pizza popup in our little downtown of Multnomah Village. We had a handful of good nights but generally we weren't doing much business. They put us in the back of the bar on porch and no one really knew we were there.

But we did have one big night during the towns little festival and the kids earned real money splitting $1000. We had another good night at the MotoCorsa event selling out in just over an hour. We wanted to do it again this summer but it's been busy and we never found or secured a good location. Until this past month.

i-99LptDg-X2.jpg

This is a photo from last year. Lucas is about a foot taller now.

We always wanted to do one at our coffee shop which is just a couple blocks away because they close at 3pm and finally we asked if they'd let us do a takeover and they gave us the month of August on Friday. So this week we're going to do our first one.

But for this one we're spinning the pizza thing off as its own business. The name is LUNA Pizza and my brother suggested it and then did the design work for the logo. It comes from LUcas and NAdia and after all the options was the one we landed on. Here's the Instagram link: https://www.instagram.com/lunapizzapdx/

i-t8C8hNS-X2.jpg

So if you're around this Friday from 5-8pm come by. We're a little nervous about this since both Judiaann, myself and the coffee shop have all put out the word and Judiaann's social reach in the food world is pretty good. No idea how it will go but we're planning to make 60-80 pizzas to start this Friday and will go until we sell out. Our goal is to get to 100 for the night.

So I'll have more as this gets off the ground. Including some shop stuff because we needed more turning peels and regular peels so I've got to make them this week. Oh, plus 30,000 grams of pizza dough. Yikes.

G
 
OP
S

sakurama

Well-known member
Joined
Oct 10, 2010
Messages
1,466
Location
Portland - the cool one.
So the other thing that I've been trying to do this summer is rustle up work because it's been a pretty slow year/summer. In some ways I feel like I'm captaining a sinking ship with my photo career but in another way I'm trying to appreciate the beautiful sunset while the ship slowly sinks deeper and deeper...

Part of what has always been fun for me is to invent or make new tools for creating photos. As cameras get better and phones replace cameras I tend to lean into what AI or an influencer can't do which is create light. Okay, AI is getting better but for the moment I am still more creative and I can create light in ways most people can't.

i-wj2TcX6-X2.jpg

And one of the most fun things is to create new ways to modify light. One of them that we (the royal we which was Gregory Heisler and myself) loved was this very niche modifier from Broncolor called the Satellite. It was a giant parabolic reflector that you'd bounce a head into and it would focus that into a parallel beam that was very strong and, from a distance, indistinguishable from daylight.

i-QPmg9dT-X2.jpg

I owned the smaller version for years but it was never intended for the newer battery powered heads that I use now and so I sold it and instantly regretted it.

i-Q6t8GCp-X2.jpg

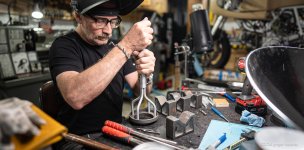
So for the last couple of years where I've been doing more architecture and hotel work I have been scouring ebay for a replacement. They are exceedingly rare and almost never show up and when they do they want crazy money for them. And I'd still have to modify it. So I thought I'd make my own that works exactly like I want.

i-q8pj4Hg-X2.jpg

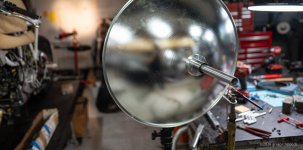
I found the reflector dish on Edmund Scientific so I just needed a way to mount it to my strobe head. The original design mounted the reflector to the stand and the head was mounted to that but the battery heads are too heavy for that.

i-LfR6v3Q-XL.jpg

I'd originally imagined making this adjustable with an Acme thread since I had some in the shop. When I welded the nuts to a tube I got the orientation wrong and they bound as a pair. Another option I'd considered but abandoned was a linear bearing. I'd ordered one from McMaster and decided to go with that instead.

i-rw22f5x-XL.jpg
i-xPk96fR-XL.jpg

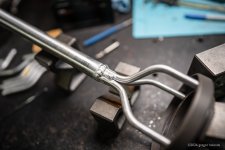
The plan was to weld the struts to that machined center and each other and then weld that to a 1" aluminum tube so that the dish was the part that moved off the head. My dish was much lighter as it didn't have the plastic surround the original used.

i-2wsrzQd-XL.jpg

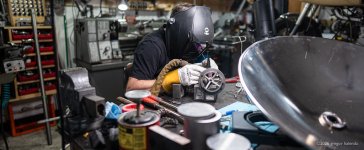
Haven't welded aluminum in a while but Claude helped me dial in some settings. It's the conflict of AI stealing jobs but also being very helpful while doing it.

i-tM2W4jZ-XL.jpg

All parts fabricated...

i-xCmgRhT-XL.jpg
i-kqrxqpX-XL.jpg
i-Djzhdk6-XL.jpg

Not winning any awards for those welds but they're more than serviceable for the job.

i-dhmbTR4-XL.jpg

I originally didn't want to use the linear bearing because I was overthinking it and wanted to design a rack and pinion geared adjustment for the focus. The dish has a sweet spot - its focus point - but there's still a little room to adjust the beam pattern and spread by moving the dish to bulb relationship.

i-kmVG3jj-XL.jpg

But thankfully the inherent friction of the linear bearing is more than enough to hold the dish in position and while it would be nice to make some kind of geared adjustment it's easy enough to push or pull the dish to focus it.

i-LBhscjX-XL.jpg

"Version 1" is designed to be used with both strobes and LED lights since I'm doing more video now. I've had a couple of jobs since completing this but they haven't needed this particular solution so I still haven't gotten to use it yet for an actual job but in testing it's doing just what I want...

i-N4n3Qz9-X2.jpg

You can certainly do more with light in here but there's no drama to this shot. No singular focus or thing to draw you in.

i-NkKfXmF-X2.jpg

The same shot with a slightly darker exposure and a single strobe with my new reflector placed out in the middle of the back yard. Having a strong shaft of "daylight" that is streaming in the windows adds a sense of time and space. Time in that your mind knows by the angle of the sun that this shot is either morning or late afternoon. Depth in that there are deeper shadows and strong single light source that dominates the shot. Together they create an image that feels warmer and inviting.

So while the ship is sinking I'm designing fancy new oars, hoping to stay afloat by perfecting my paddling technique and enjoying the opportunity to invent and fabricate my own solutions to problems that won't exist in some near off future. The other benefit is that while you're actually working on something physical you are thinking and imaging other solutions along the way. That process is very satisfying and only happens while you're interacting with reality. Something AI can't quite do... yet.

Gregor
 
OP
S

sakurama

Well-known member
Joined
Oct 10, 2010
Messages
1,466
Location
Portland - the cool one.
The other half is getting their friends into it as well so they have the social aspect too. So it’s amazing the racing club has taken off so well for them.

Nice!
You say, picking up and returning kids?! Are the parents not responsible for that? They should be grateful that someone teaches them something and entertains them.
Thom

Yes, parents normally do the pick up and drop off but Nadia's friends' parents were all busy and the commitment was difficult so I volunteered to make it easy as possible for her friends to join. Now that they are more invested and their parents are seeing them really enjoy it I'm not having to transport all of them all the time so that's helpful.

So yes, as Grant says, getting their friends involved really makes it more fun for them and then they all make friends with other kids on the team and now there's this whole new friend group that revolves around practice and racing.

Props for coaching. I am an L3 NICA coach so I get the time commitment.

It’s also one of the most rewarding experiences I have had. And my kids are just getting to be old enough.

Thanks. It's a LOT of training and time but I really do love it. I would like to move to L3 but I'm afraid the coach will give me even more responsibilities so I'm going to hold for now at L2 and maybe do L3 for next season.

G
 
OP
S

sakurama

Well-known member
Joined
Oct 10, 2010
Messages
1,466
Location
Portland - the cool one.
We've used two for everything so far but if we get as busy as we anticipate we're going to need a third and Ben has offered up his for Friday. I'm still not completely happy with the Roccbox for what we're trying to do but we have it pretty dialed in so it's too late to reinvent things for this month. If we work a deal that lets us keep this going in some way we'll need to come up with a new solution.

G
 
To avoid these ads, REGISTER NOW!

burger

Well-known member
Joined
Jun 6, 2005
Messages
1,014
Location
Erf
i-N4n3Qz9-X2.jpg

You can certainly do more with light in here but there's no drama to this shot. No singular focus or thing to draw you in.

i-NkKfXmF-X2.jpg

Photo A looks like a decent AirBnB listing, Photo B could be in a magazine. You do good stuff. You must feel like John Henry at points. Except with John Henry the machine was replacing labor. Labor and art are different things. What you do is not just the physical work, it's irreplaceable things: creativity, problem solving, and the undefinable quality of an eye that sees things and how to capture them. I don't think art can be reduced to an algorithm.
 

CMB41

Well-known member
Joined
Dec 31, 2018
Messages
94
Location
california
So the other thing that I've been trying to do this summer is rustle up work because it's been a pretty slow year/summer. In some ways I feel like I'm captaining a sinking ship with my photo career but in another way I'm trying to appreciate the beautiful sunset while the ship slowly sinks deeper and deeper...

Part of what has always been fun for me is to invent or make new tools for creating photos. As cameras get better and phones replace cameras I tend to lean into what AI or an influencer can't do which is create light. Okay, AI is getting better but for the moment I am still more creative and I can create light in ways most people can't.

i-wj2TcX6-X2.jpg

And one of the most fun things is to create new ways to modify light. One of them that we (the royal we which was Gregory Heisler and myself) loved was this very niche modifier from Broncolor called the Satellite. It was a giant parabolic reflector that you'd bounce a head into and it would focus that into a parallel beam that was very strong and, from a distance, indistinguishable from daylight.

i-QPmg9dT-X2.jpg

I owned the smaller version for years but it was never intended for the newer battery powered heads that I use now and so I sold it and instantly regretted it.

i-Q6t8GCp-X2.jpg

So for the last couple of years where I've been doing more architecture and hotel work I have been scouring ebay for a replacement. They are exceedingly rare and almost never show up and when they do they want crazy money for them. And I'd still have to modify it. So I thought I'd make my own that works exactly like I want.

i-q8pj4Hg-X2.jpg

I found the reflector dish on Edmund Scientific so I just needed a way to mount it to my strobe head. The original design mounted the reflector to the stand and the head was mounted to that but the battery heads are too heavy for that.

i-LfR6v3Q-XL.jpg

I'd originally imagined making this adjustable with an Acme thread since I had some in the shop. When I welded the nuts to a tube I got the orientation wrong and they bound as a pair. Another option I'd considered but abandoned was a linear bearing. I'd ordered one from McMaster and decided to go with that instead.

i-rw22f5x-XL.jpg
i-xPk96fR-XL.jpg

The plan was to weld the struts to that machined center and each other and then weld that to a 1" aluminum tube so that the dish was the part that moved off the head. My dish was much lighter as it didn't have the plastic surround the original used.

i-2wsrzQd-XL.jpg

Haven't welded aluminum in a while but Claude helped me dial in some settings. It's the conflict of AI stealing jobs but also being very helpful while doing it.

i-tM2W4jZ-XL.jpg

All parts fabricated...

i-xCmgRhT-XL.jpg
i-kqrxqpX-XL.jpg
i-Djzhdk6-XL.jpg

Not winning any awards for those welds but they're more than serviceable for the job.

i-dhmbTR4-XL.jpg

I originally didn't want to use the linear bearing because I was overthinking it and wanted to design a rack and pinion geared adjustment for the focus. The dish has a sweet spot - its focus point - but there's still a little room to adjust the beam pattern and spread by moving the dish to bulb relationship.

i-kmVG3jj-XL.jpg

But thankfully the inherent friction of the linear bearing is more than enough to hold the dish in position and while it would be nice to make some kind of geared adjustment it's easy enough to push or pull the dish to focus it.

i-LBhscjX-XL.jpg

"Version 1" is designed to be used with both strobes and LED lights since I'm doing more video now. I've had a couple of jobs since completing this but they haven't needed this particular solution so I still haven't gotten to use it yet for an actual job but in testing it's doing just what I want...

i-N4n3Qz9-X2.jpg

You can certainly do more with light in here but there's no drama to this shot. No singular focus or thing to draw you in.

i-NkKfXmF-X2.jpg

The same shot with a slightly darker exposure and a single strobe with my new reflector placed out in the middle of the back yard. Having a strong shaft of "daylight" that is streaming in the windows adds a sense of time and space. Time in that your mind knows by the angle of the sun that this shot is either morning or late afternoon. Depth in that there are deeper shadows and strong single light source that dominates the shot. Together they create an image that feels warmer and inviting.

So while the ship is sinking I'm designing fancy new oars, hoping to stay afloat by perfecting my paddling technique and enjoying the opportunity to invent and fabricate my own solutions to problems that won't exist in some near off future. The other benefit is that while you're actually working on something physical you are thinking and imaging other solutions along the way. That process is very satisfying and only happens while you're interacting with reality. Something AI can't quite do... yet.

Gregor
Nice! I think Profoto had a similar dish back in the late 80’s? I owned that version. A lot better than lugging an HMI with a ballast. You should try to get a utility patent on yours at the very least
 
OP
S

sakurama

Well-known member
Joined
Oct 10, 2010
Messages
1,466
Location
Portland - the cool one.
Interesting about the utility patent but I don't think the idea is truly novel or new - my idea is really just a refinement of what has been done before and now others are also making what they call "parallel beam" devices which are similar.

i-T5jvsn3-X2.jpg

So most of my mill tooling has been in this cabinet which I always liked for ease of access and being able to see. Plus it does a good job of holding the larger tools, chucks and face mills. But the number of smaller cutters and metrology equipment was in tool box drawers.

And then lathe tooling and bigger drills were in the large Vidmar that I'd bought hoping to consolidate things into...

i-s4mn6MP-X2.jpg

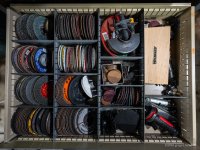
And it wasn't really being utilized as intended. Partly because I found the dividers to be a pain in the ***. So for the past month I've been trying to make that cabinet do some more work. I started with my grinding, sanding and cutoff tools which were in multiple drawers.

i-gJTbxpn-X2.jpg

Here the dividers pretty much worked for me and I was able to consolidate most of all this into this one drawer. There's still some of the smaller 2" wheels that are in another bin but right now this is working.

i-5NDVgrK-X2.jpg

So part of the motivation is the realization that as much as I'd love to somehow expand the garage it's unlikely I'll suddenly double my income or that the cost of building and materials will drop by half or more. The squeeze on both sides means I have to make the best of where I'm at and if I can't make the garage larger I can make it more compact.

i-s8HSW5t-X2.jpg

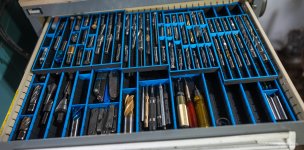
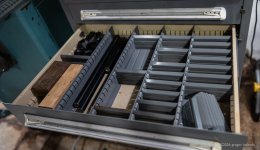
LilScorpion's tooling organization thread was always inspiring and while I've tried to find ways to make the space more dense that wasn't happening in the drawers. My first foray into Gridfinity wasn't super helpful or successful but recently I found WaveGrid and this system was both modular and customizable and those things together gave me some flexibility. The printer has been going non-stop for a few weeks now...

i-tq7FKCn-X2.jpg
i-SQKVrpt-X2.jpg

The system is based on Gridfinity obviously but it can use lips to create a second level where trays can slide over the lower level. You can create almost any width for the bins and make them different lengths and add dividers. I haven't completely organized everything but most of the mills tooling is at least now closer together and consolidated in the top drawer. That will leave more space for larger mill tooling in the cabinet.

i-XhLb8Mb-X2.jpg

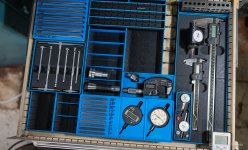
The next drawer down I wanted to consolidate metrology and lathe tooling. The lathe has a lot of tool holders and inserts and the inserts are a jumble of boxes without much order. The other issue - and this is a huge issue - is that so much of this stuff comes in its own small or large blow cases or sometimes wooden boxes. While initially nice to have the boxes have no unified structure and waste a lot of space.

i-7DrPV7z-X2.jpg

A handful of drill bits and reamers can take up half a drawer. The parallels and angle blocks have their own cases. While I hate to get rid of original boxes (I keep all my photo gear boxes for resale) there comes a point where it just doesn't make sense if space is at a premium. In addition you can't see stuff when it's in boxes and sometimes you forget you even have a certain tool.

Side note: It is now a constant worry that my own mind could go the way of Lara's but then I think about what I actually forget (which is a lot) and then how much there is to keep track of. When you consider all the tooling, bits, wrenches, drivers, disks, files, hardware, etc. that the shop contains it's probably in the 10's of thousands of items. So while I may forget that I actually have laydown cutting inserts because they slid under the parallels I can also tell Lucas that the micro screw drivers are in the third large drawer of the top toolbox on the far left side. The reverse pin pliers are in the fourth small drawer of the second tool chest in the back. The spare starter for the BMW is in the top of the cabinet over the lathe. Etc. The same can go for music - I can't always recall the band I'm looking for or remember who played a certain song but there are almost 1400 records in the cabinet at this point because Nadia has added to the collection as well...

So my memory keeps track of a massive amount of things and I can't possibly remember all of it. Especially when it's out of site or in multiple locations. So I wanted to get rid of the blow cases and put things together in as small a footprint as possible. Luckily there's a lot of Gridfinity options for a lot of tools - unfortunately not all of them.

i-tJ4vVSv-X2.jpg

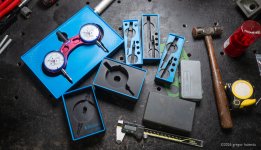
The small box for the Mitutoyo indicator didn't have space for the mount mine had on the back. The small indicators had Gridfinity but they didn't consolidate. There was no box for the tramming device at all. I tried one of the AI services where you take a photo of the tool on a piece of paper and let it generate a shadow box and as you might be able to see it was a complete failure for the tramming device. So I turned to Fusion 360 and this time I had Claude help by walking me through making my models parametric so that I could change them more easily.

i-wXfBttK-X2.jpg

So the indicators are all my Fusion 360 designs, the calipers, inside mics, angle blocks and parallels were (thankfully) existing models. The small indicators I designed to fit in the inset box of the larger two part caliper box. I have not tackled the tramming device yet after the AI failure as it's probably more complicated than I'm ready to do but that's on my list. If anyone knows of a model for that let me know - I can't believe that I couldn't find one.

It may not seem like a lot but in these two drawers plus the one of sanding disks I was able to consolidate about 7 partial or full drawers into three very dense drawers. And not just dense but visible and more organized. If I can continue this I think I can compact that tooling enough that I can get rid of at least one if not two of the giant tool chests which would give me more room to work. It will also make keeping track of tooling easier.

So more room in my current space is the next best thing to more room from an expansion which isn't going to happen in this lifetime unless I win the lottery (I don't play) or the world manages to change in some drastic (for the better) way. Something I'm very much hoping to tackle is the socket drawer which was once nicely organized but has overflowed into a hot mess of homeless bits, extensions, sockets and rouge torque wrenches and their stupid blow boxes.

So watch this space for updates on what will be an ongoing project of tool densification and organization.

Gregor
 

nicholam77

Well-known member
Joined
Dec 18, 2016
Messages
2,684
Location
Minneapolis, MN
Awesome work, Gregor. Gridfinity and 3d printing is still a time consuming chore for drawer organization like this, but glad you got over the hump and figured some things out that would work for you! The WaveGrid looks perfect for that bit and tooling storage.

I tried one of the AI services where you take a photo of the tool on a piece of paper and let it generate a shadow box and as you might be able to see it was a complete failure for the tramming device.

It's not always a slam dunk, but to get accurate dimensions, the photo has to be orthogonal and not have perspective warping from the lens. It could also just be the AI did a :poop: job. It's still not *perfect*, but one trick I've used is to use a scanner (like a paper copy machine scanner) to scan an image of the object. This helps with the perspective and keeping things accurate. If the object can sit flat on the scan bed.

You can also load a photo into Fusion360 and scale it to a known dimension and then trace sketch shapes on top of it. There's Youtube's on that if you get that deep down the rabbit hole at some point. But at the very least, a scanned image might provide one of the AI tools a better base (certainly better than snapping an iPhone pic).

So the indicators are all my Fusion 360 designs, the calipers, inside mics, angle blocks and parallels were (thankfully) existing models. The small indicators I designed to fit in the inset box of the larger two part caliper box. I have not tackled the tramming device yet after the AI failure as it's probably more complicated than I'm ready to do but that's on my list.

Your models look good! It always feels like a cheat code to find a pre-existing model... but I also think it's very satisfying to design your own model because it truly feels custom to your needs, even if the design is simple.

For most tools, I think you'll find that basic shapes (rectangles, circles, arcs) will do the trick and tool storage designs don't often take advanced CAD work. Once you've done a few, it gets easier and you can bang things out with greater speed. Personally, I have no background in CAD or 3D wor,k and I've been able to 'hack' my way through Fusion with some semi-decent results.

Like you mentioned, parametric design is key to editability when a design inevitably needs to be changed.

Glad you are having a good summer with the kids and finding some shop time, too.
 

quadrcr87

Well-known member
Joined
Jul 5, 2013
Messages
1,039
Location
Travelers Rest, SC
The drawers look great. I had not heard of WaveGrid before, and it looks like a better solution than gridfinity for bit storage. These types of efficiency projects are so satisfying. Small improvements that you will continue to benefit from in the long term.
 

APEowner

Well-known member
Joined
Oct 2, 2009
Messages
4,168
Location
Sunny, New Mexico
So the other thing that I've been trying to do this summer is rustle up work because it's been a pretty slow year/summer. In some ways I feel like I'm captaining a sinking ship with my photo career but in another way I'm trying to appreciate the beautiful sunset while the ship slowly sinks deeper and deeper...
I sincerely hope that you find a way to keep your photo career going until you're ready to retire. Both for you and because I think it'll be a loss to society if we no longer benefit from the artistry that you and other photographers create.
 
OP
S

sakurama

Well-known member
Joined
Oct 10, 2010
Messages
1,466
Location
Portland - the cool one.
The drawers look great. I had not heard of WaveGrid before, and it looks like a better solution than gridfinity for bit storage. These types of efficiency projects are so satisfying. Small improvements that you will continue to benefit from in the long term.

WaveGrid is a form of Gridfinity - that link above will let you download existing models and this is the WaveGrid Customizer which you can also find in the link above. That makes the whole thing a lot more helpful as you can change the dimensions to match what you need and then build out the drawer the way you want. So pairing that with existing models on a grid is, for me, the most useful way to make Gridfinity work.

G
 

mfg0772

Well-known member
Joined
Aug 8, 2018
Messages
147
Location
Northeast CT
WaveGrid is a form of Gridfinity - that link above will let you download existing models and this is the WaveGrid Customizer which you can also find in the link above. That makes the whole thing a lot more helpful as you can change the dimensions to match what you need and then build out the drawer the way you want. So pairing that with existing models on a grid is, for me, the most useful way to make Gridfinity work.

G
Thanks for the links Gregor! I've recently started my 3D printing journey and it can be overwhelming for me to figure out or know where to start. The WaveGrid Customizer is incredibly intuitive and will hopefully reduce my analysis paralysis on how to organize my drawers.
 
To avoid these ads, REGISTER NOW!
Top Bottom