To avoid these ads, REGISTER NOW!

Salt Life Hideout

OP
W

Wingnut65

Well-known member
Joined
Apr 21, 2010
Messages
3,170
Location
Tampa Bay, FL
red-x.gif


I just went back over the whole thread and all pix seem to be working. It may just take time to load because I've been using larger sized shots. I probably should be attaching them, but these are easier for many to veiw and analyze.

Thanks for stopping by the Hideout, JCQ. Love your Bugs. Let me know if you are heading to the Bug Jam this year.
 
To avoid these ads, REGISTER NOW!

flybefree

Well-known member
Joined
May 18, 2008
Messages
1,111
Location
Ohio/Kentucky
Dude, just thinking about all that moving around of stuff to put the floor down made me TIRED! Hey, is the bench still clean?

Shaun
 

JCQuick

Well-known member
Joined
Nov 29, 2008
Messages
4,932
Location
Apopka Fla.
red-x.gif


I just went back over the whole thread and all pix seem to be working. It may just take time to load because I've been using larger sized shots. I probably should be attaching them, but these are easier for many to veiw and analyze.

Thanks for stopping by the Hideout, JCQ. Love your Bugs. Let me know if you are heading to the Bug Jam this year.

yeah they seem to be working now I think my PC may have had some left over **** or something in its memory. :shocking: I don't know how you did the pokey thing with the red x but thats pretty cool :thumbup:

I'm not a big car show person I perfer track time but I do make bug jam sometimes just to see some old VW friends. I sold VW parts for 20+ years to most shops in Florida so when you get to doing that bus if you need anything hit me up. i still have a few good connections :bounce:
 
OP
W

Wingnut65

Well-known member
Joined
Apr 21, 2010
Messages
3,170
Location
Tampa Bay, FL
Flybefree: I know what you mean. But at least my little place is only a 2-car, I can't imagine all the stuff that can accumulate with a hangar on a farm. If you get too much in there, the only biplane that may fit is a Pitts, which isn't a bad thing...

JCQ: The animated red x is a .gif that someone used here one time. I just had to use it when I had a chance. I will remember to get in touch when the work on the bus continues. Right now I hit the Bulli Brigade and Bug Jam every year to get parts. I've been investing in the funky green parts every year. This year may be the floorboards. I already have the front one. I guess the car shows are different if you have a project or just going as a spectator.
 
OP
W

Wingnut65

Well-known member
Joined
Apr 21, 2010
Messages
3,170
Location
Tampa Bay, FL
Salt Life Hideout’s Floor Gets Installed – Volume 2

You now know the background of how I got to decide on RaceDeck, how the pattern came to be, why I had to start the tiles from the far right wall and saw the actual install of a whopping 136 square feet of tile in March 2011. (12.5 square meters for those that speak metric)

Jump forward to July 4th weekend 2011. A 3-day weekend with one goal set – Get the rest of the floor down!

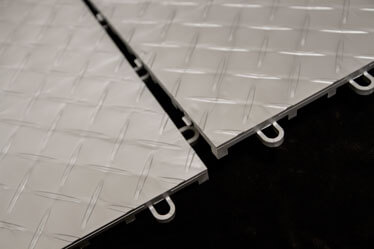
Now in order to continue the installation of tiles in the new pattern, the temporary checkerboard floor had to come up. Since the tiles just snap together, to separate them, the process is reversed. One tile needs to be higher than the other in order for them to un-snap. From the RD website, this install photo shows the lugs of the tile on the right and the loops on the tile on the left.
01 -
install-step-3.jpg


When I started to take the floor apart, one of the Hideout Support Krewe saw how much fun I was having pounding on the tiles. She jumped in. The method we used was with an old broom handle used to raise the ‘lug’ side tile and then press down with a rubber mallet on the ‘loop’ side tile. CAUTION – Do not use one of Mom’s good broom handles. Ours had its battle scars from all the pounding we did..

162 (02)

My Landscape Fabric Info – There have been other flooring threads that asked about if putting landscape fabric under the tiles would help reduce the hollow sound of walking on the tiles. To be perfectly honest, I have no problem with the sound. It is like walking on a wood floor compared to a tile floor. I find it helpful when I am working on a project and drop a bolt or something, I can hear it hit. I have had things roll off the workbench that I didn’t notice and would have been looking hard for them if I didn’t hear it hit the floor. And no one can come out to the garage without me knowing it.

The sample area that we tried had one layer of whatever fabric I had on hand. There was a slight difference in sound. I folded the fabric over and tried it again. I think I heard another difference in sound reduction.

So, while getting ready to install 500+ square feet of floor tile, I didn’t want to always be thinking ‘should I have installed the fabric?’ and ‘would I be happier if I did install it?’. So I just did it and I am pleased with the results. I shopped L’s and HD for best price per square foot and ended up installing 2 layers of ‘Weed Block Pro’ from HD’s. And now, back to the install…

Under the right row of tiles, there is the landscape fabric test strip that I used. (Ignore the chlorine bottle in the middle. That is a code we use to whoever is out driving the vehicle not to park it in the garage.)

163 (03)

Part way through the process, the Hideout Support Krewe realized that jumping on the tiles was as fun as using the mallet. We would separate the line of tiles all the way up and then into squares and then into individual or pairs as needed.

164 (04)

There have been many questions and concerns about mold growth on the bottom of the tiles. Not with RaceDeck. The RD tiles are manufactured with a mold resistant formula in the plastic. This is the bottom of some tiles that have been down for 11 months. Nothing there! With the frequent rains we have and A/C condensation dripping, some moisture did manage to drip down to the concrete because the tiles were only in a limited area of the room and could shift some. Now with the whole floor down, there is no shifting and I doubt any water seeps through. The tiles are very tight.

165 (05)

This is where I left off in March. Now to get the landscape fabric under these tiles as well, I needed to split the tiles down the middle of the Beige tiles on the right, move the whole floor over, install the fabric and move the floor back. No problem! So, as I begin to push the Bus over to the first bay, I hear “Wait! I’m over here”…

166 (06)

So there on the floor, the other member of the Hideout Support Krewe was setting up her new volleyball net. Little did I know that was going on today! So I helped her put it together and standing in the side yard. Then I moved the Bus.

167 (07)

The tile separated easily and was slid over. Using my handy red-jug ballast system, I rolled out the fabric. I doubled it back to have a second layer of fabric. Then reinstalled the tiles.

168 (08)

As I rolled out the next row of fabric, the Finance Minister came out to assist. Please excuse her formal ‘Fourth of July’ attire. It was about 92 degrees in the garage that day.

169 (09)

Then both got in the swing of things as the process continued.

170 (10)

Next came the Bus. I know the yellow edge tile pieces would support the wheels of the car dollies rolling up on them, but I know the whole Hideout Support Krewe would not be able to push the Bus uphill.

171 (11)

I rolled the Bus up next to the completed floor. A floor jack raised the Bus high enough to remove the dollie.

172 (12)

Then I set a 2x2 square of tiles down and flush against the rest of the floor and returned the dollie. Then it was easy to push the Bus over.

173 (13)

I repeated the process for the other three wheels. Mission accomplished! (This also helps explain that the old song “The Wheels On The Bus Go Round And Round” isn’t always true. It was fun dragging the bus onto a trailer with four wheels like this…)

174 (14)

The experienced Krewe continued the process – roll out the fabric and double it back, pick up the next tile, set it down, align the lugs with the loops and pound it in place. Repeat. Repeat…

175 (15)

With an open field, the process goes quick. The hardest part is to remember which pile to pick the next tile from.

176 (16)

I found it easy just to lay out a row of tiles and then sit down and install them. First a row of singles and verticals…

177 (17)

Even Yours Truly got a chance to try the system. (They can’t have all the fun! :lol: )

178 (18)

…Then a row of 2x2’s and horizontals.

179 (19)

And by the end of the day, the Bus was moved and the floor was down. Don’t tell anyone, but the floor ended up being 1” off center to the left. I think I can live with that tolerance. After all, what’s an inch among friends?

180 (20)

More Flooring, coming next...
 
Last edited:
OP
W

Wingnut65

Well-known member
Joined
Apr 21, 2010
Messages
3,170
Location
Tampa Bay, FL
Almost Done...

Now For The Trim Details

This is the boring process steps to cut the edge tiles. If you know how to do this, feel free to jump to photo 26. I won’t notice!

Since the tiles along the right wall were whole tiles in order to center the floor on the double bay, the tiles on the left had to be cut. To get the correct cut, set the next tiles on top of the last in place row.

181 (21)

With another strip of the Blue Iso Board (painted ‘Red Leader Flat Black’) set against the wall as an expansion joint filler, I set another full tile against the foam filler and on top of the tiles to be cut. The idea is that the remaining exposed tile will be the same size as what is needed against the wall.

182 (22)

When the tiles were all lined up…

183 (23)

I marked the cut line with a Sharpie (aka – permanent marker) (Is ‘Sharpie’ an international word??) Sorry for the blurry shot…

184 (24)

With the cut line in place, it was off to the miter saw. These tiles cut like butter with a miter saw. (Sorry, folks. I will have to fire that photographer)

185 (25)

Then it is back to the floor and snap them in place. (I mean Pound them in place)

186 (26)

Then step back and enjoy the results - A glamor night shot with new floor and new lights! This also shows that I held the tiles back from the edge of the concrete lip about 1-1/2” (4 cm) and the yellow edge pieces are 3” wide (8 cm). This is so a car driving up onto the tiles will put all the force onto the edge of the concrete and not pushing on the tile floor. To get this offset, I had to plan for this when I started to install the floor against the right wall four months before. That’s what I call planning ahead. :thumbup:

187 (27)

I have finished the trim pieces at the front of the garage up to the A/C unit. I still have more trimming to go. The edge pieces at front of the single garage door still need to be cut and the yellow trim pieces need to be installed. Then the 16 square feet at the back door, under my toolboxes still needs to go down.

And that is how installing a snap-together tile floor has taken me over a year to install (and counting) when others have done it in 3-4 hours.
It ain't always procrastination that gets in the way - Sometimes it’s just Stuff!
 
Last edited:

couchmechanic

Well-known member
Joined
Jul 29, 2011
Messages
104
Location
Bakersfield
Don't mean to criticize but it looks like the women folk did all the work as evidenced in your pictures? The floor looks great and somehow makes your garage look bigger. Nice pattern.
 
OP
W

Wingnut65

Well-known member
Joined
Apr 21, 2010
Messages
3,170
Location
Tampa Bay, FL
Hey, now! Every project needs a supervisor and a photographer :lol: They did a good bit of the work. And we all pushed the bus!

Thanks, Couch. I am pleased with the results. I think the reason it looks bigger is that the Bus is 5' further to the right. Which makes my workbench area 5' less... :(
 

shopnut

Well-known member
Joined
Feb 22, 2006
Messages
4,237
Location
Florida
I think the reason it looks bigger is that the Bus is 5' further to the right.(
... and 5" shorter judging by the flat tires! (Okay, the peanut gallery will shut up now) :D

It looks great, Wingnut! The light color tiles seem to match the cabinet paint perfectly.

I know the bus isn't that heavy, but are you seeing any deflection on the tile from the steel casters (they look like steel anyway)? This aspect concerns me if I consider putting RD in my city garage. The motorcycles put a real point load on the floor. It looks like there's a very good support grid on the bottom side, however.

Send your crew my way when their schedules free up - they look like real hard workers and that's hard to find :) (I'm glad to see you did some of the work!)
 

rickairmedic

Well-known member
Joined
May 31, 2005
Messages
4,165
Location
louisville ,Ky
Jeff the floor looks great . Dont forget to get some of those HF welding blankets before welding patch panels on the bus .

Oh yeah we dont mind the support crew being comfy ( since they did most of the work ) . Were just glad you didnt choose to tile in your speedo :D.


Rick
 
OP
W

Wingnut65

Well-known member
Joined
Apr 21, 2010
Messages
3,170
Location
Tampa Bay, FL
shopnut: Its great to have a peanut gallery. :thumbup: The casters are heavy duty steel and there is no deflection. The floor is solid. For bikes, others have had a small 3x3" square of plywood to distribute the point loads. As for the Krewe, they are good workers, but not cheap :lol:

rick: I have a couple welding blankets and will get more before any big repairs. And your last comment has nasty image in my mind. I think I need to go surf the Free Parking area to get rid of it. (Yes, the neighbors are glad too)

Sorry for the photo intense post. They take time to load, but give the whole story...
 

Red Leader

Well-known member
Joined
May 15, 2011
Messages
2,688
Location
Denver, CO
Jeff,

You're always one for details. Nice work and nice pictures!:thumbup:

I got in trouble too when we painted the inside of the house. I was the 'official photographer' which is always a bad idea because it means there will never be pictures of you doing any of the work! :lol:

If you need more space in the garage is it a consideration to get a good cover and pull the bus in the driveway? Or are there covenants where you are? Also, not sure how the weather is down there...maybe it would eat the bus alive:)
 

rickairmedic

Well-known member
Joined
May 31, 2005
Messages
4,165
Location
louisville ,Ky
Jeff we like pictures they can almost tell the story without reading ( I did read it too ) :D.


Dave We have salt on the ground durring the winter Jeff has salt in the air 24/7/365 :D.


Rick
 
OP
W

Wingnut65

Well-known member
Joined
Apr 21, 2010
Messages
3,170
Location
Tampa Bay, FL
Thanks, Dave. I strive for perfection, but my details fail in comparison to other masters on GJ, including the 1950's place. :thumbup:

I imagine as soon as I get the wheels back to normal, I could park it outside to free up space. But the amount of rust around the roof gutter and window frames would allow too much weather to get in for now. Then there is the slope issue on the driveway... Getting the non-operating vehicle in the garage involved a come-a-long, chains and three neighbors. So, it looks like it may be an inside pet until it is actually running again. :(

Isn't it funny that before GJ, we all went out and built something and enjoyed it. Now, we are constantly thinking of taking the right picture and thinking what question someone may ask and what progress photo I should take to answer those questions... We'd never be doing this if we still had to get film developed. :lol:

Rick, Thanks for reading it. Make me feel good that at least 4 people have so far. :thumbup: And for the salt, thankfully we are far enough from the beach so the salt air isn't a bad problem. We are more impacted by all the rain and humidity. It can rain all afternoon and the next morning the driveway is still wet because it can't evaporate. But we don't have that white stuff that you need the salt for. :lol:
 

flybefree

Well-known member
Joined
May 18, 2008
Messages
1,111
Location
Ohio/Kentucky
Jeff,

They do good work. I must confess that the rust along the bottom of the bus captured my attention...I kept thinking "oh man, that's a lot of work!" And then I would think, oh, nice floor.

floor looks great, great looking krewe...except the dude sitting lotus style with the hammer...him not so good looking. ;-)

Shaun
 

Rich H.

Well-known member
Joined
Nov 30, 2010
Messages
285
Location
SE Michigan
I see how you operate....You're over there chillin' out while the bikini clad babes do all the work :lol_hitti

No seriously, looking good.

With the amout of cutting and welding the bus seems to need, are you worried about damaging the floor? Just going to use welding blankets or something like that to protect it, maybe?

Keep up the good work:beer:
 
To avoid these ads, REGISTER NOW!
OP
W

Wingnut65

Well-known member
Joined
Apr 21, 2010
Messages
3,170
Location
Tampa Bay, FL
Thanks guys for the comments. I just showed this page to Mrs Wingnut and she didn't know why I had to include her in the photos :dunno:, but she did appreciate the geat comments. :thumbup:

flybefree: What rickairmedic said... the V-dub parts are getting more available all the time. Klassic-Fab is making enough new parts that he can almost build a single cab pick-up from scratch. Some of the rust will be removed and repaired, others like the doors may just get replaced. I buy a few parts each year to spread the pain out...

Rich H. and Dennis: That is one of the burdens we must face when living in Florida. Other times bikini's can be seen in the neighborhood is walking dogs, mowing lawns, and washing cars. But as the summer starts to fade and fall is near, I shure hope teh turtlenecks start to appear as well. :thumbup:

Rich H.: No, I'm not that worried about damaging the floor. It is a working workshop and garage. I will be taking precautions to protect it when I do projects - plywood under jack stands, blankets under welding and painting. But I know it will get abused and I can get more tiles if I need them. I just don't want to speed that use and abuse more than necessary.

TB66: I'm not trying to tempt you, but I can brag a little. Give it time, when you are ready to make a decision, feel free to come back to browse. :thumbup:
 
OP
W

Wingnut65

Well-known member
Joined
Apr 21, 2010
Messages
3,170
Location
Tampa Bay, FL
No problem at all for a floor jack on the tiles. I also have a few of the diamond tread tiles down in a corner and the jack is fine there too.

Welcome to GJ, Ugly. Love your splitty! Some day mine will be running again. :thumbup:
 

iatros

Well-known member
Joined
Jan 25, 2011
Messages
51
Location
Tampa Bay, FL
Oh man! I did my floor by myself for no reason!! UGH, I knew I should have read this thread before I started manual labor ;)

Place looks great! And as imitation truely is the sincerest form of flattery, I've managed to steal several of your ideas, including the garage door insulation ;)

My next thef... err, flattery, will definitely be those edges! Looks so CLEAN!
 
OP
W

Wingnut65

Well-known member
Joined
Apr 21, 2010
Messages
3,170
Location
Tampa Bay, FL
Trey T: I guess if you live a good life, you get blessed once and a while. It seems that is their summer attire around here. :eyecrazy: And who am I to complain? :dunno:

iotros: Feel free to continue the theivery. Your door insulation looks great! And that floor sure goes good with the Porsche. Give a call if you want some supervision on the trim work. :thumbup:
 

Red Leader

Well-known member
Joined
May 15, 2011
Messages
2,688
Location
Denver, CO
What is some of the more major work that the bus needs?

Kinda funny...several weeks back I spotted a red/white restored bus that was the spittin' image of yours (except restored:)) and I thought "Oh man, I need to take a picture that and show Jeff!"...but didn't have my camera.

I'll be excited to see those pictures with it sitting in your garage.
 

Bobcat719

Member
Joined
Nov 15, 2010
Messages
23
Location
Colorado Springs, CO
Wingnut, the floor looks great! I just spent a ton of time trying to map out the placement in my garage, then look and go, who am I kidding.....but it is nice to dream! Great team work over there as well! Keep the pictures and the updates coming, it is such a good motivator on this side of the US!

BK
 

Skullys Garage

New member
Joined
Sep 13, 2011
Messages
3
Location
Calgary, Alberta Canada
What’s Up? I mean LOOK At What’s Up… Ceiling Stuff


Also over the center bay, but accessible from the middle walking aisle, is my new ladder rack. I saw photos of these on someone else’s thread and thought they looked cool. Next to it is my former ladder shelf and hook. The wood shelf on the wall is where the foot of the ladder would rest and then I could push the top up and get the hook under a rung. It worked fine, but doesn’t look as cool as the new one. (I have since taken down the old one)
04
DSCN3361.jpg

By the way, did I mention anywhere that I have new lights??? :)

The ladder rack is built from a 1x4 at the top with 2x4’s on the ends. The horizontal is a 1/2” threaded rod with nuts on both sides of the 2x’s. Over the rod is a piece of 3/4” PVC, painted black. (I must note that this is gloss black as I had painted this well before Red Leader get me on the flat black accents in the Hideout! I may have to repaint this now. :lol: ) I do have caps to eventually put over the recessed rod ends.
05
DSCN3365-Rack.jpg


Now I spent a few too many hours making this - routing the 2x’s so I could bolt each from two directions, sanding all the wood grains, painting, sanding, painting, installing the threaded rods and PVC, and then mounting. Only after it was installed did I find out I made it a little too small. It works, but there is very little room to move the ladder around. Lesson learned!
06
DSCN3364.jpg


As I was standing on a 6’ step ladder with the 16’ extension ladder over my head and pushing the feet in first, did I realize that with the feet in first, the extension locks hang down and keep me from pushing the ladder in any further. Flipping it over didn’t work as the locks just hit the top of the rack. So, Wingnut learned another lesson that day - TGIF (Top Goes In First)
07
DSCN3365.jpg

But you can clearly see that there is very little extra room to get the ladder all the way in on one rack and then lift it up to slide it in the other end of the rack. It does fit, but really could use another inch to spare. (Like I haven’t heard that one before :lol:. Don't go there!) (There is only 7” clear from the bar to the top, but should have been 8”+)

The ladder is a 16’ fiberglass extension ladder from HD and is 8’ and some change when closed. The ladder rack is mounted 6’ apart, mounted into the trusses above. So making them further apart may have helped, but then I would have needed additional intermediate braces in the attic between the trusses.
08
DSCN3368.jpg

The ladder rack works for now. If I start to run low for things on my ‘To Do’ list, I may re-build the rack!

Also visible in this shot is my HF 40’ retractable power cord. I put a 40’ here so that I can take it out into the driveway when needed. And it works well out there.

And, just so I don’t forget how far I can pull this one towards the street, I used my handy dandy label maker to mark it as 40’.
09
DSCN3354.jpg


And, last but not least, over the first bay, is Nothing! (Except for the two lights)
10
DSCN3363.jpg

I am keeping this area open, possibly for a fishing pole rack. I have an idea what I want and when it comes up on my hit list, I will post pix of it as well. It would fit over the garage door opener, leaving the space between the lights and the wall still available for something else.

The shelf over the door has lanterns and a dead chainsaw. No reason why they are there other than it seemed like a good idea at the time. Now that I see what others are doing above their doors, I may just add more storage up there as well.

And far as the ceiling goes, Th-Th-Th-Th-Th-.That's all, folks.


Next Up, The Salt Life Hideout gets the floor tiles installed!


.

Just wondering does your ladder scrape the spackle off the ceiling when putting it up and taking it down. Like the idea and it looks great.
 
OP
W

Wingnut65

Well-known member
Joined
Apr 21, 2010
Messages
3,170
Location
Tampa Bay, FL
Skullys Garage: No, it doesn't actually scrape the ceiling. When I slide it in, I hold it up close to the black bar as I push it in the other rack. It is tighter than I would like and I plan to install spacers between the rack and the ceiling to give another 1-1/2" drop away from the ceiling. Something like I edited into this photo:

127

BTW, Skullys Garage, Welcome to GJ and thanks for stopping by the Hideout!

And thanks for reminding me to get this done. Maybe this weekend...
 
Last edited:
OP
W

Wingnut65

Well-known member
Joined
Apr 21, 2010
Messages
3,170
Location
Tampa Bay, FL
What is some of the more major work that the bus needs?

Kinda funny...several weeks back I spotted a red/white restored bus that was the spittin' image of yours (except restored:)) and I thought "Oh man, I need to take a picture that and show Jeff!"...but didn't have my camera.

I'll be excited to see those pictures with it sitting in your garage.

Thanks for the thought, Dave. The problem with mine is mainly rust, and the engine, probably the transmission and the wheels are flat on the bottom. Other than that... Work has had me slammed this past month and I'm behind schedule, but I need to get back on it with tear down so I can inventory my needs before the big VW weekend here the middle of November.

This question does offer me an opportunity to show the inspiration I have for the restoration. With the newer thought on getting the right stance for the overall finish, I will be lowering the suspension either with bags or dropped spindles. Engine and ****** will be new and dependable and able to hit highway speeds (not the 60 mph downhill with a tailwind that we always tried to hit :lol: ). Interior will be updated and comfortable.

Here is a 21-window Bus I saw at the Pasco Bug Jam several years ago. I fell in love when I saw it. Someday, mine may be close to this, except for the chrome extra windows on top and sun roof. And I'm also going to keep my style of bumpers with the overriders.


The interior was super clean and neat. Oh, mine does not have the flip-up Baja, Correction - Safari Windshield and I'm not convinced I need to add it.


The 'L' shaped seating still allows for transporting large itmes (appliances, etc)


I really like the clean look of the Bernie Bergmann engines. Performance is reportedly outstanding.
I'll have to see where the budget fall for the engine...
 
Last edited:

abstamaria

Well-known member
Joined
Jun 24, 2010
Messages
1,338
Location
Manila
Many good ideas, Wingnut. I will borrow some, if you don't mind.

By the way, this last June, at the Barrett Jackson auction in Costa Mesa, CA, a 1963 23-window VW "Samba" bus sold for ... $217,800.

Andy
 

rickairmedic

Well-known member
Joined
May 31, 2005
Messages
4,165
Location
louisville ,Ky
Jrff that is a sweet looking 21 window and if yours turns out anything like it it will be a nice ride . They are " safari " windows by the way :D.


Rick
 

tinbender 66

Well-known member
Joined
Mar 23, 2011
Messages
2,294
Location
Western Washington State
That van is awesome!! I've always had a soft spot for those things. When I was stationed in Germany three of us went together and bought one for $150. We took a 30 day leave and drove it all over Europe. Man, that was fun:)
 
OP
W

Wingnut65

Well-known member
Joined
Apr 21, 2010
Messages
3,170
Location
Tampa Bay, FL
flybefree: Thanks Shaun. I may be flying lower than you, but can fly faster :lol:

abstamaria: Thanks Andy. And I am getting ideas from your place as well. :thumbup: That $217,800 23-window Bus at Barret Jackson was beyond belief. They have been going up in value, but that is unreal.

rickairmedic. Oooops. Safari, Baja, my bad. Just goes to show you my mind doesn't function well before coffee. Thanks for straightening me out. :thumbup:

tinbender 66: Cruising Europe in a VW Bus. That would be so cool. The one above was gorgeous. I have a few of these shots over my desk to stare at when I am thinking. Great idea, but it hasn't gotten me motivated past current projects and deadlines. Its time is coming... :thumbup:
 

chris bsopke

Active member
Joined
Mar 21, 2010
Messages
27
Location
Leicester U.K
Lovin this thread Jeff ,
Would love to own your bus even more , ship it over to the uk and i'il do the restoration for you give it a 20 year shake down and then send it back All work and parts would be free :bounce:

Cheers Chris Cant
 

ChvyC10

Well-known member
Joined
Aug 16, 2011
Messages
55
Right when I saw the thread title I knew you had to be a local. I swear every other car has a SL sticker.

Looks good man.
 
OP
W

Wingnut65

Well-known member
Joined
Apr 21, 2010
Messages
3,170
Location
Tampa Bay, FL
chris: Thanks for the offer, but I don't think my daughters would let me get rid of it. My family got it shortly after they got me, so it still is a one family owner. Besides, a 20 year shake down would be about time to start all over again.

ChvyC10: There are a lot of Salt Life fans around. It was started in Jax, but their website says they may be opening more Salt Life Food Shack restaurants in the near future, including the Bay area. But I had the first SL Hideout... BTW, Welcome to GJ, Chvy
 

fredlangva

Active member
Joined
Sep 10, 2011
Messages
34
Location
Jacksonville, FL
Just perusing your thread to get some ideas. I hadn't thought about insulation on the doors. Since we are facing east, that would be a great idea. Dave has already derailed my simple garage plan with his Carftsman garage. And Jack's garage looks so organized and finished, I'll have to do the same or have an incomplete feeling everytime I go in the garage.

I used to suffer from TMT (too many tools) but a few moves had weeded them out. Now that we have bought a new house, I'm sure it will reoccur.

One nice thing is that I can get the floor done before having to move anything in the garage.

Cheers
 
To avoid these ads, REGISTER NOW!
Top Bottom