
You are using an out of date browser. It may not display this or other websites correctly.
You should upgrade or use an alternative browser.
You should upgrade or use an alternative browser.
Between 265 & 485 SQ/FT 1950s Craftsman Garage retro remodel
- Thread starter Red Leader
- Start date
Workspaces sized between 265 and 485 squarefeet.
Wow Red. I can't believe I didn't see this earlier. I just burned through nearly 5 hours catching up on your thread.
First thing first, Congrats on the baby.
We are sort of in the same boat. I was doing my reno, when my baby girl was born, and lately, the work done has been minor. Especially winter is coming up, and I have to finish up a lot of exterior work.
Garage is awesome. I cannot believe how detail oriented you are with the build. Unbelievable.
I wish I was here earlier when you were discussing flooring options. My favorite was the checker tile floor. I don't know why I like it, lol. I am sure your epoxy will look great as well.
Again, unbelievable at the amount of detail. Oh and those old tools. Damn. When you want to get rid of any of those table saws, let me know. I have a nice home in mind for them.
Again keep us updated.
Your thread actually made me want to drop all my other stuff and get back to finishing my garage.
First thing first, Congrats on the baby.
We are sort of in the same boat. I was doing my reno, when my baby girl was born, and lately, the work done has been minor. Especially winter is coming up, and I have to finish up a lot of exterior work.
Garage is awesome. I cannot believe how detail oriented you are with the build. Unbelievable.
I wish I was here earlier when you were discussing flooring options. My favorite was the checker tile floor. I don't know why I like it, lol. I am sure your epoxy will look great as well.
Again, unbelievable at the amount of detail. Oh and those old tools. Damn. When you want to get rid of any of those table saws, let me know. I have a nice home in mind for them.
Again keep us updated.
Your thread actually made me want to drop all my other stuff and get back to finishing my garage.
tinbender 66
Well-known member
I'm giddy with anticipation
OP
Red Leader
Well-known member
Alright guys! I have the card reader and pictures up on imageshack! I need to get just a little bit of work done on an over-the-range microwave install and then I'll be posting the first update! Then, later on tonight, the second.
Thanks for your patience and yes I know I'm horrible
Thanks for your patience and yes I know I'm horrible
rickairmedic
Well-known member
Dave you do know you have at least 9 months to a year before you can start blaming your son for missing camera cables right .
Rick
.Rick
OP
Red Leader
Well-known member
Update #1
Okay, so for those who can remember, I posted a while back in Rick's garage thread about a wood lathe that I had randomly found...
http://garagejournal.com/forum/showthread.php?p=1806182#post1806182
I have never had a wood lathe and while I don't see myself doing a ton on one, it might be really nice having one so that I can make custom knobs for my tools and small wooden parts, dowels, etc.
Turns out that it is made by a company called Greenfield Tap & Die Corp and was most likely made around the WWI era. To read up a little on GTD, see here:
http://vintagemachinery.org/mfgindex/detail.aspx?id=402&tab=0
I go to check out the lathe and it looks really solid. The price was probably not far from the scrap cost and hopefully with the sell of a small vise that was thrown in, it would be about the same as if you got a cup of coffee every morning for a week.
SO! I decide to get it. Now...the biggest question is...how do I get it home?
This is where a little creativity comes in.
Here is the big moving day.

Some nice touches on this lathe...


Inside the guts...


Okay, so now what?
Well, I figured there was no way I was going to get THAT in the back of the 4runner together (probably weighs about 400lbs or so, maybe more). The nice thing is, it comes apart in 3 main chunks...the bed + headstock, the right leg, and the left leg + gearing.
So I take the belt off and get under there with an adjustable wrench. The great news about these older tools is that they used square head bolts, which means that while it may be a little hard to get into tighter spots, the heads will virtually never strip! A few shots of some PB Blaster on the more stubborn ones and we get things apart!

Then, I back the 4runner up so that the end of the bed goes right into the back!


Next is the tricky part....How do I support the back half of the lathe and still manage to get the chunky leg stand with all the guts off?
Actually, ya got me! I did it and I'm not sure how!
I took off the motor and that dropped it about 40-50lbs.
All I can say is that this shot best represents how the lathe got into the back of the vehicle:

I at least had to get one shot of it in the back of the vehicle or you never would have believed me. Ya know, pics or it didn't happen, right?
I have no pictures of actually moving it out and into the garage, probably because it tapped out every single brain cell I had to figure out how to do it without breaking something. I will say this: It involved 2 trashcans, a hydraulic jack, and a lot of "hmmmm"-ing
And now, more proof that it actually happened:

It really is an elegant looking tool. At its price point it came with the outboard tool rest and turning tools. At some point it probably took a spill, as the gear changing handle and the tailstock loosening handle had both been broken off but brazed back on and are both solid. Somehow ya never noticed these things until after ya get them home (and this is a reference to my next update as well)
Some folks 'more in the know' than me told me that the outboard tool rest is probably worth more than the lathe. Again...accessories accessories accessories It's all about the accessories! If you wanted a free vintage woodshop just be patient and buy each old
tool with 2 good non-critical accessories. Sell off the accessories and your shop would pay for itself
To be honest, I probably am not going to keep it for long because it really is too big for the shop. However, it will be fun cleaning it up, polishing up the metal bits and giving it a fresh coat of paint. I am sure that the time spent using it will be most enjoyable.
All in all, a very fun and fulfilling tool adventure. And my back was never strained once
Okay, so for those who can remember, I posted a while back in Rick's garage thread about a wood lathe that I had randomly found...
http://garagejournal.com/forum/showthread.php?p=1806182#post1806182
I have never had a wood lathe and while I don't see myself doing a ton on one, it might be really nice having one so that I can make custom knobs for my tools and small wooden parts, dowels, etc.
Turns out that it is made by a company called Greenfield Tap & Die Corp and was most likely made around the WWI era. To read up a little on GTD, see here:
http://vintagemachinery.org/mfgindex/detail.aspx?id=402&tab=0
I go to check out the lathe and it looks really solid. The price was probably not far from the scrap cost and hopefully with the sell of a small vise that was thrown in, it would be about the same as if you got a cup of coffee every morning for a week.
SO! I decide to get it. Now...the biggest question is...how do I get it home?
This is where a little creativity comes in.
Here is the big moving day.
Some nice touches on this lathe...
Inside the guts...
Okay, so now what?
Well, I figured there was no way I was going to get THAT in the back of the 4runner together (probably weighs about 400lbs or so, maybe more). The nice thing is, it comes apart in 3 main chunks...the bed + headstock, the right leg, and the left leg + gearing.
So I take the belt off and get under there with an adjustable wrench. The great news about these older tools is that they used square head bolts, which means that while it may be a little hard to get into tighter spots, the heads will virtually never strip! A few shots of some PB Blaster on the more stubborn ones and we get things apart!
Then, I back the 4runner up so that the end of the bed goes right into the back!
Next is the tricky part....How do I support the back half of the lathe and still manage to get the chunky leg stand with all the guts off?
Actually, ya got me! I did it and I'm not sure how!
I took off the motor and that dropped it about 40-50lbs.
All I can say is that this shot best represents how the lathe got into the back of the vehicle:
I at least had to get one shot of it in the back of the vehicle or you never would have believed me. Ya know, pics or it didn't happen, right?
I have no pictures of actually moving it out and into the garage, probably because it tapped out every single brain cell I had to figure out how to do it without breaking something. I will say this: It involved 2 trashcans, a hydraulic jack, and a lot of "hmmmm"-ing
And now, more proof that it actually happened:
It really is an elegant looking tool. At its price point it came with the outboard tool rest and turning tools. At some point it probably took a spill, as the gear changing handle and the tailstock loosening handle had both been broken off but brazed back on and are both solid. Somehow ya never noticed these things until after ya get them home (and this is a reference to my next update as well)
Some folks 'more in the know' than me told me that the outboard tool rest is probably worth more than the lathe. Again...accessories accessories accessories
It's all about the accessories! If you wanted a free vintage woodshop just be patient and buy each old tool with 2 good non-critical accessories. Sell off the accessories and your shop would pay for itself
To be honest, I probably am not going to keep it for long because it really is too big for the shop. However, it will be fun cleaning it up, polishing up the metal bits and giving it a fresh coat of paint. I am sure that the time spent using it will be most enjoyable.
All in all, a very fun and fulfilling tool adventure. And my back was never strained once
Last edited:
softailgarage
Well-known member
Nice find ! Matches the theme of your garage perfectly. I'm still amazed at your talent, especially every time i see those shelves. Hats off to you sir!
rickairmedic
Well-known member
Dave somehow I figured you wouldnt be able to walk away from that for the price .
Rick
. Rick
tinbender 66
Well-known member
Nice score. I kinda figured you'd get that one. You can have some fun with it and still make out pretty well when/if you decide to turn it over.
I'm clueless as to what the other one could be
.I'm clueless as to what the other one could be
OP
Red Leader
Well-known member
Update #2
Sooooo....
A while back I said a few things...
And I knew you guys wouldn't let me off the hook
Although I did bring most everyone who reads this thread to the brink of insanity by lagging behind my 'release date'. You have my apologies
So, lo and behind, here is what we have!
From 1950:


Rockwell Delta Unisaw
And from 1957:


Rockwell Delta Disc Sander
These little jewels came from an estate sale. This sale was absolutely gigantic. 4-car garage and a full basement shop. Here are some pictures of what was left behind:


...and that probably amounted to about 1/12th of all the stuff. The gentleman whose estate this was had everything. There was also a nice 1950s Milwaukee reciprocating saw...and a welder, compressor, huge welding tanks, huge metal bandsaw, floor sander, etc etc etc. Honestly I wish I could have picked up a lot more but I'm not made of money. Besides, I definitely want to be really organized with the garage, so I want to be picky with a lot of the extra stuff. Still...riveter, benzomatic torch, etc...all were left There will be future estate sales, so no worries
These tools were in the basement, and this was the only way to get them out:

Haha, that was fun. A Unisaw weighs about 500lbs.
Fortunately, I got a FABULOUS lesson on how to take a Unisaw apart for transport from a gentleman named Bob on the OWWM forums. I was able to move the entire thing by myself, and up those stairs. You start off by unbolting all the 'extra' stuff hanging off it - fence, rails, extensions.

By daveamy at 2011-10-24
For me, I had to remove the top, although sometimes you can get away with not removing it. However, this made it about 60lbs lighter and gave me great access to the motor.

The motor mounting pin and bolt are removed and the motor taken out. I was almost contemplating removing the arbor assembly until one of the nice estate sale ladies let me borrow a dolly which, in turn, allowed me to get it up the stairs with the guts still attached.

Two things about moving a cabinet saw like this: never pick it up or move it by the rails - they will get bent. Also, never move it around and tilt it sideways, upside down, etc., with the motor still attached. It puts undue stresses on the parts and the last thing you want is to break the motor mount! If the saw you are moving has a tilting table, never, ever, EVER pick it up by the table! A good way to bend/break a trunion!
I found a little surprise on this saw when I got it home (again, reference lathe post above) in that I found a repair to the cast iron top. At some point, the saw most likely tipped over and an extension snapped off, breaking the mounting points on the main table. However, it has been repaired and looks like a pretty good job, as nobody could tell by looking at the saw and I couldn't see the repair until I got the saw home.
This means that I now have a broken/repaired drill press, table saw, and lathe. Well, just call me a home for wayward and abused tools
While the repair was a minus for the saw, and pleasant surprise after I bought it was the discovery of this on one side of it:

I personally feel that Porter-Cable makes some of the best hand power tools, and this thing is a beast - it takes bits with a 1/2" shank! This is great because I knew that I was going to need 2 routers...one for the table on the table saw for straight line routing, and one handheld for custom routes.
The disc sander is a real honey. It has the retractable caster set on the metal leg stand, which could probably sell for more than I bought the whole thing for. However, I am definitely keeping the disc sander. It will clean up really nice and it is one tool that has been missing from the garage - no longer!


The Unisaw I'm still thinking about. I was saddened by the table repair, but I'm willing to give it a chance. It definitely rings true to the 1950s tool theme and I like that. I think I will sell my '63 Unisaw which will help fund this and the lathe purchase. Eventually I'd like to get a Craftsman cabinet saw (or two or 3 of them: the Darra James, Atlas, and King Seely versions) and an old 1920s sliding table saw. So all the cabinet saws I have right now will probably find new homes at some point, but for now at least they'll all get a little pampered in the 1950s Craftsman Garage
Sooooo....
A while back I said a few things...
However, I have some very good news. Not about the garage. About what goes in the garage. Something from 1950 and 1957 will be joining the garage shortly.
Good guesses! Keem 'em coming!
I'll give you a hint. Starts with an 'R', ends with an 'L'
And I knew you guys wouldn't let me off the hook
Although I did bring most everyone who reads this thread to the brink of insanity by lagging behind my 'release date'. You have my apologies
So, lo and behind, here is what we have!
From 1950:
Rockwell Delta Unisaw
And from 1957:
Rockwell Delta Disc Sander
These little jewels came from an estate sale. This sale was absolutely gigantic. 4-car garage and a full basement shop. Here are some pictures of what was left behind:
...and that probably amounted to about 1/12th of all the stuff. The gentleman whose estate this was had everything. There was also a nice 1950s Milwaukee reciprocating saw...and a welder, compressor, huge welding tanks, huge metal bandsaw, floor sander, etc etc etc. Honestly I wish I could have picked up a lot more but I'm not made of money
. Besides, I definitely want to be really organized with the garage, so I want to be picky with a lot of the extra stuff. Still...riveter, benzomatic torch, etc...all were left There will be future estate sales, so no worriesThese tools were in the basement, and this was the only way to get them out:
Haha, that was fun. A Unisaw weighs about 500lbs.
Fortunately, I got a FABULOUS lesson on how to take a Unisaw apart for transport from a gentleman named Bob on the OWWM forums. I was able to move the entire thing by myself, and up those stairs. You start off by unbolting all the 'extra' stuff hanging off it - fence, rails, extensions.
By daveamy at 2011-10-24
For me, I had to remove the top, although sometimes you can get away with not removing it. However, this made it about 60lbs lighter and gave me great access to the motor.
The motor mounting pin and bolt are removed and the motor taken out. I was almost contemplating removing the arbor assembly until one of the nice estate sale ladies let me borrow a dolly which, in turn, allowed me to get it up the stairs with the guts still attached.
Two things about moving a cabinet saw like this: never pick it up or move it by the rails - they will get bent. Also, never move it around and tilt it sideways, upside down, etc., with the motor still attached. It puts undue stresses on the parts and the last thing you want is to break the motor mount! If the saw you are moving has a tilting table, never, ever, EVER pick it up by the table! A good way to bend/break a trunion!
I found a little surprise on this saw when I got it home (again, reference lathe post above
) in that I found a repair to the cast iron top. At some point, the saw most likely tipped over and an extension snapped off, breaking the mounting points on the main table. However, it has been repaired and looks like a pretty good job, as nobody could tell by looking at the saw and I couldn't see the repair until I got the saw home. This means that I now have a broken/repaired drill press, table saw, and lathe. Well, just call me a home for wayward and abused tools
While the repair was a minus for the saw, and pleasant surprise after I bought it was the discovery of this on one side of it:
I personally feel that Porter-Cable makes some of the best hand power tools, and this thing is a beast - it takes bits with a 1/2" shank! This is great because I knew that I was going to need 2 routers...one for the table on the table saw for straight line routing, and one handheld for custom routes.
The disc sander is a real honey. It has the retractable caster set on the metal leg stand, which could probably sell for more than I bought the whole thing for. However, I am definitely keeping the disc sander. It will clean up really nice and it is one tool that has been missing from the garage - no longer!
The Unisaw I'm still thinking about. I was saddened by the table repair, but I'm willing to give it a chance. It definitely rings true to the 1950s tool theme and I like that. I think I will sell my '63 Unisaw which will help fund this and the lathe purchase. Eventually I'd like to get a Craftsman cabinet saw (or two or 3 of them: the Darra James, Atlas, and King Seely versions) and an old 1920s sliding table saw. So all the cabinet saws I have right now will probably find new homes at some point, but for now at least they'll all get a little pampered in the 1950s Craftsman Garage
Last edited:
OP
Red Leader
Well-known member
Dave, the rule got here - so cool
Whoohoo! Glad it arrived safely!
rickairmedic
Well-known member
Dave buddy your gonna need an addition if you get all those table saw especially if SWMBO has any hopes of ever parking in there . I like the new toys and fel bad that " Rockwell " never entered my mind . I do remember 75% of my grandparents back yard being filled with outbuildings for all of my grandfathers woodworking tools .
Rick
especially if SWMBO has any hopes of ever parking in there . I like the new toys and fel bad that " Rockwell " never entered my mind . I do remember 75% of my grandparents back yard being filled with outbuildings for all of my grandfathers woodworking tools .Rick
Omphaloskeptic
Well-known member
The gentleman that passed is probably smiling right now knowing that some of his estate is in good hands and those tools will be well cared for.
tinbender 66
Well-known member
Fantastic score Dave!!! Well worth the wait
!!! Well worth the waittinbender 66
Well-known member
Oh yeah, I'm jealous and you **** too!!!!!!!!!!
Wingnut65
Well-known member
Nice score Dave, even if you did have to drag out the suspense. That lathe really needs just a spit shine to fit into the '50s place. Getting the lathe in the 4runner and the unisaw up the steps are both lessons in motivation. Glad you didn't have to strap the lathe to the roof! But just remember that these may go on the To-Do list, but they are behind the workbench in order of priorities.
Oh, and Congrats on the 'You ****' award! I haven't seen them being offered too much recently.
Oh, and Congrats on the 'You ****' award! I haven't seen them being offered too much recently.
flybefree
Well-known member
Oh...those are the kind of auctions I LOVE....good score.
Shaun
Shaun
I don't think I've ever seen an outboard tool post. Interesting. It's been over twenty years since I did any wood turning, but it seems like the potential relative motion between the machine and the tool rest would take a little getting use to. Does anyone who has used one care to elaborate? You will have to give us an update when you get it "turning".
It really is an elegant looking tool. At its price point it came with the outboard tool rest and turning tools.
Have fun with the new toys (I mean tools)!
OP
Red Leader
Well-known member
I don't think I've ever seen an outboard tool post. Interesting. It's been over twenty years since I did any wood turning, but it seems like the potential relative motion between the machine and the tool rest would take a little getting use to. Does anyone who has used one care to elaborate? You will have to give us an update when you get it "turning".
Have fun with the new toys (I mean tools)!
You know, you bring up a good point about the outboard tool rest and the motion/vibration between it and the turning piece. However, it weighs somewhere around 50lbs so I don't see it vibrating around too much
rickairmedic
Well-known member
I notice what looks like holes in the feet of the tool rest . I would guess that when that machine was first put into use most shop floors " especially woodshop floors " were wood . Therefore I would guess it would have been screwed down to the floor .
I would say if it doesnt want to stay put when you start using it simply attatch it to a 4X4 sheet of 3/4" plywood and stand on the plywood.
Rick
I would say if it doesnt want to stay put when you start using it simply attatch it to a 4X4 sheet of 3/4" plywood and stand on the plywood
.Rick
GirlnAgarage
Well-known member
Very cool. Love the way you got it loaded up.
Firefyter-Emt
Well-known member
Whew... two days later, I finished this thread! I have to say, awesome job so far! I LOVE the style of the cabinets you made. I love the art deco look and I am also a lover of old tools. I might just need to do something like this in my shop, I really love the idea of bringing the deco look into the shop itself.
I have slowed down on the "buy it all" era of arn collecting, and still need to refurb a fair bit of what I have.
Arn in my shop:
A 1950 (ish, I forget exactly) Delta Uni-Saw (with the cast iron good egg!).
A late 1950's Craftsman 100 Series saw (with lots of toys) King Seeley Era
A late 50's / 60's Craftsman 80 Series saw (stuck in a squirrel hole somewhere)
A Delta tilt top 10" saw (not in use, bought for the fence)
Late 1940's Craftsman 109 metal lathe (My grandfathers, my arn intro tool)
1950's era Craftsman badged "Parks" planer 10" x 4"
1950's 16" Walker Turner Bandsaw (with cast iron deco base)
1950's 15" Walker Turner Floor standing drill press
late 1930's Delta 950 wood lathe (930 w/ CI leg base) 11" swing modded to 15"
1960's Rockwell/Delta 17" machinist drill press. 3-phase waiting for a motor swap VS control
Late 50's Delta / Homecraft 10" bandsaw (hidden away somewhere)
Oh, then there is the pride of my lathe fleet... a late 1800's FE Reed flat belt engine lathe. AWESOME hunk of iron that shows signs all over of hand made parts. Like hand made nuts and bolts, handles etc.. I had to laugh when you moved yours in the 4-Runner. Mine made the trip in the back of my CJ-7!
I won't even get started on the ones that were restored and sold! Or the hand planes, braces......
Here is my website, it's in need of a massive re-vamp after a server swap killed many pages. Plus, lots of info needs to be updated too. But there is still lots of cool photos and restoration's
http://www.yankeetoys.org/lee/shop.html
I will not load up with photos and thread-jack... but I always got a kick out of this one. When it comes to tools, you must do what needs to be done to bring it home!

I have slowed down on the "buy it all" era of arn collecting, and still need to refurb a fair bit of what I have.
Arn in my shop:
A 1950 (ish, I forget exactly) Delta Uni-Saw (with the cast iron good egg!).
A late 1950's Craftsman 100 Series saw (with lots of toys) King Seeley Era
A late 50's / 60's Craftsman 80 Series saw (stuck in a squirrel hole somewhere)
A Delta tilt top 10" saw (not in use, bought for the fence)
Late 1940's Craftsman 109 metal lathe (My grandfathers, my arn intro tool)
1950's era Craftsman badged "Parks" planer 10" x 4"
1950's 16" Walker Turner Bandsaw (with cast iron deco base)
1950's 15" Walker Turner Floor standing drill press
late 1930's Delta 950 wood lathe (930 w/ CI leg base) 11" swing modded to 15"
1960's Rockwell/Delta 17" machinist drill press. 3-phase waiting for a motor swap VS control
Late 50's Delta / Homecraft 10" bandsaw (hidden away somewhere)
Oh, then there is the pride of my lathe fleet... a late 1800's FE Reed flat belt engine lathe. AWESOME hunk of iron that shows signs all over of hand made parts. Like hand made nuts and bolts, handles etc.. I had to laugh when you moved yours in the 4-Runner. Mine made the trip in the back of my CJ-7!
I won't even get started on the ones that were restored and sold! Or the hand planes, braces......
Here is my website, it's in need of a massive re-vamp after a server swap killed many pages. Plus, lots of info needs to be updated too. But there is still lots of cool photos and restoration's
http://www.yankeetoys.org/lee/shop.html
I will not load up with photos and thread-jack... but I always got a kick out of this one. When it comes to tools, you must do what needs to be done to bring it home!
OP
Red Leader
Well-known member
Well guys, sometimes being an idiot hurts...
Good news is as Wingnut suggested, I started working on the workbench tonight - I finally got the 4x4 legs rough cut (will need to do a final cut on a miter saw) and in the process nearly destroyed one of the eye shields on my restored Craftsman grinder when one of these 4x4s flipped right off the radial saw table and right onto the grinder.
My stupidity for moving around restored tools and keeping them in the workpath. I was pretty pissed. Needless to say, the grinder is now in the basement away from the work area, and the eye shield has been prepped for a repair.
I hate hate hate when I do stupid stupid things. PLEASE learn from me.

Good news is as Wingnut suggested, I started working on the workbench tonight - I finally got the 4x4 legs rough cut (will need to do a final cut on a miter saw) and in the process nearly destroyed one of the eye shields on my restored Craftsman grinder when one of these 4x4s flipped right off the radial saw table and right onto the grinder.
My stupidity for moving around restored tools and keeping them in the workpath. I was pretty pissed. Needless to say, the grinder is now in the basement away from the work area, and the eye shield has been prepped for a repair.
I hate hate hate when I do stupid stupid things. PLEASE learn from me.
rickairmedic
Well-known member
Dave the good news is you didnt destroy it and we all have done it .
Rick
.Rick
OP
Red Leader
Well-known member
Whew... two days later, I finished this thread! I have to say, awesome job so far! I LOVE the style of the cabinets you made. I love the art deco look and I am also a lover of old tools. I might just need to do something like this in my shop, I really love the idea of bringing the deco look into the shop itself.
I have slowed down on the "buy it all" era of arn collecting, and still need to refurb a fair bit of what I have.
Arn in my shop:
A 1950 (ish, I forget exactly) Delta Uni-Saw (with the cast iron good egg!).
A late 1950's Craftsman 100 Series saw (with lots of toys) King Seeley Era
A late 50's / 60's Craftsman 80 Series saw (stuck in a squirrel hole somewhere)
A Delta tilt top 10" saw (not in use, bought for the fence)
Late 1940's Craftsman 109 metal lathe (My grandfathers, my arn intro tool)
1950's era Craftsman badged "Parks" planer 10" x 4"
1950's 16" Walker Turner Bandsaw (with cast iron deco base)
1950's 15" Walker Turner Floor standing drill press
late 1930's Delta 950 wood lathe (930 w/ CI leg base) 11" swing modded to 15"
1960's Rockwell/Delta 17" machinist drill press. 3-phase waiting for a motor swap VS control
Late 50's Delta / Homecraft 10" bandsaw (hidden away somewhere)
Oh, then there is the pride of my lathe fleet... a late 1800's FE Reed flat belt engine lathe. AWESOME hunk of iron that shows signs all over of hand made parts. Like hand made nuts and bolts, handles etc.. I had to laugh when you moved yours in the 4-Runner. Mine made the trip in the back of my CJ-7!
I won't even get started on the ones that were restored and sold! Or the hand planes, braces......
Here is my website, it's in need of a massive re-vamp after a server swap killed many pages. Plus, lots of info needs to be updated too. But there is still lots of cool photos and restoration's
http://www.yankeetoys.org/lee/shop.html
I will not load up with photos and thread-jack... but I always got a kick out of this one. When it comes to tools, you must do what needs to be done to bring it home!
Wow, you sir have a very, very nice collection. At some point I want to get another band saw for metalworking. You have a VERY nice machine in the W/T 16" w/ base.
I wouldn't mind a little thread-jacking to see such beautiful tools. This thread is very welcoming to such things
OP
Red Leader
Well-known member
Dave the good news is you didnt destroy it and we all have done it
Rick
Thanks Rick, I appreciate it. And your right, it wasn't destroyed. It will take a little bit to get it back in shape. The real kicker is just letting something like that happen. The really pathetic part is I had a few warning shots as a board or two fell and missed it. I thought I was doing good by weighing it down with something so it wouldn't move, but it wasn't enough and didn't stop it.
One more thing to add to the project list
And I've decided...after this Atlas cabinet saw rebuild, I am NOT going to completely restore another single thing until I get it together out there and have a PLACE for the restored items to go.
rickairmedic
Well-known member
Dave maybe you could go ahead and get one side of the garage pretty much done and put the " finished tools " on that side and the " still working not so pretty ones " on the unfinished side .Although honestly they are going to get scuffed and bumped as this isnt a " show " garage you intend to use all of the tools you are restoring soooooooooo get used to having to do touchups and repairs on them and when something happens dont let it get to you .
Rick
.Rick
rickairmedic
Well-known member
Oh yeah get that new workbench done so that sweet grinder has a safe place to stay instead of being on the floor getting 4X4's tossed at it .
Rick
.Rick
OP
Red Leader
Well-known member
Oh yeah get that new workbench done so that sweet grinder has a safe place to stay instead of being on the floor getting 4X4's tossed at it
Rick
Haha and now ya rub it in
tinbender 66
Well-known member
Sounds like at least it is repairable. The school of hard knocks is tough way to learn. If we ever do. Couple nights ago I had my camera on the workbench where I should know better. Of course I knocked it off and now it's toast. You are in good company'
. You are in good company'
OP
Red Leader
Well-known member
Wow Red. I can't believe I didn't see this earlier. I just burned through nearly 5 hours catching up on your thread.
First thing first, Congrats on the baby.
We are sort of in the same boat. I was doing my reno, when my baby girl was born, and lately, the work done has been minor. Especially winter is coming up, and I have to finish up a lot of exterior work.
Garage is awesome. I cannot believe how detail oriented you are with the build. Unbelievable.
I wish I was here earlier when you were discussing flooring options. My favorite was the checker tile floor. I don't know why I like it, lol. I am sure your epoxy will look great as well.
Again, unbelievable at the amount of detail. Oh and those old tools. Damn. When you want to get rid of any of those table saws, let me know. I have a nice home in mind for them.
Again keep us updated.
Your thread actually made me want to drop all my other stuff and get back to finishing my garage.
Thanks Slick! I appreciate your comments. As far as the floor options go, I was right there with ya on the porcelain tile. Matter of fact you gave me quite a bit of info in another thread in the flooring section. I actually thought my floor was not going to be a candidate for an epoxy coating since it has a bunch of big cracks in it, but when I saw the contest for the free Epoxy-Coat I had to try
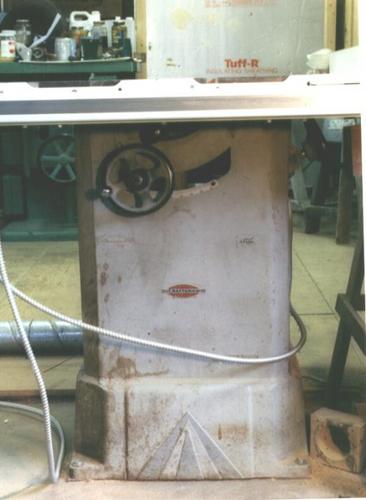
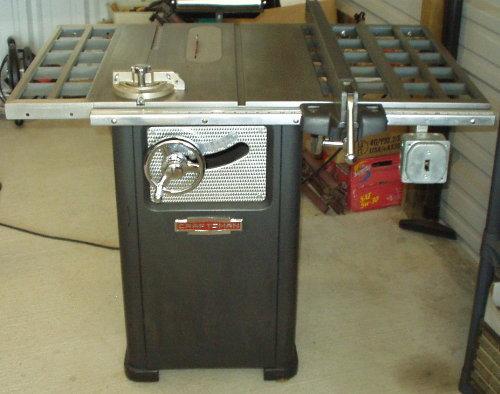
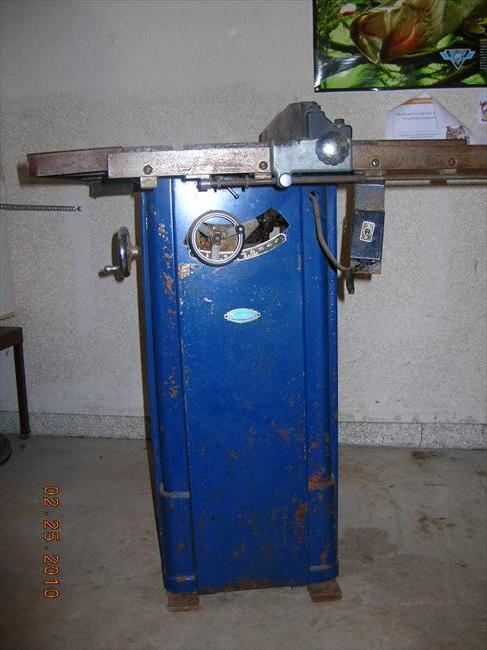
Eventually, probably all the table saws will be sold as I am hoping to collect my three favorite Craftsman cabinet saws:
A Craftsman-badged Darra James (1940s):
A King-Seely 10" cabinet saw (1950s):
and a 9" Craftsman-badge Atlas cabinet saw (1930s):
And then an old school 1920s sliding table saw (Yates American or JA Fay & Egan).
The two Unisaws won't really need restorations as they are users and then the Atlas will finish up nicely once I am done.
OP
Red Leader
Well-known member
Red Leader:
SWEET GARAGE!!
Let me know if you need help repairing the floor before coating. We have some solutions for cracks, joints, etc...
Thanks! I have actually checked out your products and was interested in using one for the cracks.
Come this next spring, let's talk.
OP
Red Leader
Well-known member
Okay...
Now that I've talked old tools for forever, its time to get back to 'gitt'n r done'
If I veer off topic again and start up on tools (I am known to do this) just gently steer me back (exception is the Atlas rebuild)
Its time to get back to the garage!!!
Per Jeff's suggestion about remember priorities, it was enough of a motivation to grab the 4x4 wood I was keeping for the workbench project on the side of the house and cut it to rough size. It was raining out but fortunately most of the wood wasn't wet.
Which actually doesn't really matter. The wood sat outside for about a year prior and is basically ****. However, free **** is sometimes better than expensive good stuff and in this case its not so much me not wanting to spend the money on new wood as it is the challenge of trying to make this wood work. I'm hoping that some of the cracks and weathering will actually add to the character once I get it finished.
So, I dragged these 4x4x8ft 'log' (or 'lumps') up on to the radial saw table and went to work.


And it was one of those stupid things that hit and damaged part of my grinder
So right now they are rough cut and I will probably take them to my FIL's house and use his miter saw (don't have a miter saw yet) as I want a clean even cut on each one and my Unisaw only cuts up to 3". These will be the legs. The bench idea will use 8 of these legs in a design similar to this:
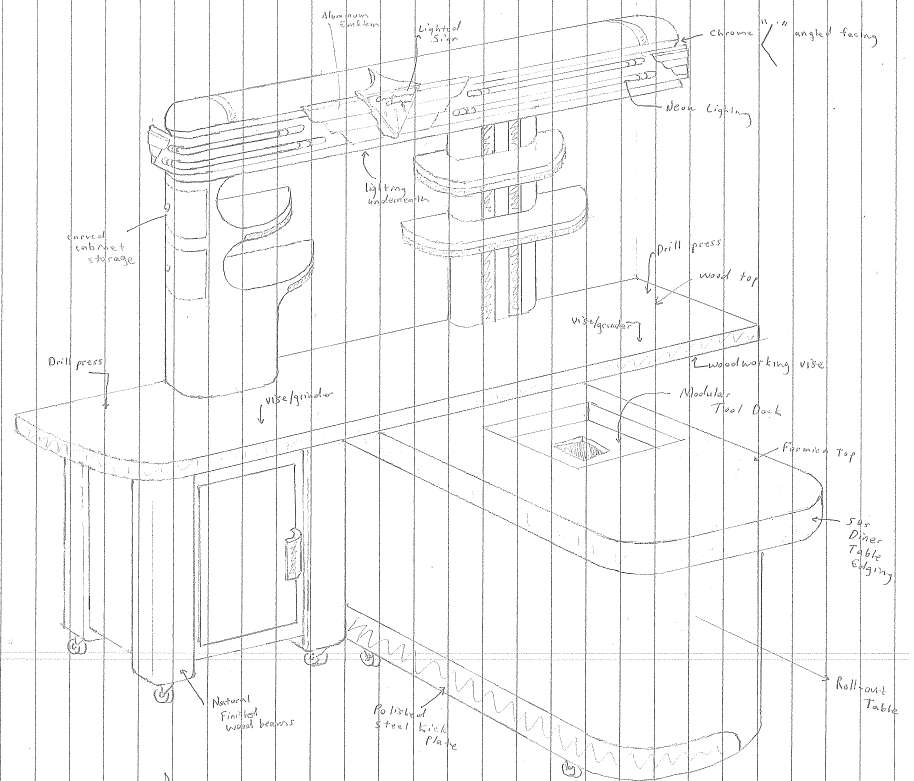
...only it will now be a slightly different design as the plans have matured
Next step after cutting them all to length will be to clean them up just a little bit, route channels for the side panels and round out the exposed corners on the router.
Now that I've talked old tools for forever, its time to get back to 'gitt'n r done'
If I veer off topic again and start up on tools (I am known to do this) just gently steer me back
(exception is the Atlas rebuild)Its time to get back to the garage!!!
Per Jeff's suggestion about remember priorities, it was enough of a motivation to grab the 4x4 wood I was keeping for the workbench project on the side of the house and cut it to rough size. It was raining out but fortunately most of the wood wasn't wet.
Which actually doesn't really matter. The wood sat outside for about a year prior and is basically ****. However, free **** is sometimes better than expensive good stuff and in this case its not so much me not wanting to spend the money on new wood as it is the challenge of trying to make this wood work. I'm hoping that some of the cracks and weathering will actually add to the character once I get it finished.
So, I dragged these 4x4x8ft 'log' (or 'lumps'
) up on to the radial saw table and went to work.
And it was one of those stupid things that hit and damaged part of my grinder
So right now they are rough cut and I will probably take them to my FIL's house and use his miter saw (don't have a miter saw yet) as I want a clean even cut on each one and my Unisaw only cuts up to 3". These will be the legs. The bench idea will use 8 of these legs in a design similar to this:
...only it will now be a slightly different design as the plans have matured
Next step after cutting them all to length will be to clean them up just a little bit, route channels for the side panels and round out the exposed corners on the router.
Wingnut65
Well-known member
Collateral Damage is not suppose to be part of a garage build. Sorry to hear that I had anything to do with the grinder setback, but if it was a learning process for all... Isn't there a saying about obtaining 'good judgment'?
I really think Ryan had something to do with this motivation to proceed to the next step in the build. Congrats on moving forward. Love that design.
+2 on Rick's idea on the clean side and yet-to-be clean side.
I really think Ryan had something to do with this motivation to proceed to the next step in the build. Congrats on moving forward. Love that design.
+2 on Rick's idea on the clean side and yet-to-be clean side.
bacarl
Well-known member
Ha, check this out! Randomly happened across this on CL and immediately remembered your thread - check out that logo!
http://detroit.craigslist.org/wyn/tls/2667651712.html

The guy is right around the corner from me so I could pick this up for you if it's something you want for the garage. Shipping to Denver might be pricey, though...
Great space, by the way, congrats on all your progress!
http://detroit.craigslist.org/wyn/tls/2667651712.html
The guy is right around the corner from me so I could pick this up for you if it's something you want for the garage. Shipping to Denver might be pricey, though...
Great space, by the way, congrats on all your progress!
Last edited:
That A King-Seely 10" is the stuff. Damn I would love to have that. Do these have vacuum ports? Never seen one if real life. I only have the more modern tools. But that King 10" is epic. Thanks to you, I now have another thing to look for. Great. lol.
Also, wanted to ask you. Why are you kirfing wood strips for the edges. I like to take plywood and cut out the top. Then I take smaller scrap pieces to build up thickens, from underneath, and cut them out to the same curve as the top. After that, a little veneer strip, and you get the same thing, but with much more strength. I just worry someone will grab that one day to support themselves, and rip it off. Would be a massive shame after such effort, and beauty.
Either way, looking great. Now get back on track. Tired of seeing posts without pictures.
Also, wanted to ask you. Why are you kirfing wood strips for the edges. I like to take plywood and cut out the top. Then I take smaller scrap pieces to build up thickens, from underneath, and cut them out to the same curve as the top. After that, a little veneer strip, and you get the same thing, but with much more strength. I just worry someone will grab that one day to support themselves, and rip it off. Would be a massive shame after such effort, and beauty.
Either way, looking great. Now get back on track. Tired of seeing posts without pictures.
OP
Red Leader
Well-known member
That A King-Seely 10" is the stuff. Damn I would love to have that. Do these have vacuum ports? Never seen one if real life. I only have the more modern tools. But that King 10" is epic. Thanks to you, I now have another thing to look for. Great. lol.
Also, wanted to ask you. Why are you kirfing wood strips for the edges. I like to take plywood and cut out the top. Then I take smaller scrap pieces to build up thickens, from underneath, and cut them out to the same curve as the top. After that, a little veneer strip, and you get the same thing, but with much more strength. I just worry someone will grab that one day to support themselves, and rip it off. Would be a massive shame after such effort, and beauty.
Either way, looking great. Now get back on track. Tired of seeing posts without pictures.
Haha, will do, sir!
As far as the kerfing goes, I did it probably because I didn't think of the other way sooner haha. Actually, it is quite strong - I filled in the back 'open spaces' with industrial liquid nails and once dried, it doesn't budge one bit. Unless I move something very, very heavy into it, it will probably hold out just fine. However, the way you mentioned is something I might try for the future, and maybe for parts of the art deco work bench build as well.
And yes, that King Seely Craftsman saw is amazingly beautiful. The only thing I am not a fan of is the handwheels, where were cheap hollow pot metal. Many were broken on these saws. A small imperfection on a near otherwise perfect tool.
OP
Red Leader
Well-known member
Ha, check this out! Randomly happened across this on CL and immediately remembered your thread - check out that logo!
http://detroit.craigslist.org/wyn/tls/2667651712.html
The guy is right around the corner from me so I could pick this up for you if it's something you want for the garage. Shipping to Denver might be pricey, though...
Great space, by the way, congrats on all your progress!
Wow, that's cool! I'm wondering if that might fit on the top of the vintage Craftsman rolling tool cart.
I'm not quite there yet with the purchase of a vintage tool chest...but soon!
Beautiful find! If $40 isn't much, heck you could pick that up yourself. If it comes with the front piece, it is a steal.
rickairmedic
Well-known member
The front drawer cover is sticking out from under the bottom drawer .
Rick
.Rick
Haha, will do, sir!
As far as the kerfing goes, I did it probably because I didn't think of the other way sooner haha. Actually, it is quite strong - I filled in the back 'open spaces' with industrial liquid nails and once dried, it doesn't budge one bit. Unless I move something very, very heavy into it, it will probably hold out just fine. However, the way you mentioned is something I might try for the future, and maybe for parts of the art deco work bench build as well.
And yes, that King Seely Craftsman saw is amazingly beautiful. The only thing I am not a fan of is the handwheels, where were cheap hollow pot metal. Many were broken on these saws. A small imperfection on a near otherwise perfect tool.
Ha, when I Kerf anything, I fill the gaps with Liquid nails as well. Then take edge banding, glue and shoot finish nails through it. I only cut Kerfs when I have to make some huge arch, like for a transom. It is quite solid when everything dries.