To avoid these ads, REGISTER NOW!

Above 1200 Sq/FT Blue Bomber's Garages

Wokspaces above 1200 squarefeet.

Locker537

Well-known member
Joined
Sep 25, 2016
Messages
488
Location
Massachusetts
BlueBomber - the garage progress looks great!

Given your location and the snow covered pics, I'd say we are a stone throw from each other.
 
To avoid these ads, REGISTER NOW!
OP
B

BlueBomber

Well-known member
Joined
Sep 14, 2013
Messages
3,201
Location
Outside Boston, MA
Okay, after much delay, here's an update on the other additions to my air compressor network that I hinted at last time.

I normally keep my 80-gal compressor fully charged all the time, but shut off the distro system just above the tank via a manual ball valve when I'm done using air tools. This keeps the tank from cycling due to small leaks in the distro system. Now that the compressor will be supplying air for two buildings, I wanted an easy way to activate the valve from the new garage. I also wanted an indicator to show when the valve was open so that I'd know the status of the valve and have a visual reminder to close the valve when done. So, after some creative shopping, and a few misfires, I settled on an electrically-activated 3/4" ball valve with built in open/closed state switches.

2c7199c886a5d450ef404e5b9149b614.jpg

Here's the one I bought:

https://rover.ebay.com/rover/0/0/0?mpre=https://www.ebay.com/ulk/itm/273030881172

I also wanted to add an automatic tank drain, because I'm terrible about remembering to do that regularly. That, and the tiny little stock drain valve is a pain in the **** to open when the tank is fully pressurized. Here's the valve I bought:

https://www.amazon.com/dp/B015IY9VJI/?tag=atomicindus08-20

... and the water that was in the tank when I depressurized it for this work.

400f511d68c9af6c0b4c9f4ffcde7b66.jpg

My plan required a new 120V circuit to the compressor to power both valves. The 3/4" valve is controlled from switches at three locations (tank-side, workbench-side and new garage) via a four-way switch circuit. The valve state signal is distributed to the same locations via 12V, 22-gauge speaker wire. The tank auto drain has a built-in timer, but the longest interval available is 45 minutes. Since I only need it to run maybe once per day, I'll control it via an outlet connected a vintage timer I picked up at a sale. Here's the schematic:

2f62e79ec3b9951ece95360c06302b1e.jpg

The ball valve installed without a hitch, and after a little second guessing (that's just part of the creative process, right? :) 
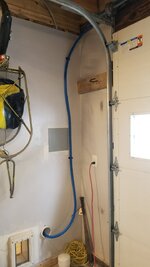
I routed the flexible line to the closest end of the existing 3/4" galvanized distro piping. This involved weaving the line around one garage door jack shaft and down the wall to the utility pipe. Not as tidy as I could envision, but functional.

2686d8a9d14f18c7971e247d013d1bfe.jpg6c898fb21bdb800d3a12ba0a66d0cd49.jpg34bb01dbb83e4853f2fd326df06e2a81.jpgfaf71f8d097aa0fc00afac8a372bf33f.jpg

Here's the timer I put to work, an ancient Sangamo that's way overkill for this application, but the price was right! Behind the timer you can see the ball valve switch and the outlet. One side of the outlet gets full-time power for the 12V power source and the other is controlled by the timer. The black and red speaker wire will activate an LED that will light when the valve is open.

3b24cf955edcf6188d32abc52c7a0f88.jpg

The second switch went to the workbench side, on the same wall as the wrench rack. This one will just house a switch, but I put it in as a 2-gang after deciding a single wouldn't leave much room for the indicator. I modified a double blank cover for switch and light, and voila!

1634d2ef01e71fa9a875d9c9e91e4e9e.jpg3454cf5bf2aba6c0dcae844eda0a563a.jpg5cd035c9d1fc4172c026de0f3b5127ec.jpg5b2851dfb98e3a54859ef55995c737cd.jpg

It works great! The valve takes a few seconds to open when energized, and so the distro system gradually pressurizes, rather than being hit with a sharp blast. When power is cut, the valve automatically closes. I still need to pull the three-way circuit conductor thru the utility pipe to the other building, but I'll wait until the building inspections are done.

This was a bit of an extravagance--$200 and two day's work just to save a trip between the garages. But seeing and hearing it work in real life after dreaming it up made it totally worth it!


Sent from my SM-G950U using Tapatalk
 

Attachments

  • 5b2851dfb98e3a54859ef55995c737cd.jpg
    5b2851dfb98e3a54859ef55995c737cd.jpg
    78.5 KB · Views: 2
  • 5cd035c9d1fc4172c026de0f3b5127ec.jpg
    5cd035c9d1fc4172c026de0f3b5127ec.jpg
    106.2 KB · Views: 2
  • 3454cf5bf2aba6c0dcae844eda0a563a.jpg
    3454cf5bf2aba6c0dcae844eda0a563a.jpg
    70.7 KB · Views: 2
  • 1634d2ef01e71fa9a875d9c9e91e4e9e.jpg
    1634d2ef01e71fa9a875d9c9e91e4e9e.jpg
    113.1 KB · Views: 2
  • 3b24cf955edcf6188d32abc52c7a0f88.jpg
    3b24cf955edcf6188d32abc52c7a0f88.jpg
    63.4 KB · Views: 2
  • faf71f8d097aa0fc00afac8a372bf33f.jpg
    faf71f8d097aa0fc00afac8a372bf33f.jpg
    68 KB · Views: 2
  • 34bb01dbb83e4853f2fd326df06e2a81.jpg
    34bb01dbb83e4853f2fd326df06e2a81.jpg
    70.4 KB · Views: 2
  • 2686d8a9d14f18c7971e247d013d1bfe.jpg
    2686d8a9d14f18c7971e247d013d1bfe.jpg
    38.8 KB · Views: 2
  • 2c7199c886a5d450ef404e5b9149b614.jpg
    2c7199c886a5d450ef404e5b9149b614.jpg
    115.5 KB · Views: 2
  • 6c898fb21bdb800d3a12ba0a66d0cd49.jpg
    6c898fb21bdb800d3a12ba0a66d0cd49.jpg
    82.9 KB · Views: 2
  • 400f511d68c9af6c0b4c9f4ffcde7b66.jpg
    400f511d68c9af6c0b4c9f4ffcde7b66.jpg
    100 KB · Views: 2
  • 2f62e79ec3b9951ece95360c06302b1e.jpg
    2f62e79ec3b9951ece95360c06302b1e.jpg
    47.7 KB · Views: 2
Last edited:
OP
B

BlueBomber

Well-known member
Joined
Sep 14, 2013
Messages
3,201
Location
Outside Boston, MA
I'm working on my Dad's '33 Chevy Master over the next few days. We're trying to get the tripower setup to work, so we're swapping out three homebuilt Rochester carbs for three professionally rebuilt ones. Wish us luck! We've only been trying for two years to get it back on the road.3b44c7c90d8f769bd3d476db0e4ef522.jpg9a86f916977b3ad56b55a25ef254dbdc.jpg9f7fd582131f69da65437836ccfd541d.jpg

Sent from my SM-G950U using Tapatalk
 

Attachments

  • 9f7fd582131f69da65437836ccfd541d.jpg
    9f7fd582131f69da65437836ccfd541d.jpg
    152.9 KB · Views: 2
  • 9a86f916977b3ad56b55a25ef254dbdc.jpg
    9a86f916977b3ad56b55a25ef254dbdc.jpg
    151 KB · Views: 2
  • 3b44c7c90d8f769bd3d476db0e4ef522.jpg
    3b44c7c90d8f769bd3d476db0e4ef522.jpg
    145.9 KB · Views: 2

zmotorsports

ALLIANCE MEMBER
Joined
Oct 20, 2009
Messages
21,312
Location
Northern Utah
Nice job on the compressor air valve shutoff system.

I've been waffling over something like this. Currently my air compressor is in the next bay over and just walk over and close the ball valve before walking out the door and locking up the shop each night. Not a big deal but an electrical shutoff with indicator light would be kind of cool.
 
OP
B

BlueBomber

Well-known member
Joined
Sep 14, 2013
Messages
3,201
Location
Outside Boston, MA
How did you get SWMBO to agree to give up her parking bay in the garage ? [emoji38]
(Loving the color on the Chevy [emoji106])
SWMBO can be persuaded with logical arguments coupled with puppy dog eyes. Actually, she's pretty reasonable, as long as she doesn't have to clear snow off of her car..

However, in this case we're working in my Dad's garage. The metallic blue is one of my favorite features of my Dad's hot rod.

Sent from my SM-G950U using Tapatalk
 

Bob Heine

ALLIANCE MEMBER
Joined
Oct 24, 2009
Messages
10,703
Location
Boca Raton, Florida
BB, in my youth the idea of driving a 4-door was right up there with wearing a dress. As I got older (when my kids got bigger) a 4-door was a necessary evil. In my 40s we traveled with friends and a big fat Lincoln Town Car was perfect. Now I perk up every time I see a 4-door hot rod or custom go across the block at Barrett-Jackson or Mecum. I still have a couple of Corvettes but the Cadillac CTS-V is the most frequently driven in the stable (mainly because I can still climb out after a 4-mile trip).
 

Attachments

  • 3b44c7c90d8f769bd3d476db0e4ef522.jpg
    3b44c7c90d8f769bd3d476db0e4ef522.jpg
    143.3 KB · Views: 2
OP
B

BlueBomber

Well-known member
Joined
Sep 14, 2013
Messages
3,201
Location
Outside Boston, MA
Nice job on the compressor air valve shutoff system.

I've been waffling over something like this. Currently my air compressor is in the next bay over and just walk over and close the ball valve before walking out the door and locking up the shop each night. Not a big deal but an electrical shutoff with indicator light would be kind of cool.
Thanks, z. Once it's fully run to the other building, I'll enjoy it even more, I think!
BB, in my youth the idea of driving a 4-door was right up there with wearing a dress. As I got older (when my kids got bigger) a 4-door was a necessary evil. In my 40s we traveled with friends and a big fat Lincoln Town Car was perfect. Now I perk up every time I see a 4-door hot rod or custom go across the block at Barrett-Jackson or Mecum. I still have a couple of Corvettes but the Cadillac CTS-V is the most frequently driven in the stable (mainly because I can still climb out after a 4-mile trip).
Yeah, I get ya. My daily driver after college was a 4-dr '60 Bel Air. It's the one in my avatar picture and is also the origin of my screen name. Even though I have owned it for over 30 years, I still want a 2-dr '60. My dad's car, however, surpasses any trepidation about owning a 4-dr. It overcomes it with sheer coolness.
Nice Progress there BB, coming along nicely.... you've got some nice added space now...
Thanks, JDRSA. There's more to come once the building inspection is complete.

Sent from my SM-G950U using Tapatalk
 
OP
B

BlueBomber

Well-known member
Joined
Sep 14, 2013
Messages
3,201
Location
Outside Boston, MA
I squeezed in two garage related activities this weekend.

First, yesterday was the last day on a Harbor Freight coupon for their 44" tool chests. There's a whole thread on here somewhere of folks building these into workbenches (several, actually), so I decided to copy the idea and get two for mine. When I called the closest HF store, they didn't have any. They pointed me at another in the Boston area (we are blessed with an abundance of such stores). I called THAT store before I left the house and they said they still had two. However, when i showed up, they said their inventory was wrong and they only had one. The manager was very apologetic and he called a third store, had them confirm their inventory, and had them hold it for me (something they don't normally do, I was told). So, after a lot more miles than expected, here are my two boxes.

796d040ab4d906d0ddc98d6e66ffbb8c.jpg

In the afternoon, I put up the exterior lights over the doorways. I like this style of lights but I had trouble finding an affordable set. These lights are Amazon Chinese imports and once I got them, I saw why they were half the money of the others--they are about half the quality. We'll see how they hold up.


b23f0657a8f6d16100ab7c37ec7070ce.jpg
 

Attachments

  • b23f0657a8f6d16100ab7c37ec7070ce.jpg
    b23f0657a8f6d16100ab7c37ec7070ce.jpg
    144.1 KB · Views: 3
  • 796d040ab4d906d0ddc98d6e66ffbb8c.jpg
    796d040ab4d906d0ddc98d6e66ffbb8c.jpg
    48.6 KB · Views: 6
Last edited:
OP
B

BlueBomber

Well-known member
Joined
Sep 14, 2013
Messages
3,201
Location
Outside Boston, MA
Let's start with the fun thing I did today--I bought a two-post lift for my new garage. I've been watching for a used one on Craigslist since last summer, and finally found a decent used one advertised for $750. However, just before I picked up the phone to call, I realized that the company that made the lift was out of business and that for twice that money, I could buy a brand new lift from companies that are only a tech support phone call away.

After a little online browsing, I decided to take a drive up to Greg Smith Equipment in New Hampshire to buy their introductory Elite 9KOH 9,000-lb lift. However, once I got up there and talked with the staff, I ended up bringing home their bigger PV-10P. I wasn't really upsold, as they would have happily sold me the Elite, but after talking it over with them, their PV-9P has thicker metal on the lifting arms. This is where the most stress occurs on 2-post lifts, and for another $500, I could have a better safety margin for lifting my 3/4 ton pickup. Once I decided to step up to the PV-9P 9,000 pound lift, I realized the -10P 10,000 pound lift was only $200 more. Picking it up saved on the freight cost, so for $2245, I came home with a 10K-lb lift that will easily lift any vehicle I plan to put in there almost 7-ft in the air. Here's a picture of the new lift in the driveway.

attachment.php

attachment.php


I decided to leave it in the back of the truck until I could round up some buddies to help me unload it next weekend. Instead, I tackled the trim around the garage door and that's when the day went from fun to frustrating. I started by cutting and fitting the vinyl jamb moulding around the first garage door opening. You can see the gap I had to work with here.

attachment.php


I had to notch the back of the jamb boards to relieve interference with the garage door brackets.

attachment.php

attachment.php


I also managed to crack two jamb boards, one by letting it fall and strike the ground and the other by bending the jamb while driving a nail. In this cold weather, it doesn't take much. Next up was the vinyl door stop moulding and I had previously test fit it and concluded the flexible seal would span the remaining gap and seal the door. I was wrong.

This picture shows what I thought I'd get...

attachment.php


...and what actually happened.

attachment.php


The gap was too wide to be spanned by the flexible lip. Drats. I'd have to pull it all off and install a filler board first to bring the jambs further in. So, off to Home Depot (with 1900 pounds of lift still strapped in the back!) to pick up three 12' 1"x6" pressure treated board. Back home, I cut and fit them to the second door opening and went to work revising and trimming in that door. I finished the one door by 9PM, to include all of the J-trim needed to start the vinyl siding. Here're the last shots of the night.

attachment.php

attachment.php


I'm no fine craftsman like others on here. I will have some caulking to do to hide my mistakes and seal things up, but I'm hoping the other door goes faster tomorrow and allows me to get some siding on this side of the garage before the weekend's done.
 
Last edited:
OP
B

BlueBomber

Well-known member
Joined
Sep 14, 2013
Messages
3,201
Location
Outside Boston, MA
Repeated post to try and get the pictures with the text...

Let's start with the fun thing I did today--I bought a two-post lift for my new garage. I've been watching for a used one on Craigslist since last summer, and finally found a decent used one advertised for $750. However, just before I picked up the phone to call, I realized that the company that made the lift was out of business and that for twice that money, I could buy a brand new lift from companies that are only a tech support phone call away.

After a little online browsing, I decided to take a drive up to Greg Smith Equipment in New Hampshire to buy their introductory Elite 9KOH 9,000-lb lift. However, once I got up there and talked with the staff, I ended up bringing home their bigger PV-10P. I wasn't really upsold, as they would have happily sold me the Elite, but after talking it over with them, their PV-9P has thicker metal on the lifting arms. This is where the most stress occurs on 2-post lifts, and for another $500, I could have a better safety margin for lifting my 3/4 ton pickup. Once I decided to step up to the PV-9P 9,000 pound lift, I realized the -10P 10,000 pound lift was only $200 more. Picking it up saved on the freight cost, so for $2245, I came home with a 10K-lb lift that will easily lift any vehicle I plan to put in there almost 7-ft in the air. Here's a picture of the new lift in the driveway.


I decided to leave it in the back of the truck until I could round up some buddies to help me unload it next weekend. Instead, I tackled the trim around the garage door and that's when the day went from fun to frustrating. I started by cutting and fitting the vinyl jamb moulding around the first garage door opening. You can see the gap I had to work with here.


I had to notch the back of the jamb boards to relieve interference with the garage door brackets.


I also managed to crack two jamb boards, one by letting it fall and strike the ground and the other by bending the jamb while driving a nail. In this cold weather, it doesn't take much. Next up was the vinyl door stop moulding and I had previously test fit it and concluded the flexible seal would span the remaining gap and seal the door. I was wrong.

This picture shows what I thought I'd get...


...and what actually happened.


The gap was too wide to be spanned by the flexible lip. Drats. I'd have to pull it all off and install a filler board first to bring the jambs further in. So, off to Home Depot (with 1900 pounds of lift still strapped in the back!) to pick up three 12' 1"x6" pressure treated board. Back home, I cut and fit them to the second door opening and went to work revising and trimming in that door. I finished the one door by 9PM, to include all of the J-trim needed to start the vinyl siding. Here're the last shots of the night.


I'm no fine craftsman like others on here. I will have some caulking to do to hide my mistakes and seal things up, but I'm hoping the other door goes faster tomorrow and allows me to get some siding on this side of the garage before the weekend's done.
20180407_111615.jpg20180407_111623.jpg20180407_143147.jpg20180407_143153.jpg20180407_171056.jpg20180407_171050.jpg20180407_180557.jpg20180407_204927.jpg

Sent from my SM-G950U using Tapatalk
 
Last edited:
OP
B

BlueBomber

Well-known member
Joined
Sep 14, 2013
Messages
3,201
Location
Outside Boston, MA
Tapatalk is not letting me go back and add pictures to previous posts. Its been getting harder and harder to use. Maybe I need to spend some time looking into it.

I got the second garage door and the main door trimmed, and managed to get start at the siding between the doorways.20180408_132640.jpg

Sent from my SM-G950U using Tapatalk
 
OP
B

BlueBomber

Well-known member
Joined
Sep 14, 2013
Messages
3,201
Location
Outside Boston, MA
So here's how you unload an 1,850-pound two post ļift from your pickup truck by yourself:

First, build two skid pads. I bought a large polypropylene cutting board for cheap on Amazon and then cut off two six-inch squares. Next, I screwed on a 1-1/2" square strip (countersink the screw heads) and then laid two pieces of 1/8" metal plate on top of the poly to spread the load across the truck bed.

20180414_203059.jpg20180414_203810.jpg20180414_214943.jpg

Next, lift up the back end of the lift with a cherry picker and chain the lift to the foundation bolts. Then drive slowly forward and watch in satisfaction as the lift glides easily back out of the bed. Panic briefly when you go too far and the skids drop 900 pounds on to your tailgate! (It survived)

20180414_215615.jpg20180414_220001.jpg

Then, repurpose that pile of too-short window headers that you never threw away into cribbing to hold up one end of the lift package. Bring the cherry picker around to the other side and lift the load off of the tailgate. Drive the truck out from under it and set that end down on a pair of 2x6s spanning your two tallest jack stands.

20180414_222843.jpg20180414_223809.jpg

Finally, very gradually lower the lift to the ground by lifting each end in succession and removing a little bit of cribbing each time. Don't get greedy and try to remove too much--and don't put yourself anywhere you could be hurt if the cribbing fails.

The last picture shows all 1,850 pounds safely on the floor. It will be a while until I can get the lift installed, but at least i can use the truck again!

20180414_225851.jpg

Sent from my SM-G950U using Tapatalk
 
Last edited:
OP
B

BlueBomber

Well-known member
Joined
Sep 14, 2013
Messages
3,201
Location
Outside Boston, MA
I picked up a central vacuum canister at a storage sale yesterday. I'll probably install it in the new garage. Its overkill for vacuuming cars, but for $45, it was a good buy.e0e5103ccdb9872c567965e87c6d9a06.jpg

You know how sometimes you have a project you finished years ago, and you walk by it one day and notice you overlooked an important step? That occurred to me on this flight of steps I built for the new 2nd floor entrance to the old garage. I completed the project in 2013/2014, but I noticed after plowing snow this winter that one of the 6x6s was a little askew. Closer examination revealed...d'oh!...I had never driven nails through the Simpson bracket on the footer! I took care of that today. smh...

759e6f04f1d877d39a90f2c7a78fa070.jpg27257e7a72fa8f7f3900b5013c243470.jpg

Another "what was I thinking" moment--I ran out of vinyl siding after going through seven cartons of the stuff. Apparently I needed eight. I was hoping I could at least get the front side completely finished but alas it was not to be. I'll have to order another carton, and that'll be another month...grumble-growl! Well, there are lots of other things to do while I'm waiting on the siding.

827f61f8286954edec4435e8431a2b65.jpg
 

Attachments

  • 827f61f8286954edec4435e8431a2b65.jpg
    827f61f8286954edec4435e8431a2b65.jpg
    144 KB · Views: 9
  • 27257e7a72fa8f7f3900b5013c243470.jpg
    27257e7a72fa8f7f3900b5013c243470.jpg
    198.8 KB · Views: 7
  • 759e6f04f1d877d39a90f2c7a78fa070.jpg
    759e6f04f1d877d39a90f2c7a78fa070.jpg
    149.1 KB · Views: 3
  • e0e5103ccdb9872c567965e87c6d9a06.jpg
    e0e5103ccdb9872c567965e87c6d9a06.jpg
    112.3 KB · Views: 3
Last edited:
To avoid these ads, REGISTER NOW!
OP
B

BlueBomber

Well-known member
Joined
Sep 14, 2013
Messages
3,201
Location
Outside Boston, MA
You realize that you're going to have to paint one of those garages to match, don't you ? :evil: [emoji38]
Hush your mouth! :->

SWMBO wants to change the color on the main house. It'll end up being closer to the new garage. I think the old "barn" will stay red.

Sent from my SM-G950U using Tapatalk
 

captain14

Well-known member
Joined
Dec 19, 2012
Messages
7,013
Location
Near College Park Maryland 20740
How much persuasion was needed for the post to be centered again on the connection?

I’m finding missing trim nails on my garage when the tables and soffits were installed 3 1/2 years ago. This was while looking at the 8-10 nails pops under the garage shingles.
That’s a sooner project than later. No holes in the shingles yet.
 
OP
B

BlueBomber

Well-known member
Joined
Sep 14, 2013
Messages
3,201
Location
Outside Boston, MA
How much persuasion was needed for the post to be centered again on the connection?

I’m finding missing trim nails on my garage when the tables and soffits were installed 3 1/2 years ago. This was while looking at the 8-10 nails pops under the garage shingles.
That’s a sooner project than later. No holes in the shingles yet.

Not a lot, maybe an inch at the bottom. The post wasn't carrying much weight so a few taps with a hammer was all it needed.
 

cbacres

Well-known member
Joined
May 28, 2010
Messages
5,998
Location
SW Florida
Everything's looking good BB, funny how I started on your electric valve posting. I'm building a storage building to give the shop some relief and I'm considering setting the air compressor in the new building. This would be a great set up, along with a remote start and might as well have a gauge to see what the pressure is:lol_hitti.

Thanks for showing me something else I didn't know I needed!

Good job though.
 
OP
B

BlueBomber

Well-known member
Joined
Sep 14, 2013
Messages
3,201
Location
Outside Boston, MA
Everything's looking good BB, funny how I started on your electric valve posting. I'm building a storage building to give the shop some relief and I'm considering setting the air compressor in the new building. This would be a great set up, along with a remote start and might as well have a gauge to see what the pressure is :lol_hitti.

Thanks for showing me something else I didn't know I needed!

Good job though.

Cross fertilization is what its all about--for example: I didn't even think of having a pressure gauge on the new garage end of the air line! I'll be adding that for sure once finalize the work bench and subsequently place the air lines.

Thanks!
 

bagged89s10

Well-known member
Joined
Mar 13, 2005
Messages
4,607
Location
CT
I picked up a central vacuum canister at a storage sale yesterday. I'll probably install it in the new garage. Its overkill for vacuuming cars, but for $45, it was a good buy.e0e5103ccdb9872c567965e87c6d9a06.jpg

You know how sometimes you have a project you finished years ago, and you walk by it once day and notice you overlooked an important step? That occurred to me on this flight of steps I built for the new 2nd floor entrance to the old garage. I completed the project in 2013/2014, but I noticed after plowing snow this winter that one of the 6x6s was a little askew. Closer examination revealed...d'oh!...I had never driven nails through the Simpson bracket on the footer! I took care of that today. smh...

759e6f04f1d877d39a90f2c7a78fa070.jpg27257e7a72fa8f7f3900b5013c243470.jpg

Another "what was I thinking" moment--I ran out of vinyl siding after going through seven cartons of the stuff. Apparently I needed eight. I was hoping I could at least get the front side completely finished but alas it was not to be. I'll have to order another carton, and that'll be another month...grumble-growl! Well, there are lots of other things to do while I'm waiting on the siding.

827f61f8286954edec4435e8431a2b65.jpg


That central vac is great. I picked up an old sears kenmore central vac unit last year and use it as my garage shop vac and dust collector when doing small woodwork. It works great for now.
 

Attachments

  • 827f61f8286954edec4435e8431a2b65.jpg
    827f61f8286954edec4435e8431a2b65.jpg
    139.5 KB · Views: 2
  • 27257e7a72fa8f7f3900b5013c243470.jpg
    27257e7a72fa8f7f3900b5013c243470.jpg
    189.8 KB · Views: 2
  • 759e6f04f1d877d39a90f2c7a78fa070.jpg
    759e6f04f1d877d39a90f2c7a78fa070.jpg
    144.6 KB · Views: 1
  • e0e5103ccdb9872c567965e87c6d9a06.jpg
    e0e5103ccdb9872c567965e87c6d9a06.jpg
    110.1 KB · Views: 2
OP
B

BlueBomber

Well-known member
Joined
Sep 14, 2013
Messages
3,201
Location
Outside Boston, MA
Another "what was I thinking" moment--I ran out of vinyl siding after going through seven cartons of the stuff. Apparently I needed eight. I was hoping I could at least get the front side completely finished but alas it was not to be. I'll have to order another carton, and that'll be another month...grumble-growl! Well, there are lots of other things to do while I'm waiting on the siding.

827f61f8286954edec4435e8431a2b65.jpg

Amazingly, the siding arrived within three days! I picked it up Friday and plan to get more siding work done today (if it stops raining, that is...).
 

Attachments

  • 827f61f8286954edec4435e8431a2b65.jpg
    827f61f8286954edec4435e8431a2b65.jpg
    139.5 KB · Views: 5
OP
B

BlueBomber

Well-known member
Joined
Sep 14, 2013
Messages
3,201
Location
Outside Boston, MA
Tapatalk is not letting me add pictures to this post I typed on my computer. See the next entry for the pictures.

Between rain showers, I did some more soffit work on the north side of the garage. This was a tedious job on the south side--a lot of time going up and down the ladder figuring out how it all would go together. I had to cut and fit a 2x6 in each corner to box the horizontal soffits and then do the same to a 10" extension of the corner trim to bring it up to meet the gable end soffit box. After much ruminating and research on various ways to fasten the soffit to the fascia board, I decided to screw it through the valleys directly to the edge of the 1x6 fascia, and capture the other end with some F-channel vinyl trim on the wall side. Later, I'll bend some aluminum trim roll and cover the exposed edge of the soffit and the screw heads.

Once the soffit was in, I checked the fitment of the last course of siding. Naturally, it was just short of the distance I would have needed after cutting off the top siding lock. However, i figured out that if I left the top lock on, it would slip in under the skiny J-channel intended to capture a single layer of vinyl. The main fold of the top lock would still show, but I decided it would look okay way up at the top of the wall when viewed from the ground.

Here's the north wall with all the vinyl finished. I only need to wrap the fascia board in aluminum to call it done. I still have the back gable fascia to do, then I'll rent a metal brake, and get all the trim done in a weekend (I hope!).
 
Last edited:

Jayman17

Well-known member
Joined
Feb 6, 2017
Messages
3,793
Location
Seattle, Wa
Looks great BB! I don't envy climbing up and down that ladder a bunch of times :eyecrazy:. Also love the compressor set up you have.

Jay
 
OP
B

BlueBomber

Well-known member
Joined
Sep 14, 2013
Messages
3,201
Location
Outside Boston, MA
Looks great BB! I don't envy climbing up and down that ladder a bunch of times :eyecrazy:. Also love the compressor set up you have.

Jay

Thanks, Jay. The ladder time is good exercise, although I'll admit to muttering a few curse words more than once after getting to the top of the ladder and realizing I left my tapemeasure next to the chop saw...
 

C_F

ALLIANCE MEMBER
Joined
Jan 21, 2005
Messages
9,675
Location
Utah...SNOW BLOWS!
Thanks, Jay. The ladder time is good exercise, although I'll admit to muttering a few curse words more than once after getting to the top of the ladder and realizing I left my tapemeasure next to the chop saw...
Man I sure hate it when I do that.

The garage is looking great!:beer:
 

drivesitfar

Well-known member
Joined
Oct 23, 2013
Messages
35,988
Location
Pacific Northwest
BB: sorry I haven't made time to make a post on your thread yet so here's my first of many.

I don't post from my cell phone much and rarely post pics from my cell phone and I don't use Tapatalk. that saying when GJ made some changes and i try to post large pictures i usually have to download a picture before i browse and download the next one, but i'm able to get my 7 pictures per post if I have that many. maybe you are having the same issue with Tapatalk and just trying to download 2 or more pictures at a time and getting that security token warning message?

in any case your garage looks great and I bet you've maybe made an awesome tool board for all those double enders you've been amassing the last couple years.

cheers and have a great weekend!!
 
OP
B

BlueBomber

Well-known member
Joined
Sep 14, 2013
Messages
3,201
Location
Outside Boston, MA
Thanks for the advice, Drives. Tapatalk will allow me to upload a bunch of pictures as attachments in the original post, but won't let me go back and add pictures to an existing post. I sometimes like to do my writeup on the laptop and then go back and attach the pictures via Tapatalk from the phone. After a recent update to Tapatalk, it quit letting me do that.

I'm still tinkering with it. Tapatalk lets you host unlimited pictures for free, so I guess the trouble is worth the price.
 
OP
B

BlueBomber

Well-known member
Joined
Sep 14, 2013
Messages
3,201
Location
Outside Boston, MA
Here's a picture of the finished siding where it meets the soffit. I think it looks acceptable. I also got all the soffit done on the back peak section--the next two shots are in-progress about halfway up the one side with 3x the work to go.

20180505_092636.jpeg
20180505_104613.jpg20180505_104621.jpg

Funny story on the last picture. I've been very pleased with my Makita 18V lithium cordless hammer drill. I've used it extensively on this garage project for drilling holes and driving screws. Here, I've been securing the soffit to the fascia boards by running deck screws in the valleys of the soffit, directly into the edge of the 1x6. Anyhoo, I guess I totally forgot this was a 2-speed drill and had been driving my screws at the same low speed I'd been using for drilling holes. Shortly after the in progress pictures, the Makita slipped out of my hand and fell 10 feet to the ground, landing **** first on soft ground. After some muttered curses, I retrieved it and was surprised and delighted on the next screw I drove that it went in twice as fast. Apparently, the gear selector dropped into high speed upon impact. After realizing what had happened, I retracted my curses at dropping the drill and felt kinda dumb for not finding Hi-Gear on my own.

20180505_124655.jpg

Sent from my SM-G950U using Tapatalk
 
OP
B

BlueBomber

Well-known member
Joined
Sep 14, 2013
Messages
3,201
Location
Outside Boston, MA
The siding and soffit work are done! I put in some time today between rain showers and got the last of it finished. My last bits of ladder work will be to rent a sheet metal brake and fab up some aluminum fascia around all four sides. I also need to trim the shingles even on both gable ends.

In other news, I passed my electrical inspections! No notes, so no problems. I have a short punch list of items to take care of, then I call for my final, hopefully on the next two weeks.20180520_190130.jpeg20180520_195659.jpeg

Sent from my SM-G950U using Tapatalk
 

C_F

ALLIANCE MEMBER
Joined
Jan 21, 2005
Messages
9,675
Location
Utah...SNOW BLOWS!
Congrats on finishing your siding & soffits, it looks great!:beer:
That's great that you passed your electrical inspection too, you're almost finished. :thumbup:
 
OP
B

BlueBomber

Well-known member
Joined
Sep 14, 2013
Messages
3,201
Location
Outside Boston, MA
Alright--today I rented a 10-ft metal brake from Home Depot and got my aluminum fascia done! This was my first time using a metal brake, but I figured it out pretty quickly. The best feature was the rolling cutter attachment that effortlessly trimmed 10 feet of aluminum sheet dead straight in like 5 seconds!

As my first attempt at bending and installing aluminum trim coil, I give myself a B-. There are some gaps in the corners, and a few wrinkles in the sheet aluminum. I also had a few misfires where I forgot to add extra length on a measure to account for a fold. However, I'm happy enough to leave it as is. Hopefully, the mistakes that seem so glaring to me today will fade from perception over time.

Tomorrow, I work on the rest of the punch list!
20180525_131254.jpeg
20180525_140719.jpg
20180525_141025.jpeg
20180525_141737.jpeg
20180525_203203.jpeg
20180525_185710.jpeg

Sent from my SM-G950U using Tapatalk
 
Last edited:
To avoid these ads, REGISTER NOW!
Top Bottom