Outlawmws
Well-known member
That's quite the resurrection ZB! Well done!

Hello All,
Member of VM but new member here.
I also have a Jacobs 6426 chuck and have had little luck finding information and parts. I was hoping to ask some questions.
My chuck is missing the cammed allen bolt that tightens the jaws. I am looking for that piece.
My other options are:
1. replace the chuck with the same chuck that has all of its pieces
2. replace the chuck with another that mates with the same spindle (I really don't want to replace the spindle). As jweier111 explained, the spindle is a 5/8" shaft with a flat face ground onto the end of it. There is no taper.
I tried to follow the link FrankLee supplied for a newer chuck that mated with that spindle but the link was broken. I have done a fair amount of searching and have yet to find a chuck that appears to mount in the same way. Am I missing something?
thanks for your time!
Michael Williams
530-859-3468


Michael, I have a Jacobs 3326 1/2" chuck made to mount to a 5/8" straight spindle, has a set screw to lock it in place. PM me if you have interest.Hello All,
Member of VM but new member here.
I also have a Jacobs 6426 chuck and have had little luck finding information and parts. I was hoping to ask some questions.
My chuck is missing the cammed allen bolt that tightens the jaws. I am looking for that piece.
My other options are:
1. replace the chuck with the same chuck that has all of its pieces
2. replace the chuck with another that mates with the same spindle (I really don't want to replace the spindle). As jweier111 explained, the spindle is a 5/8" shaft with a flat face ground onto the end of it. There is no taper.
I tried to follow the link FrankLee supplied for a newer chuck that mated with that spindle but the link was broken. I have done a fair amount of searching and have yet to find a chuck that appears to mount in the same way. Am I missing something?
thanks for your time!
Michael Williams
530-859-3468


Jim: nice work on the 80/100. The pipe WTF is too funny.
I used to think that I've seen everything, but the more machines I see, the more I know I'm a long ways off.As I had mentioned last fall, my CMan 80 works well except for the run-out. I found another drill press that I am hoping to remove the spindle and try in the refurbished machine. It is a 103.23120. I have not found the manual yet for this exact model.
I think the manual for model 103.23640 may be a good substitute for your machine.
- overall good shape, the PO ran it for me. But after seeing the wiring, I am surprised it didn't start on fire. Every connection was just loosely wrapped and taped.
- run-out seemed good, just by eye. Fingers crossed !!
- the chuck seems good.
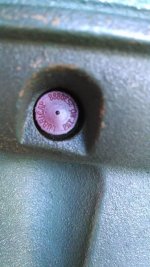
The chuck looks like a Supreme. The set screw on the collar is a plug for ball bearings used to retain the collar onto the body.
- alot of grease on the quill, pinion and spindle. Alot.
Lots of grease is a double edged sword. Time consuming clean-up, but it does protect parts from corrosion.
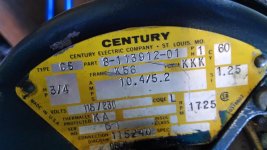
- 3/4 hp motor with some very poor wiring hacks.
Very, very common.
- a user installed depth stop with a grease zerk??
Now that is unique!
I've got the quill/spindle assembly out of the machine, and again, alot of old but clean grease. I need to find a spanner tool for this chuck.
Because that is a replacement chuck, it could be easy to remove. That is unless the PO used a retaining compound.
Since this was intended to be a donor machine, I may sell the motor if it is worth anything, and wait for another donor.
.
That is a beauty! Glad to help.and here is the earlier refurbished machine for reference, thanks to this forum and especially FrankLee.
.
FrankLee: thanks again for your assistance.
- yes the chuck is a Supreme 6T33C.
- there is old grease everywhere, the quill cavity was packed with grease. The quill lock spring was filled with grease. The set screws on the spindle bearings were replaced with more grease zerks, and that cavity was full of grease. But all this was good, it kept the rust down to a minimum.
I have the assemblies all apart except for the chuck, I don't have the right size spanner. Ugh, I want to fully clean the new spindle and check run-out now.
Thanks again.


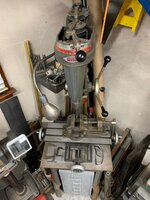
I have the same two units. Excepting that the variable speed drive is on the gold floor model instead of the gray bench top model.look what I found. Finally found a floor standing unit in good condition and within my cheap budget. As a bonus, it came with a slow speed middle pulley. The rotary table on the bottom was a separate purchase.
I’m using the base and column as a donor for my bench model which has the vari-slo setup. I prefer the gray color and that one only needs some more simple green cleaning. I’m not a fan of the gold. I’ll probably pop off the engine turned trim piece as well.
Am I better off parting the unit out, or selling a bench model with mismatched color base?
look what I found. Finally found a floor standing unit in good condition and within my cheap budget. As a bonus, it came with a slow speed middle pulley. The rotary table on the bottom was a separate purchase.
I’m using the base and column as a donor for my bench model which has the vari-slo setup. I prefer the gray color and that one only needs some more simple green cleaning. I’m not a fan of the gold. I’ll probably pop off the engine turned trim piece as well.
Am I better off parting the unit out, or selling a bench model with mismatched color base?
I have the same two units. Excepting that the variable speed drive is on the gold floor model instead of the gray bench top model.
Obviously these are yours to do with as you please.
However, I use both of mine. The gold floor model ONLY gets wood drilled, and the gray bench top model ONLY gets metal drilled. That way I never have sawdust around my metal projects and never have oil messing up wood projects.
So, I suggest you keep both of them and after doing what you plan with the gray one on the floor stand, use the remaining gold one on the bench top base.
Just my 2 cents worth; and probably worth less than what you paid.

Congrats!
That middle pulley is for an earlier Atlas-made machine with the swept-back head frame. Still a very good find!
I'm not a gold fan either.
Parts are almost always worth more than the whole. My criteria for parting out usually has to do with condition and how many parts are missing or broken.
You can always use the bench base, column and the gold table as a grinder stand. Recently, I've had some very good luck selling those dp pedestal stands for $60 to $80.
If the gold machine is equipped and the gray machine is not, other parts to swap to your keeper machine:
- the rapid adjust feed stop
- the quill assembly with the snap ring
- steel lock cylinders for the softer cast cylinders
What do the rapid adjust feed and steel lock cylinders look like? I don’t think either of my machines have the rapid adjust. What part is the lock cylinder?
Rapid-adjust feed stop:
https://www.garagejournal.com/forum/showthread.php?p=3602221&post3602221
Lock cylinders:
https://www.garagejournal.com/forum/showthread.php?p=5443008#post5443008
thanks. so by the lock cylinders you mean the table lock or the quill locks?


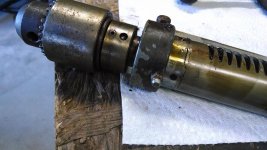
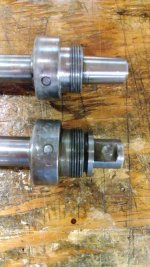
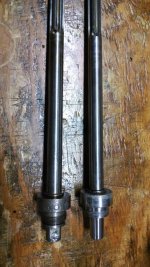
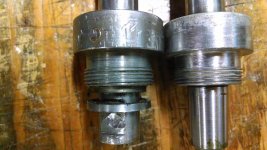
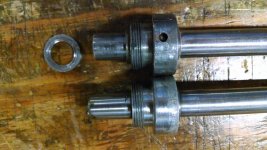
Another first.So I am continuing work on the parts machine, got the chuck off and saw this on the spindle end. Is this OEM, or modified? The end of the spindle is much shorter, no noticeable taper, and a milled flat. The newer to me spindle is on the left on the 1st pic, and bottom on 2nd. The other spindle is the only type I know so far.
I guess I will use the Supreme chuck, on the non-taper spindle and see how the run-out is. But first I will disassemble the chuck. Like everything else, it is loaded with grease, and hopefully a full set of BBs.
Time to read up on Supreme chucks.
Thanks.
Thanks for response FrankLee: the diameter of the new spindle is 9/16", with very litte to no taper. That spindle is also 1/4" shorter than my original one. Yes on the thick washer, see new pics. And I do not see any provision for a screw through the chuck into the spindle. The chuck was apparently only held on by the threaded collar.
The fun continues .....
So after looking for quite a while I found a craftsman 150 Bench model late version to restore. Everything is going well so far, though I just started on it today.
I am having one issue though. When I got it home I tested it to see how it ran. And it seems like the motor has a lot of vibration in it. It looks like the rubber motor mount on the top is also slightly bubbled on one side. Is this possible from the belt being either to loose or tight or likely another issue?
Update so this is model 113.24501 and I was trying to read what the belt on it said. I couldn't read all the stuff on the belt but I was able to make out Craftsman 4L420. Meaning it is a 42" belt. Is it possible this belt was to short which is what was causing the vibration? I think it is suppose to be a 44" belt.
Welcome Shorty!
Vibration issues are often belt related... especially with original 60 year old belts. Belts can become very stiff and retain a memory of the small pulley. Also, verify that the belt is square to the spindle and also to the motor shaft.
Belt part numbers often refer to the inside diameter of the belt and the resulting size is 2" longer for the outside diameter of the belt. So, 4L420 is a 44.0" belt.
Yes, 44" is the spec'd size for your machine. On your machine with the hinged motor mount with clip, you may be able to go slightly shorter or longer; 43.5" to 44.5".
I really like Autozone's Duralast cogged belts.
The motors on the later machines are referred to as resilient mount or cradle mount. The rings may be replaceable, but I've never found anything that fits a Craftsman motor, but then I haven't looked too hard. You can search for resilient motor mount rings. I think I would first try to flip and rotate the original rings.
You will get differing opinions on whether resilient mount motors should be used in a vertical position. I recommend looking for your motor in an old catalog. Craftsman catalogs usually say whether these motors can be mounted in any position.
If you haven't discovered it yet, Craftsman Power Tool catalogs and owners manuals for your machine can be found on the Vintage Machinery website.
Thanks for the info. I have few more questions if you don't mind since you are the resident expert.
I had to take the drill completely apart because the old grease was gunked up and kind of hard so nothing was moving smoothly.
Very, very common.
Dissasembly went mostly fine.
The bearings in both pullys seem to be completely fine they spin freely and smooth.
I'm not sure what you mean by both pulleys.
So here is the questions.
1. I got the spindle out but i notice it does not spin smoothly.
Does this mean that you got the spindle out of the quill or you removed the quill/spindle assembly from the head frame.
While turning it it is slightly getting stuck through the turn but it isnt hard to turn. I can just feel it isnt smooth and may be causing some of that vibration i was getting. Does that mean the bearings are shot or is it possible if i take the ends off and spray some lithium grease in there that it may free up what was causing the sticking?
It's possible that the bearings need replacing. I've replace bearings on only a handful of machines. For the quill/spindle bearings, I normally just apply several drops of oil (3-in-One motor oil SAE 20) around the inner race and let it seep into the bearing. For me, it usually does a good job of smoothing out the bearings and somewhat rejuvenates the grease.
On some machines, the spindle will slide out of the quill with little effort. In that case, I will remove the bearings, inspect for any play, then remove one shield on each bearing, thoroughly clean the bearings with lacquer thinner, a sonic cleaner and a final spray with brake cleaner. Then repack and reinstall.
2. For some reason the head release lever was on the right side which makes no sense to me because it bumps your hand when lowering the press to drill some thing. Is it fine to just reverse the handle to the left side when reassembled? I see pics of others who have it installed both ways.
The head frame lock handle should always be on the left side. I've seen some dp's where a custom switch is installed on the left and the handle on the right. If that's necessary, a standard bolt should be used replace the handle.
3. The feed stop rod assembly is missing which i didn't realize when i bought it, is three anywhere to purchase it for a not crazy price?
No... especially the rapid adjust feed stops. If the bracket is still in place, a piece of 3/8" all-thread can be used as a make-shift feed stop.
4. I know this will annoy some people who like to keep vintage items original but i am gong to paint this most likely orange.
It's your machine. Do what YOU like. Check this thread for color options.
My question is would it be save to pressure wash the cast iron parts before i paint? All the parts are already out of them?
Yes, it's very safe. After ALL parts are removed, I usually take my castings to the quarter car wash, spray thoroughly with an engine degreaser, let it soak and then pressure rinse. It works well. Then another scrubbing at home with Zud or Barkeeper's Friend. Then a coat of wax.
Because you plan to repaint, proper prep is necessary.
Sorry to ask so much i just really was excited to finally get one, and glue to have it finished this weekend.
Don't apologize. That's the intent of this thread.
So a couple of updates. I bought a second craftsman to use as a part machine, but it is older and it also doesn't have the feed stop so that was kind of pointless. Depending on how this one goes I may try to refurbish the second one but the second one doesn't work at all currently.. No biggie only cost 5 dollar at a yard sale.
So I finally got the spindle out of the quill. My god that was a pain. But the top bearing in the quill is bad. when you turn it with your finger it feels like a bunch of rocks were used instead of ball bearings. The bottom bearing seems fine. The bearing is a Made in Japan Shielded Hoover 77202-10.
I am trying to find a replacement but the one sight says that the upper and lower quill bearings are different models but on my machine they are both the same Hoover bearing. Is there a good shielded replacement for these? If I am replacing the bad upper one I would prefer to do both.
I am considering getting NSK bearings.
NSK 6202-10ZZ
I wanted to post a link but I am not allowed to yet. They have them on Amazon.
My question is when I reassemble do I attach to spindle or quill first?
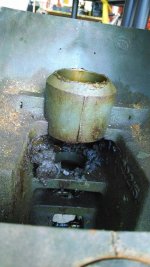
I actually think I found a way to get it together quite simply.
I got 2 sections of 8" long 3/4 galvanized pipe. Then got some large 3/4 washers. I can use the pipe and the washer over ther spindle so that i can tap the bearing and spindle in place with a hammer without damaging them.
I made a thread. The pics are there.Can you post pictures yet? I’d like to see that.
I made a thread. The pics are there.
https://www.garagejournal.com/forum/showthread.php?p=7874491#post7874491
Also I went be the V-Belt replacement list on here and I got the Duralast 17440 which was listed as 44.2" . It is way to big. If I were to replace the belt that was on there I would probably have to move the motor out almost 2 inches. After looking it up the 4l420 belt I said it has is not 44"on the outside , it is in fact 42" on the outside.

That 17440 belt is too big because your motor pulley is not the pulley that originally came with the drill press. It is much smaller, maybe 3"(?) on the largest step.
The way you're set-up now with the belt on the largest step of the motor pulley, you're spindle is spinning at roughly 3000 rpm (assuming your motor is 1725 rpm). That is screaming fast for most drilling applications.
Also, because of the mis-matched pulleys, you may not be able to lower the belt. IMO, you'd be better off with the 44.2" belt installed on the lowest pulley steps which would put you closer to 600 rpm.
The small step of the original motor pulley would be 1-3/4", the large step, 5".
Regardless, your refurb looks great! Nice job!
I did buy a second machine for parts I should check that pully to see if. It is the correct size and maybe swap it over. How hard is it to change the motor pully?
Edit update the second one I bought had the same exact pully on the motor so that wont work. What size is the correct one? I will have to start looking for one.
Well, that's a bummer... two machines with replaced pulleys.
Swapping pulleys can be easy or difficult. Many times, the set screw will back out. The pulley will then turn on the shaft and the set screw will scar/burr the shaft. The burr prevents the pulley from siding off. A puller is frequently required. That is what happened on the last two motors I got.
Check the following posts regarding motor pulleys.
https://www.garagejournal.com/forum/showthread.php?p=6018082#post6018082
https://www.garagejournal.com/forum/showthread.php?p=4731213&post4731213