To avoid these ads, REGISTER NOW!

Modifications to the HF 4 and 5 drawer service carts - what changes have you made?

CoryDH

Well-known member
Joined
Mar 8, 2018
Messages
64
Location
VA
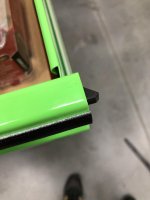
I just saw these paper towel and tray at the local store today. They had all the colors. Not sure if they are new but giving them a try. Magnetic so we'll see.20190907_151741.jpg

Sent from my SM-G973U using The Garage Journal mobile app
 
To avoid these ads, REGISTER NOW!

fartymarty

Well-known member
Joined
Nov 9, 2012
Messages
1,348
Location
Fort Worth
Got some slides from the trash. Made a slide out tray
attachment.php
Nice work! Are you going to paint that plywood or cover it with the black vinyl or what?

I see you cut out the front and reinforced it on the bottom, is that documented or copied from somewhere else in this thread?
 

Radio Flyer

Well-known member
Joined
Mar 28, 2010
Messages
1,683
Location
Suburban Chicago
Nice work! Are you going to paint that plywood or cover it with the black vinyl or what?

I see you cut out the front and reinforced it on the bottom, is that documented or copied from somewhere else in this thread?


Still have some finishing up to do.

The plywood is 1/2" that was laying around, I want to get some 3/4"
I'll paint the plywood and 2x4 spacers at the same time.

I want to add a back to the tray so I can store more stuff behind the craftsman box.

After rolling it around, it needs a latch to keep the tray from sliding out.


As for the reinforcement, someone from the thread used flat stock, but I had some angle iron laying around that i cut.
 

Catadj78

Well-known member
Joined
Aug 11, 2014
Messages
1,009
Location
Alabama
I bought the yellow one for my 12vdc tools and such, I was so impressed I went and bought the white one too. It’s still in the box right now though5b634791691bd6a0d4998a15e126e5c9.jpg1e16d840f6f03116a0e96f7f1a1412a8.jpg7bc2a0695170928cfb99a5159469a7fa.jpg120c33a03863cdecb0b35058f162aea3.jpg


Sent from my iPad using Tapatalk
 

Attachments

  • 120c33a03863cdecb0b35058f162aea3.jpg
    120c33a03863cdecb0b35058f162aea3.jpg
    210.2 KB · Views: 31
  • 7bc2a0695170928cfb99a5159469a7fa.jpg
    7bc2a0695170928cfb99a5159469a7fa.jpg
    255.2 KB · Views: 27
  • 1e16d840f6f03116a0e96f7f1a1412a8.jpg
    1e16d840f6f03116a0e96f7f1a1412a8.jpg
    210.4 KB · Views: 26
  • 5b634791691bd6a0d4998a15e126e5c9.jpg
    5b634791691bd6a0d4998a15e126e5c9.jpg
    265.9 KB · Views: 46
Last edited:

Gcf11

Active member
Joined
Aug 5, 2019
Messages
40
Location
Salt Lake City, Utah
Filed down the plastic locks so they act as a detent. I could not stand the stupid locking system and this works way better.
 

Attachments

  • B1F5A08D-61F5-4DBA-95AD-163BB881380E.jpg
    B1F5A08D-61F5-4DBA-95AD-163BB881380E.jpg
    44.3 KB · Views: 420

fartymarty

Well-known member
Joined
Nov 9, 2012
Messages
1,348
Location
Fort Worth
Filed down the plastic locks so they act as a detent. I could not stand the stupid locking system and this works way better.

Great idea as long as the cart is only moved smoothly or not moved much at all. However if it's ever vehicle transported, or moved over bumpy areas, just remember that all the drawers could open and, depending how it's loaded, possibly risks it toppling over. With that in mind, a nice modification. :thumbup:
 

Gcf11

Active member
Joined
Aug 5, 2019
Messages
40
Location
Salt Lake City, Utah
Great idea as long as the cart is only moved smoothly or not moved much at all. However if it's ever vehicle transported, or moved over bumpy areas, just remember that all the drawers could open and, depending how it's loaded, possibly risks it toppling over. With that in mind, a nice modification. :thumbup:

Well it still has the drawer locks that go through the back of the box so with the lid closed, the drawers won’t open. But you are correct about the slides with the lid open. Luckily my shop is smooth and flat :)
 

fartymarty

Well-known member
Joined
Nov 9, 2012
Messages
1,348
Location
Fort Worth
Well it still has the drawer locks that go through the back of the box so with the lid closed, the drawers won’t open. But you are correct about the slides with the lid open. Luckily my shop is smooth and flat :)

DOH!:wtf: ...I actually thought of that and went out and checked my cart to be sure. I came back in and thought I hadn't hit the enter button yet and just hit the back button and thought my post had gone into the bit bucket. Hrummphh!

Well, now I have to go out and do mine as well. Did you really use a file?... or some kind of grinder-sander-electric-thingie. (don't be intimidated by my use of technical nomenclature :) )
 

Gcf11

Active member
Joined
Aug 5, 2019
Messages
40
Location
Salt Lake City, Utah
DOH!:wtf: ...I actually thought of that and went out and checked my cart to be sure. I came back in and thought I hadn't hit the enter button yet and just hit the back button and thought my post had gone into the bit bucket. Hrummphh!

Well, now I have to go out and do mine as well. Did you really use a file?... or some kind of grinder-sander-electric-thingie. (don't be intimidated by my use of technical nomenclature :) )

Haha no worries :) and yeah just a basic ******* file I had. Probably took 45 minutes to do every drawer. You can go pretty hard at first but just make sure to check it every so often, go slower as you’re getting closer. I learned that if you can open the drawer with your hand on the same side of the lock but not the opposite side, you’re super close and just need a tiny bit more. Now all of mine open with my hand anywhere on the handle.


I may have to steal that idea from you I likey that. Mine is never moved.

Go for it! I’m sure other have done it before, but I’ve never seen any posts so I figured I would share :)
 

jmhinkle

Well-known member
Joined
Feb 6, 2019
Messages
452
Location
Portland, OR
Filed down the plastic locks so they act as a detent. I could not stand the stupid locking system and this works way better.

I'm just the opposite. I love the drawer locks and have no issues with them at all. Work perfect for me on my slanted driveway. I did shorten the rear lock bars so they don't engage with the lid down unless I slip the pieces back in the caps. I hated not being able to open the drawers with the lid down especially since I can't open the lid where I store it.
 

PelicanPines

ALLIANCE MEMBER
Joined
Apr 30, 2014
Messages
38,103
Location
New Jersey, USA, Earth, My own reality
I'm just the opposite. I love the drawer locks and have no issues with them at all. Work perfect for me on my slanted driveway. I did shorten the rear lock bars so they don't engage with the lid down unless I slip the pieces back in the caps. I hated not being able to open the drawers with the lid down especially since I can't open the lid where I store it.

Agree 100%... like button pressed. I eliminated the lid down locking mechanism to gain that little bit of space in the lid area.
 

Odd-job

Well-known member
Joined
Aug 13, 2017
Messages
2,255
Location
SF Bay Area
Yet another modification to bolt on more tools to the outside. Steel stock plus Olsa screwdriver holder riveted on.

c5596c8ce49124487d8daf99e360f6b0.jpg
 

Attachments

  • c5596c8ce49124487d8daf99e360f6b0.jpg
    c5596c8ce49124487d8daf99e360f6b0.jpg
    365.6 KB · Views: 46

txrob5150

New member
Joined
Sep 27, 2019
Messages
1
Location
Texas
I am new to site so this is my first post - been lurking for quite some time on the HF cart thread.....

Am planning on buying one during next parking lot sale and already planning my mods. Couple of quick questions on some of the mods:
1. Has anyone found a less expensive version of the Snap-on bumpers?
2. for those using the Snap-on side panels, what is the distance between the square holes or "pegs"? Has anyone found a generic metal pegboard that works as well as the Snap-on panels?

Also, does anyone have mods they did either before install as during install?

Thanks everyone
 

jakemac

Well-known member
Joined
May 21, 2013
Messages
9,035
Location
New England
For bumpers, you could try searching at Baby stores for corner bumpers for furniture.

For the metal pegboard, I think someone posted that they found something at Home Depot or Lowes, but I don’t know about the sizing. They may have fit the series 1 carts, I’m not sure if they’ve been used on the new series 2 carts.


Sent from my iPad using The Garage Journal mobile app
 
To avoid these ads, REGISTER NOW!

fartymarty

Well-known member
Joined
Nov 9, 2012
Messages
1,348
Location
Fort Worth
Also, does anyone have mods they did either before install as during install?

Thanks everyone
Any changes that you want to make to the bottom should be done first before the assembly, such as cutting out the front of the bottom shelf and reinforcing the metal below the cutout...or changing to different casters and any changes needed by that change. The only thing I wish I had done before the assembly that I ended up doing after the assembly (two at a time :( ) was paint the heads of the carriage bolts black.

I purchased black metal pegboard from Lowe's but I've yet to install it so I can't really say how easy it's going to be, however, I'm going to make it work somehow.
 

PelicanPines

ALLIANCE MEMBER
Joined
Apr 30, 2014
Messages
38,103
Location
New Jersey, USA, Earth, My own reality
I am new to site so this is my first post - been lurking for quite some time on the HF cart thread.....

Am planning on buying one during next parking lot sale and already planning my mods. Couple of quick questions on some of the mods:
1. Has anyone found a less expensive version of the Snap-on bumpers?
2. for those using the Snap-on side panels, what is the distance between the square holes or "pegs"? Has anyone found a generic metal pegboard that works as well as the Snap-on panels?

Also, does anyone have mods they did either before install as during install?

Thanks everyone

Nearly all my mods were done during inital assembly... they are shown somewhere near page 55 of this thread.
 

zanyad

ALLIANCE MEMBER
Joined
Apr 26, 2018
Messages
2,755
Location
NE Ohio
Nearly all my mods were done during inital assembly... they are shown somewhere near page 55 of this thread.

Here ya go: https://www.garagejournal.com/forum/showthread.php?p=3989999#post3989999

Ok, I'm done.
1. Removed lid activated drawer locks
2. Snap On Hinges
3. Grommets in all the screw driver holes
4. Door Trim all the upper and lower edges including lid
5. Remove US General Badge
6. Cut and enforce bottom shelf to store dewalt metal cases
7. Enclose right panel with trim
8. Install 13 amp power outlet
9. Hoffman 150lb side folding shelf
10. Install hooks and hanging bar on back
11. 20 inch magnetic bars on lid (modified)
12. Matt's Plier Racks !!!

~~ Done ~~:rocker:
 

darkzero

Well-known member
Joined
Oct 20, 2011
Messages
3,315
Location
SoCal
Late to the party, or shall I say back to the party. I got the gen1 5-drawer cart back when they were $149. Always wanted a black one. When I saw the $169 coupon for the gen2 I went & got me one. The gen1 does feel like it was better built. Gen2 top lid feels flimsier, measured the thickness & it is thinner. Drawer liners included with the gen2 are really thin compared to the gen1 but whatever, I'll just make new ones. This time I got the folding side table. I also have two trays for spray cans or whatever. Just need to add the door edge trim again.

Thanks to whoever posted on how they drilled out the rivets to access the drawer locks. I did the same. Cut them on my bandsaw using the work stop so both are exactly the same length & sit just slightly below the covers. I drilled holes in the cut off pieces before sticking them back into the covers in case for some reason I ever need to pull them back out. I had planned on giving my gen1 cart to my buddy but just before loading it into my truck I decided to keep it. Now that I'm keeping the red one I guess I'll do the same to it.

2b85e46ae0fecf5c82cc20ac84b73902.jpg

1357dfb1c9272f0fb4a6ccdc73a1ab78.jpg

792d114a16c2d638dae96f43daf9ac23.jpg

247c6e88ca57fad54bb88fa18ad1d35a.jpg

6653f4ec552940e8aec22e2f9128650b.jpg
 

Attachments

  • 1357dfb1c9272f0fb4a6ccdc73a1ab78.jpg
    1357dfb1c9272f0fb4a6ccdc73a1ab78.jpg
    52.4 KB · Views: 28
  • 792d114a16c2d638dae96f43daf9ac23.jpg
    792d114a16c2d638dae96f43daf9ac23.jpg
    25.9 KB · Views: 26
  • 247c6e88ca57fad54bb88fa18ad1d35a.jpg
    247c6e88ca57fad54bb88fa18ad1d35a.jpg
    40.5 KB · Views: 27
  • 6653f4ec552940e8aec22e2f9128650b.jpg
    6653f4ec552940e8aec22e2f9128650b.jpg
    68.9 KB · Views: 24
  • 2b85e46ae0fecf5c82cc20ac84b73902.jpg
    2b85e46ae0fecf5c82cc20ac84b73902.jpg
    39.7 KB · Views: 28
Last edited:

MushCreek

Well-known member
Joined
Jan 14, 2015
Messages
9,732
Location
Upstate South Carolina
Funny thing about the steel thickness. I bought a new yellow one, and compared it to my old red one. Some places were thinner, yet some were thicker. I think they just run whatever steel shows up at the factory.
 

jmhinkle

Well-known member
Joined
Feb 6, 2019
Messages
452
Location
Portland, OR
Late to the party, or shall I say back to the party. I got the gen1 5-drawer cart back when they were $149. Always wanted a black one. When I saw the $169 coupon for the gen2 I went & got me one. The gen1 does feel like it was better built. Gen2 top lid feels flimsier, measured the thickness & it is thinner. Drawer liners included with the gen2 are really thin compared to the gen1 but whatever, I'll just make new ones. This time I got the folding side table. I also have two trays for spray cans or whatever. Just need to add the door edge trim again.

Thanks to whoever posted on how they drilled out the rivets to access the drawer locks. I did the same. Cut them on my bandsaw using the work stop so both are exactly the same length & sit just slightly below the covers. I drilled holes in the cut off pieces before sticking them back into the covers in case for some reason I ever need to pull them back out. I had planned on giving my gen1 cart to my buddy but just before loading it into my truck I decided to keep it. Now that I'm keeping the red one I guess I'll do the same to it.

2b85e46ae0fecf5c82cc20ac84b73902.jpg

1357dfb1c9272f0fb4a6ccdc73a1ab78.jpg

792d114a16c2d638dae96f43daf9ac23.jpg

247c6e88ca57fad54bb88fa18ad1d35a.jpg

6653f4ec552940e8aec22e2f9128650b.jpg

You know you can put tape right over the top and cut them with a multi tool right? No reason to remove all that from the cart.
 

Attachments

  • 2b85e46ae0fecf5c82cc20ac84b73902.jpg
    2b85e46ae0fecf5c82cc20ac84b73902.jpg
    38.4 KB · Views: 32
  • 1357dfb1c9272f0fb4a6ccdc73a1ab78.jpg
    1357dfb1c9272f0fb4a6ccdc73a1ab78.jpg
    52.4 KB · Views: 32
  • 792d114a16c2d638dae96f43daf9ac23.jpg
    792d114a16c2d638dae96f43daf9ac23.jpg
    25.4 KB · Views: 26
  • 247c6e88ca57fad54bb88fa18ad1d35a.jpg
    247c6e88ca57fad54bb88fa18ad1d35a.jpg
    38.9 KB · Views: 27
  • 6653f4ec552940e8aec22e2f9128650b.jpg
    6653f4ec552940e8aec22e2f9128650b.jpg
    67.3 KB · Views: 86

darkzero

Well-known member
Joined
Oct 20, 2011
Messages
3,315
Location
SoCal
You know you can put tape right over the top and cut them with a multi tool right? No reason to remove all that from the cart.


Yep, that's exactly what I did not want to do. Removing & replacing 4 rivets was easy & gave me a cleaner result.
 

Greg85mcss

Well-known member
Joined
Jul 9, 2015
Messages
760
Location
Frederick MD
Does anyone know if there's an alternative to the snap on hinges? I've been checking occasionally for a few years and they're always out of stock.

Sent from my moto g(6) using Tapatalk
 

fartymarty

Well-known member
Joined
Nov 9, 2012
Messages
1,348
Location
Fort Worth
Does anyone know if there's an alternative to the snap on hinges? I've been checking occasionally for a few years and they're always out of stock.

Sent from my moto g(6) using Tapatalk

I could be wrong and I frequently am, however I think that is standard for them. The black bumper pads I ordered from them were also always out of stock as well but I ordered them anyway and two weeks later I had them. I'm sure there are alternatives including almost any safety lid support for a child's toybox could be adapted, but if I were you I'd just go ahead and order the Snap-On ones here.

Let us know how long it takes if you do.
 

PelicanPines

ALLIANCE MEMBER
Joined
Apr 30, 2014
Messages
38,103
Location
New Jersey, USA, Earth, My own reality
I could be wrong and I frequently am, however I think that is standard for them. The black bumper pads I ordered from them were also always out of stock as well but I ordered them anyway and two weeks later I had them. I'm sure there are alternatives including almost any safety lid support for a child's toybox could be adapted, but if I were you I'd just go ahead and order the Snap-On ones here.

Let us know how long it takes if you do.

^^^^--- this
 

Greg85mcss

Well-known member
Joined
Jul 9, 2015
Messages
760
Location
Frederick MD
I've thought about asking my dealer but I'm still on the fence because the cart's gotten pretty beat up and that's more than I paid for it. I might just do some measurements and see if I can find a cheap alternative.

Sent from my moto g(6) using Tapatalk
 

darkzero

Well-known member
Joined
Oct 20, 2011
Messages
3,315
Location
SoCal
I could be wrong and I frequently am, however I think that is standard for them. The black bumper pads I ordered from them were also always out of stock as well but I ordered them anyway and two weeks later I had them. I'm sure there are alternatives including almost any safety lid support for a child's toybox could be adapted, but if I were you I'd just go ahead and order the Snap-On ones here.

Let us know how long it takes if you do.


I just ordered them so we'll see what happens.


I think I f'd up though. Qty 1 is for one set of hinges? I ordered 2 not realizing it said "set". Oh well. :lol_hitti
 

rick carpenter

Well-known member
Joined
Jan 20, 2011
Messages
3,763
Location
Huntsville, East Texas
Funny thing about the steel thickness. I bought a new yellow one, and compared it to my old red one. Some places were thinner, yet some were thicker. I think they just run whatever steel shows up at the factory.

I think that differences in composition and use of primers (if used) and paints from one generation to the next might affect also measurements.
 

fartymarty

Well-known member
Joined
Nov 9, 2012
Messages
1,348
Location
Fort Worth
Yep, that's exactly what I did not want to do. Removing & replacing 4 rivets was easy & gave me a cleaner result.

I was originally thinking about using a multi-tool to just saw them off and I guess it's a viable way to do it, however having just used a multi-tool on another project with all it's noise, vibration, and chip throwing I decided that I'd just drill out the rivets. Still got some chips in the cart but I got them out with a quick shot of the shop vac. I just measured and marked carefully and sawed off the ends with a hack saw. Lightly de-burred the ends with a small file and gave the cut edges a quick shot of the Rustoleum Apple Red. Like darkzero, I too drilled the cut offs but for a different reason. As I couldn't think of any reason that I'd want to take them out of the plastic covers, I riveted them in place so I wouldn't lose them, as my covers didn't fit very tightly.

Yeah, I painted the rivet heads black with the left over touch up paint that I used on the bolt heads on the rest of the cart, which I'll admit is a little bit over the top for a HF tool cart :wtf: . But to my credit, I managed to share photos of my work (unlike darkzero) without including background shots of my nice lathe and vertical mill with a right angle indexing chuck, nor my bandsaw. (darkzero, you ****!:lol_hitti)

Edit:...and by the way, it may be obvious if you think about it but then you might not think about it, ..once the rivets are drilled and the cover removed you then need to open the drawers a little before you can lift the bar out vertically for sawing the tip off.:thumbup: Probably mentioned elsewhere in this huge thread, if so then enjoy the echo.:bounce:


Last edited:

PelicanPines

ALLIANCE MEMBER
Joined
Apr 30, 2014
Messages
38,103
Location
New Jersey, USA, Earth, My own reality
It looked like $11 something each on their website which would probably be about $30 for the pair with truck mark up. If that's for the pair I would do it for sure

Sent from my moto g(6) using Tapatalk

it is sold as a SET... they are TWO different hinges included... a LEFT and a RIGHT... part of a set... you don't buy TWO... you get TWO when you order ONE.

Edit: I'm not yelling... I'm old and grumpy.
 
Last edited:

MattT

Well-known member
Joined
Feb 20, 2010
Messages
3,201
It looked like $11 something each on their website which would probably be about $30 for the pair with truck mark up. If that's for the pair I would do it for sure

If your driver won't at least "price match" the online price just order a set from the website. Snap-ons web prices are full retail, to protect the dealer network, so you definitely shouldn't be paying more on the truck.
 
To avoid these ads, REGISTER NOW!
Top Bottom