To avoid these ads, REGISTER NOW!

Cabinet for Small Parts Storage Cases

To avoid these ads, REGISTER NOW!

MWMWMW

Well-known member
Joined
Sep 2, 2019
Messages
89
Location
WV
I’m planning to do something similar to this as I get farther into organizing my shop. Awesome idea!
 

dsgreen3

Well-known member
Joined
May 18, 2015
Messages
86
Location
Unadilla NY
So has anyone come up with an easy method for removing the sticker off the top lid of those HF parts organizers? :) I bought some, and am wondering about how to do it with minimal effort. I think my first experiment will be to put one in the bathtub and let it soak in water overnight.

A little late but WD40 sprayed on the label let sit for a couple of minutes then I scrape it off with one of my auto trim nylon tools that I picked up from harbor freight one with a wide blade. No scuffs, scratches.
 

PugetDude

ALLIANCE MEMBER
Joined
Mar 13, 2013
Messages
22,481
Location
Superstition Mountains, AZ
A little late but WD40 sprayed on the label let sit for a couple of minutes then I scrape it off with one of my auto trim nylon tools that I picked up from harbor freight one with a wide blade. No scuffs, scratches.

I returned 26 of the 6xxxx SKU bins with the stuck like death labels and exchanged them for the 93928 SKU with the easy-to-remove labels. Store manager went into the back room and found two cases of the better ones. You can tell the difference by just pushing the label with your thumbnail through the cellophane wrapper. Make sure the labels shift easily, the 93928's peel right off with no residue. The others are a PITA.
 

marantzer

Well-known member
Joined
Jan 14, 2016
Messages
48
Location
ATL
The first time I saw SOJ's cabinet I knew I had to make my own. At the time I kept my small parts in a drawer in a number of Plano type organizers. They were not efficient with storing various sizes and quantities of items and you had to move them all around to find the part you needed. Ultimately they all ended up on the workbench and I was left with no room to work on the actual task at hand. I immediately knew that SOJ's solution would address a major source of frustration I would frequently encounter when attempting something that was supposed to be enjoyable.

Unfortunately, concurrent with finding a solution, I also discovered Sortimo T-boxxes. Sortimo's breadth of solutions and quality were exactly what I was looking for, but they are also much more difficult and expensive to source (especially if you're OCD and want specific colors).

The final hurdle to overcome was the lack of the tools I felt were 'necessary' to complete the project with a level of quality that I felt it deserved. Once again this site was ready and able to help with suggestions and the occasional deals on a table saw (Sawstop), router bits (Whiteside), track saw (Bosch), random orbital (Bosch), portaband (Milwaukee) and dust collector (Flex).

The Sortimo Cabinet is made from 18mm Baltic Birch (cabinet), 12 mm Baltic Birch (drawers and back), some SCC casters, KV slides, hardware from National Hardware, and a sugar maple slab from Michigan Maple. After years of design, planning, acquisition, and inspiration from you fine folks I humbly present The Sortimo Cabinet:
<a data-flickr-embed="true" href="https://www.flickr.com/gp/marantzer/6f9450" title="D8D8262F-2F74-4B3B-B570-2C2E98A50F96"><img src="https://live.staticflickr.com/65535/49631252693_3687c62bdf_c.jpg" width="800" height="600" alt="D8D8262F-2F74-4B3B-B570-2C2E98A50F96"></a><script async src="//embedr.flickr.com/assets/client-code.js" charset="utf-8"></script>

Easily accessible
<a data-flickr-embed="true" href="https://www.flickr.com/gp/marantzer/31W0yB" title="B6C966BC-358E-4157-968F-E756308ACAC5"><img src="https://live.staticflickr.com/65535/49631252648_8c88ac96d7_c.jpg" width="800" height="600" alt="B6C966BC-358E-4157-968F-E756308ACAC5"></a><script async src="//embedr.flickr.com/assets/client-code.js" charset="utf-8"></script>
<a data-flickr-embed="true" href="https://www.flickr.com/gp/marantzer/9Y4yq6" title="46CFF841-91AD-4273-A667-1DA2BAFC1640"><img src="https://live.staticflickr.com/65535/49632041292_73d261223e_c.jpg" width="800" height="600" alt="46CFF841-91AD-4273-A667-1DA2BAFC1640"></a><script async src="//embedr.flickr.com/assets/client-code.js" charset="utf-8"></script>

A notch on the front of the T-boxxes catch a countersunk L-bracket to keep them from sliding off:
<a data-flickr-embed="true" href="https://www.flickr.com/gp/marantzer/qL7j5c" title="DFAAC468-1CDA-4AEA-AC91-C70CD6F1F1C7"><img src="https://live.staticflickr.com/65535/49631773921_549b597c77_c.jpg" width="800" height="600" alt="DFAAC468-1CDA-4AEA-AC91-C70CD6F1F1C7"></a><script async src="//embedr.flickr.com/assets/client-code.js" charset="utf-8"></script>

An empty drawer:
<a data-flickr-embed="true" href="https://www.flickr.com/gp/marantzer/5iA00j" title="E3C72AB7-B1C5-40A6-A802-AAC32EEE12E7"><img src="https://live.staticflickr.com/65535/49631252663_936bc28742_c.jpg" width="800" height="600" alt="E3C72AB7-B1C5-40A6-A802-AAC32EEE12E7"></a><script async src="//embedr.flickr.com/assets/client-code.js" charset="utf-8"></script>

The way T-boxxes and L-boxxes open, I had to go with 16" slides to allow the tops to open fully:
<a data-flickr-embed="true" href="https://www.flickr.com/gp/marantzer/58SD91" title="6115F75E-013B-4949-A052-AAFC5BD73AC9"><img src="https://live.staticflickr.com/65535/49632041187_b934c60995_c.jpg" width="800" height="600" alt="6115F75E-013B-4949-A052-AAFC5BD73AC9"></a><script async src="//embedr.flickr.com/assets/client-code.js" charset="utf-8"></script>

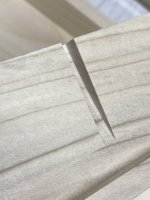
An L-bracket with a notch cut into it to catch a ridge on the back of the T-boxxes:
<a data-flickr-embed="true" href="https://www.flickr.com/gp/marantzer/5F0V54" title="3405539B-2B88-4C45-A79C-E3FC611C042C"><img src="https://live.staticflickr.com/65535/49632041262_305dd55842_c.jpg" width="800" height="600" alt="3405539B-2B88-4C45-A79C-E3FC611C042C"></a><script async src="//embedr.flickr.com/assets/client-code.js" charset="utf-8"></script>

One of the L-boxxes on the top row:
<a data-flickr-embed="true" href="https://www.flickr.com/gp/marantzer/0785uj" title="9241A127-4BC6-4967-BBFB-FAFF5F16D663"><img src="https://live.staticflickr.com/65535/49632041232_68e15db64f_c.jpg" width="800" height="600" alt="9241A127-4BC6-4967-BBFB-FAFF5F16D663"></a><script async src="//embedr.flickr.com/assets/client-code.js" charset="utf-8"></script>

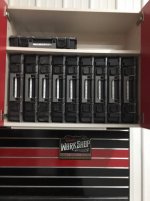
And finally how it fits in to the space:
<a data-flickr-embed="true" href="https://www.flickr.com/gp/marantzer/y88NiV" title="B5E7F2CC-E220-4178-8C91-F4E62F02ADDE"><img src="https://live.staticflickr.com/65535/49631252688_84c2dfd977_c.jpg" width="800" height="600" alt="B5E7F2CC-E220-4178-8C91-F4E62F02ADDE"></a><script async src="//embedr.flickr.com/assets/client-code.js" charset="utf-8"></script>

I learned quite a bit along the way. One of the best decisions I made was to design and build everything in metric. I am absolutely certain I wouldn't have been able to get the final product I did without a lot more waste using imperial units. One major area of disappointment was the primer and paint that I used (Zinsser Cover Stain and Benjamin Moore Cabinet Coat). They left a very "stippled" finish and I have no idea why. The one saving grace is that it covers the edge of the ply well so that you don't see the individual ply.
 

manwithtools

ALLIANCE MEMBER
Joined
Aug 24, 2015
Messages
14,167
Location
Lebanon, TN
The first time I saw SOJ's cabinet I knew I had to make my own. At the time I kept my small parts in a drawer in a number of Plano type organizers. They were not efficient with storing various sizes and quantities of items and you had to move them all around to find the part you needed. Ultimately they all ended up on the workbench and I was left with no room to work on the actual task at hand. I immediately knew that SOJ's solution would address a major source of frustration I would frequently encounter when attempting something that was supposed to be enjoyable.

Unfortunately, concurrent with finding a solution, I also discovered Sortimo T-boxxes. Sortimo's breadth of solutions and quality were exactly what I was looking for, but they are also much more difficult and expensive to source (especially if you're OCD and want specific colors).

Very nice job and congratulations on the tool acquisitions - you'll find many more projects to use those on - and having the fasteners well organized will help as well.
 

MWMWMW

Well-known member
Joined
Sep 2, 2019
Messages
89
Location
WV
I just want to say that there has been some exceptional craftsmanship posted on this thread.

We’ve been organizing the shop and recently finished building the small parts cabinet. The guys did a good job using scrap wood and some old bed frames to put this together. Now for the sorting!

5nINjD5.jpg


m0r1C3C.jpg


y0pNAvq.jpg


6XAhZtx.jpg


jkDZ06Z.jpg


urPEYDb.jpg
 

TravisT

Well-known member
Joined
Oct 22, 2011
Messages
156
Location
NoVA
Just wanted to add my version of the highly plagiarized idea. I am building 4 of these that will be identical, holding two large boxes and six smaller ones. It will give me 32 total boxes (8 large and 24 small) and will also act as the base cabinets for my miter saw station.

83c3a10cb711d367a15e2baa1a97c64a.jpg


Sent from my iPhone using Garage Journal
 

Attachments

  • 83c3a10cb711d367a15e2baa1a97c64a.jpg
    83c3a10cb711d367a15e2baa1a97c64a.jpg
    194.2 KB · Views: 84

niget2002

Well-known member
Joined
Oct 2, 2012
Messages
11,260
Location
Josephine, TX
With much ideas from this thread and little budget, I provide my entry into this topic.

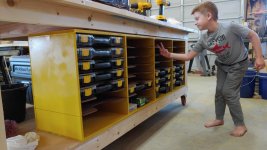
I used 1/2" MDF for the casing and 1/8" hardie board for the shelves. The shelves were cut on my little CNC machine. I painted it with cheap paint from walmart (poor coverage, lots of coats, went on like water).

I didn't do any fancy drawers. The shelves are dado'ed into the vertical pieces and the back.

Total cost was $60 and I have lots of room to add more containers. It'll hold 24 medium containers and 4 large.

The casing is mounted on the lower shelf of my 4'x8' assembly table.
 

Attachments

  • 0326201247.jpg
    0326201247.jpg
    136.8 KB · Views: 413

PugetDude

ALLIANCE MEMBER
Joined
Mar 13, 2013
Messages
22,481
Location
Superstition Mountains, AZ
The first time I saw SOJ's cabinet I knew I had to make my own. At the time I kept my small parts in a drawer in a number of Plano type organizers. They were not efficient with storing various sizes and quantities of items and you had to move them all around to find the part you needed. Ultimately they all ended up on the workbench and I was left with no room to work on the actual task at hand. I immediately knew that SOJ's solution would address a major source of frustration I would frequently encounter when attempting something that was supposed to be enjoyable.

Unfortunately, concurrent with finding a solution, I also discovered Sortimo T-boxxes. Sortimo's breadth of solutions and quality were exactly what I was looking for, but they are also much more difficult and expensive to source (especially if you're OCD and want specific colors).

The final hurdle to overcome was the lack of the tools I felt were 'necessary' to complete the project with a level of quality that I felt it deserved. Once again this site was ready and able to help with suggestions and the occasional deals on a table saw (Sawstop), router bits (Whiteside), track saw (Bosch), random orbital (Bosch), portaband (Milwaukee) and dust collector (Flex).

The Sortimo Cabinet is made from 18mm Baltic Birch (cabinet), 12 mm Baltic Birch (drawers and back), some SCC casters, KV slides, hardware from National Hardware, and a sugar maple slab from Michigan Maple. After years of design, planning, acquisition, and inspiration from you fine folks I humbly present The Sortimo Cabinet:
<a data-flickr-embed="true" href="https://www.flickr.com/gp/marantzer/6f9450" title="D8D8262F-2F74-4B3B-B570-2C2E98A50F96"><img src="https://live.staticflickr.com/65535/49631252693_3687c62bdf_c.jpg" width="800" height="600" alt="D8D8262F-2F74-4B3B-B570-2C2E98A50F96"></a><script async src="//embedr.flickr.com/assets/client-code.js" charset="utf-8"></script>

Easily accessible
<a data-flickr-embed="true" href="https://www.flickr.com/gp/marantzer/31W0yB" title="B6C966BC-358E-4157-968F-E756308ACAC5"><img src="https://live.staticflickr.com/65535/49631252648_8c88ac96d7_c.jpg" width="800" height="600" alt="B6C966BC-358E-4157-968F-E756308ACAC5"></a><script async src="//embedr.flickr.com/assets/client-code.js" charset="utf-8"></script>
<a data-flickr-embed="true" href="https://www.flickr.com/gp/marantzer/9Y4yq6" title="46CFF841-91AD-4273-A667-1DA2BAFC1640"><img src="https://live.staticflickr.com/65535/49632041292_73d261223e_c.jpg" width="800" height="600" alt="46CFF841-91AD-4273-A667-1DA2BAFC1640"></a><script async src="//embedr.flickr.com/assets/client-code.js" charset="utf-8"></script>

A notch on the front of the T-boxxes catch a countersunk L-bracket to keep them from sliding off:
<a data-flickr-embed="true" href="https://www.flickr.com/gp/marantzer/qL7j5c" title="DFAAC468-1CDA-4AEA-AC91-C70CD6F1F1C7"><img src="https://live.staticflickr.com/65535/49631773921_549b597c77_c.jpg" width="800" height="600" alt="DFAAC468-1CDA-4AEA-AC91-C70CD6F1F1C7"></a><script async src="//embedr.flickr.com/assets/client-code.js" charset="utf-8"></script>

An empty drawer:
<a data-flickr-embed="true" href="https://www.flickr.com/gp/marantzer/5iA00j" title="E3C72AB7-B1C5-40A6-A802-AAC32EEE12E7"><img src="https://live.staticflickr.com/65535/49631252663_936bc28742_c.jpg" width="800" height="600" alt="E3C72AB7-B1C5-40A6-A802-AAC32EEE12E7"></a><script async src="//embedr.flickr.com/assets/client-code.js" charset="utf-8"></script>

The way T-boxxes and L-boxxes open, I had to go with 16" slides to allow the tops to open fully:
<a data-flickr-embed="true" href="https://www.flickr.com/gp/marantzer/58SD91" title="6115F75E-013B-4949-A052-AAFC5BD73AC9"><img src="https://live.staticflickr.com/65535/49632041187_b934c60995_c.jpg" width="800" height="600" alt="6115F75E-013B-4949-A052-AAFC5BD73AC9"></a><script async src="//embedr.flickr.com/assets/client-code.js" charset="utf-8"></script>

An L-bracket with a notch cut into it to catch a ridge on the back of the T-boxxes:
<a data-flickr-embed="true" href="https://www.flickr.com/gp/marantzer/5F0V54" title="3405539B-2B88-4C45-A79C-E3FC611C042C"><img src="https://live.staticflickr.com/65535/49632041262_305dd55842_c.jpg" width="800" height="600" alt="3405539B-2B88-4C45-A79C-E3FC611C042C"></a><script async src="//embedr.flickr.com/assets/client-code.js" charset="utf-8"></script>

One of the L-boxxes on the top row:
<a data-flickr-embed="true" href="https://www.flickr.com/gp/marantzer/0785uj" title="9241A127-4BC6-4967-BBFB-FAFF5F16D663"><img src="https://live.staticflickr.com/65535/49632041232_68e15db64f_c.jpg" width="800" height="600" alt="9241A127-4BC6-4967-BBFB-FAFF5F16D663"></a><script async src="//embedr.flickr.com/assets/client-code.js" charset="utf-8"></script>

And finally how it fits in to the space:
<a data-flickr-embed="true" href="https://www.flickr.com/gp/marantzer/y88NiV" title="B5E7F2CC-E220-4178-8C91-F4E62F02ADDE"><img src="https://live.staticflickr.com/65535/49631252688_84c2dfd977_c.jpg" width="800" height="600" alt="B5E7F2CC-E220-4178-8C91-F4E62F02ADDE"></a><script async src="//embedr.flickr.com/assets/client-code.js" charset="utf-8"></script>

I learned quite a bit along the way. One of the best decisions I made was to design and build everything in metric. I am absolutely certain I wouldn't have been able to get the final product I did without a lot more waste using imperial units. One major area of disappointment was the primer and paint that I used (Zinsser Cover Stain and Benjamin Moore Cabinet Coat). They left a very "stippled" finish and I have no idea why. The one saving grace is that it covers the edge of the ply well so that you don't see the individual ply.

Really nice job! Those Sortimo organizers look top notch; what did you spend on them?
 

copythat

New member
Joined
Jun 7, 2017
Messages
3
I stumbled across this thread a while back and ended up buying 18 of the Stanley small parts containers that are similar to the Harbor Freight model. I got a good price on the Stanley boxes and thought they looked more rigid. Anyhow, I planned to copy SOJ's build until I realized the Stanley boxes do not have the side notches that hold them in place. At some point later on, I ended up buying a CNC machine. I came up with the design below that I think will work for the Stanley boxes. The prototype allows for the box to drop into place without any wiggle room front to back or left to right. Since I'm in no hurry, I plan to number the box to the tray. The "1" in the photo is for box 1. I thought the STANLEY logo would be fun and decided what the heck. I was going to attach hardwood cleats to the sides of the tray and attach the drawer slides to that.

Do you think the 1/2" MDF bottom will hold up? I was going to use 3/4" birch plywood for the case and 1/4" birch plywood for the back.

Thanks

https://photos.app.goo.gl/cAE5Nvxr9Z6KuJT18
https://photos.app.goo.gl/xt5LDW9rpHNfcymj7
https://photos.app.goo.gl/PA1K4zwDKnQp61kG6
 
To avoid these ads, REGISTER NOW!

Trapps

ALLIANCE MEMBER
Joined
Feb 10, 2017
Messages
2,004
Location
The Detroit Zoo
Working on two components: 1) L-Boxx Ports, 2) Small Parts Storage Boxes

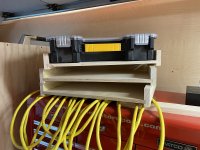
Here is the 'prototype' L-Boxx Port storage:

51046947881_14bfbd1378_h.jpg

51061602482_bf9e5f9702_h.jpg

Each of the upper L-Boxxes sits on a pair of clear pine 1x rails with a 45° mitre at the entrance. I have zero explanation for this. It just seemed logical. :eyecrazy: The bottom L-Boxx simply sits on the plywood base. I also store less frequently used items behind the portal.
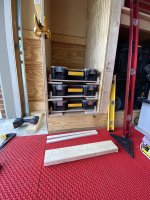
It's not completely inefficient, but I have a plan to improve it, involving a soon to be acquired Router Table. :bounce::bounce::bounce:

Until then, this arrangement is functional.
 
Last edited:

Paladin306

Well-known member
Joined
Jun 25, 2014
Messages
136
Location
Oklahoma City, OK
Do you think the 1/2" MDF bottom will hold up? I was going to use 3/4" birch plywood for the case and 1/4" birch plywood for the back.

copythat,

I don't know why half inch mdf wouldn't work. I used 3/4" southern yellow pine for the sides and backs and then edge glued the pine so that it would be large enough for the bottoms. I then planed and sanded the pieces down to 1/2" cut 1/4" rabbets on the bottoms and 1/4" dadoes in the sides and put it all together. It's worked out great.

Also, unless the Stanley boxes have changed, they have a small ledge as you can see in the attached photo, I made the sides just tall enough to where they support most of the weight.

View media item 103209
 

copythat

New member
Joined
Jun 7, 2017
Messages
3
Do you think the 1/2" MDF bottom will hold up? I was going to use 3/4" birch plywood for the case and 1/4" birch plywood for the back.

copythat,

I don't know why half inch mdf wouldn't work. I used 3/4" southern yellow pine for the sides and backs and then edge glued the pine so that it would be large enough for the bottoms. I then planed and sanded the pieces down to 1/2" cut 1/4" rabbets on the bottoms and 1/4" dadoes in the sides and put it all together. It's worked out great.

Also, unless the Stanley boxes have changed, they have a small ledge as you can see in the attached photo, I made the sides just tall enough to where they support most of the weight.

Thank you for the information. Your build looks good. I am going to try the 1/2 MDF for the bottom with the hardwood cleats like you did. I will update my progress as it moves along. I probably won't get back to it until next Saturday. Sadly, work tends to spoil the fun.
 

eyeball

Well-known member
Joined
Jul 14, 2011
Messages
407
...I learned quite a bit along the way. One of the best decisions I made was to design and build everything in metric. I am absolutely certain I wouldn't have been able to get the final product I did without a lot more waste using imperial units...


I would like to hear a bit more about this... in my mind there is not a lot of difference between measuring in 1/8” increments vs say 5mm increments. Was it because the stock you bought was in metric units? Or possibly just simple and quick math of using mm in the design phase?

I personally have been considering making the switch to metric I but have a hard time visualizing 25 cm **** a good grasp of 10 inches.
 
Last edited:

marantzer

Well-known member
Joined
Jan 14, 2016
Messages
48
Location
ATL
I would like to hear a bit more about this... in my mind there is not a lot of difference between measuring in 1/8” increments vs say 5mm increments. Was it because the stock you bought was in metric units? Or possibly just simple and quick math of using mm in the design phase?

I personally have been considering making the switch to metric I but have a hard time visualizing 25 cm **** a good grasp of 10 inches.

It really started in the planning phase, measurements for T-boxxes and L-Boxxes are mostly in metric as, to your point, are the measurements for Baltic Birch. I’ve found that if I build out the cut list in Excel and added formulas, I’m less likely to make a mistake or forget something.

I think I have a bit of dyslexia when it comes to fractions and reading out 16ths on a tape measure. It gets even worse when I start conversion to decimals and back again. Like you I still very much visualize in Imperial units, but it wasn’t important for me to visualize while making cuts and dados. It was important to stick to the cut list, so measure twice and cut once.
 

Trapps

ALLIANCE MEMBER
Joined
Feb 10, 2017
Messages
2,004
Location
The Detroit Zoo
Finally made some progress:
51063405661_3cc6001d59_h.jpg

Over Travel slides allow the lids to fully open and stay up while I am digging...
51046526157_c4ee002634_h.jpg

51046894671_5f5c9a0428_h.jpg

Drawer bottoms are 1/2" baltic birch, rails are poplar. Screwed and glued. Slides are 14" Over travel Medium Duty units from Centerline (sourced from Rockler)

51041235138_7b37f4c6b0_h.jpg

I grooved the rails to accept 'flanges' on the sides of the DeWalt Deep Pro Organizers

51042054647_faff1480fc_h.jpg
51046103953_b7c7e7355c_h.jpg


Thanks to all who posted and inspired! :beer:
 
Last edited:

tonyis

Member
Joined
Oct 30, 2019
Messages
7
Location
South Jersey
Does anyone have any tips on how to get the better 93928 SKU versus the 62778? So far, I've only been able to find the 62778s at my local stores. Thanks
 

Spudmunkey

New member
Joined
Aug 26, 2020
Messages
1
Location
California
Does anyone know if there are any re-branded, re-colored versions of the shallow Stanley 014725R 25-bin boxes?

I'm aware of the red ones from Craftsman #CMST14725, but they have been out of stock for a couple of months, at least.
 

Vahispd

Well-known member
Joined
Nov 21, 2012
Messages
141
Location
SE VA
SOJ, thanks for the design inspiration and to everyone else who posted their versions! A much better solution than the old plastic trays and bags of nuts and bolts in a couple (ok a few) drawers.

Looks like I missed the sale for $6.99 last week...figures. The HF website has the containers at $9.99 now.
 

ManUpOrShutUp

Well-known member
Joined
Sep 13, 2018
Messages
61
Location
PA
Very impressive. I can relate to getting carried away on a project also. I do it all the time.
 
Joined
Oct 18, 2020
Messages
12
Location
Waco, TX
This thread is very therapeutic! Thanks to all of you for the great ideas and inspiration for my eventual build. I totally can't wait to copy your hard work!

Thoughts on what I consider important design elements:
1. Regarding the full sliding door vs. dado or L-bracket type slides decision, I would posit that full-slideout "drawers" may be a better solution simply because of the number of "experiences" I have had picking up a storage box like this or a fishing tackle box with a lid not fully latched...and then picking up everything from the floor. I did notice that the Home Depot orange latched boxes have the lid integrated into the handle so this would not happen. But if your design was on sliding shelves, you really never need to latch since you usually wouldn't take the whole container from the shelving unit.

2. A vertical design like the OP's that doesn't exceed my eyeball height also seems favorable because it would minimize footprint as well as minimize the horizontal surface area where I would just put stuff...

3. The IT rack design is nice because of the adjustability of the shelf height. This allows for multiple types of storage containers or a bit of future proofing if you one day need to get a different type of storage container due to obsolescence.

4. Regarding storage containers, I think a very clear lid is important. Like most people here, I have an assortment of different "organizers" in my garage, from coffee cans to the all metal lift off drawers like you'd find at Ace Hardware. Despite labeling, I often tend to pull out a drawer open it, close it, move to the next drawer...a clear lid would be preferable.
 

TravisT

Well-known member
Joined
Oct 22, 2011
Messages
156
Location
NoVA
This thread is very therapeutic! Thanks to all of you for the great ideas and inspiration for my eventual build. I totally can't wait to copy your hard work!

Thoughts on what I consider important design elements:
1. Regarding the full sliding door vs. dado or L-bracket type slides decision, I would posit that full-slideout "drawers" may be a better solution simply because of the number of "experiences" I have had picking up a storage box like this or a fishing tackle box with a lid not fully latched...and then picking up everything from the floor. I did notice that the Home Depot orange latched boxes have the lid integrated into the handle so this would not happen. But if your design was on sliding shelves, you really never need to latch since you usually wouldn't take the whole container from the shelving unit.

2. A vertical design like the OP's that doesn't exceed my eyeball height also seems favorable because it would minimize footprint as well as minimize the horizontal surface area where I would just put stuff...

3. The IT rack design is nice because of the adjustability of the shelf height. This allows for multiple types of storage containers or a bit of future proofing if you one day need to get a different type of storage container due to obsolescence.

4. Regarding storage containers, I think a very clear lid is important. Like most people here, I have an assortment of different "organizers" in my garage, from coffee cans to the all metal lift off drawers like you'd find at Ace Hardware. Despite labeling, I often tend to pull out a drawer open it, close it, move to the next drawer...a clear lid would be preferable.

Good points. What I really like about my version (posted here) is that it is bench height. No need to take any boxes out of the drawers only to see in them.

The one thing I have found to not like about the OP's design: After you take a box out of the drawer and close the drawer, there's nothing to really grab onto easily to pull the drawer back out to put the box back in. I may consider a whole centered in the drawer to put a finger into, which would help pull the wooden drawer out with no box in place.
 

dwall174

Well-known member
Joined
Jun 1, 2012
Messages
453
Location
Southeast Michigan
I realize this is an "Old Thread" but seeing that there's a lot of useful information here, I'm bringing it back up!

I just bought 24 of the HF storage containers during a weekend sale. It took me 4-days & going to two different stores to get them all because of HF's coupon policy's & item limits, but I got them all for 30% off.
IMG_0395.JPGIMG_0396.JPG
I'm still trying to figure out which style rack system I want to use, but I'm leaning towards the drawer slide set-up.

Doug
 

dwall174

Well-known member
Joined
Jun 1, 2012
Messages
453
Location
Southeast Michigan
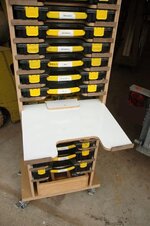
Here's another style that I don't believe is shown in the old thread.
Pull-Out Shelf 1 .jpgPull-Out Shelf 2 .jpgPull-Out Shelf 3 .jpg
Plans are available on Etsy for the Stanley cases version, but I believe the HF container is about 1/4" taller than the Stanley.

I'm thinking of making a variation of SOJ (OP) & the one shown above!
The drawer slides would be nice for the upper cases since the parts would be near eye level. However, the lower cases would probably not need the slides since it would be easier to just remove the whole case & set it on a bench so that you don't have to bend over to dig through the bins.

Here's a YouTube video that shows another version that has a pull-out shelf that you can set the cases on.

Adding some type of pull-out shelf would make since in my garage, since any flat surface with over 1 sq-ft of area usually ends up getting something set-down on it. :oops:

Doug
 
To avoid these ads, REGISTER NOW!
Top Bottom