To avoid these ads, REGISTER NOW!

Radioman\woodworking shop rebuild, pic heavy

OP
W

willy3486

Well-known member
Joined
Jan 14, 2010
Messages
1,594
Location
Middle Tennessee
The workbench begins. If you saw a few posts ago I want to build a new workbench along the lines of one of the old alemite auto workbenches. I had posted a picture of the poly gas one that had been restored.

I started with the legs. I had 3 sets of legs. I had one I really liked that was streamlined. It had flowing curves but the problem was I only had one. And a workbench usually needs two. That left these two.

2336466460101948653S425x425Q85.jpg


Its starting to look like Gilligans Island at my shop with all the high grass. The two legs are on the steel bridge I made so water could go under in the small ditch. I think I had posted on the bridge a post or so ago. As far as these legs goes the one on the left was a good size. It was about 26 inches wide IIRC. The one on the right had two shorter legs but welded on a long piece. So what I did was cut one side along the leg in the center. That gave me one side of the piece. I needed a piece 11 inches wide to weld it to the one I cut to make it as wide as the one I did not need to cut. I then cut the far side leg and left 11 inches of the top and other sections so I could weld it to the other leg I had cut.

I then welded those two sections together to make a side set of legs like the one I did not have to cut. The end result is the two legs you see in this picture. Sorry that its upside down, I took it that way to get a feel for what it looks like. The one on the right is the one I have welded. The blue piece of metal is the piece I plan to use for a brace in the back. I am by no means claim to be a good welder but I was happy with the outcome.

2896245540101948653S425x425Q85.jpg


I like my big stuff other than shelves to be mounted on rollers. The reason is I have had to move stuff around by myself so much I want it as easy to move as possible. I had some really nice rollers I put on them. If I see rollers on sale or cheap I usually at least buy one set even if I don't have a project for them at that time. So I have quite a few sets on hand. I bought a set from the scrapyard to make a dolly to roll my trucks bed and cab around when I redid it. I never made it and used them for my welding cart. So I will eventually use them. Anyway I put them on the ends of the leg extensions. These legs have extensions so you can raise or lower it to the height you want. I clamped the extension to the top frame part of the roller. I dampened a rag and wrapped the wheel part up. I clamped the welding clamp on it and tacked the two together. I welded around it. As soon as I had it welded I cut the welder off and dipped the wheel in a jug of water. I have found if I dampen a rag and wrap it the wheel will be fine. Here is the outcome.

2878995410101948653S425x425Q85.jpg


So now the legs are made and on to the top. My dad use to get wood from a flooring maker. They also made drawers and my dad had a lot of oak 1x4x24. He took some and glued them up in a fashion similar to laying bricks. He made two of these and they are huge. I took one,split it down the middle and made a woodworking workbench and cabinet. I am not sure if I posted it before but here it is. The orange frame I used was metal shipping containers made out of angle iron. I welded two pieces on the bottom with rollers as well. I made drawers for it. I plan on redoing the top and clear it again. I plan on keeping it nice this time.

[
2176463040101948653S425x425Q85.jpg


Here is what the one for the new workbench looked like. I had saved it after my dad died. My mom wanted the place cleaned up and the stuff gone. She said I could have what I wanted so that is where I got a lot of old metal and the wood. Otherwise the wood was going to be burned and metal scrapped out. Glued up its about 6 feet long,4 inches by 11 inches. Its all oak and heavy. I lets me know how old I am when I move it.
2490545480101948653S425x425Q85.jpg


Here is the same piece after I split it. I wanted it about 2 inches thick so the 4 inch was cut down the middle. I then glued the two sections together. To split it I marked the center of the 4 inch width. I cut it a little using a circular saw. I then went down two more times until I couldn't cut any more with that saw. I then flipped it over and repeated the process. I still had about 5 inches in the center. I then cut that with my reciprocating saw. I picked up this saw last year
http://www.harborfreight.com/6-amp-reciprocating-saw-with-rotating-handle-65570.html
I have been pleasantly surprised at how well it works. I sometimes buy tools at HF I don't have to see if I would use them. If I use them a lot I then buy a better one when I wear that one out. But this one has been great. The only issue is the bar that keeps the saw from hitting the wood works loose so if you get one check it often.

Using that saw it still took about 3 hours to get it split. I would rest the saw after about every 5 to ten inches. Plus it wears you out. Here it is after it was glued.

2728100570101948653S425x425Q85.jpg


That will give me about 22 inches and I still have some of that oak saved back. I will split it first then glue it up. I really don't want to split it after it is already glued. I will still need to sand it to get to the wood smooth and nice looking. I have my planer in my shop but its not wired or gone through yet. I can get it though.

Next week I hope to paint the frame and get it bolted together. I have some 2x2 I want to make sides and then use some on the back. I bought some metal rails that shelve brackets go in. I want to wire it and put a light in it as well. I am trying to figure out if I want to make it in the lines of streamlining or art deco. I like the streamlined look of the late 30s to 40s but the metal legs give in to the look of the art deco of the 20s/30s. I guess it will just present itself. I didn't expect to get started this early in the summer on it but I have. I hope to get it fixed up within the next month . I will need to as even though my shop has a lot of space I am almost out of room. So this one needs to be finished and put in the place of my current bench.
 
To avoid these ads, REGISTER NOW!
OP
W

willy3486

Well-known member
Joined
Jan 14, 2010
Messages
1,594
Location
Middle Tennessee
A couple of new shots. The actual work area was a little short, about 22 inches. I needed at least 27. So I took some of the oak boards I had left and cut them in half. I then glued them on top of the boards already glued up. To give you an idea of the size its 2 1/2 inches thick, 28 inches deep and 6 feet wide. It is on its side in the photo.

2124980630101948653S425x425Q85.jpg


I put a piece of wood in the vise and clamped it to the new work area that was on its side. It held up the piece so it wouldn't flip over. I put the new glued pieces on. The new ones are on the top in the photo. I clamped it down and then wrapped some wire on it and the clamps to hold it up.

As far as the legs here is a better picture of them.

2472426500101948653S425x425Q85.jpg


The top area is slightly different. One has a piece welded on and the other is bolted on. The one that is bolted on has a different piece in front of it. I plan to put a last piece of wood on the front and then have it wide enough to hide these differences. My plans this weekend if everything works out is to primer the frame. I then hope to square up the top and sand it down. I have one piece of metal to tie in the two legs together. I also want to add a couple of braces. The bench is actually coming together great so far.
 
OP
W

willy3486

Well-known member
Joined
Jan 14, 2010
Messages
1,594
Location
Middle Tennessee
Not much going on these days in the shop. I have been doing for others so much I haven't had any time to work on the workbench. I am going to see how much vacation time at work so I can just get a few things done. I loose days after I get to a number of days so I plan to take a few. I have been cutting trees down for the MILs new house and doing some work on furniture for my daughter.

Now on to the shop. Although I haven't done anything on the workbench I did get a few items for the shop. The first one is a what is it. It is a tool used a lot over 100 years ago. Chances are you may have some of the product it was used for right now.
Care to guess?

2375046370101948653S425x425Q85.jpg


There is a show on my local Public TV station called Tennessee crossroads. I checked with the station to see if they had any of the old station cards I might could get. They didn't but that had a poster from the Tennessee Crossroads which is one of my favorites. I got a frame and mounted it with a few other items they sent when it was originally WDCN.

2268301030101948653S425x425Q85.jpg


They also sent me a full size poster from the Antiques Roadshow. I need a frame for it. I may have to make one for it.

2236839610101948653S425x425Q85.jpg


Here is the poster in my shop. The dads workshop sign was made for me years ago by my daughter. The Perryman was a standup ad from the 20s I think. The radio it is on has actually been in a magazine . About 20 years ago a picture of my shop was in the magazine Popular Electronics. They had a contest and I won one of the prizes then for a project in my shop. My shop may be getting national exposure. Pictures of the shop may be used nationally. If it happens I will post more when I know more.

2347644810101948653S425x425Q85.jpg


That's all for for now. If you have any questions let me know. If you know what that tool let me know. Remember part of my shop is old tools that may not be related to TVs and radios. This piece has nothing to do with electronics. Any ideas on what it is?
 

mdbeck1

Well-known member
Joined
Mar 7, 2010
Messages
2,297
Location
Norman, OK
... Although I haven't done anything on the workbench I did get a few items for the shop. The first one is a what is it. It is a tool used a lot over 100 years ago. Chances are you may have some of the product it was used for right now.
Care to guess?

2375046370101948653S425x425Q85.jpg


If you know what that tool let me know. Remember part of my shop is old tools that may not be related to TVs and radios. This piece has nothing to do with electronics. Any ideas on what it is?

The actual name escapes me but it's an old scale to weigh things like cotton.
 
OP
W

willy3486

Well-known member
Joined
Jan 14, 2010
Messages
1,594
Location
Middle Tennessee
The actual name escapes me but it's an old scale to weigh things like cotton.

Its a cotton scale,you got it. I don't know the actual name but it was used to weight cotton. It was my FIL and my MIL gave it to me. We are cleaning out a small building for her move and it was in it.
 

magnusk750

Well-known member
Joined
Nov 6, 2010
Messages
501
Location
Estonia
In swedish this kind of scale is called besman. International or german name for it perhaps, doesn't sound swedish? They were used as the laymans scale for almost everything here, I remember a quite cool pic from the history book in secondary school were such a scale was used in the 1940s to weigh a newborn kid.
 
OP
W

willy3486

Well-known member
Joined
Jan 14, 2010
Messages
1,594
Location
Middle Tennessee
New stuff for the workshop. I was able to get a stop sign and a yield sign. These went into the auto area. These signs were from private property and were replaced . They were being thrown away and a friend asked if he could have them. I had mentioned I would like to have a few signs and he asked for them. I helped him a lot and tries to do stuff like this for me because he knows I like old junk.

Here is the stop sign. It looks to be in good shape and is for the most part. But it was run over and rolled up. So it had to be replaced. I was able to get it flat to screw on the wall.

2171787010101948653S425x425Q85.jpg


Here is the other sign. It is a yield sign. It was in great shape except for the colors. The sun had faded it so much it was replaced. The bolts were rusted on so they just torched the sign. I just left it with the torch burns, it adds character.

2997504440101948653S425x425Q85.jpg


A while back I mentioned I would like to get a screen protector for my door. These are the things that use to be on old country stores that had bread advertising usually on them. I have seen pictures of ones with tube advertising on them but I have never found them . I found one of the old aluminum protectors that were used on screen doors. These were the ones from the 50s that people would put the letter from their last name on the center. So I thought why not a emblem. So I found a RCA emblem from years ago I liked. I printed it out and adjusted until I got it to the size I liked. I took a piece of aluminum that came from a old tube organ to use. I sprayed the back of the picture with 3m glue and laid it on the aluminum. Here is a copy of the printout, the emblem as I had cut some out and the aluminum screen protector.

2411885280101948653S425x425Q85.jpg


I drilled holes in the emblem so I could insert a blade to my scroll saw. The good thing on my scroll saw is I can use just about any blades. It clamps the blades in, no pins.

Here is a picture of the emblem laid on a piece of paper to get an idea of what it looks like. It wasn't too bad to cut out. The saw has a air pump that blows the cuttings away and I have a light that shines good on it. The saw is a vintage delta I rebuilt. This is the first major project I have used the saw since rebuilding it and I am well pleased. Its one of the old 24 inch saws they made from the late 30s to the early 60s. It really works great.

2258376810101948653S425x425Q85.jpg


Here it is finished. I took a few pictures of it but sometimes I don't get a really good one. To get it clean I used a heat gun to heat the paper. Just enough so the heat would warm the glue. Then it just peeled off. I used a combination of files to smooth it out. I used a chainsaw file to get the curves I needed. then other files to smooth out things. The good thing if aluminum is it files fast but not so fast you cut more than you want. I then took 800 grit wet or dry sandpaper and sanded it with some water. After that I used some silver wadding compound. Its a silver polish walmart has and it is in a little can. You pull out the fibers and just rub. It really shiles aluminum as well.

2620020910101948653S425x425Q85.jpg


Here is it mounted on the door. I have cats as well as a dog. I like to keep cats because it keeps mice to a minimum or almost non existent here. I haven't seen a mouse in a long time. The bad thing is the cats try to claw the screen if I am in the shop. So hopefully this will deter them.

2231573080101948653S425x425Q85.jpg


Another picture of the entire door.

2520643460101948653S425x425Q85.jpg


Well that was this weeks project. I liked it because it was one of those I came in from work and was able to work anywhere from 5 minutes to 15 on it. I got it on this morning. Due to the hours I work and drive time thats all I feel like doing in the shop a lot of days. I would work on the bench but the stuff I need to do to it I need a lot longer. If I weld something up I have to route the welding cables outside, get the tools outside,clamp the items up and weld. Doing all of that takes at least an hour or more. So I save that stuff for the weekends. I hope to work on the bench this weekend. I need to put new gaskets on my old worktruck this weekend so hopefully thats all. If I can keep it to that maybe I can get the workbench at least together. I would still need to make the shelves and cabinets. Hopefully family won't line me up any projects. That keeps me out of the shop a lot. I plan on taking it easy for a few weeks. I pulled my back at work so I am hoping to be able to work on it. I have been hauling,lifting,cutting trees and other stuff like that. So it hasn't been able to heal much. Thats all for now.
 
OP
W

willy3486

Well-known member
Joined
Jan 14, 2010
Messages
1,594
Location
Middle Tennessee
I got to work on the bench today. I started off by hand planing the top of the bench. The bench top was not smooth due to the wood being glued. I haven't wired in my planer yet so this had to be done by hand. Here is the top after I hand planed it for about an hour.
I wanted to do this first to get it as smooth as I could before I sanded the top.
2304487710101948653S425x425Q85.jpg


After I got it smooth with the plane I then used a 40 grit sanding belt on my sander. I went through at least two or three belts before I got it as smooth as I could with the belt sander. Here is how it was after that.

2819649420101948653S425x425Q85.jpg


After this I flipped it over. I needed a way to smooth out the cuts to the wood from where I split it. The top side is the side that was on the outside of the piece. But this side is where I had to spit it. So I came up with this.

2137820060101948653S425x425Q85.jpg


What I did was to mark a line on the side across the front to screw in the board. I did this to the back side as well. I then took two pieces and used the clamps to hold them. The boards were not too far apart so the router would be held up by the boards. I then put in a bit and then ran the router forward,backward and across. I was able to get about 3 inches wide smoothed out. I then removed the clamps then moved those boards over. I then clamped the boards and routed that area. By doing this it gave me a clean smooth area to mount the frame to. I then removed the clamps,boards and unscrewed the boards. I then did this process on the other side. It worked out really good.

The next step was the frame. I primered the frame and pieces. I saved some scrap metal from the trash and there was a piece perfect for the back piece. It was actually a piece used to brace a frame with wheels. I didn't have to do any fabrication to it. All I had to do is to is mark the holes on the new piece to the sides I already made. Then drill the sides and bolt it together. Here it is all together. The back piece already made like I needed saved me a lot of time so I got a lot done to it today.

2582793460101948653S425x425Q85.jpg


You can see how the back piece was made and was a perfect fit.


Here is the table top on the frame. It was a great fit. I took my chair over to it and gave it a try. It seems to be a good height. I can roll up to it and not have my legs bumping into the wood top. It seems to have enough room on top to work and hopefully when tools go on it will still be roomy.

2003192680101948653S425x425Q85.jpg


After this I made the sides and back. I want to use this area to put my equipment on. I picked up some adjustable shelving brackets to go on the back. I put a board across the top. This board serves two purposes. One is to sturdy the frame. The other is I plan on putting a light there and this will hide it. I am going to put a second board below this board. Between the two boards I will have a plexiglas sign. Seems like I have seen some of the alemite workbenches have a sign there. The black item on the bench is a computer holder. I plan on putting it to the outside of the metal frame on the left just below the wood bench top. I hope the cable to the scanner is long enough to go to the other side. I plan on making doors and boxes to hide these. I also hope to build storage boxes to the sides of the walls I made.

2115816740101948653S425x425Q85.jpg


Well that's the progress this week. I may work on it next week as well. I would love to get this done in the next few weeks. I want to wire some plugs in the back and put a switch to turn everthing on. I am thinking of painting the wood a 50s era color, maybe robin eggs blue and do black splatter paint. That was big then, if you are not familiar with it check out my scotty camper and how its painted.

2725765800101948653S425x425Q85.jpg


I rebuilt that camper from the frame up. I researched and figured out how to paint it like that. You paint the base color then use white and black to splatter. You just dip the brush in black or white and run your finger over the brush end to make the paint spatter on it IIRC. The metal frame will be black and wood bench top will be varnished. That will be the only part of the wood not painted.


When I get the workbench done my workshop would be almost redone. I just need to fold up the rest of the cardboard boxes and put parts in them. I would still have a few things to do like run the wire for the planer and completely organize that area but I think that area would maybe take two days,three at the most. I went through it a month or so ago and cleaned a lot out of it.
 
Last edited:

Cranehead

Member
Joined
Dec 9, 2011
Messages
15
Location
Portland, OR
Always enjoy seeing your posts.

I worked in the theater years ago, we would use that spatter paint technique to give the appearance of texture when painting scenery. You can tap a brush on your hand to spatter the paint, and you can control to some extent the size of the droplets. We also used a hand pumped sprayer- we were using casein based water paint so you could use garden type sprayers.

TC
 
OP
W

willy3486

Well-known member
Joined
Jan 14, 2010
Messages
1,594
Location
Middle Tennessee
Thanks for the complements. I have a bench I currently use. It is a little high. At one time in my shop I had a "U" shaped bench all around. But what happened was that it got to be where I piled it up. I also got more tools and ran out of floor space. So I cut it down. Now it is piled up with stuff under it. I am hoping this will keep me from packing so much in it. So far with the shop rebuild that is not as bad of a issue. I have everything sorted and stored in its own place. There is not a lot of new tools I expect to get. I have restored so many that there is not any I can think of I need.

I am hoping to get the wood for the shelves and also for the side pieces this week. I have been thinking about going ahead and tearing down the current bench. I have decided against that due to needing to paint it on the outside and also due to the fact I may put off finishing it. I may walk around and see what I can find around the place to use. The wood so far is just extra I had laying around the place. The bench is also helping me to get rid of lumber I have not being used. That helps to be able to clean up. Where my tractor is I want to make some type of lumber storage on the side of the wall. But I think that will be a fall project. Thanks for the comments folks.
 

ODIS

Well-known member
Joined
Apr 30, 2012
Messages
2,110
Location
Pacific Northwest
Have enjoyed reading and looking at all you have been able to get completed. Great work and a great place to have fun.

Ody.
 

Lippyp

Well-known member
Joined
Jun 26, 2006
Messages
6,720
Location
Shropshire, UK
.

Now on to the shop. Although I haven't done anything on the workbench I did get a few items for the shop. The first one is a what is it. It is a tool used a lot over 100 years ago. Chances are you may have some of the product it was used for right now.
Care to guess?

2375046370101948653S425x425Q85.jpg

Over here in the UK we call that a steelyard balance or just a steelyard. Over in France you can still see old farmers at some of the markets using them to weigh out vegetables for sale, complete with a calibration sticker on it from the local council weights and measures people that check that sort of thing!
 
OP
W

willy3486

Well-known member
Joined
Jan 14, 2010
Messages
1,594
Location
Middle Tennessee
Over here in the UK we call that a steelyard balance or just a steelyard. Over in France you can still see old farmers at some of the markets using them to weigh out vegetables for sale, complete with a calibration sticker on it from the local council weights and measures people that check that sort of thing!

Its funny how things can have different names. I got to be friends with this guy at work. One day he tells me he is Brittish. I thought he was joking at first until showed me how he talked with a Brittish accent. Come to find out he was born there and came to the US when he was about 5 as his dad transfered to the US. Any way we talked about how things had different names depending on which side of the ocean you were on. Holiday in Britian is a vacation in us, *** in Brittian is cigarette IIRC and Biscuit is a cookie IIRC as well. A *** is also a bad place in a piece of cloth IIRC. Its is interesting how items can be called different areas. I heard a saying one that went like this, how dumb you are is dependant on where you are in the country. Anyway its nice to get other perspectives form other parts of the world, Thanks for that info on the steelyard.
 
Last edited:
OP
W

willy3486

Well-known member
Joined
Jan 14, 2010
Messages
1,594
Location
Middle Tennessee
Thanks for all the positive comments. I hope to post some more pictures this weekend so keep an eye open. I have been thinking about not putting the plexiglas in the front. I will have to see what needs to be done to the cabinet. I have been designing the next piece after the last piece has been put on. I may have to change what I wanted with the sign. I may just put advertising signs over it. I will have to see how it goes.
 
OP
W

willy3486

Well-known member
Joined
Jan 14, 2010
Messages
1,594
Location
Middle Tennessee
Well back to the workbench. The workbench is a Alemite inspired workbench not a exact copy. I have more or less let the design happen as I went along, I think this has made it better for me. Anyway I cleaned out the old bench. The old bench was the original one I had in the shop. I had originally made a workbench in the shape of a "U" all around the wall. It originally began to collect junk on top and under it. I also began to run out of room due to new tools so I cut it down a few times. It was amazing how much filled the small area, roughly 80 inches wide. I filled up the two hallways with the stuff. Here is first hallway

2221329300101948653S425x425Q85.jpg


I had a opps moment on this hallway.The wood primer is down this hall and I forgot to get it, opps. That won't be so bad as I will need to get this stuff out first. It is my tools so I will just get them out and stack them in the woodworking area.

Here is the other area. Along one of these halls is my roller wheel box. I buy swivel wheels every time I see a good deal on them. I plan on putting wheels on the cabinet with the printer and scanner. I can do that after everything is cleaned up.

2868304420101948653S425x425Q85.jpg


I have a lot of vintage radios down that hall I pulled out from the bench. I will probably put them in my auto area for storage until I can redo them. I have a original 8 track for a 60s firebird and the underdash case as well. I plan on restoring it. I also have a ChevyII, late 50s wonderbar and a few others.

As I said it was a inspired alemite bench. I needed a area for my scanner. I have a older but a really nice flatbed scanner I wanted to store. So I made a cabinet for it and the printer I have. I Will put the laser printer in the lower area. and the scanner will be in the top area that has a slide out tray.It will be more under the workbench than in this picture. When it is under the bench where it will be it will line up with the top storage cabinets. Its not quite finished in this picture but hopefully you can get an idea of how it will be.

2490979220101948653S425x425Q85.jpg


Here is the bench in place and before I put the side cabinets on. I have the shelves for the insides cut and in place. I am using the metal brackets that sit in a track. I wanted a way to easily adjust up and down. As I find new test boxes and such I may change the layout.

2007611680101948653S425x425Q85.jpg


Here is the side cabinets I have for it. One is standing up and the other is down. I wanted the side cabinets like the alemite but I needed the area free on one side for the printer/scanner cabinet. I had a old 30 or 40s vintage medicine cabinet and I thought it would be perfect for the other side. I am running out of room so it will be a good place to put it, plus if I need a little extra tabletop I can roll it out.So with that in mind and since the Medicine cabinet was almost the same size as the printer cabinet I made these side cabinets the same size.

2319771860101948653S425x425Q85.jpg


Here is the shot of the medicine cabinet. I got this one day at the place I worked at about 18 years ago. One of the fellows I worked with had it and the leg was warped under it, the weld gave loose.He asked if I wanted it before he threw it out. I took it home and rewelded the legs and made them all good. I have used it every since. I am at odds with it. I don't know if I will paint it blue like the wood or paint it black like the metal frame will be. I am thinking of painting it black to match the other metal.

2409067100101948653S425x425Q85.jpg


And here is the bench as it is now. I need to paint the wood and do the splatterpaint. Then I will varnish the workbench top and leave it clear. I then will need to paint the metal black and mount the computer stand keyboard holder. I hope it will make me be a lot neater. So far the woodworking area I am neater due to the rework of the area.

2227504670101948653S425x425Q85.jpg


Here is a closer shot of the workbench. I used a router to round over the edges with a 1/2 inch curve. I routed the sides and bottom as well. It seems like it is going to work out good. I will post more later when I paint and varnish it. Then all I have to do is to wire it for electricity. I had thought about making a light sign in the top area but I think I will make one to go on the top of the cabinet. If I had made one under the top it would have took up shelf space. Well thats all for now.

2956244610101948653S425x425Q85.jpg
 
Last edited:
To avoid these ads, REGISTER NOW!

fergus

Well-known member
Joined
Oct 4, 2009
Messages
1,620
Location
Yolo County CA
Willy,

I've acquired an old Fisher stereo (hi fi?) and I wonder if you might be able to help me out a bit? It is a family heirloom and I would like to get it working.
 
OP
W

willy3486

Well-known member
Joined
Jan 14, 2010
Messages
1,594
Location
Middle Tennessee
Willy,

I've acquired an old Fisher stereo (hi fi?) and I wonder if you might be able to help me out a bit? It is a family heirloom and I would like to get it working.

No problem. Can you look and see if it has a model on it? That would help a lot to see what I can find on it. I have lots of info and diagrams on radios. Can you also tell me the place you live, city?That way I can see if I can find someone local for you. If it is not feasable for me to look at it I will see if I can find someone in your area to. I wouldn't care to look at it but its a little far for a housecall. Seriously though there are lots of people who still work on them and to ship one across the country can be pricey. I am also probably 6 months away from working on anything. Just send me a PM directly and I will see what I can find out. I also know some good techs all over the country if it is not economical to ship.

As far as the replies thanks for the positive comments.
 

oldgoaly

Well-known member
Joined
Apr 3, 2006
Messages
395
Location
Shiloh, Il
Willy! when you come up with a self cleaning workbench let me know I will be your beta tester! Have you decided on a Color scheme? or manufacturer? I have the urge for a Hickok and a Philco, you know the ones with the engine turned meters! Maybe I should go for the Philco one 1st, less equipment to find! tt
 
OP
W

willy3486

Well-known member
Joined
Jan 14, 2010
Messages
1,594
Location
Middle Tennessee
Willy! when you come up with a self cleaning workbench let me know I will be your beta tester! Have you decided on a Color scheme? or manufacturer? I have the urge for a Hickok and a Philco, you know the ones with the engine turned meters! Maybe I should go for the Philco one 1st, less equipment to find! tt

I wish I could invent the self cleaning workbench, I would be a millionaire. As far as color scheme I am going to paint the wood cabinets and such a light blue like was used in the 50s a lot. Then I plan on painting the metal black. The wood butcherblock like work area I want to clear it. As far as advertising the way it came together I have no room underside for one. So I am thinking of doing something on top. I can do something after it is done when I get a chance. I would like to get a sign from a shop so I may make one similar to your RCA or philco signs. I also want a "on the air" sign as well. But the "on the air can easily be reproduced . So I think I will find or make a sign used in a shop that was hung down from the ceiling. I like repoducing these items. So it will give me a new project. I think with the colors the old Tung sol guy would fit in, maybe I can store my tungsol tube box there.
 
OP
W

willy3486

Well-known member
Joined
Jan 14, 2010
Messages
1,594
Location
Middle Tennessee
Well the workbench is almost done.I did this work a while back but due to work,strained back and going on vacation I am just getting them posted. Here is the cabinet that will hold the printer and the scanner .

2552183190101948653S425x425Q85.jpg


Inside of the cabinet. It has a slide out tray that holds the scanner.

2890050910101948653S425x425Q85.jpg


This bench fits just under the cabinets that are mounted to the side of the workbench.

The other cabinet was a 30s medicine cabinet. I repainted it black since it was metal. I painted the metal parts black. I painted the wood parts that show the blue and splatter paint. The wood tabletop work area I varnished.

Here is the right side cabinet opened. I didn't paint the inside, I left it unpainted. I will use it for storage. I have four shelves in it about 12 inches wide each.

2747775300101948653S425x425Q85.jpg


Here is the metal legs on the table. Its not the best picture but you can get a idea. The top of the workbench has a good smooth finish and nice shine.

2474950680101948653S425x425Q85.jpg


Here is a better picture of the workbench top. It has three coats on it. I also wet sanded each coat between with 800 grit wet or dry sandpaper.

2756953620101948653S425x425Q85.jpg


Here is a shot of the top of it with the doors closed.

2385615120101948653S425x425Q85.jpg


Here is another picture of the entire cabinet.

2184156050101948653S425x425Q85.jpg


This is not the best picture but it will give you an idea of it. I still have to wire it and put the tools on. But the workbench is done. I may either make a lighted sign or if I can find a original put on on top. But thats a project for another day. I plan on the next day or so to get the wiring done, tools put on it,clean up the area, and put away the rest of the stuff laying around from cleaning the old workbench out. I plan on doing that this week and being finished with the project.
 
Last edited:
OP
W

willy3486

Well-known member
Joined
Jan 14, 2010
Messages
1,594
Location
Middle Tennessee
Ahh the last pic of it clean..... the blue does look good!

You are probably right on the last time its clean,lol.

Here is a few new pictures. The first is the workbench with tools.

2545658160101948653S425x425Q85.jpg


The other photo is magnetic tool holders. To make your own go to

http://www.garagejournal.com/forum/showthread.php?p=2412367#post2412367

Here is a picture of the tool holders.

2668232700101948653S425x425Q85.jpg


If I can get up an hour before my family I think I can finish it. I cleaned out a bunch of stuff today and got a load for a yard sale.
 

miketyler

Well-known member
Joined
Sep 10, 2009
Messages
635
Location
Cedar Hill, TX
Just saw this post and couldnt put it down till I read all of it. There simply isnt enough guys like Willy around that are interested in re-utilizing resources to this degree. I recycle everything I can get my hands on to the nth degree but Willy has me beat. Good job on the shop and workbench and all your endeavors my friend.

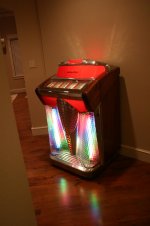
I too have a fondness for the old electronics of yesterday. I started collecting and restoring old jukeboxes and wallboxes over 15 years ago. I have several finished pieces in my collection including a Wurlitzer 800, 1015, 1100, a Seeburg G and VL200, and the star of my collection, a very rare Filben Maestro. As the hobby matured for me 5-6 years ago, I changed gears and began restoring 70's muscle cars but I have four jukes lined up to restore including an iconic AMI Continental II.

Keep doing what you're doing Willy. I'll be reading.....
 

miketyler

Well-known member
Joined
Sep 10, 2009
Messages
635
Location
Cedar Hill, TX
Wouldnt be right to not post pics....
 

Attachments

  • IMG_3807.jpg
    IMG_3807.jpg
    136.3 KB · Views: 34
  • IMG_3814.jpg
    IMG_3814.jpg
    134.8 KB · Views: 29
  • IMG_3795.jpg
    IMG_3795.jpg
    138.5 KB · Views: 31
  • IMG_3779.jpg
    IMG_3779.jpg
    136.6 KB · Views: 29
  • IMG_3803.jpg
    IMG_3803.jpg
    136.7 KB · Views: 31
OP
W

willy3486

Well-known member
Joined
Jan 14, 2010
Messages
1,594
Location
Middle Tennessee
Wouldnt be right to not post pics....

Nice jukes. MY first job after college was repairing jukeboxes. The Filben Maestro is a rare one. I don't think I have ever seen one in person. I have a 38 Seeburg and a 47 Seeburg now. I have a old Seeburg trashcan door I made a stereo cabinet for. I had bought a bunch of old parts and it was in the pile. One of the old guys who is gone now who I got inspiration from had the jukeboxes and parts. I will have to post it.

I did a similar route that you did. I went to school on electronics,computers and robotics. I took almost every class they had then. I only liked about 4 classes to have 3 degrees. Anyway I got the first jukebox when I was in college. I got it to have something to tinker on when I was home from school. All the people at home were either out partying or married so I had nothing in common. I got the first job on jukeboxes then a electronics repair shop,plant maintainence. After that I got a job on computers and have been working on them every since.

I got into repairing electronics on the side and did tube stuff back in the late 80s. Then in the 90s I built our house and got away from tubes. Then I built my shop from side jobs on computers. I got burned out on computers on the side and got into restoring my old truck. I then got it done and got into old campers. I also got into vintage woodworking tools. After a while I had two campers and no more room for them. So recently I got back into tube items. After seeing BB767s post on the 30s welding shop and Kiwi Kevs shop I got the idea on how to set it up. So I can relate to redoing old cars and such. It took me about 6 years to do the truck, about 6 months to do a camper and 60 minutes to 6 hours usually to redo a radio. So on radios you can see the work done a lot quicker than a vehicle. Also on vehicles I have lost patience working on them. I hate to work on engines anymore.

I will post the the bench with the scanner cabinet and the magnets installed. My next step is to finish making the tube boxes and sorting the tubes.
 
OP
W

willy3486

Well-known member
Joined
Jan 14, 2010
Messages
1,594
Location
Middle Tennessee
A few more pictures.

Down the side of the bench. The red piece is a test lead holder.
2346909290101948653S425x425Q85.jpg


Here is the black cabinet I restored under the bench. It can slide out easy to give me a little more room to put stuff on.

2709729000101948653S425x425Q85.jpg


Here is a straight in shot that I did. You can see the blue fan I restored. Under the last shelf is the magnetic holder I made for tools. You can also see a 40s vintage scope waiting to be restored.
2905586330101948653S425x425Q85.jpg


Here is another shot. This is of the left hand side. The bottom cabinet can roll out for more space on top. It will house the printer and scanner. You can also see the side cabinets on top. The item with masking tape is the 40s tape. I put that to hold the clear plastic chart for the screen until I can reset it in the scope.

2021591820101948653S425x425Q85.jpg


Here is the shot of the scanner and printer cart open. The scanner is a big flatbed type. I fixed it with a tray that slides out to put pieces on it to scan.

2799245780101948653S425x425Q85.jpg


Another straight in shot.
2904402700101948653S425x425Q85.jpg


I had thought about a lighted sign on top but I haven't made one. I used that area to hold a couple of tube testers,scope and a few other tools. I do have a light under the top to give me more light on the bench. Here is a shot of the top.
2033554580101948653S425x425Q85.jpg


I would like to get a shot of the entire bench but my shop has so much I can't get far back enough to get one. I can now work on stuff if I can just get the time. I also use to design electronics stuff. If I get a chance I might get into that as well. I have a bunch of schematics of stuff I always wanted to build. So thats pretty much the build of the bench, I hope you like it. One think I am thinking of building is to make a stereo meter. I will hook it up to all kinds of lights I have. I have a don't walk sign, hope to get a "on air" sign and a few others set up. In the next few weeks, I hope, my MIL will settle with the state. If that happens I will be busy for a few months. I will have to help move, have a yard sale, haul stuff off and dig then replant her plants.
 
OP
W

willy3486

Well-known member
Joined
Jan 14, 2010
Messages
1,594
Location
Middle Tennessee
I haven't worked much out there lately, too much to do around the house. I did replace my rusted out garage door with a better one. There was a radio meet today that I went to. I picked up a nice original Radio Shack clock that was a dealer only clock. The meet was at a Radio shop that still repairs items. I got to talking to the owner and asked if he had any advertising items. Seems to work good. My shop is full of clocks. I have a couple of the school/bank type clocks made by IBM I need to get set up out there as well. Here is the RS clock.

2761019480101948653S425x425Q85.jpg


I really like this clock. I wanted something from a Radio Shack. When I was a kid I got into building stuff. I first started going to the local radio shack when I was around 12. The RS was inside the local Western Auto. It was a a area about 14x16. Since it was so small I would usually have to order then go back to get the parts. The owner was about 5 feet or less tall. I think we were close to the same height, I may have been taller. Anyway he got to recognizing me and would always ask what I was working on. He was always encoraging and wanted to know what my latest project was. Really nice older fellow. Its because of him and the other older fellows who helped me is why I am setting the shop up like it is.

I also got a stack of books. Most of them are most often used diagrams by year. I got quite a few of them and I may be able to keep looking to get a complete set. One book was a companion to my rider books I already had. I also got a 1920s radio book and a 1933 radio book.

2167653340101948653S425x425Q85.jpg


I picked up a new radio to work on. It is a 30s philco. One guy at the meets I get at least one item from. I always ask if he has a basket case. This wasn't really a basket case but I liked it.

2249866020101948653S425x425Q85.jpg


As far as the shop goes it made the Jameco workbench hall of fame. JAmeco is a parts supplier. Only bad thing is they have a before picture when I had it piled up. They also have my after. From what they said I take it they are going to post the new bench as well. Here is a link.


http://www.jameco.com/Jameco/workshop/inthenews/halloffame.html

Thats it for now. Its the muggy and hot part of the summer. I haven't a AC unit in yet so it can be too hot to do stuff in there. I have a lot to do over the next 3 months for the road project. The state has sent bidders out to give bids for the MILs new house. Once that is done and accepted in three months she will be moved and all my stuff to do with it will be done. I have had to wait on them to do some of the last of it. Anyway I will post when more is done.
 

cactiki

Well-known member
Joined
Nov 17, 2011
Messages
123
Location
Ridgecrest, Ca
Nice bench, I never saw that trick with the router, I might use that one! I always appreciate everyone taking time out of their busy lives to post things like that.
Do you have any pictures of your trailer? I want to restore one myself someday.
 

Outlander

Well-known member
Joined
Jul 30, 2010
Messages
5,154
Location
Quebec, Canada
Great thread, I read it again for the 5th time. Made me think of my uncle who taught me electronics at around 10 with some Heathkit projects. Here are some books that found their way home with me when he passed.
 

Attachments

  • electronics books - old.jpg
    electronics books - old.jpg
    90.9 KB · Views: 14

MBfreak

MEMBER EMERITUS
Joined
Dec 10, 2010
Messages
2,301
Location
Linkoping , Sweden
Hi again.
As usual, this is the most interesting thread on GJ, neck and neck with APmechs story on making a new variable drive for a Do-All.
I like the entire thread and do admire the amount of work that has got into fixing up your shop with all nice test instruments and old radios.

I am prohibited to have more than six old OWN radios, so to walk the line and at the same time get some more I restore old radios for fun.
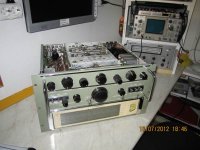
The latest bench weight( 32 kilos!!!) is a 1948 communications receiver made by the GEC in the UK in 1948. Amazing radio, and it has some very interesting circuit solutions. Active filter in the power supply since they did not want electrolytics, a crystal filter that you can tune to listen to the lower or higher sideband on AM, a six gang tuning cap and the story goes on. Like using the difference in thermal expansion between the oscillator coil former and the ferrite core brass screw to keep the local oscillator rock steady with varying ambient temperature!! A far cry from todays phase looked loops. There were a number of issues , mostly related to corrosion and one real fault, a litz wire in the second IF transformer stage had broken at the soldering joint.
The radio now works perfect, and is tuned and tested to the factory specs.
Great fun

I attach a couple of pictures.

Best regards

Ola
 

Attachments

  • mini-Magnus E radio 1.jpg
    mini-Magnus E radio 1.jpg
    57.1 KB · Views: 26
  • mini-Magnus E radio 2 .jpg
    mini-Magnus E radio 2 .jpg
    68.1 KB · Views: 24
To avoid these ads, REGISTER NOW!
Top Bottom