To avoid these ads, REGISTER NOW!

Townhouse 2-car

Cone Eater

Active member
Joined
Mar 30, 2012
Messages
38
Location
charlottesville, VA
Hello GJ. I've been lurking off and on for a long time, but haven't really posted much, so I thought I'd start a running thread for my work-in-progress.

For background, I spent the last 10 years getting edumacated (college, masters, medschool), which meant living out of small apartments on student-loan-level income and ramen noodle savings plans. This past summer I got my first job, and with it, bought my first home. It's a Ryan-built townhouse which I bought brand new - I know, not the highest quality homes, but it's a starter, and an investment in a nice young-family-type-neighborhood, and I bought in at the low point of the housing market here. At any rate, the best part is, it's got a 2-car garage!

Since I've spent my whole life busy with school, I'm no master mechanic, I'm certainly no wood craftsman, and thus my tool collection is embarrassingly lacking. Until I moved here, I had everything in a little plastic Craftsman tool box so I could carry it up and down my apartment stairs to my car, along with my jack, jack stands and parts. I can't tell you how glad I am to be done with that nonsense.

My addiction is Autocross, and I'm now getting into track days, so my garage space is mostly for tinkering, maintenance, and modifying my Subaru STI :3gears:. Of course, now that I have the space, I'm looking forward to more random around-the-house type projects and DIY stuff.

Due to the nature of my job, I'm only likely to be in this location for 4, maybe 6 years, so I'm not planning on going too crazy in the garage with stuff that wont add resale value (epoxy floors, for example, despite how much I want to do that). With that in mind, most of what I'll do will be take-with-me-able where possible.

Ok, enough talk. Here's what my garage (and less importantly, the house) looked like when I signed my mortgage documents:
IMG_0324.jpg


IMG_0325.jpg


And not long after...
garageconstruction.jpg


The day I moved in: It's drywalled, but only super-rough tape/mudded (there's a proper building term for this, I'm sure). The rear-of-the-house hose spigot is in the garage, oddly.

emptygarage.jpg


Right after moving in, my baby in her new home and glad to be out of the weather!
earlygarage1.jpg


A little later, doing some maintenance

earlygaragework.jpg


And I finally got proper tool storage. The little plastic thing next to it is what I used to use, LOL
toolbox.jpg


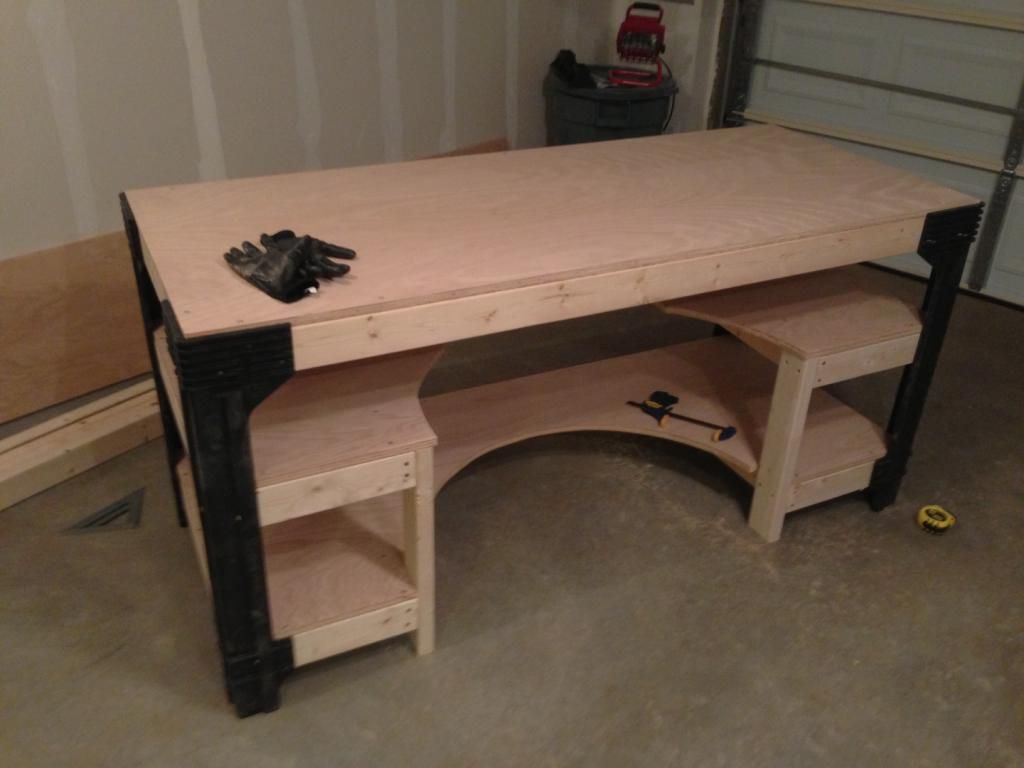
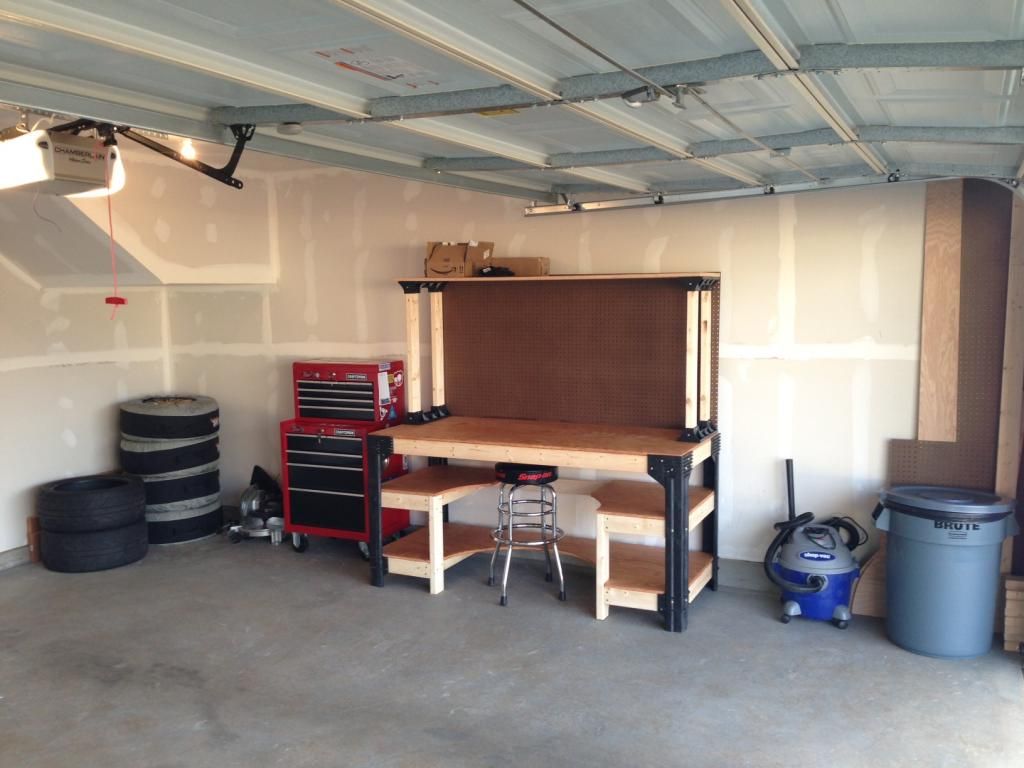
Anyway, it's nothing compared to some of the shops on GJ, but it's my little slice of heaven after all these years of apartment living. I've got some more plans for storage and the like coming soon, and my first proper workbench build in the next post.:bounce:
 
Last edited:
To avoid these ads, REGISTER NOW!

dubber

Well-known member
Joined
Dec 31, 2012
Messages
5,326
Location
Canada's Capital
That's a great size for your first creation. Looks good. I have the same spigot in my townhouse garage right near the door. Pain in the ****. Good luck with the set-up. Keep ur thread going!
 
OP
C

Cone Eater

Active member
Joined
Mar 30, 2012
Messages
38
Location
charlottesville, VA
I quickly discovered I had a serious lack of work space and surface area in my new garage, so I spent the weekend building my first workbench ever. I started with the 2x4Basics bench kit, and the more I planned, the more I modified their design. The original (shown below) is basically just a table with two full size shelves underneath. It's a good table, it's not a good workbench. I mean, if you wanted to sit and work, where do your legs go? :dunno:
51IxjCHyB3L._SL500_AA300_.jpg


I first decided on a 2.5' x 6' bench, and initially decided to just split the middle shelf into two on either side so I could put my legs in between. But I realized that still leaves the stool too far from the work surface if the bottom shelf is left full size. In trying to do this economically I discovered cutting two sheets of plywood to size left me with two 24"x30" remnants that made perfect shelves, so all I had to do was cut out the bottom shelf to allow the stool to be pulled in. Since the original design only had 2x4s around the outer perimeter of the bench, and mine would have the front ones cut out in the middle, I needed more structural support for the middle and bottom. Front-to-back 2x4s under the inner edges of the middle shelves essentially boxed them in, and I just did this on the bottom as well. During construction, it became clear this wasn't going to be enough support so I added vertical supports on the inner front corners of the middle shelves, notched the bottom shelf for them, and tied them in to the 2x4 box structure of both levels. I used glue along with quality Spax screws for all the joints except the deck surface so that's easily replaceable. The pegboard with upper shelf were the final touch. I'm in the process of finishing the top and shelf surfaces with Tung oil mixed 1:1 with mineral spirits. I'm thinking of painting the 2x4s later for a more finished look. Anyway, here are the build pics:

Raw materials and an essentially new Craftsman miter saw I picked up on Craigslist
workbench4.jpeg


Background: the start of the framework of the bench. Foreground: the half-circle cut out of the bottom sheet of plywood
workbench6.jpg


"Test fitting" the stool - plenty of leg room!
workbench5.jpg


bottom shelf notched for the middle legs
workbench7.jpg


Framed out, bottom shelf about to go on
workbench1.jpeg


All together. The middle is two separate shelves. At the last minute I decided to jigsaw the curves into them so they matched the bottom shelf
workbench8.jpg


After the first coat of Tung oil
workbench9.jpg


Upper shelf and peg board added
workbench10.jpg


In place
workbench16.jpg


workbench13.jpg


The stool is still a bit of a tight fit under the work surface when I'm sitting on it, so I may lift the whole bench up on some bricks/pavers to give me some vertical leg room, but otherwise I'm really happy with how it turned out. It just needs several more coats of oil before real use.

Oh ya, and I picked up a vintage, USA-made Wilton vice off eBay which will get mounted up once I'm done oiling the top. Did I mention the vice is chromed? :rocker:
wilton.jpg
 
Last edited:

dubber

Well-known member
Joined
Dec 31, 2012
Messages
5,326
Location
Canada's Capital
You could get one of the tire rack wheel racks and mount it high beside your bulk head to get those wheels off the ground and save space.
 
OP
C

Cone Eater

Active member
Joined
Mar 30, 2012
Messages
38
Location
charlottesville, VA
You could get one of the tire rack wheel racks and mount it high beside your bulk head to get those wheels off the ground and save space.

Good idea, at least for the seasonal ones. The race tires go in-and-out of the car too often during season for me to want to lift them over head. They're also too big for me to want to lift them over my head, haha. How much are those racks? might be cheaper to build something..
 

alpinewhite

Well-known member
Joined
Aug 4, 2012
Messages
1,315
Location
Orange County, California, USA
Try painting the entire garage a single color so that you don't have drywall mud marks all over the place. Now is the time to do it before you've amass more things. You'll be glad you did it.
 

Requin6

Well-known member
Joined
Jul 24, 2011
Messages
280
Location
Frederick, MD
Congrats on the new house and garage build! I am excited to see what you come up with as I have a very similar size and layout to my garage.

Nice start!
 

55cadillacking

Well-known member
Joined
Apr 26, 2012
Messages
1,959
Location
Calgary
Welcome aboard! Congratulations on your purchase. Seeing that you only think you'll be there for 4-6 years, I would still think it would be worth the time, money and effort to do some smart upgrades in the garage. If you are in a complex with identical properties, the garage is a great way to separate your place from the rest. Paint has a massive impact on the space, and it is relatively cheap. An epoxy floor is a big step, but you may want to consider a RaceDeck floor since you can take it with you if, and when, you move. Your workbench looks great and your modifications make it all the more useful. Keep up the good work and be sure to share your progress.

PS..a metal tire rack usually runs between $100-150.
 
OP
C

Cone Eater

Active member
Joined
Mar 30, 2012
Messages
38
Location
charlottesville, VA
Thanks for the input and kind words everyone. I'd love to paint the walls, but it requires mudding/taping and a sh!t ton of sanding first. The current mud looks like it was flung in by angry monkeys. Anyway, it's going to be a lot of work, but it's on the to do list, and I'll have some more questions for the garage gurus before it happens.
 

dubber

Well-known member
Joined
Dec 31, 2012
Messages
5,326
Location
Canada's Capital
I definitely recommend putting the effort of painting in. It for sure can be daunting before you start, but I'm sure everyone here will agree once its painted you won't have any regrets and it will completely transform your space.
 

lmb

Well-known member
Joined
Feb 13, 2013
Messages
164
Location
United Kingdom
Another one to say it would definitely be worth painting it. I don't think that you'd need to go too mad on prepping the surface either so saving all the time you thought might be needed on sanding - I painted all the walls in my place, which were very rough breeze blocks (do you call them that in the US - they are large, rough concrete blocks?) and it still looks pretty darn good I think even though the walls are still very far from smooth. There's some before/after pics in my thread and from looking at yours as they are at the moment they are only going to look much better than that when they are painted!

Nice Scooby by the way!
 

Zeke

Well-known member
Joined
Aug 13, 2009
Messages
17,176
Location
Long Beach CA, the sewer by the sea.
That's what they call fire taping. Just enough to seal the walls from smoke and possibly flame. I think one more coat and some texture will be good enough for flat paint. Nothing wrong with flat paint unless it's in a hospital.

The bench kit looks handy. You might consider some wood at the back and sides to keep things from being pushed off the lower shelves. Anything would do from 1 x 4's to pegboard left over to thin plywood (like paneling).

If that were my garage. I'd slide the bench back to next to the stairs and build in the area under the stairs with cabinets, open shelving, whatever. It's not going to be useful open floor space. Just leave yourself room for 2 cars in that eventuality. That's what the builder was thinking, or he would have used it up for the WH or something like that. And if you put in a false floor, your new storage area will stay dry. Vent and screen any base you install in a garage.

Edit: Oh, and you could cantilever a 4' light from the top shelf for bench lighting. but you probably already thought of that. :)
 
Last edited:
OP
C

Cone Eater

Active member
Joined
Mar 30, 2012
Messages
38
Location
charlottesville, VA
Ok, ok, I'll paint it! I'll make that a spring project I guess.

As far as the space under the stairs, the floor space isn't wasted as I can stack a number of tires there, even the really wide race rubber (not pictured as they're inside hibernating for the winter months) That's more useful to me than shelving or a closet there, at least at the moment. That saves wall space (instead of putting wheels up) for other stuff like my ramps, saw horses and random stuff. I'd really like to get a nice metal cabinet for fluids, paint, cleaning products and the like. I'm not sure what to do with the ship vac other than taking up floor space along a wall though.
 

Mr. Pink

Member
Joined
Dec 30, 2012
Messages
22
Location
Mt Airy, MD
Matt - I like it! I too struggle with where to put my track stuff and it's amazing how quickly you can accumulate enough stuff for the "just in case" situation during events. My advice would be to think everything you intend to do at least twice before making a decision on how to complete your build out. Good luck with the project!
 

JimVonBaden

Well-known member
Joined
Dec 2, 2011
Messages
15,716
Location
Northern Virginia
Hi Matt,

Congrats on .... everything! Nice to finally be working and making a living wage!

I had a single car townhouse garage, and would never do it again!

A couple pieces of advice, even though you are likely only there for 4-6 years, paint the walls, go with at least semi-gloss. It will make them much easier to keep clean, and help resale value.

Secondly, consider porcelain tile on the floors. Looks like you have about 400 sq feet, so under $500, and the floor will look like new the day you put it up for sale, which in a townhouse garage (which is how 90% of people actually enter their townhouse), makes a great first impression, plus helps keep it cleaner.

Shelves and all the rest are for nothing but you as most will want to do it their way when the move in.

Jim :cool:
 

Bib Overalls

Well-known member
Joined
Dec 4, 2006
Messages
3,318
Location
Jonesboro, Arkansas
Get a quote from a drywall finisher. You might be surprised. In most areas there will be a couple of guys that specialize in small dry wall jobs and repairs. A paint store that sells to the trade will have some names.
 

Zeke

Well-known member
Joined
Aug 13, 2009
Messages
17,176
Location
Long Beach CA, the sewer by the sea.
Get a quote from a drywall finisher. You might be surprised. In most areas there will be a couple of guys that specialize in small dry wall jobs and repairs. A paint store that sells to the trade will have some names.
I thought the same thing, but I didn't say it. Because it's still a couple hundred for more if texture is applied. Every garage/homeowner should learn how to finish drywall and paint properly. It saves so much money that could otherwise be used for tools, racing or anything else that you can't hire people for.

And what better place to learn that a garage. There are videos galore on taping and finishing. The way I learned was by watching some guys at a job. I went home and did some taping. Then I went back and watched some more.

Amazing what you see after you've tried it on your own. After that, I was doing it professionally as part of my house painting business in the '70's.
 

dubber

Well-known member
Joined
Dec 31, 2012
Messages
5,326
Location
Canada's Capital
I thought the same thing, but I didn't say it. Because it's still a couple hundred for more if texture is applied. Every garage/homeowner should learn how to finish drywall and paint properly. It saves so much money that could otherwise be used for tools, racing or anything else that you can't hire people for.

And what better place to learn that a garage. There are videos galore on taping and finishing. The way I learned was by watching some guys at a job. I went home and did some taping. Then I went back and watched some more.

Amazing what you see after you've tried it on your own. After that, I was doing it professionally as part of my house painting business in the '70's.

I completely agree with this. I applied the principle of learning techniques etc within the garage that i may have been a little more hesitant to apply in my house.
 
To avoid these ads, REGISTER NOW!
OP
C

Cone Eater

Active member
Joined
Mar 30, 2012
Messages
38
Location
charlottesville, VA
I'd love to try to do it myself, after a good bit of planning. My issue is schedule, as I work near 80hour work weeks, 6ish days per week.

Since everyone is on the subject of my drywall, I guess I'll ask some questions now. This might not make sense without pictures but, I'm at work, so maybe later.

Anyway, question one is baseboards: the drywall stops about 6-8" above the floor level, and there is concrete in between, but the concrete extends PAST the drywall maybe 1/2-3/4 of an inch. The bottom edge of the drywall is pretty ugly, but I don't know what kind of baseboard/trim would be good in this situation. I was thinking about the commercial rubber/plastic stuff - I know it comes in fairly tall heights because it's all over the hospital I work in - but since the concrete extends beyond the drywall, I'm not sure that would work. Thoughts? other options?

2)The front/door wall of the garage is also concrete, without drywall on the very short portion before the opposing wall. The drywall-to-concrete 90deg is an ugly joint and probably similarly needs some kind of trimwork, but I dont know what to do there either.

3) There are a few exposed 2x4s and other lumber that the garage door is bolted to - these were not drywall wrapped. I was thinking about just priming and painting these as putting additional drywall over them would be a ton of work. I'll get photos later to explain better.
 

dubber

Well-known member
Joined
Dec 31, 2012
Messages
5,326
Location
Canada's Capital
I'd love to try to do it myself, after a good bit of planning. My issue is schedule, as I work near 80hour work weeks, 6ish days per week.

Since everyone is on the subject of my drywall, I guess I'll ask some questions now. This might not make sense without pictures but, I'm at work, so maybe later.

Anyway, question one is baseboards: the drywall stops about 6-8" above the floor level, and there is concrete in between, but the concrete extends PAST the drywall maybe 1/2-3/4 of an inch. The bottom edge of the drywall is pretty ugly, but I don't know what kind of baseboard/trim would be good in this situation. I was thinking about the commercial rubber/plastic stuff - I know it comes in fairly tall heights because it's all over the hospital I work in - but since the concrete extends beyond the drywall, I'm not sure that would work. Thoughts? other options?

2)The front/door wall of the garage is also concrete, without drywall on the very short portion before the opposing wall. The drywall-to-concrete 90deg is an ugly joint and probably similarly needs some kind of trimwork, but I dont know what to do there either.

3) There are a few exposed 2x4s and other lumber that the garage door is bolted to - these were not drywall wrapped. I was thinking about just priming and painting these as putting additional drywall over them would be a ton of work. I'll get photos later to explain better.


Check out my thread, i think a few of the things I've done would address these issues.
 
OP
C

Cone Eater

Active member
Joined
Mar 30, 2012
Messages
38
Location
charlottesville, VA
Check out my thread, i think a few of the things I've done would address these issues.

Hey thanks. It looks like you just painted the vertical concrete below the drywall, right? How does that lower drywall edge hold up? I mean, drywall edges are pretty brittle, and mine is beat up just from the original install (i guess?). That will be difficult enough to fix up cleanly.

And just painting the lumber the garage door is mounted to made a huge difference in your space, I like it. What did you use to paint the door spring?
 

dubber

Well-known member
Joined
Dec 31, 2012
Messages
5,326
Location
Canada's Capital
Hey thanks. It looks like you just painted the vertical concrete below the drywall, right? How does that lower drywall edge hold up? I mean, drywall edges are pretty brittle, and mine is beat up just from the original install (i guess?). That will be difficult enough to fix up cleanly.

And just painting the lumber the garage door is mounted to made a huge difference in your space, I like it. What did you use to paint the door spring?

Thanks. Yes I just painted the lower concrete with a specialty exterior paint and it worked great. REALLY helped to clean up the look. My drywall overlaps but it was in perfect shape. I also caulked under where the two (drywall/concrete) join to seal it in. If your drywall is rough on the corner you could put a corner trim piece over it, but i'm not certain how yours is set up. Post some close pics and the input should flow in to answer all your questions.

Yea a little polyfil some trimming and paint completely changed the wood above the garage door. As for the spring you can see the crazy before and after difference it makes. I just used some rustoleum black spray paint i had.
 

bighouse01

Well-known member
Joined
May 21, 2009
Messages
293
Location
NY
Instead of sanding, get a wide taping knife and give everything a scrape to remove the ridges. Then a thin compound coat to smooth it out. I add a tad of water to the compound to thin it out a little. Do it nice enough and flat paint could hide the minor defects.
 

alpinewhite

Well-known member
Joined
Aug 4, 2012
Messages
1,315
Location
Orange County, California, USA
Hamilton's drywall powder is what I'd use. It comes in 5, 20, or 45-minute drying time. It doesn't shrink when drying either. You can get them in 20-lb bags at Depot or Lowes for about $10. Mix only what you need.
 

Zeke

Well-known member
Joined
Aug 13, 2009
Messages
17,176
Location
Long Beach CA, the sewer by the sea.
Hamilton's drywall powder is what I'd use. It comes in 5, 20, or 45-minute drying time. It doesn't shrink when drying either. You can get them in 20-lb bags at Depot or Lowes for about $10. Mix only what you need.

It doesn't sand very well. It's OK for the base coats if you want to do multiple coats in a day. But topping compound is the best for the finish coat. I agree that it must be thinned a bit for the best performance.

Paint and mud are packaged a little heavier than optimum. If they shipped it at application thickness, the painter or finisher doesn't have much leeway. Production wall paint used on tract homes is so heavy that a 5 gal. bucket will take up to 2 gallons of water. It's just part of the economy when so much is used every day. No one wants to handle 20 5's when they could do it with 15 and then cut it down.

PITA to box it all up though. I know, I've done my share on tracts.
 

Requin6

Well-known member
Joined
Jul 24, 2011
Messages
280
Location
Frederick, MD
Our drywall finish appears to be very similar. In fact Ryan also builds homes in my neighborhood and I have taken notice at the finish in their garages and its almost exactly like mine was. I just spent a couple days mudding (drywall compound) all the nail holes and drywall sheet seems. Basically just once over with the mud and then sanded it smooth. The ceiling was the most laboring part, i pulled out the pole sander and gave it a once over. I then gave it a coat of primer that is made for uncoated drywall. Then its ready for paint!

In my opinion, next to having a fancy floor, giving your garage a couple coats of paint makes for the biggest transformation.

Knowing that you won't be in the home for more than 6 years presents a little dilemma. Paint is cheap and most of your labor is in the prep work, but I think it will be worth it for sure.

The Tirerack tirerack was $150.61 shipped to my door. Its been a great addition, gets the set of tires out of the way and it has a very clean look.
 

Mr. Pink

Member
Joined
Dec 30, 2012
Messages
22
Location
Mt Airy, MD
I had a similar issue with the drywall meeting up with the raised concrete on three sides of my garage. We put the dry wall as close as we could and put-in a baseboard similar to what is in the house.

I have to paint the concrete yet to give it a finished look.

The header over my garage door was exposed and the bolts extended about an inch out...we put in fairing strips to make-up the difference and drywalled over everything.

There are some pics here: http://www.garagejournal.com/forum/showthread.php?t=188665
 
OP
C

Cone Eater

Active member
Joined
Mar 30, 2012
Messages
38
Location
charlottesville, VA
Nice! You going to strap it to your new workbench?

Heck ya. Just have to figure out how I'm going to bolt it down to the bench corner....
the top is 3/4" ply and the edges have 2x4 on end underneath it, so to get the vise way out onthe corner, several of the mounting holes are over the vertical 2x4s. I guess big screws with washers might work there, and bolt-through the ply on the others.
 

Mat Mobile

Well-known member
Joined
Nov 23, 2010
Messages
88
Location
Montreal, Québec
Heck ya. Just have to figure out how I'm going to bolt it down to the bench corner....
the top is 3/4" ply and the edges have 2x4 on end underneath it, so to get the vise way out onthe corner, several of the mounting holes are over the vertical 2x4s. I guess big screws with washers might work there, and bolt-through the ply on the others.

Nice garage.

Just wanted to chime in to warn you to be careful on placement of Vise. Make sure it doesn't come into contact of any drawers below the bench when the bar is drooping down. I made that mistake and really regret not thinking it thru.

Keep up the great work!
 
OP
C

Cone Eater

Active member
Joined
Mar 30, 2012
Messages
38
Location
charlottesville, VA
Mat Mobile, there are not drawers to worry about, but it does need to be pretty much on the edge for clearance from the bench. We'll see. Gonna tear it down before thinking about mounting.
 
To avoid these ads, REGISTER NOW!
Top Bottom