To avoid these ads, REGISTER NOW!

VISE REPAIR 101 all vise repairs, lubricants, sources for parts and the tricks to fix

McBrownie

Well-known member
Joined
Mar 27, 2014
Messages
1,827
Location
Cleveland, OH
Drives:
Thanks for the compliment:)
You weren't really intending the waxy graphite coating to be the final finish for gym equipment. But it does sound like a good "temporary-long term" coating to keep the rust away during storage in your difficult conditions. Nobody as yet has mentioned the dreaded old Cosmoline that was used on metal parts to protect them during shipment by sea. And is still used today too.

What is that messy grease found on Harbor Freight machinery?

Here is a little more modern approach to Cosmoline:

http://www.amazon.com/dp/B0009H1AMG/?tag=atomicindus08-20
 
To avoid these ads, REGISTER NOW!

Fretters

Well-known member
Joined
Jan 25, 2014
Messages
4,217
Location
South Yorkshire, England
would also like another option to BLO that i don't need to keep applying every few months to keep the rust off my vises and other tools.

If you bake it on, it should provide a more durable coating than just leaving to cure naturally. One other thing I would love to find out how it was done is the traditional japan black enamelling, as was used on some spanners, planes etc. I've searched no end of times on that subject though, and found absolutely nothing. That was one of the most resilient hard finishes I can ever recall seeing. Even things like bluing and browning tend to rely on the surface being kept well oiled to maintain them, so they're good finishes but somewhat prone to rust if upkeep isn't exemplary.
 

Carla

MEMBER EMERITUS
Joined
Nov 27, 2010
Messages
672
If you bake it on, it should provide a more durable coating than just leaving to cure naturally. One other thing I would love to find out how it was done is the traditional japan black enamelling, as was used on some spanners, planes etc. I've searched no end of times on that subject though, and found absolutely nothing. That was one of the most resilient hard finishes I can ever recall seeing. Even things like bluing and browning tend to rely on the surface being kept well oiled to maintain them, so they're good finishes but somewhat prone to rust if upkeep isn't exemplary.

Here in the US, that class of finish was commonly (but not technically accurately) called 'Japanning', or a 'Japan finish'.

The recipe for doing that finish may be found in some of the old machine shop practice handbooks, usually in the context of setting up a production-line finishing operation, in which a significant investment in equipment and process control was justifiable.

Up until the 1920's, it was a very common industrial practice, as may be seen in, for example, the Stanley and Millers Falls lines of woodworkers' tools. Those firms continued to use this finishing technique into the 1960's, when it had been largely abandoned elsewhere.

The process is simple, but is an 'art form' to do well. It basically involves a 'paint' which is mostly asphaltum, and an oven-baking process, in which the temperature and baking time are carefully regulated.

Actually, anyone can readily replicate the process, if they are willing to invest their time in the 'learning-curve', and experiment until they 'get it right'.

One simply mixes up the asphaltum-based 'paint', with care to have the viscosity 'just right' for a nice uniform 'flow-out' on the work, without runs or sags, applies the material to clean metal, then bakes the work in an oven at a 'just right' temperature for 'just long enough'.

Rough approximations of the 'just right' and 'just long enough' are given in the old recipes, as 'established practice' in various plants, on a production basis, but may or may not be right for a small shop today, as the materials which may be available these days may not be the same as were readily available a century ago.

That said, if you've the interest, it 'wouldn't hurt' to give it a go......do be warned, tho, and do the baking in an 'expendable' oven, in a well-ventilated area, as the smell of baking asphaltum 'paint' is 'memorable', to 'put it mildly'......and that 'penetrating' smell will persist for a surprising length of time.

The finished product, if done correctly, is an excellent durable finish, with the aesthetic advantage of flowing-out to create a nice smooth finish on a casting which is only moderately well fettled.

These days, pretty much every bit of information ever printed has been put on the internet 'somewhere', and may be found with some searching......so anyone interested should be able to find the recipe......and read the stories of folks who recently did this finish work, as was done all those years ago.......I'd suspect that some of them may say 'yes, I did it, but (remembering that smell) never again'.

cheers

Carla


Fretters

Well-known member
Joined
Jan 25, 2014
Messages
4,217
Location
South Yorkshire, England
Cheers Carla. :) I'll have another delve on that subject. I know McBrownie has done some experiments using a Gilsonite base, but I believe he mentioned it had a notable brown hue. Was that common to the process, or does the specific mix used alter the final colour? Or, is it one of those finishes like enamel paint where the appearance darkens somewhat over time?
 

Hemi49

Well-known member
Joined
Feb 13, 2015
Messages
282
Location
Rush (Rochester), NY
C1 Update
I'm starting to correct some of the problems I discovered during disassembly and cleaning.....The jaw mating surface on the stationary had a crown approximately 3/64" high in the area marked in red....It looked like someone used a BFH on the front of the jaw and actually deformed the jaw causing the crown.....I've all but removed the crown by filing it flat.....The other problem in the same area is a bad jaw bolt hole, marked in yellow.....I'll mount the jaw with the good bolt hole and then use the jaw hole as a drill bushing to drill the defective hole for a helicoil®......

There are other problems with the stationary centered around the pins that connect the body to the nose cone and nut.....It is almost comical what the PO did to it....He has enough holes in it that it could be mistaken for Swiss cheese.....I'll write up and photograph the repair procedure when I do it.....
Hemi
 

Attachments

  • IMG_20151120_105523_hdr_kindlephoto-2586631.jpg
    IMG_20151120_105523_hdr_kindlephoto-2586631.jpg
    139.3 KB · Views: 66
  • IMG_20151120_105542_hdr_kindlephoto-2426751.jpg
    IMG_20151120_105542_hdr_kindlephoto-2426751.jpg
    143.1 KB · Views: 67

Hemi49

Well-known member
Joined
Feb 13, 2015
Messages
282
Location
Rush (Rochester), NY
Hemi, If the 5/16:18 stripped hole is a little bigger then the Helicoil tap drill size (Q-.332) Then I have had luck with these inserts. http://www.mcmaster.com/#91731a053/=zwcwy3 The outside threads are 1/2:13. This repair has shown me good results and much stronger then helicoils. Post how you repaired it if you do not mind.

Kevin
When I bolt the jaw to its mating surface, my plan was to drill down through the jaw thru hole into the stripped hole with the helicoil® drill....If clean up was good, I will tap with helicoil® tap and install the helicoil®.....(I already have the helicoil® kit)......If clean up isn't satisfactory I'll do as you suggest with the larger bodied inserts.....Thanks for the link.:bounce:
Hemi
 

Pupuhd

Well-known member
Joined
Aug 18, 2011
Messages
346
Location
New Jersey
Hemi, If the 5/16:18 stripped hole is a little bigger then the Helicoil tap drill size (Q-.332) Then I have had luck with these inserts. http://www.mcmaster.com/#91731a053/=zwcwy3 The outside threads are 1/2:13. This repair has shown me good results and much stronger then helicoils. Post how you repaired it if you do not mind.

Hemi: I second that on using inserts. From McMaster I order one of these (http://www.mcmaster.com/#catalog/121/3301/=zwdi2r) for an exact repair like yours for my United States Electric Tool Comp. 12" grinder with excellent results. Used same on a vintage 1978 Porta Cable metal band saw into the aluminum cast body. The grinder was into cast iron. When tapping use tons of lubricant and go slow. Broke two taps trying to initially clear and clean out the 5/16-18 hole, then after the further damaged went with the insert. Good luck.
 

McBrownie

Well-known member
Joined
Mar 27, 2014
Messages
1,827
Location
Cleveland, OH
Cheers Carla. :) I'll have another delve on that subject. I know McBrownie has done some experiments using a Gilsonite base, but I believe he mentioned it had a notable brown hue. Was that common to the process, or does the specific mix used alter the final colour? Or, is it one of those finishes like enamel paint where the appearance darkens somewhat over time?

Fretters,
I did try that on my Prentiss to try and give it a period-correct finish. I started with Gilsonite (asphaltum) a.k.a. driveway sealer. At least it smelled like it. :) My first go around, I did a 4:1 Gilsonite and boiled linseed oil which was close to a Ford formula (m-100?) for model T's. I baked it it for 30 minutes at around 400 F in an old gas grill. As Carla mentions, the smell is memorable. Aside from the smell, the process really made me appreciate modern paint. I tried different ratios and even pure Gilsonite. On smaller items like squares and planes, getting the mix, heat, and baking time would be easier and, I'm sure, lead to more durable finishes. Trying to heat up a 50lb block of iron is a bit more of a challenge. I still have the finish on my Prentiss and it looks like a Model T, which is what I was going for. Anything else, I'll take a good enamel any day. :) It is fun to play with old finishes, I have to admit.
 

Shiftless

Well-known member
Joined
Mar 9, 2014
Messages
14,553
Location
East Bay SFO
Fretters and Shift: I couldn't think of a couple better members to mix up something to make our naked metal shine. my thoughts were more for storing the gym plates in my unheated storage, but baking something on next summer either outside or in a shop oven or smoker might be even better.

would also like another option to BLO that i don't need to keep applying every few months to keep the rust off my vises and other tools.

Better add McBrownie to the list! :thumbup:
 
OP
D

drivesitfar

Well-known member
Joined
Oct 23, 2013
Messages
36,036
Location
Pacific Northwest
Shift: and CARLA too if they are willing.

Carla: nice post as we have been accustomed to seeing those with your name on them. hope you are feeling a bit better?

McB: of course if you have the time to try to perfect Fretter's, Shift's, Carla's and your recipe by all means let us know how you make out. i remember you not liking all the time it took and probably the smell of Japanning finishing your Prentiss a while back.
 

Fretters

Well-known member
Joined
Jan 25, 2014
Messages
4,217
Location
South Yorkshire, England
Fretters,
I did try that on my Prentiss to try and give it a period-correct finish. I started with Gilsonite (asphaltum) a.k.a. driveway sealer. At least it smelled like it. :) My first go around, I did a 4:1 Gilsonite and boiled linseed oil which was close to a Ford formula (m-100?) for model T's. I baked it it for 30 minutes at around 400 F in an old gas grill. As Carla mentions, the smell is memorable. Aside from the smell, the process really made me appreciate modern paint. I tried different ratios and even pure Gilsonite. On smaller items like squares and planes, getting the mix, heat, and baking time would be easier and, I'm sure, lead to more durable finishes. Trying to heat up a 50lb block of iron is a bit more of a challenge. I still have the finish on my Prentiss and it looks like a Model T, which is what I was going for. Anything else, I'll take a good enamel any day. :) It is fun to play with old finishes, I have to admit.

Cheers for the info McB'. :) Aye, I agree on the simplicity of enamel paints. Quick and easy to apply, compared to more traditional or quirky finishes. The only problem is the fact that it makes things look a bit too fresh. The enamels do darken with age, but trying to get something looking a bit older straight off the bat is something I'd like to do if possible. Clean and tidy but old in appearance would be my perfect goal. So far, I think this paste is the closest I've come to achieving that aim, but I'll likely be having a play at some point and extending your experiments with the asphaltum based mix.

Did a search on Japanning btw Carla, and that brought up some interesting results. I thought I had tried that search term in the past, but it would appear not. It seemed to show better results than I'd encountered previously. Cheers for that pointer. :) I've only briefly scanned this page as yet, but it looks like there's some interesting info on there:

http://www.cranialstorage.com/Wood/japanning.html

Should give a good basis for experimenting from, along with McB's recipe.
 
Last edited:

Shiftless

Well-known member
Joined
Mar 9, 2014
Messages
14,553
Location
East Bay SFO
Shift: and CARLA too if they are willing.

Carla: nice post as we have been accustomed to seeing those with your name on them. hope you are feeling a bit better?

McB: of course if you have the time to try to perfect Fretter's, Shift's, Carla's and your recipe by all means let us know how you make out. i remember you not liking all the time it took and probably the smell of Japanning finishing your Prentiss a while back.

All:
Bagged has also been posting some results of Penetrol finishes, etc. over on the main vise thread. He should join the list of vintage iron finish experimenters too. I am away from my little shop for a couple of weeks so I'll leave it up to the others to do the hands on work. I'm following along with great interest and will add my 2 cents worth from time to time.
 

bagged89s10

Well-known member
Joined
Mar 13, 2005
Messages
4,607
Location
CT
So I just took this Parker 433-1/2 out of the etank and realized the center hole has a broken tap in it. It makes sense of why the previous owner decided to drill 2 collar bolt holes now. What's the best method to try to remove it?
ImageUploadedByTapatalk1448405794.269935.jpg
 

Hemi49

Well-known member
Joined
Feb 13, 2015
Messages
282
Location
Rush (Rochester), NY
So I just took this Parker 433-1/2 out of the etank and realized the center hole has a broken tap in it. It makes sense of why the previous owner decided to drill 2 collar bolt holes now. What's the best method to try to remove it?
ImageUploadedByTapatalk1448405794.269935.jpg

BAGGED

You can get it burnt out on an EDM machine, or
Try a tap extractor, or
Try breaking it up with a ***** punch........
Hemi
 

McBrownie

Well-known member
Joined
Mar 27, 2014
Messages
1,827
Location
Cleveland, OH
So I just took this Parker 433-1/2 out of the etank and realized the center hole has a broken tap in it. It makes sense of why the previous owner decided to drill 2 collar bolt holes now. What's the best method to try to remove it?

It's not too deep. You might be able to tease it out of there with a small pin and hammer. You only need to get one rotation or so and then you can probably grab it with needle nose pliers. Or, just stick with the two bolt setup.
 

bagged89s10

Well-known member
Joined
Mar 13, 2005
Messages
4,607
Location
CT
It's not too deep. You might be able to tease it out of there with a small pin and hammer. You only need to get one rotation or so and then you can probably grab it with needle nose pliers. Or, just stick with the two bolt setup.


Tried to punch it out with no luck. Who knows how long it's been stuck in there and if any rust is still holding it in. I have it soaking in penetrant to see if it helps before I try it again. If it doesn't work, maybe I'll try welding a nut to it and turn it out.
 

KMScott

Well-known member
Joined
Feb 14, 2012
Messages
4,642
Location
Daufuskie Island, South Carolina
Veeps, if I had to remove the broken tap, my first shot would be hit it with a punch at a angle like my picture. The four flute tap has thinner webs and will break easier then a three or two flute tap. If this did not work then I would cut the tap out with a carbide end mill or a carbide drill. You would need a mill or a large drill press. One thought is even if you get the tap out you might have trouble finding the correct bolt since Parker used real oddball threads here and on the wrench swivel lock downs. The EDM is a great tool for broken taps but finding one with a deep tank for the Dynamic jaw support and the machine time would be expensive. Good luck and post how you did it.
 

Attachments

  • Veeps_broken_tap.jpg
    Veeps_broken_tap.jpg
    121.2 KB · Views: 56

McBrownie

Well-known member
Joined
Mar 27, 2014
Messages
1,827
Location
Cleveland, OH
Veeps, if I had to remove the broken tap, my first shot would be hit it with a punch at a angle like my picture. The four flute tap has thinner webs and will break easier then a three or two flute tap. If this did not work then I would cut the tap out with a carbide end mill or a carbide drill. You would need a mill or a large drill press. One thought is even if you get the tap out you might have trouble finding the correct bolt since Parker used real oddball threads here and on the wrench swivel lock downs. The EDM is a great tool for broken taps but finding one with a deep tank for the Dynamic jaw support and the machine time would be expensive. Good luck and post how you did it.

Good point on the Parker threads. I forgot how they can be oddballs. The good news is that the tap is stuck in cast iron. Shouldn't be impossible to get out. Here are the specs on my Parker 203:

View media item 49830
 
To avoid these ads, REGISTER NOW!

KMScott

Well-known member
Joined
Feb 14, 2012
Messages
4,642
Location
Daufuskie Island, South Carolina
Yep Bill, yours is a 5/16:20. You still can buy the tap but good luck finding the screw. I also have seen a 9/16:12 thread on a Parker 974 lockdown. Amazon carries both of these taps.
 

Attachments

  • Parker 974 Swivel Lock.jpg
    Parker 974 Swivel Lock.jpg
    57.7 KB · Views: 37

Hemi49

Well-known member
Joined
Feb 13, 2015
Messages
282
Location
Rush (Rochester), NY
I've used this style extractor before.....They work well except if the tap really dug in when it broke.....
Hemi
 

Attachments

  • Screenshot_2015-11-24-23-28-50.jpg
    Screenshot_2015-11-24-23-28-50.jpg
    16.4 KB · Views: 51

bagged89s10

Well-known member
Joined
Mar 13, 2005
Messages
4,607
Location
CT
Veeps, if I had to remove the broken tap, my first shot would be hit it with a punch at a angle like my picture. The four flute tap has thinner webs and will break easier then a three or two flute tap. If this did not work then I would cut the tap out with a carbide end mill or a carbide drill. You would need a mill or a large drill press. One thought is even if you get the tap out you might have trouble finding the correct bolt since Parker used real oddball threads here and on the wrench swivel lock downs. The EDM is a great tool for broken taps but finding one with a deep tank for the Dynamic jaw support and the machine time would be expensive. Good luck and post how you did it.


Thanks for the tip. I tried it and failed. That tap is jammed in there hard. I even tried welding a washer and bolt to it but it wont budge. I think I'm going to just leave it in before I end up doing more damage. I'll just go with the 2 screw collar.

ImageUploadedByTapatalk1448431977.323646.jpg
 

patrickoneal

Well-known member
Joined
Mar 9, 2009
Messages
75
Hopefully someone here can help me. I've got a Ridgid 6000R vise at work, and some knuckle head lost the main vise nut about a year ago. http://www.ereplacementparts.com/ridgid-6000r-bench-vise-parts-c-7929_8182_207654.html I replaced the vise because I couldn't get another nut(discontinued), and set up an ebay alert should one pop up. One showed up today: http://www.ebay.com/itm/301807734330 I ordered it immediately.

I went to look at the vise to make sure I had everything else I need, and the center swivel bolt is missing, and of course unavailable. The bottom of the vise just has an unthreaded hole, as does the swivel base. Does the swivel bolt usually thread into a hole on the bottom of the vise nut on these things? It doesn't look like that is possible from the pictures of the vise nut I ordered. It's got a notch in it, maybe to clear the end of the bolt, but there is nothing on my vise to thread a bolt into. Any help would be greatly appreciated.

Here are some photos of the vise, the vise nut photos are in the ebay link as I haven't received it yet:

Pic with the model number: https://goo.gl/photos/zWu5xFuUmQKmT2mL7

Top of the swivel plate, showing untheaded hole: https://goo.gl/photos/rPigbVLc9DyU5u5N7

Bottom of the vise, showing another unthreaded hole:
https://goo.gl/photos/DJ3paNThFtgBgcK68
 

CwazyWabbit

Well-known member
Joined
Jan 9, 2015
Messages
1,189
Location
Surrey, UK
I know it says swivel bolt on the parts diagram but perhaps it is just a drop in pin? After all the swivel lock downs will hold the vice and base together.
 

Shiftless

Well-known member
Joined
Mar 9, 2014
Messages
14,553
Location
East Bay SFO
Patrick and Cwazy:
Gotta love this vise repair thread. A guy has trouble, posts a question on Wednesday afternoon and in less than 20 minutes, an answer pops up! :rocker:
 
OP
D

drivesitfar

Well-known member
Joined
Oct 23, 2013
Messages
36,036
Location
Pacific Northwest
Patrick: can you use the paperclip just above where you are writing your posts to post a few more pictures of your Rigid vise? what does the bottom of the static jaw looks like. i'm tending to agree with CW that it's probably just a pin and most any machine shop or a lot of GJ member could make one up for you for less than $50.

keep asking questions if you have any.

Shift: when i started this thread last year or whenever it was i was happy to see the guys embrace it and make it ours so we could help everybody that asked for help. we can't fix them all, but we're doing a good job and i continue to learn what i didn't know about these great tools.
 

Shiftless

Well-known member
Joined
Mar 9, 2014
Messages
14,553
Location
East Bay SFO
Patrick:
If that is just a short pin you are looking for, why not search for a bolt of the correct diameter and cut a short piece off? Clean up the ends and put a little bevel on them with a file and you've got a pin.
It's great to have a lathe but if you don't have a buddy to knock one out for you you might not want to sink $$ into the project.
 

patrickoneal

Well-known member
Joined
Mar 9, 2009
Messages
75
Patrick: can you use the paperclip just above where you are writing your posts to post a few more pictures of your Rigid vise? what does the bottom of the static jaw looks like. i'm tending to agree with CW that it's probably just a pin and most any machine shop or a lot of GJ member could make one up for you for less than $50.

keep asking questions if you have any.

Shift: when i started this thread last year or whenever it was i was happy to see the guys embrace it and make it ours so we could help everybody that asked for help. we can't fix them all, but we're doing a good job and i continue to learn what i didn't know about these great tools.

I really appreciate the help, garagejournal is is great place. Any kind of house, car, or tool repair, I come here before I google. There's always good advice from people that have been there, done that.

I can't take more pictures until Friday, or the weekend. Do you have any pictures of how such a pin would work? The hole in the bottom of the swivel base is larger than the hole in the bottom or the vise, and I assume the notch in the vise nut is even smaller. I have a couple of friends that are machinists, and they have a good bit of downtime at work, so if I know how to measure the dimensions of the pin I need, I can get one made for well less than $50 :)
 

Shiftless

Well-known member
Joined
Mar 9, 2014
Messages
14,553
Location
East Bay SFO
"The hole in the bottom of the swivel base is larger than the hole in the bottom or the vise, and I assume the notch in the vise nut is even smaller. I have a couple of friends that are machinists, and they have a good bit of downtime at work, so if I know how to measure the dimensions of the pin I need, I can get one made for well less than $50 "

Good to have machinist buddies! :D
Forget everything I said about using a piece of a bolt. You obviously need a custom made piece.
Let us know how it turns out...
 
OP
D

drivesitfar

Well-known member
Joined
Oct 23, 2013
Messages
36,036
Location
Pacific Northwest
Patrick: i was just throwing out a $ figure on the high side because materials might not cost $5 and a machinist's time and machines are the main costs. sorry i don't have any pictures of a Rigid saved in my laptop, but maybe somebody else has a catalog page to post.

Some Wilton vises i'm pretty sure had the pin to keep the static aligned on the swivel's base so maybe this exploded drawing will give you an idea.

good luck and post pictures when you can and we usually are checking here daily to help or PM one of us that posts. i'm far from the expert at fixing these, but some of these guys are and might have been the original designers of some of them.

ALL: Happy Thanksgiving to all of you
 

Attachments

  • Wilton C1 exploded drawing.jpg
    Wilton C1 exploded drawing.jpg
    19.4 KB · Views: 54

Outlawmws

Well-known member
Joined
Aug 9, 2011
Messages
39,285
Location
The Badlands
Patrick, correct me if i'm wrong, but the hole in the vise body, it's a clearance hole through right, and the main nut you were missing is threaded on it's bottom?

You should be able to get a suitable bolt, make up a sleeve with the appropriate inside and outside diameter, just a hair longer than the base is thick, and possibly a flat washer under the head of the bolt, and you should be good to go...
 

Evergreentree

Well-known member
Joined
Nov 24, 2015
Messages
452
Location
Montgomery County PA
Hey all! I have a new to me Wilton 60. I showed her off in the vises of Gj, and eventually I was steered here, posting for advice. I cannot get what I assume to be a taper pin out from the static jaw to get it to swivel. I've let it soak in penetrating oil for a week, and nothing. I tried jacking it out with the nut, but I got a little nervous about really cranking on it before getting some more advice. (Picture is of that going on, large washer to protect). But, maybe it's not a taper pin?! I'm trying not to electrolysis if I can help it. I like the patina for now. Let me know what you think!

Thanks!

Oh yea. Forgot to mention a mounting hole(ear?) is broke off. Guess the 100lbs was to heavy for someone at one time! Thoughts on purchasing a repop from Wilton? Same casting as c2, 600, etc. casting 101084.

This will be retired to my main chainsaw holding vise for filing, so it really doesn't need a new base. I know it drops the value, but I'm not a seller, yet....
 

Attachments

  • image.jpg
    image.jpg
    15.4 KB · Views: 50
Last edited:

Evergreentree

Well-known member
Joined
Nov 24, 2015
Messages
452
Location
Montgomery County PA
And here is a shot of a friend who's 60 had a tapered pin. I was told it may have a threaded bolt, so I'm just waiting on the experts to chime in before I crank on it hard or dip in e tank.
 

Attachments

  • image.jpg
    image.jpg
    18.3 KB · Views: 36

GETRIDAONE

Well-known member
Joined
May 21, 2013
Messages
1,549
Location
Auburn, GA
First, I am no expert on Wilton vises but I have restored a few others. I just happen to be working on a 350SJ swivel jaw right now. The pin in mine was stuck and evidently someone had tried to remove it with a tool similar to what you are using. All the shoulders were rounded off and I had to use a file just to get a socket on it. I sure you have noticed the 5/8" threads on top of the pin have been mushroomed out to keep the nut from coming off. About two threads on my pin are below the top surface so tighting the nut could possibly pull the pin up if you could get a shim in between. It's not something I wanted to admit but I used an impact wrench :shocking: 
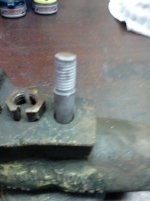
to finally get it to break loose. The nut was trashed and I cut each side with a small air cut off tool and a tap with a chisel and the nut was off.
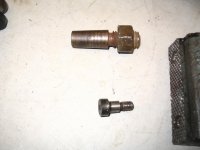
I would get rid of the antique monkey wrench and put a socket and breaker bar on it.
By the way, nice vise and welcome to the forum.
 

Attachments

  • IMG_20151202_151447.jpg
    IMG_20151202_151447.jpg
    136 KB · Views: 37
  • IMG_20151202_151410.jpg
    IMG_20151202_151410.jpg
    135.5 KB · Views: 39
Last edited:

Evergreentree

Well-known member
Joined
Nov 24, 2015
Messages
452
Location
Montgomery County PA
Thanks get rid. My nut can spin right off, no mushrooming on the threads. Nut is in perfect condition. I was able to put a big washer under it, and tried light duty turning with the small wrench just because I didn't want to mess something up before I knew it was True non threaded pin. So I guess I'll just keep tightening on it, cranking until it lets loose...I don't want to use the impact..
 
Last edited:

KMScott

Well-known member
Joined
Feb 14, 2012
Messages
4,642
Location
Daufuskie Island, South Carolina
Just in case you need to make a pin, this one I made for a 450SJ for a member that sold it for around $600. Just add a thread if you need to make one. I would be curious to see if it is the same size and taper as yours. I had to drill out the one on the 450SJ because it was so stuck. Making one out of Stainless might help on the rust situation. Wilton should have made the pins with a greater angle like the Prentiss pins. Good luck, keep at it.
 

Attachments

  • Greggs 450sj.jpg
    Greggs 450sj.jpg
    142 KB · Views: 51
  • Wilton 350SJ (3).jpg
    Wilton 350SJ (3).jpg
    139.5 KB · Views: 57
  • Wilton_Swivel_Pin.jpg
    Wilton_Swivel_Pin.jpg
    71.1 KB · Views: 52

Evergreentree

Well-known member
Joined
Nov 24, 2015
Messages
452
Location
Montgomery County PA
Thanks km. Seems like we run a similar path of late. I emailed your company directly before I even joined the GJ! I'm sure I'll be in touch about something....

Anyone else with some advice other then breaker bar, impact wrench, or e-tank? Is it most definitely a non threaded pin?

Question, what's a vise like this worth km, after a good resto? Electrolysis the whole 9? Not that I plan that...
 

Hemi49

Well-known member
Joined
Feb 13, 2015
Messages
282
Location
Rush (Rochester), NY
Thanks km. Seems like we run a similar path of late. I emailed your company directly before I even joined the GJ! I'm sure I'll be in touch about something....

Anyone else with some advice other then breaker bar, impact wrench, or e-tank? Is it most definitely a non threaded pin?

Question, what's a vise like this worth km, after a good resto? Electrolysis the whole 9? Not that I plan that...

EGT
My 2 cents is remove it anyway necessary (drill, heat, etc) then make a cast of the female with the same compound gunsmiths use for casting a chamber....You can get it on line under gunsmith supplies...Send the cast to Reverend Scott so he can measure it with his optical comparator and make you a new pin.....
Hemi
 
To avoid these ads, REGISTER NOW!
Top Bottom