To avoid these ads, REGISTER NOW!

Between 485 & 705 SQ/FT When Not Committed to the ASYLUM, You Will Find Me Here

Workspaces between 485 and 705 squarefeet.

BBChevro

Well-known member
Joined
Jan 24, 2014
Messages
2,235
Location
Brisbane, Qld., Australia
Great thread Shopnut, you are sooooo much more organised than me - I have stuff all over the place :willy_nil

I've subscibed to this thread in the sincere hope that I'll catch some of that "Organizational Spatial Order Disorder" - I could really do with some.

:thumbup:

Mark
 
To avoid these ads, REGISTER NOW!
OP
S

shopnut

Well-known member
Joined
Feb 22, 2006
Messages
4,237
Location
Florida
Great thread Shopnut, you are sooooo much more organised than me - I have stuff all over the place :willy_nil

I've subscibed to this thread in the sincere hope that I'll catch some of that "Organizational Spatial Order Disorder" - I could really do with some.

:thumbup:

Mark

I can only hope that you don't catch whatever disorder I have :) (I'm still trying to figure out what exactly it is!)

Seriously, it seems I go in streaks - sometimes I get the bug to clean up and other times the place is just a complete mess and I keep telling myself I will clean it up when the project is over. But the problem is, one project most often rolls right into another (or two) and the cleaning never gets done. You just need to plan the cleaning and the organizing into daily/weekly activities. It's amazing what 30 minutes a week can do. Thanks for the visit.
 
OP
S

shopnut

Well-known member
Joined
Feb 22, 2006
Messages
4,237
Location
Florida
MRS. SHOPNUT LIKED THE FIRST INDUSTRIAL HOSE REEL...

I installed a Reelcraft industrial hose reel out on the patio when we renovated our pool and it has been holding up well. When I ran a water supply line out to the new pool equipment enclosure when the pool reno was going on, I was tempted to add a nice reel there as well but never did. Well, I finally got around to it and here are some pictures.

I bought the side mount style to make the job a bit easier considering the existing framework that was there. I simply needed to add 2x6 and a 45 degree angle to tuck the reel back in the corner out of the way.

103-Hose-Reel-for-Pool-Equipment-02.JPG

Some paint slapped on it.

104-Hose-Reel-for-Pool-Equipment-06.JPG 105-Hose-Reel-for-Pool-Equipment-08.JPG

Up goes the reel. As I mentioned, the side mount reel version made this job a bit easier. I think the mount version cost about $20 more than the regular style. I used some PEX as a lead hose feeding the reel from the spigot. We will see how long it lasts out in UV exposure, but it’s cheap to replace.

106-Hose-Reel-for-Pool-Equipment-15.JPG 107-Hose-Reel-for-Pool-Equipment-16.JPG

The reel had 3/8” air hose on it when purchased so I had to adapt it to 5/8” garden hose. I used some Gatorbite fittings to screw into the 1/2” NPT swivel joint and a short section of copper pipe to enter into the drum where the hose fastened.

108-Hose-Reel-for-Pool-Equipment-20.JPG
 
OP
S

shopnut

Well-known member
Joined
Feb 22, 2006
Messages
4,237
Location
Florida
I really thought about starting a business doing garages. I found out that many many ppl aren't that serious about there garages as ppl on the GJ.
And many of the people that want a nice garage generally are capable and willing to do it themselves. No, I'm not quitting my day job :)
 
OP
S

shopnut

Well-known member
Joined
Feb 22, 2006
Messages
4,237
Location
Florida
Well here I am I ran out of popcorn waiting but I do have plently o beer
After 10 days, you must be completely wasted by now... sorry to keep you waiting :)

I'll buy the next few rounds :beer::beer::beer::beer::beer::beer:

It seems I'm DOING more than writing and posting these days! I'm in the process of making more room so I can squeeze another motorcycle in the new place.
 
OP
S

shopnut

Well-known member
Joined
Feb 22, 2006
Messages
4,237
Location
Florida
Extra, Extra, Extra: SHOPNUT MOVED!!!

.

SAY GOODBYE TO THE OLD DOUBLE GARAGE...

attachment.php


AND HELLO TO THE NEW TRIPLE...

109-Exterior View.JPG

I had the old 2-car garage working pretty good for me, but some recent life changes has landed me in a new home with a 3-car space. I let the cat out of the bag over in my main Asylum thread (link to Asylum thread Reply#3542 here), but this will be the thread where I will tell the ongoing story of my updates and shenanigans that happen in the city garage.

Repeating the pictures in this thread for completeness, here is the back wall. I really wish they would have found a different spot for the water heater since it limits my full size truck to be parked in only 1 of the 3 bays, but we have worked around it and I’m still happy it fits SOMEWHERE inside!

attachment.php


Double overhead door. Both daily drivers will park here.

attachment.php


Here’s the additional single side bay. Two motorcycles, a riding mower and 4 bicycles will be parked here if my plan works out. I’ll have a modest workbench and set of tools to do basic home and auto repairs/upgrades. I’m debating whether to bring a project bike here to tinker on when I can’t make it out to the Asylum. That may be pushing it though.

attachment.php


attachment.php
 
Last edited:
OP
S

shopnut

Well-known member
Joined
Feb 22, 2006
Messages
4,237
Location
Florida
I KNOW YOU GUYS LIKE FLOORPLANS, SO HERE IT IS...

The house had already been built for someone else, but the deal fell through and builder was offering a pretty hefty discount to unload it. The house floor plan fit our needs (actually we love it!) and we were able to move in immediately with a full warranty. Finishing treatments inside the house were to our liking too so it seemed like a perfect fit.

The house wouldn’t even have been on our radar if it didn’t have the 3-Car Garage Option. But had we built this from scratch, the Optional Extended Garage would have been on the must have list too. It looks to be an additional 2 feet of depth, which would have allowed me to park in either BAY 1 or 2, instead of being limited to BAY 1 due to the water heater placement.

The optional Service door on the side was not included and its likely we would NOT have added that if building from new. The last house had one and I essentially blocked it off after the first year and hardly ever used it again. The frame actually rotted out after 15 years so it ended up costing me more work than it was worth. So the bottom line is, I’m glad this house doesn’t have it.

Total square footage is 630 or 58.5 square meters.

attachment.php


attachment.php
 

Attachments

  • 110-Floor-Plan-01 (no Dims).JPG
    110-Floor-Plan-01 (no Dims).JPG
    55.6 KB · Views: 790
  • 111-Floor-Plan-01 (with Dims).JPG
    111-Floor-Plan-01 (with Dims).JPG
    74.9 KB · Views: 792
Last edited:

Trey T

Well-known member
Joined
Aug 3, 2011
Messages
3,749
Location
Houston, TX
Oh man the possibilities. I would love to have a space like that instead but I do like my 2car detached though.
 
To avoid these ads, REGISTER NOW!
OP
S

shopnut

Well-known member
Joined
Feb 22, 2006
Messages
4,237
Location
Florida
Trey T – Yes, possibilities! I’m not going to get out of control in this place, however, since I don’t know how long we will be living here. But I will add a few things to make it “livable” (said the garage junkie) while I’m here.

Bob Heine – I agree on that one. The one in your link looks like a nice tidy unit and the cost seems great too. Thanks for sharing! Whether or not I want to park the big truck in a different bay, the small water heater will still allow me to add more storage space.

taumac – Sadly no :(
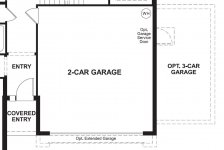
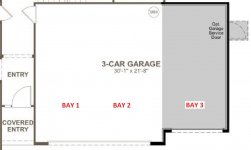
. But we weren’t even in the house yet and I was planning on moving it to that exact corner. Seems like the best spot for it. I guess the builder plans the plumbing for it in the same spot, regardless if you pick a 2 or 3 car garage. Cabinets have already moved in around the water heater and we are making due. Actually, it works fairly well and I will update on what I’ve done shortly in a future post.

JCQuick – Epoxy was the first thing I was planning in that garage before the movers came. But the house closing was delayed a bit, but the moving van was already scheduled. I flat ran out of time to do it. BUT, everything in the garage is on wheels (well NEARLY everything!), so it won’t be a monster job to add epoxy in the future.

I guess there’s always the RaceDeck option as well. It might make sense in this case since I don’t know for sure how long we will be in this house.
 
OP
S

shopnut

Well-known member
Joined
Feb 22, 2006
Messages
4,237
Location
Florida
THIS IS WHAT THE GARAGE LOOKED LIKE AFTER 1.5 MONTHS...

Obviously, getting everyone settled in the new house was top priority and the garage ended up being a temporary home for boxes and boxes of household items waiting for their final home inside. But after about 6 weeks, the first car was able to spend nights under cover (it would be some time before the Avalanche would get the same privilege.

112-Garage-Car Inside.jpg

By this time, I had managed to make a few truckloads of stuff from the Asylum offew tool essentials and cabinets. I also found a great deal on a bunch of office cabinets that will work in nicely with my garage plan here. I grabbed a couple spare 8’ light fixtures form the Asylum because I’m not used to such a dimly lit garage.

As some other houses in the neighborhood were being constructed, I made nightly dumpster dives to seek treasures of discarded 2x4’s and plywood, and that started accumulating too.

113-Garage-Workspace-01.jpg 114-Garage-Workspace-03.jpg

No matter how hard I tried keeping the garage in order back then, it was impossible to do so. As soon as we could clean some out, new stuff to be sorted filled its place.

AND A QUICK GLIMPSE OF CURRENT DAY…

I snapped this last night to show you where I’m headed with this. When the cars are out, I will take some better pictures and give more details on the cabinets.

115-Garage-Cabinets-03.jpg
 
OP
S

shopnut

Well-known member
Joined
Feb 22, 2006
Messages
4,237
Location
Florida
OVER-DOOR STORAGE SHELVES (Part 1)…

The over-door storage shelves worked so well in the old garage that I decided to repeat it here in the new one. All the lumber and plywood you see being used was scrap from the house being built across the street from us, so the only money invested was about $20 in fasteners to hold it all together.

I started with the ones over the double door and here is the empty spot they were to go.

116-Garage-Storage-Shelves-01 (Before).jpg 117-Garage-Storage-Shelves-04 (Before).jpg

And Wah-La, they are up (I wish it was that easy!). The short pieces of 2x4’s attach to the roof trusses with 6” lag bolts. As before, this shelf is intended for light weight items such as Christmas decorations and such. The far ends tie into the wall above the garage door.

118-Garage-Storage-Shelves-09.jpg 119-Garage-Storage-Shelves-13.jpg

Here are some details. Rather than decking them all the way to the wall, you will note that a gap was left to allow access to the fourth side of the shelf.

120-Garage-Storage-Shelves-14.jpg 121-Garage-Storage-Shelves-15.jpg
 
OP
S

shopnut

Well-known member
Joined
Feb 22, 2006
Messages
4,237
Location
Florida
OVER-DOOR STORAGE SHELVES (Part 2)…

Here the first two are with a coat of white paint. That was free too thanks to the builder that left us 2 5 gallon pails of ceiling paint. It looks a lot more integrated now in the matching color.

122-Garage-Storage-Shelves-19.jpg 123-Garage-Storage-Shelves-21.jpg

Here they are with the garage door up and filled with some misc stuff. I built them to extend beyond the top edge of the raised door because over time, it’s likely a few oddball items will get hung from the front framework of the shelf (if history repeats itself!).

124-Garage-Storage-Shelves-45.jpg
 

E.rodz

Well-known member
Joined
Nov 11, 2009
Messages
2,434
Location
st.paul MN.
good to see your still kicking ! looks like your adapting to your changes in your life well! can't wait to see what you can do with more space! love the bike too! I had no idea they made a two stroke bigger than a 350! :rocker:
 
OP
S

shopnut

Well-known member
Joined
Feb 22, 2006
Messages
4,237
Location
Florida
good to see your still kicking ! looks like your adapting to your changes in your life well! can't wait to see what you can do with more space! love the bike too! I had no idea they made a two stroke bigger than a 350! :rocker:

Thanks E.rodz. Life is great, but I think I still have a bit more adapting to do as I learn how to live in a house full of women. Its not exactly easy! LOL Every now and then, I have to bite my tongue and retreat to garage while I think about how the more sensitive of our species may take what I'm about to say. So far they haven't kicked me out yet though, so I must be doing something right. :)

Yep, an RZ350 big brother... never sold by Yamaha in the states, but our friends to the north got them so they can be found with US titles if you look. That 4-cylinder 2-stroke makes a wicked sound.

Don't expect too much fancy stuff in this garage. We don't expect to be here forever. but while I'm here, I intent to outfit it to fit all my toys and tools (as well as the decorations, bicycles, and other family stuff!)
 
OP
S

shopnut

Well-known member
Joined
Feb 22, 2006
Messages
4,237
Location
Florida
OVER-DOOR STORAGE SHELVES (Part 3)…

Here is the bare ceiling over Bay #3 with its single garage door. I decided to build two scaled-down the shelves in this area to hold tote bins and stick of lumber. Tape on the ceiling marks the roof trusses above for lag bolt placement.

125-Garage-Storage-Shelves-25.jpg 126-Garage-Storage-Shelves-29.jpg

Framing for the first shelf against the wall was started. Tapcon concrete screws were used to fasten the 2x4 to the wall.

127-Garage-Storage-Shelves-30.jpg 128-Garage-Storage-Shelves-32.jpg

The framing is complete and it’s ready for some plywood decking. Framing will allow for raw wood storage in the 3.5” tall spaces above and below the tote bins. Small 1x2 wood strips will be enough to support the plywood for the short span (~28”).

129-Garage-Storage-Shelves-37.jpg 130-Garage-Storage-Shelves-33.jpg
 
OP
S

shopnut

Well-known member
Joined
Feb 22, 2006
Messages
4,237
Location
Florida
OVER-DOOR STORAGE SHELVES (Part 4)…

Next, it’s on to shelf number 2 above the small door. 2x4’s were again lag bolted to the roof trusses.

131-Garage-Storage-Shelves-40.jpg

Then verticals and deck supports.

132-Garage-Storage-Shelves-42.jpg 133-Garage-Storage-Shelves-43.jpg

Again, the framing will allow for more lumber or long stock storage. Not all the supports are installed yet for the plywood to rest on.

134-Garage-Storage-Shelves-47.jpg 135-Garage-Storage-Shelves-48.jpg
 
OP
S

shopnut

Well-known member
Joined
Feb 22, 2006
Messages
4,237
Location
Florida
OVER-DOOR STORAGE SHELVES (Part 5)…

It was raining out, so I figured it was a good day for painting inside on Bay-3 shelf number 1. I had the luxury of pre-painting things so I did so. Rolling the OSB was so much easier with it standing upright.

136-Garage-Storage-Shelves-49.jpg 137-Garage-Storage-Shelves-50.jpg

I had to take a few boards off to install the deck sheet, buy that was an easy task with threaded fasteners (compared to nails). Here it is all finished and ready for bins and raw lumber.

138-Garage-Storage-Shelves-52.jpg 139-Garage-Storage-Shelves-54.jpg
 
OP
S

shopnut

Well-known member
Joined
Feb 22, 2006
Messages
4,237
Location
Florida
OVER-DOOR STORAGE SHELVES (Part 6)…

Next, I finished the framing and then painted shelf number 2 in Bay 3. It’s more or less a duplicate of shelf number 1 so I won’t go into construction details. Here is the final product

140-Garage-Storage-Shelves-58.jpg 141-Garage-Storage-Shelves-59.jpg

Here’s a shot of both, flanking the garage door opener.

142-Garage-Storage-Shelves-61.jpg

As an example of what these shelves will be used for, these shots show a few bins up there. Vertical supports were placed such that bins fit perfectly between them. I also placed a few sticks of lumber up there to show you how that works.

143-Garage-Storage-Shelves-66.jpg 144-Garage-Storage-Shelves-67.jpg

ALL FOUR SHELVES ARE FINISHED!!!
 
To avoid these ads, REGISTER NOW!
Top Bottom