To avoid these ads, REGISTER NOW!

Craftsman Block motor Bench Grinders - What's the Fuss (with resource information)

Leviton

Well-known member
Joined
Feb 25, 2019
Messages
903
Location
Oregon
I've got two blocks in the works right now and went with Rustoleum Matte Hammered Black. The block in the foreground of this pic has been re-painted. The one in the background is original finish. Not a perfect match but damned near. The name of the paint is misleading as it's not black (more of a charcoal gray) and it's not matte.

I've been a silent lurker on this thread for about a year now and have accumulated 6 blocks (addictive). Two are daily users (love em) and finally getting around to churching a couple of them up. One will go to my daughter. Thanks to all that contribute to this thread. Lot's of valuable info here!

IMG_5050.jpg

6!! Wow.

Nice job on the paint - (and thanks for the color and type I.D.)
 
To avoid these ads, REGISTER NOW!

Leviton

Well-known member
Joined
Feb 25, 2019
Messages
903
Location
Oregon
My 1/2 HP Commercial block (397.19591) is missing spark arrestors. Does anyone have an extra pair to sell, or can you measure your commercial grinder so I could make some?

The spark arrestors on my non-commercial 1/2 HP block are not wide enough to fit the commercial block.

(FYI, for the NON-commercial block, the dimensions are: A=1.5", B=2.0", C=1.39", D=0.329", Thickness=0.063")
 

Attachments

  • Spark-Arrestor-Dimensions.jpg
    Spark-Arrestor-Dimensions.jpg
    48.7 KB · Views: 44

Chadwilliam1

Well-known member
Joined
May 13, 2012
Messages
2,788
Location
Cincinnati
my dad gave me his 1/2 hp model 397 19340. I am interested in restoring. I am going to add some pictures. Everything still works.
 

Chadwilliam1

Well-known member
Joined
May 13, 2012
Messages
2,788
Location
Cincinnati
What is the best option of restoring this cover? 46df67fd95ab4fe04c479720fc0b7446.jpgab69cef7168ce900e324f0a7647d2506.jpg

Sent from my SM-G975U using Tapatalk
 

Attachments

  • 46df67fd95ab4fe04c479720fc0b7446.jpg
    46df67fd95ab4fe04c479720fc0b7446.jpg
    126.5 KB · Views: 2
  • ab69cef7168ce900e324f0a7647d2506.jpg
    ab69cef7168ce900e324f0a7647d2506.jpg
    76.8 KB · Views: 2
Last edited:
OP
T

torqueman2002

Well-known member
Joined
Jun 3, 2009
Messages
6,139
Location
SE Michigan
What is the best option of restoring this cover?

Sent from my SM-G975U using Tapatalk
I would get a replacement label from member Mattblast, and strip/sand blast the cover, then use a good sandable primer, body filler, and finish with 2 coats of your favorite paint. I use RustOleum and Velspar.

Supposing you had a 1/2 HP round top and a 1/3 HP block grinder and you wanted to set up a course and medium grit stone, and a wire wheel and polishing wheel - how would you guys set that up strictly from a HP/torque need?

Abrasive stones on one and the wire wheel and polishing wheel on the other or mix them up some way?

Just trying to figure, aside from a style standpoint, which makes more sense for using available horsepower in accordance wiith need.
I use four grinders.

1/3-HP with steel and brass coated wire wheels.
3/4-HP with fine and coarse grit stones.
1-HP with hd wire wound wheels for hd material removal. This guy is down right scary!
For buffing, I use a 2-speed (3600/1800) dual HP (0.75/0.5) Baldor buffer from TP Tools.
I want to keep buffing and grinding/wire wheeling grinders separate.


Also, buffing takes more HP than grinding.
 

Chadwilliam1

Well-known member
Joined
May 13, 2012
Messages
2,788
Location
Cincinnati
I would get a replacement label from member Mattblast, and strip/sand blast the cover, then use a good sandable primer, body filler, and finish with 2 coats of your favorite paint. I use RustOleum and Velspar.


I use four grinders.

1/3-HP with steel and brass coated wire wheels.
3/4-HP with fine and coarse grit stones.
1-HP with hd wire wound wheels for hd material removal. This guy is down right scary!
For buffing, I use a 2-speed (3600/1800) dual HP (0.75/0.5) Baldor buffer from TP Tools.
I want to keep buffing and grinding/wire wheeling grinders separate.


Also, buffing takes more HP than grinding.

thank you, any idea where i can get that missing guard?
 

Wazzu11js

New member
Joined
Nov 3, 2015
Messages
4
Location
Denver, CO
That is cool. A website I found says that the 1/3 hp unit would have been the equivalent of $452 in today's money. Mine is a 1969 model that I bought in 2018 for $115 and it works like a champ still. Thanks for sharing that.
 

exmaxima1

Well-known member
Joined
Jun 25, 2011
Messages
6,341
Location
Midwest
OP
T

torqueman2002

Well-known member
Joined
Jun 3, 2009
Messages
6,139
Location
SE Michigan
Done.
Still working on the finesse here, block, pre-block, round top etc. Thanks!

So I'm clear, Pre-Blocks are the 115.xxxxx versions from earlier than the beginning of the 1960's (cast iron body, higher amp rating), the Block Grinders are the 397.xxxxx and 257.xxxxx from the early 60's onward (cast aluminum body, lower amp rating than the pre-blocks), with a subset of those 397.xxxxx's being the round tops from the early 60's before they shifted to the flat top block style, right?

Sent from my SM-N950U using The Garage Journal mobile app
:thumbup::thumbup:


Post #1 has the details and still some pictures that survived the photobucket debacle.
 
OP
T

torqueman2002

Well-known member
Joined
Jun 3, 2009
Messages
6,139
Location
SE Michigan
New Old grinding stones.

Here's a perfect example of grinding stones that have been improperly stored.

The seller says they are new, and I don't doubt it.

However, look at the condition of the boxes. There is evidence of water staining, which will compromise the binding agents of vitrified grinding stones, making use of the stones a very dangerous operation as they can come apart without warning!

attachment.php


attachment.php

attachment.php

https://columbus.craigslist.org/tls/d/ostrander-6-new-8-grinder-disks-all-for/7025924465.html
 

Attachments

  • Stones sm .JPG
    Stones sm .JPG
    48.3 KB · Views: 401
  • Stones a sm.jpg
    Stones a sm.jpg
    44.9 KB · Views: 402
  • Stones b sm.jpg
    Stones b sm.jpg
    51.1 KB · Views: 404

platypus20

Well-known member
Joined
Nov 16, 2008
Messages
226
Location
camillus, ny (syracuse)
I have 2 Baldors, 2 Jets, 2 Milwaukees and 3 of the Craftsmans (from my FIL’s estate), I have different wheels and brushes on all of them. While they work good, I’ve never seen the almost mystical allure of the Craftsman block grinders to others, while they are not bad, they are not great either. The allure is a mystery to me.
 
OP
T

torqueman2002

Well-known member
Joined
Jun 3, 2009
Messages
6,139
Location
SE Michigan
I have 2 Baldors, 2 Jets, 2 Milwaukees and 3 of the Craftsmans (from my FIL’s estate), I have different wheels and brushes on all of them. While they work good, I’ve never seen the almost mystical allure of the Craftsman block grinders to others, while they are not bad, they are not great either. The allure is a mystery to me.
I also have Milwaukee and Baldor grinders, as well as other very fine grinders.

Not taking away from any of them.

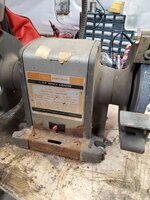
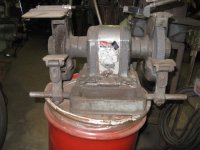
The charm of the Craftsman Block motor style grinder for me, is there seems to be an inexhaustible supply of these well made simple machines, targeted to the home consumer.

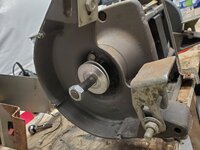
They are easy, fun, and rewarding to restore and put back into service.

Initial cost and parts are well under what the Big Box stores charge for the very inferior grinders they carry.

Comparing a Baldor or Delta Triple Duty to a Block grinder is like comparing a Mercedes to a Chevrolet. The target market is different - Baldors are industrial tools. Meant to be run non-stop.

Take a look at the very first post of this thread for more information.

Camillus, NY? I use to know it well. I graduated from Corcoran HS in '67. IIRC we were the 2nd class to graduate.

I sure miss all the fine snow skiing to be had in that part of the country.


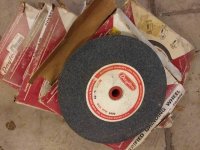
BTW - I trust you take the possible danger in using grinding stones with dubious history seriously. See above for more information and links to the sources of our concerns.
:)
 
Last edited:

ndfan6464

Well-known member
Joined
Jan 17, 2017
Messages
593
Location
All over
Iam not either really. Upset that this one got busted during my move. Oh well...

Thanks for the link. I'll take a peep.. glad to see this post is still alive. Been a while since I've been on here. Sad to see alot of your pics and links are broken on the 1st page...
 
OP
T

torqueman2002

Well-known member
Joined
Jun 3, 2009
Messages
6,139
Location
SE Michigan
Also how did you wire the light to a two pole switch?
I have seen a couple of ways to wire-up a Block light.

Lamp with switch.
Connect the hot/brass (center tab) to hot (non-switched) side of grinder power switch (same terminal as the power cord black hot leg).

Lamp without switch.
Connect the hot/brass to the load (switched) side of the power switch (not the same terminal as the power cord black hot leg).

Both lamps.
Connect the neutral/silver to the neutral side of the grinder, white wire.


Schematic, showing both lamp options. For reference, your grinder may vary.
attachment.php


Typical Block, lamp with switch.
attachment.php


Picture for reference, wire colors may vary.
attachment.php


Amazon has these 0.25" piggyback spade connectors, if you need more terminals.
attachment.php
 

Attachments

  • Piggy Back terminal a_.jpg
    Piggy Back terminal a_.jpg
    16.8 KB · Views: 455
  • How to wire a Socket_02.JPG
    How to wire a Socket_02.JPG
    50.4 KB · Views: 461
  • Small a.jpg
    Small a.jpg
    34.5 KB · Views: 461
  • Fi 115V Block Wiring rev01 P1110134.jpg
    Fi 115V Block Wiring rev01 P1110134.jpg
    59.8 KB · Views: 458

ndfan6464

Well-known member
Joined
Jan 17, 2017
Messages
593
Location
All over
So heres the two switches that I ordered. Got two different brands just encase one didnt fit right and if they both dont, then back to the drawing board
 

Attachments

  • Screenshot_20191124-150529_Amazon Shopping.jpg
    Screenshot_20191124-150529_Amazon Shopping.jpg
    132.8 KB · Views: 28
  • Screenshot_20191124-150448_Amazon Shopping.jpg
    Screenshot_20191124-150448_Amazon Shopping.jpg
    47 KB · Views: 27
  • Screenshot_20191124-150454_Amazon Shopping.jpg
    Screenshot_20191124-150454_Amazon Shopping.jpg
    34.7 KB · Views: 31
OP
T

torqueman2002

Well-known member
Joined
Jun 3, 2009
Messages
6,139
Location
SE Michigan
So heres the two switches that I ordered. Got two different brands just encase one didnt fit right and if they both dont, then back to the drawing board
Those look fine for the power even the biggest Block grinder should draw.

You'll just need to add the correct terminals.

What model grinder are you working on? Any pictures?
 
To avoid these ads, REGISTER NOW!

ndfan6464

Well-known member
Joined
Jan 17, 2017
Messages
593
Location
All over
It's one I did about a year ago. I believe I posted it on here when you got me hooked on these hahah. Unfortunately I forgot to take more before pics..

But here it is just encase. Had replica sticker made for it. Orginal on left replica on the right... I still haven't put it in haha..
 

Attachments

  • IMG_20170327_153823981.jpg
    IMG_20170327_153823981.jpg
    151 KB · Views: 63
  • IMG_20170306_171725065.jpg
    IMG_20170306_171725065.jpg
    62.3 KB · Views: 57
  • IMG_20170223_160608104.jpg
    IMG_20170223_160608104.jpg
    87 KB · Views: 49
OP
T

torqueman2002

Well-known member
Joined
Jun 3, 2009
Messages
6,139
Location
SE Michigan
OK. Those switches should do the job.

Looks nice.

You can use a couple of washers to mount the switch to the front cover, or maybe you have a plan already.
 
OP
T

torqueman2002

Well-known member
Joined
Jun 3, 2009
Messages
6,139
Location
SE Michigan
Couple washers?
I was thinking one on either side of the cover plate, with the switch/nut clamping the switch and washers/cover all together.

If you follow my meaning

Or, epoxy/pop rivet a piece of metal/aluminum to the cover and mount the switch through a hole that's drilled in the piece of metal/aluminum.

eMail sent.
 

ndfan6464

Well-known member
Joined
Jan 17, 2017
Messages
593
Location
All over
So in theory I could solder the black wire from the light to the white wire going to the coil right? Since they both went to the same terminal on the orginal switch or am I missing something?
 

Attachments

  • 20191125_155306.jpg
    20191125_155306.jpg
    39.5 KB · Views: 37

ndfan6464

Well-known member
Joined
Jan 17, 2017
Messages
593
Location
All over
As much as I didnt want to I just used rivets to secure the switch plate to the grinder.. if it come down to putting an OEM switch back in I can just fill the holes with JB weld and you never know once its painted..

Ran a bench test and all ran like it should. Also finally added the rubber grommets.. Now off to grind on some chisels
 

Attachments

  • 20191125_165125.jpg
    20191125_165125.jpg
    114.5 KB · Views: 59
  • 20191125_164624.jpg
    20191125_164624.jpg
    58.1 KB · Views: 44
  • 20191125_164558.jpg
    20191125_164558.jpg
    51.1 KB · Views: 46
OP
T

torqueman2002

Well-known member
Joined
Jun 3, 2009
Messages
6,139
Location
SE Michigan
So in theory I could solder the black wire from the light to the white wire going to the coil right? Since they both went to the same terminal on the orginal switch or am I missing something?
That will work, if that black wire goes to the hot/center part of the lamp AND the neutral wire from the lamp goes to the neutral wire of the power cord.
 
OP
T

torqueman2002

Well-known member
Joined
Jun 3, 2009
Messages
6,139
Location
SE Michigan
As much as I didnt want to I just used rivets to secure the switch plate to the grinder.. if it come down to putting an OEM switch back in I can just fill the holes with JB weld and you never know once its painted..

Ran a bench test and all ran like it should. Also finally added the rubber grommets.. Now off to grind on some chisels
Good solution. Happy grinding. :thumbup:
 

ndfan6464

Well-known member
Joined
Jan 17, 2017
Messages
593
Location
All over
What size wheel is on the 1/3 HP blocks, 1" or 3/4"? I cant for the life of me remember. I know ots 1/2" arbor.
 

ndfan6464

Well-known member
Joined
Jan 17, 2017
Messages
593
Location
All over
Yeah I've been having a hard time finding some good steel flanges as well.. just cheaper flimsy aluminum ones.. Thanks I'll see if that place still has them..
 

rpol7966

Member
Joined
Dec 25, 2007
Messages
10
Location
Central Il
I have two Craftsman grinders, a 1 HP and a 3?4 HP.
The 1 HP has a label with no visible markings other than 1 HP, a number 8213G3120 and Sear Roebuck and Company across the bottom of the label. It's case is a lot taller than the 3/4 HP grinder.
The 3/4 HP model number 397 19671 is ball bearing and has heavier rests which leads me to believe it is earlier production. It's case has corrosion damage between the grinder and quench tray. Notice in the picture, how badly deteriorated the base is. Would it be worth while replacing the case halves if I could find them?
Any help dating these grinders would be appreciated.
Thanks and Merry Christmas to all.
 

Attachments

  • IMG_2283.JPG
    IMG_2283.JPG
    53.1 KB · Views: 68
  • IMG_2285.JPG
    IMG_2285.JPG
    45.5 KB · Views: 64
  • IMG_2282.JPG
    IMG_2282.JPG
    54.7 KB · Views: 82
  • IMG_2287.JPG
    IMG_2287.JPG
    52 KB · Views: 70
  • IMG_2286.JPG
    IMG_2286.JPG
    73.8 KB · Views: 58
  • IMG_2284.JPG
    IMG_2284.JPG
    47 KB · Views: 64

exmaxima1

Well-known member
Joined
Jun 25, 2011
Messages
6,341
Location
Midwest
The lamination stacks are different lengths for the various hp grinders of the same family. AFAIK you can’t easily replace 3/4 hp cases with those from a much smaller power grinder.

Btw, what size are the wheels on the 3/4hp grinder? They look smaller than the 8” on my 3/4 deluxe base grinder
 
Last edited:

lafester

Well-known member
Joined
Mar 1, 2017
Messages
2,191
Location
Northern CO
I just tried this with my 3/4 using a 1/2 hp housing. I think it could work with some modification but I did not compare the two to see what the issue is. It couldn't be much with the same part number though.

You are welcome to them though if you would like to try.

I looked through quite a few catalogs lately. Your 3/4 first appeared in the 1974 catalog and your 1 hp in 1980. The round top grinders with plastic eye shields were only in like one catalog but you sure see a lot of them... this shows that the catalogs are not really accurate for dating but sometimes it is the best we have.
 

Attachments

  • 1974 3-4 hp.jpg
    1974 3-4 hp.jpg
    140 KB · Views: 56
  • 1980 1HP.jpg
    1980 1HP.jpg
    138.7 KB · Views: 51
Last edited:
To avoid these ads, REGISTER NOW!
Top Bottom