To avoid these ads, REGISTER NOW!

VISE REPAIR 101 all vise repairs, lubricants, sources for parts and the tricks to fix

rusty65

Well-known member
Joined
Mar 20, 2012
Messages
2,279
Location
Pekin,IL
So I just picked up a monarch with a broken repaired jaw. What do you fellow vise guys think would be a good way to test the weld you know for “science”. I’ve put a large socket in the jaws and cranked hard on the screw. I’m wanting to test the vise without damaging the other good parts such as the swivel base and screw/nut. What would you guys want to see as a test on the repair. f8d9765ed30f0339fda7231d45f097e8.jpgb542dfd9a5f4a9134d711ad9f74cfec7.jpg1614633dcd1bc5d3db1c4ca71435bf05.jpga3653c6a6178832cc5744bd66383dae6.jpg


Sent from my iPhone using Tapatalk
 

Attachments

  • f8d9765ed30f0339fda7231d45f097e8.jpg
    f8d9765ed30f0339fda7231d45f097e8.jpg
    71.4 KB · Views: 0
  • b542dfd9a5f4a9134d711ad9f74cfec7.jpg
    b542dfd9a5f4a9134d711ad9f74cfec7.jpg
    79.5 KB · Views: 0
  • 1614633dcd1bc5d3db1c4ca71435bf05.jpg
    1614633dcd1bc5d3db1c4ca71435bf05.jpg
    75.2 KB · Views: 0
  • a3653c6a6178832cc5744bd66383dae6.jpg
    a3653c6a6178832cc5744bd66383dae6.jpg
    51.1 KB · Views: 0
To avoid these ads, REGISTER NOW!

cory52000

Well-known member
Joined
Jan 10, 2020
Messages
71
Location
southern oregon
My guess is it went on hot and was crimped down if it's is not got enough spring to get it off that would be my route. You will nick something with the dremel
I’m starting a restoration on a Red Arrow vise.

Is there a method of removing this split ring retainer without destroying it so it can be re-used?

If not, I suppose a Dremel cutoff wheel and then reassemble with a washer and an e-clip ?

Anybody have experience that they’d like to share?

Thanks in advance.

Sent from my LM-V405 using The Garage Journal mobile app
 

cory52000

Well-known member
Joined
Jan 10, 2020
Messages
71
Location
southern oregon
Why destroy it. Sounds like a good repair. Make it a user and get it in the hands if someone that doesn't have the funds for a high dollar vise but still wants the look. Just my 2 cents
So I just picked up a monarch with a broken repaired jaw. What do you fellow vise guys think would be a good way to test the weld you know for “science”. I’ve put a large socket in the jaws and cranked hard on the screw. I’m wanting to test the vise without damaging the other good parts such as the swivel base and screw/nut. What would you guys want to see as a test on the repair. f8d9765ed30f0339fda7231d45f097e8.jpgb542dfd9a5f4a9134d711ad9f74cfec7.jpg1614633dcd1bc5d3db1c4ca71435bf05.jpga3653c6a6178832cc5744bd66383dae6.jpg


Sent from my iPhone using Tapatalk

Sent from my LM-V405 using The Garage Journal mobile app
 

Attachments

  • f8d9765ed30f0339fda7231d45f097e8.jpg
    f8d9765ed30f0339fda7231d45f097e8.jpg
    71.4 KB · Views: 0
  • a3653c6a6178832cc5744bd66383dae6.jpg
    a3653c6a6178832cc5744bd66383dae6.jpg
    47.3 KB · Views: 0
  • 1614633dcd1bc5d3db1c4ca71435bf05.jpg
    1614633dcd1bc5d3db1c4ca71435bf05.jpg
    71.6 KB · Views: 0
  • b542dfd9a5f4a9134d711ad9f74cfec7.jpg
    b542dfd9a5f4a9134d711ad9f74cfec7.jpg
    74.1 KB · Views: 3
OP
D

drivesitfar

Well-known member
Joined
Oct 23, 2013
Messages
35,997
Location
Pacific Northwest
Shift: that question has been asked several times on this thread and I think the only good solution was to cut it off and replace with an E clip. if there is a better way i'd like to see pics and hear about it even though I'm not too much a fan of those little open screw vises they are a handy tool. i've seen more than a few on some very handy guy's benches in the past.

Rusty: I'd probably pass on buying one welded like that unless of course cheap or I needed the parts. Monarchs are a Prentiss brand that would tend to have the back of the slides split most likely from being used as an anvil so if your Dynamic is good it might serve well on a better static later.

i've seen guys test pressure with gauges so if one of them posts or you know how maybe test to see if it holds up under a normal PSI clamp.


I'd put it on a shelf or use it for light duty if you like it's looks, but curious to hear what others say.

Maddog: nice spiffing up work!! personally BLO works great for me especially now that you've got it naked and grease the parts where you've got metal to metal movement like screw and swivel base.
 

rusty65

Well-known member
Joined
Mar 20, 2012
Messages
2,279
Location
Pekin,IL
Why destroy it. Sounds like a good repair. Make it a user and get it in the hands if someone that doesn't have the funds for a high dollar vise but still wants the look. Just my 2 cents

Sent from my LM-V405 using The Garage Journal mobile app


I thought about selling it to my friend to hold chainsaws but I want to make sure the repair is up to snuff if I do sell it as a complete unit. The guy I bought the vise from seemed like a rough neck and doubt he did the repair. The vise still had two bolts and a splinter of wood from the bench where the vise was last mounted. So it was in active use since the repair.


Sent from my iPhone using Tapatalk
 

ClappedOutBport

Well-known member
Joined
Mar 30, 2016
Messages
998
So I just picked up a monarch with a broken repaired jaw. What do you fellow vise guys think would be a good way to test the weld you know for “science”. I’ve put a large socket in the jaws and cranked hard on the screw. I’m wanting to test the vise without damaging the other good parts such as the swivel base and screw/nut. What would you guys want to see as a test on the repair.

Sent from my iPhone using Tapatalk

You'll probably ruin the other good parts trying to break it. Why not just use it? Sorta disrespectful to the folks that put in a lot of effort to fix that.

Much like the weld was not the weak point of this Prentiss.

[Timestamped]
 

Shiftless

Well-known member
Joined
Mar 9, 2014
Messages
14,479
Location
East Bay SFO
Rusty:
I agree with the others. Clean it up. Lube properly and let your buddy put it back to work. Monarchs weren’t built to the same standards as Bulldogs but the lion head on the side sure looks cool. If you clamped down hard on a big socket and it held, it will probably be fine. With that being said, if the guy abuses that old Prentiss, of course it might fail. I have seen broken Reed 4C’s. Given enough stupidity, anything can be broken.

Drives:
You’re right. Most all of us consider the open screw vises to be second to the nicer ones but my Columbian Red Arrow will be a “restomod” with a metallic gray body and a bright red arrow on the side. I have seen those vises painted red with the arrow highlighted in black. I am choosing to paint the arrow on a red arrow vise RED. Seems to make sense to me.

Outlaw and cory:
Thanks for the advice on the removal of that clip. Cutting it out without collateral damage would be VERY tricky.
 
Last edited:
Joined
Nov 6, 2009
Messages
17
Hey Vise experts!

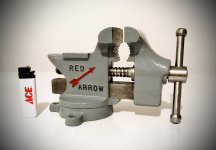
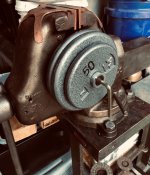
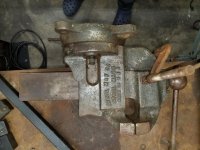
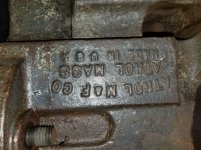
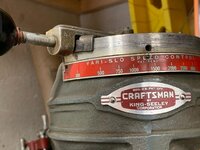
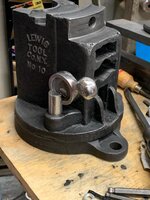
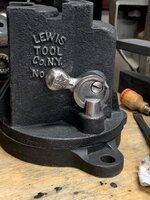
I have an old Ridgid vise that I am working on. Its a 61SN that belonged to my grandfather:
F44q6DO.jpg


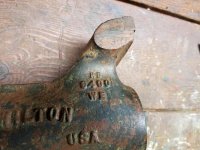
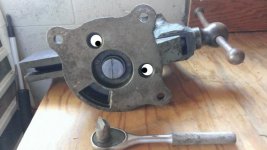
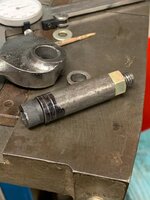
I have disassembled and derusted the vise, to see whats what.
Gt9fFrF.jpg


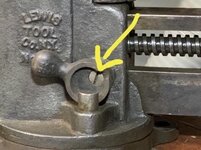
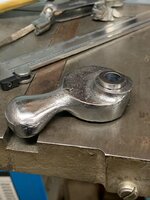
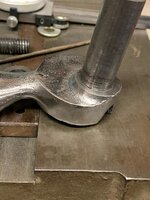
Unfortunately she has a lot of backlash between the retaining collar and the shoulder on the screw / meatball.

mpl56zC.jpg


QKxMIFL.jpg


IVJNXPf.jpg


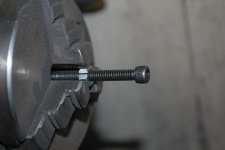
I thought about making a washer for between the dynamic jaw and the meatball on the lathe. Or machining down the collar to take up the gap on the mill.

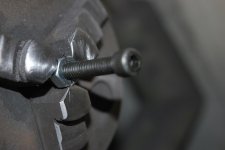
But then I saw fireball Tools video where he adds a thrust bearing.

WE4rfyg.png

I could set the depth of the pocket in red such that the bearing was a bit proud of the dynamic jaw, and takes up the backlash as well.

Any cons to using a thrust bearing like fireball did? Seems like a nice way to solve my issue while also getting a bit more squeeze thanks to reduced friction. On fireballs vice, he went from ~9k lbs clamp load to ~15k lbs clamp load with this (and other) modifications.

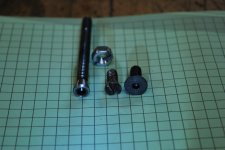
Here is the proposed bearing https://www.mcmaster.com/60715k16
 
Last edited:
OP
D

drivesitfar

Well-known member
Joined
Oct 23, 2013
Messages
35,997
Location
Pacific Northwest
Mike,
Check out post #1280 that ssdave made cause I saw it show up on another thread and looks like you’ll get your answers there. I haven’t ever heard of anybody not liking their vise as much after taking out backlash with a thrust bearing so hoping your not the first.

Also welcome to garage journal
 

Shiftless

Well-known member
Joined
Mar 9, 2014
Messages
14,479
Location
East Bay SFO
Last week, I asked about removing a heavy retaining clip on my Columbian 63 project. I couldn’t wedge it out and decided not to cut it but to just work around it. Of course it makes polishing the nose more difficult but with shelter in place, it’s also not an option to go the hardware store for new pieces.

Anyway, I finished the project earlier today. Here it is.
 

Attachments

  • 8D766E5B-F9E7-4B4F-ABBE-785867A3A54F.jpg
    8D766E5B-F9E7-4B4F-ABBE-785867A3A54F.jpg
    94.6 KB · Views: 54
Last edited:

Shiftless

Well-known member
Joined
Mar 9, 2014
Messages
14,479
Location
East Bay SFO
Thanks outlaw!

I will admit that I had to wipe off the black highlights on the “ARROW” lettering 3 times before I was happy enough with it to post a photo. The red arrow painting was a lot easier.
 

SGKent

Banned
Joined
Feb 12, 2010
Messages
1,959
Location
Citrus Heights CA
Last week, I asked about removing a heavy retaining clip on my Columbian 63 project. I couldn’t wedge it out and decided not to cut it but to just work around it. Of course it makes polishing the nose more difficult but with shelter in place, it’s also not an option to go the hardware store for new pieces.

Anyway, I finished the project earlier today. Here it is.


did you try snap ring pliers? That is what I use to spread rings like that. Watch your fingers for pinch if the pliers slip off.
 
Last edited:

Shiftless

Well-known member
Joined
Mar 9, 2014
Messages
14,479
Location
East Bay SFO
did you try snap ring pliers? That is what I use to spread rings like that. Watch your fingers for pinch if the pliers slip off.

If I had a pair of those pliers at one time, I couldn’t find them. I just worked around the problem and did the polishing and painting with the main screw in place. Popping off an e-clip is EZ.
 

Jc2043

Well-known member
Joined
Sep 6, 2018
Messages
84
Location
San Diego
I’ve started on my first vise restoration. I was gifted my grandfathers Morgan Chicago 140. I disassembled the entire vise but I couldn’t get the original jaw screws out. I know some on this forum have said if there’s nothing wrong with the jaws leave them be. But I really wanted to get those crisp paint lines and polish the jaws.

I tried days of penetrating oil treatments, lots of heat, and finally an impact driver. As was able to get one of the screw out. The rest I drilled and easy outed. The screw have standard thread and pitch but the tapers are non standard. Are these available anywhere or do I need to backyard machine them?
 

Private Lugnutz

Well-known member
Joined
Mar 30, 2012
Messages
30,477
Location
The Authentic Jersey Shore
I've had an old ("2-49") Chicago Wilton bullet (4", HD 8400) sitting around here for a few years collecting dust. Yesterday I decided to at least get the thick offensive coat of sh*t brown off it and repaint it. I've got the swivel base and hardware soaking. Going to have to use some heat and penetrating oil or maybe something stronger (Metal Rescue) on the collar screws. The issue I am having is the four hex screws in the jaws. The key size is bigger than 15/32" and smaller than 3/16". I searched the Vise Motherthread thinking I would run into all kinds of comments about the crazy key size in the hex screws on old Wilton bullet jaws. Are they 11/64"? Not sure why they'd do that, but I don't have a single hex key ("Allen") wrench that size, modern or vintage, and that includes sets and an ammo box full of them.
 

Attachments

  • 20200423_063929.jpg
    20200423_063929.jpg
    151.3 KB · Views: 21
  • 20200423_063800.jpg
    20200423_063800.jpg
    124.3 KB · Views: 31
  • 20200423_063806.jpg
    20200423_063806.jpg
    121.3 KB · Views: 22

GETRIDAONE

Well-known member
Joined
May 21, 2013
Messages
1,549
Location
Auburn, GA
The screws could be metric, you didn't mention trying that. They were replaced at some point because originals were just plain slotted screws.
 
OP
D

drivesitfar

Well-known member
Joined
Oct 23, 2013
Messages
35,997
Location
Pacific Northwest
JC: I thought somebody might respond to your post about those old screws for your old Morgan, but guess they are all busy putting out fires or dealing with C19 and it'si aftermath or wrath.

anyway I'm not a big fan of removing and replacing jaws, but in your case it sounds like you want to shine them up and replace the old ones back on your old vise.

there was some mention that McMaster or other tool companies have the exact screw, but i think since Morgan is still in business i'd maybe try their customer service and see what one of them has to say.

a lot of guy here take a screw with the right threads and length and they either put the angle on it on their bench grinder or some put in their drill press or drill chucks and file while it's spinning.

good luck and make a few posts on any of a bunch of great threads here so you can post up some pictures of this vise and other projects you are doing.

welcome to GJ too!!

LUG: while those jaws look like they've been to war a nice pair of Wilton jaw covers would look and work great on them. if you can't find a decent deal you can always make some out of copper pipe like this member did that likes to have a good soft grip for his gun work.

GET: sometimes it's the obvious that isn't so obvious when we are working on stuff and thanks for the assist and reminder.

ALL: I don't use my big Reed 4c a lot, but I found a nice job for it's bottom section of it's pipe jaws the other day. I couldn't hold on the handle of this dumbbell firm enough to get the screw out with the Allen wrench and it took about 3 minutes to set the dumbbell in my 4c and get the rusted screw out.

let's get this world back up and running soon!!
 

Attachments

  • REMOVE~1.jpg
    REMOVE~1.jpg
    136.6 KB · Views: 30

Jc2043

Well-known member
Joined
Sep 6, 2018
Messages
84
Location
San Diego
JC: I thought somebody might respond to your post about those old screws for your old Morgan, but guess they are all busy putting out fires or dealing with C19 and it'si aftermath or wrath.


anyway I'm not a big fan of removing and replacing jaws, but in your case it sounds like you want to shine them up and replace the old ones back on your old vise.


there was some mention that McMaster or other tool companies have the exact screw, but i think since Morgan is still in business i'd maybe try their customer service and see what one of them has to say.


a lot of guy here take a screw with the right threads and length and they either put the angle on it on their bench grinder or some put in their drill press or drill chucks and file while it's spinning.


good luck and make a few posts on any of a bunch of great threads here so you can post up some pictures of this vise and other projects you are doing.


welcome to GJ too!!


LUG: while those jaws look like they've been to war a nice pair of Wilton jaw covers would look and work great on them. if you can't find a decent deal you can always make some out of copper pipe like this member did that likes to have a good soft grip for his gun work.


GET: sometimes it's the obvious that isn't so obvious when we are working on stuff and thanks for the assist and reminder.


ALL: I don't use my big Reed 4c a lot, but I found a nice job for it's bottom section of it's pipe jaws the other day. I couldn't hold on the handle of this dumbbell firm enough to get the screw out with the Allen wrench and it took about 3 minutes to set the dumbbell in my 4c and get the rusted screw out.


let's get this world back up and running soon!!


Thank you Drivesitfar. Here’s a picture of the disassembled vise. I’ll check on the leads you gave me or grind some standard screws down.IMG_1527.jpg


Sent from my iPhone using The Garage Journal mobile app
 
To avoid these ads, REGISTER NOW!

Mslund1

Well-known member
Joined
Feb 9, 2019
Messages
133
Location
Michigan
Thank you Drivesitfar. Here’s a picture of the disassembled vise. I’ll check on the leads you gave me or grind some standard screws down.IMG_1527.jpg


Sent from my iPhone using The Garage Journal mobile app


Morgan does have screws like drives said. However they come with new jaws as well. They changed the head diameter on the new jaws/screws. The ~60 degree-ish taper on the original screws is no longer standard.

I just went through this with my Morgan 160 I cleaned up. I ended up counterboring the original jaws and used shallow head socket head cap screws. An option if you have the capability to do so. Otherwise, grinding some newer style bolts down to fit the old style taper might be your option.

I have yet to find anyone that sells the old style taper screw.


Sent from my iPhone using Tapatalk Pro
 

Outlawmws

Well-known member
Joined
Aug 9, 2011
Messages
39,123
Location
The Badlands
You can grind your own 60 deg heads out of Std countersunk screws. Chuck it in a hand drill and carefully grind it on a bench grinder while spinning. go slow and keep it cool
 

KMScott

Well-known member
Joined
Feb 14, 2012
Messages
4,632
Location
Daufuskie Island, South Carolina
They are actually 30 degrees included angle. The pictures show how I did mine. I used a file and got it pretty close. Can be done in a drill press too.
 

Attachments

  • 30 Degree Screws (6).jpg
    30 Degree Screws (6).jpg
    153.3 KB · Views: 57
  • 30 Degree Screws (5).jpg
    30 Degree Screws (5).jpg
    51.8 KB · Views: 56
  • 30 Degree Screws (1).jpg
    30 Degree Screws (1).jpg
    92.7 KB · Views: 59
  • 30 Degree Screws (3).jpg
    30 Degree Screws (3).jpg
    146.9 KB · Views: 57
  • 30 Degree Screws (4).jpg
    30 Degree Screws (4).jpg
    107.1 KB · Views: 52
  • 30 Degree Screws (2).jpg
    30 Degree Screws (2).jpg
    91.4 KB · Views: 60

larry4406

Well-known member
Joined
Jan 27, 2006
Messages
19,056
Location
Northern Virginia
They are actually 30 degrees included angle. The pictures show how I did mine. I used a file and got it pretty close. Can be done in a drill press too.
Pretty clever using the split nut to hold the screw in the lathe jaws! Poor man's collet! Thanks for showing that trick!
 

Outlawmws

Well-known member
Joined
Aug 9, 2011
Messages
39,123
Location
The Badlands
I have a whole collection of nuts I split on one side at a point to hold a threaded part in a vise. I like the idea of doing the same in a chuck like that.

I routinely use that for cutting a bolt to length and then "chasing" the end when I turn it off...
 

javie

Active member
Joined
Sep 15, 2019
Messages
37
Location
Missouri
Not sure this is the right place for this, but I picked up a great Athol 624. Main screw is smooth as glass, the swivel base was locked up but I ended up freeing it up, but it only swivels 90-degrees, and I mean exactly 90-degrees before hard stops each way. I can see the geometry works when mounting it at the corner of a bench, but most of the vises I've seen that swivel will swivel 360-degrees and are locked up by either one or two bolts with handles. Is it normal for this vise to only swivel 90-degrees?
 
OP
D

drivesitfar

Well-known member
Joined
Oct 23, 2013
Messages
35,997
Location
Pacific Northwest
Javie: I bet Starrett (Athol's owner) figured that 99% of the buyers buying swiveling bases for their vises only used them on a corner of a bench so they probably did that on purpose to make the piece less likely to break.

nice find and got any pictures? also turning it on it's side and taking a few pictures might help when posting questions like this cause we all don't own all of the vise brands and some brands change their design yearly.
 

javie

Active member
Joined
Sep 15, 2019
Messages
37
Location
Missouri
Here are a few pics. This one doesn't have Starrett anywhere on it so may predate them buying Athol. It'll probably become crystal clear when I get the swivel base off, I just wondered if someone knew already.
 

Attachments

  • 20200427_171621.jpg
    20200427_171621.jpg
    148 KB · Views: 45
  • 20200427_171628.jpg
    20200427_171628.jpg
    148 KB · Views: 48
  • 20200427_171650.jpg
    20200427_171650.jpg
    149.5 KB · Views: 43
Last edited:
OP
D

drivesitfar

Well-known member
Joined
Oct 23, 2013
Messages
35,997
Location
Pacific Northwest
Javie: I'm pretty sure Starrett always owned Athol and they didn't start putting their names on their vises til after WWII, but not sure when.

Rusty is correct that your vise is old, but now i'm curious why its not turning 360 if he thinks it should.

if you might not have a drag link to remove the swivel's base i ground off a side of a big washer and used an eye bolt to hold it so i could get a little leverage on one of my vises. or some guys make a tool out of scrap if you have some welding skills.

holding the ground off washer in monkey or crescent wrench might work too.
 

Attachments

  • user218165_pic51056_1433176540.jpg
    user218165_pic51056_1433176540.jpg
    48.5 KB · Views: 29
  • eye bolt with huge washer flat on one side to remove big screw under Reed 4c.jpg
    eye bolt with huge washer flat on one side to remove big screw under Reed 4c.jpg
    154.9 KB · Views: 31
  • WP_20150530_012.jpg
    WP_20150530_012.jpg
    107.1 KB · Views: 27

bagged89s10

Well-known member
Joined
Mar 13, 2005
Messages
4,607
Location
CT
I am working on restoring a Lewis No. 10 vise and thought I would share how I repaired the swivel pin lever. Originally I lost the screw to hold on the lever. So with the help of instagram I found someone with a lewis vise. They got me some measurements and I found out my lever had a broken piece which was actually stuck inside the lever mounting hole. I was also able to find the missing screw in my vise parts stash from the pictures and measurements I was given. Here is how I fixed the broken lever. If it was just steel, I would have just welded the bushing end back on. I don’t have the proper welding setup for cast iron so I decided to make a bushing that could be press fit from the back. My lathe is also in pieces so I had to get a little creative.
I started with a 5/8” solid rod and cut off about a 3” piece on the bandsaw. I marked the center with calipers. I clamped up a vise with a 3 jaw lathe chuck at the drill press so I could make sure the rod was perpendicular to the drill press table. A vise with a V groove would work too but I had the 3 jaw chuck sitting next to the drill press so I used it. I eyeballed the center using the center drill bit chucked into the drill press. I center drilled it then I drilled a 3/8” hole. The bushing needed to be 1/8” inside the lever and protrude 1/8” out of the back so I made those 2 marks. Now I had to turn down the part of the bushing that would go into the lever to 0.578”. I used an allen head bolt and nut to make a way for it to be chucked into a drill chuck. I first ran the drill on the belt sander to take off the majority of material, then I used a file on the drill press to square it off. I filed a little and checked fit until I got it to the size I needed. I had it so it was tight, but easy enough to push on by hand. I then went all the way around and punched dimples into the bushing to deform and give it a little more friction on the fit. I got it to be tight enough to have to tap it in with a hammer. I didn’t want to have it too tight and risk cracking the casting by pressing it in so I went with this route. I cut the bushing off to be a total 1/4” length and de-burred it. I was going to add some epoxy or super glue in the bushing but it’s tight enough that it’s not moving. Now this vise has the mounting hole for the lever drilled and all the way thru. I’m guessing it was just easier to tap the threads deeper this way vs needing a bottom tap. Just a guess, I don’t know how the process was back in the late 1800s. This causes the lever to get too tight if you put the screw in all the way. If you don’t put the screw in all the way, it just keeps loosening up every time to turn the lever back and forth. My fix was to thread in a short set screw to make a bottom to the tapped hole. Now it works perfectly smooth.

dc7f0e972fc5a4d13bda5145e1d8664e.jpg
b7aea06e4a57d35818469cd5c3b7ca42.jpg
988a3d3154458fbef6e810c261d1a664.jpg
97fb408e57bda6d83d68be26ac96fa24.jpg
563997c37a3be97fe574188bbae456ad.jpg
c4b4722c133b6ae19278e7406195bb38.jpg
b87f0ae5da4e260d3635827113480753.jpg
a01952294d5f4f7bd804551d7dcd09ef.jpg
8a09df63dfbcf0064650dfd528306c04.jpg
 

Attachments

  • 8a09df63dfbcf0064650dfd528306c04.jpg
    8a09df63dfbcf0064650dfd528306c04.jpg
    119.3 KB · Views: 1
  • a01952294d5f4f7bd804551d7dcd09ef.jpg
    a01952294d5f4f7bd804551d7dcd09ef.jpg
    55.1 KB · Views: 1
  • b87f0ae5da4e260d3635827113480753.jpg
    b87f0ae5da4e260d3635827113480753.jpg
    77.8 KB · Views: 1
  • c4b4722c133b6ae19278e7406195bb38.jpg
    c4b4722c133b6ae19278e7406195bb38.jpg
    131.6 KB · Views: 1
  • 97fb408e57bda6d83d68be26ac96fa24.jpg
    97fb408e57bda6d83d68be26ac96fa24.jpg
    124.3 KB · Views: 1
  • 988a3d3154458fbef6e810c261d1a664.jpg
    988a3d3154458fbef6e810c261d1a664.jpg
    135.8 KB · Views: 1
  • b7aea06e4a57d35818469cd5c3b7ca42.jpg
    b7aea06e4a57d35818469cd5c3b7ca42.jpg
    32.1 KB · Views: 1
  • 563997c37a3be97fe574188bbae456ad.jpg
    563997c37a3be97fe574188bbae456ad.jpg
    103.6 KB · Views: 1
  • dc7f0e972fc5a4d13bda5145e1d8664e.jpg
    dc7f0e972fc5a4d13bda5145e1d8664e.jpg
    137 KB · Views: 1

bagged89s10

Well-known member
Joined
Mar 13, 2005
Messages
4,607
Location
CT
Lewis vise swivel repair lever pictures part 2

ce3655897fd60aa3f646a95f819affab.jpg
9449bf4091674a6b9e119523a8ec3cf5.jpg
c4982c5847f6306a4958f57ad4d5174e.jpg
958bd714cfe86ee286193caec915663d.jpg
8087cd2add9e14e3340ed50db222df9c.jpg
c95ae07cd1e9ae89c0abcd1b33a636b2.jpg
b9d70633c61d4751c5212eea2659c3cd.jpg
a38a7a1bb0c2370461eaf81111c9f972.jpg
97fa71b2dfbb90169d0780330bed6210.jpg
 

Attachments

  • 958bd714cfe86ee286193caec915663d.jpg
    958bd714cfe86ee286193caec915663d.jpg
    115.6 KB · Views: 1
  • c4982c5847f6306a4958f57ad4d5174e.jpg
    c4982c5847f6306a4958f57ad4d5174e.jpg
    96.3 KB · Views: 1
  • ce3655897fd60aa3f646a95f819affab.jpg
    ce3655897fd60aa3f646a95f819affab.jpg
    94.6 KB · Views: 0
  • b9d70633c61d4751c5212eea2659c3cd.jpg
    b9d70633c61d4751c5212eea2659c3cd.jpg
    108.8 KB · Views: 0
  • 9449bf4091674a6b9e119523a8ec3cf5.jpg
    9449bf4091674a6b9e119523a8ec3cf5.jpg
    114.1 KB · Views: 0
  • c95ae07cd1e9ae89c0abcd1b33a636b2.jpg
    c95ae07cd1e9ae89c0abcd1b33a636b2.jpg
    85.4 KB · Views: 0
  • 8087cd2add9e14e3340ed50db222df9c.jpg
    8087cd2add9e14e3340ed50db222df9c.jpg
    92.1 KB · Views: 0
  • 97fa71b2dfbb90169d0780330bed6210.jpg
    97fa71b2dfbb90169d0780330bed6210.jpg
    105.5 KB · Views: 0
  • a38a7a1bb0c2370461eaf81111c9f972.jpg
    a38a7a1bb0c2370461eaf81111c9f972.jpg
    96.4 KB · Views: 0
Last edited:

bagged89s10

Well-known member
Joined
Mar 13, 2005
Messages
4,607
Location
CT
Lewis vise swivel repair lever pictures part 3

7e82185d51ae85d73d532ef90cd5c6f0.jpg
c3080650907071931d522615058d4bdb.jpg
e65865a52dba64876ef306b5dda9f145.jpg
524b37b92e93e6ca3428fa114d87dfdd.jpg
14adf1f236eae9cbbeb365cc279d07ba.jpg
2902222e55d38d6f3d313ae55c6a5c76.jpg
972ee8aec0cf35a3c8bfc57d994fa566.jpg
ec5ece5f6ab465a7ea3d63bdae0219cc.jpg
7802903783ba91522c3c2b7a7236cd22.jpg
 

Attachments

  • 7802903783ba91522c3c2b7a7236cd22.jpg
    7802903783ba91522c3c2b7a7236cd22.jpg
    119.3 KB · Views: 0
  • 972ee8aec0cf35a3c8bfc57d994fa566.jpg
    972ee8aec0cf35a3c8bfc57d994fa566.jpg
    96.5 KB · Views: 0
  • 2902222e55d38d6f3d313ae55c6a5c76.jpg
    2902222e55d38d6f3d313ae55c6a5c76.jpg
    76.6 KB · Views: 0
  • 14adf1f236eae9cbbeb365cc279d07ba.jpg
    14adf1f236eae9cbbeb365cc279d07ba.jpg
    81 KB · Views: 0
  • 524b37b92e93e6ca3428fa114d87dfdd.jpg
    524b37b92e93e6ca3428fa114d87dfdd.jpg
    69.4 KB · Views: 0
  • e65865a52dba64876ef306b5dda9f145.jpg
    e65865a52dba64876ef306b5dda9f145.jpg
    75.2 KB · Views: 0
  • c3080650907071931d522615058d4bdb.jpg
    c3080650907071931d522615058d4bdb.jpg
    73.2 KB · Views: 0
  • 7e82185d51ae85d73d532ef90cd5c6f0.jpg
    7e82185d51ae85d73d532ef90cd5c6f0.jpg
    105.9 KB · Views: 0
  • ec5ece5f6ab465a7ea3d63bdae0219cc.jpg
    ec5ece5f6ab465a7ea3d63bdae0219cc.jpg
    120.8 KB · Views: 1
Last edited:

bagged89s10

Well-known member
Joined
Mar 13, 2005
Messages
4,607
Location
CT
Lewis vise swivel repair lever pictures part 4.
a5530a90486b64211c742aa4174dbb0d.jpg
d710d005bf99a560bdedc88b33db856b.jpg
b1fbfa1f56f6906d3f21568971c36d5b.jpg
 

Attachments

  • b1fbfa1f56f6906d3f21568971c36d5b.jpg
    b1fbfa1f56f6906d3f21568971c36d5b.jpg
    108.4 KB · Views: 1
  • d710d005bf99a560bdedc88b33db856b.jpg
    d710d005bf99a560bdedc88b33db856b.jpg
    127.6 KB · Views: 1
  • a5530a90486b64211c742aa4174dbb0d.jpg
    a5530a90486b64211c742aa4174dbb0d.jpg
    135.3 KB · Views: 1
To avoid these ads, REGISTER NOW!
Top Bottom