To avoid these ads, REGISTER NOW!

Above 1200 Sq/FT The ASYLUM - Happy 40th Birthday to Me! (Est. 2005)

Wokspaces above 1200 squarefeet.
OP
S

shopnut

Well-known member
Joined
Feb 22, 2006
Messages
4,237
Location
Florida
your continual improvements look great. I know you can probably leave that new area open next to the door, but with your OCD the first time a few leaves get inside it will drive you CRAZY.

so my thoughts is to paint a 1/4 inch hardy board (or plywood or similar thin product) white and put it up on the side of your 2 x 4's. that way you'll not only have an enclosed area to keep leaves, rain and dirt out you will also not stick any of your 8-12 foot items into that area and get them stuck or worse.

keep up the great work!!

(yep I do like the way you put a 3 inch extension on to your reel's cord with the 3 prong adapter)
You have a good point about long items possibly getting snagged in that stud wall... hadn't thought about that. I will keep that in mind when it comes time to finish the "cabinet" off. I will say, now that the south wall cabinet system is there, it is harder to see back in that nook behind the roll-up door jamb. My head doesn't fit in that gap! But I figured out that I can open the sliding door and peer right through the stud wall right now, which is convenient.

Thanks for your thoughts, suggestions, and kind words.
 
To avoid these ads, REGISTER NOW!
OP
S

shopnut

Well-known member
Joined
Feb 22, 2006
Messages
4,237
Location
Florida
THE LAST FRONTIER, THE ASYLUM SOUTH WALL… (Part 46 of 50)

OUTFITTING THE RIGHT CABINET.


Like the left cabinet with its hangers for all my lifting straps, I wanted to do a few custom hangers in the right cabinet to organize my saw horses and bar clamps.

In this first picture, you will see I first added a little “latch” to hold the yellow auto lift ramps from tipping outward from the wall. I needed them to store perfectly vertical to fit another item in front of them. Above the ramps, you will see what I built to hang the saw horses on… simple and made from wood scraps.

attachment.php


And here are the intended items, now stored in place.

attachment.php


Running the entire width of the cabinet (about 54”) and mounted a simple 2x3” stud on the wall to hold my bar clamps. I have plenty of room for more, so they will be on my gift list for some time (birthdays, Christmas, Fathers Day!) until I build up a good quantity/variety. I will still keep 2 or 4 of them over in my main workbench door because they do tend to get used a lot.

attachment.php


attachment.php


Pipe clamps hang on the framing of the side wall.

attachment.php


Lastly, I trimmed out the framing to allow the doors to roll all the way to the right (see bottom of picture), matching the lines of the overhead door above. This was an oversight, and now I need to figure out how to “stretch” the doors some to make them wider. LOL

attachment.php
 

Attachments

  • 4760-South-Wall-401 (Right Side Cabinet).jpg
    4760-South-Wall-401 (Right Side Cabinet).jpg
    50.5 KB · Views: 288
  • 4761-South-Wall-402 (Right Side Cabinet).jpg
    4761-South-Wall-402 (Right Side Cabinet).jpg
    59.4 KB · Views: 293
  • 4762-South-Wall-411 (Right Side Cabinet).jpg
    4762-South-Wall-411 (Right Side Cabinet).jpg
    143.3 KB · Views: 294
  • 4763-South-Wall-414 (Right Side Cabinet).jpg
    4763-South-Wall-414 (Right Side Cabinet).jpg
    147.6 KB · Views: 294
  • 4764-South-Wall-412 (Right Side Cabinet).jpg
    4764-South-Wall-412 (Right Side Cabinet).jpg
    72.2 KB · Views: 297
  • 4765-South-Wall-413 (Right Side Cabinet).jpg
    4765-South-Wall-413 (Right Side Cabinet).jpg
    56.3 KB · Views: 292
Last edited:

shortykorte

Well-known member
Joined
Sep 1, 2014
Messages
8,034
Location
Tallahassee, Fl
Re: The ASYLUM - Turning a Crazy Vision into a Lakefront Gearhead Getaway: Year 6

Everything has a place, a place for everything. We need to talk about the color of those clamps. Lol.


Sent from my iPhone using Garage Journal
 
OP
S

shopnut

Well-known member
Joined
Feb 22, 2006
Messages
4,237
Location
Florida
Re: The ASYLUM - Turning a Crazy Vision into a Lakefront Gearhead Getaway: Year 6

Everything has a place, a place for everything. We need to talk about the color of those clamps. Lol.


Sent from my iPhone using Garage Journal
Beggars can't be choosers!
 
OP
S

shopnut

Well-known member
Joined
Feb 22, 2006
Messages
4,237
Location
Florida
THE LAST FRONTIER, THE ASYLUM SOUTH WALL… (Part 47 of 50)

LIBRARY LADDER CLEARANCE CHECK.


I’ll start off by saying this little test was an EPIC FAIL. The last time I tried to roll the library ladder past the auto lift, it just BARELY cleared between the 4-post lift column and the lateral cabinets. But that was before I added the upper sliding door track, and that track ended up MUCH further out from the wall than I originally envisioned (the shortcomings of not having a detailed plan!). I assumed lately that the ladder wasn’t going fit through anymore, but I decided to see just how bad it was.

The first couple of pictures show where it got stuck around the corner. I had the bottom of the ladder swung out away from the post as much as possible while hitting the door track and a rung of the ladder was hitting the top of the auto lift post.

attachment.php


attachment.php


So Plan B was to pop the ladder off the LL rail trolley and carefully walk it past the lift post. This was less scary than I thought because it was “contained” fairly well and I didn’t fear having it topple over. With the lift raised anyway.

attachment.php


Once past the post, I snapped it back on the rail carriage up at 15 feet. In this picture, I have the ladder feet resting on some blocks so all the weight of me climbing up it would bear on the bottom of the ladder. The ladder’s own weight is fine, but the carriage its hooked on tends to swivel if too much weight is pulling down on the ladder.

attachment.php


Another view from the other side. At this point, I was able to climb up the step ladder and step over to the extension ladder to continue climbing to the windows and lights up there. It was as bad as it sounds because the lift runway it right there to step on too (carefully, of course).

attachment.php


So I guess it isn’t a total fail after all. It took me maybe ten minutes to get the ladder over there and that will be less time than clearing a big path through the south wall storage cabinets for the manlift to rise to the occasion. The next time I use the ladder over there, however, I will remove the chain hoist from the library ladder carriage because it wanted to scratch the roof and door rail. Just a simple rope in its place will assist me in pulling the carriage around without scraping anything.

attachment.php


attachment.php
 

Attachments

  • 4772-South-Wall-371 (Library Ladder).jpg
    4772-South-Wall-371 (Library Ladder).jpg
    62.8 KB · Views: 260
  • 4771-South-Wall-375 (Library Ladder).jpg
    4771-South-Wall-375 (Library Ladder).jpg
    75.6 KB · Views: 263
  • 4770-South-Wall-370 (Library Ladder).jpg
    4770-South-Wall-370 (Library Ladder).jpg
    87.4 KB · Views: 261
  • 4769-South-Wall-369 (Library Ladder).jpg
    4769-South-Wall-369 (Library Ladder).jpg
    86.8 KB · Views: 260
  • 4768-South-Wall-364 (Library Ladder).jpg
    4768-South-Wall-364 (Library Ladder).jpg
    80.6 KB · Views: 260
  • 4767-South-Wall-363 (Library Ladder).jpg
    4767-South-Wall-363 (Library Ladder).jpg
    83.1 KB · Views: 260
  • 4766-South-Wall-362 (Library Ladder).jpg
    4766-South-Wall-362 (Library Ladder).jpg
    76.2 KB · Views: 264
Last edited:
OP
S

shopnut

Well-known member
Joined
Feb 22, 2006
Messages
4,237
Location
Florida
THE LAST FRONTIER, THE ASYLUM SOUTH WALL… (Part 48 of 50)

SLIDING DOOR PULLS.


I’m moving on to some of the final details of the south wall storage cabinets and now it was time to decide where the sliding door pulls would go and get them installed.

These are the ones I used and it has become the standard around the ASYLUM for this sort of thing.

attachment.php


I first taped the pulls on just to get a visual of what it would look like. I tried the side cabinets with them low and lined up with the black pull-out shelves on the cabinets, and also high, just below the upper sliding doors.

attachment.php


attachment.php


The former won out, and I started drilling holes. This is the pattern the recessed pull requires.

attachment.php


Here is one mounted, including a back view.

attachment.php


attachment.php


Eight pulls installed and ready to use.

attachment.php
 

Attachments

  • 4779-South-Wall-383 (Door pulls).jpg
    4779-South-Wall-383 (Door pulls).jpg
    62.7 KB · Views: 220
  • 4778-South-Wall-384 (Door pulls).jpg
    4778-South-Wall-384 (Door pulls).jpg
    74 KB · Views: 220
  • 4777-South-Wall-387 (Door pulls).jpg
    4777-South-Wall-387 (Door pulls).jpg
    33.9 KB · Views: 216
  • 4776-South-Wall-386 (Door pulls).jpg
    4776-South-Wall-386 (Door pulls).jpg
    35.6 KB · Views: 216
  • 4775-South-Wall-381 (Door pulls).jpg
    4775-South-Wall-381 (Door pulls).jpg
    71.2 KB · Views: 216
  • 4774-South-Wall-380 (Door pulls).jpg
    4774-South-Wall-380 (Door pulls).jpg
    62.5 KB · Views: 220
  • 4773-South-Wall-379 (Door pulls).jpg
    4773-South-Wall-379 (Door pulls).jpg
    66.9 KB · Views: 220
Last edited:
OP
S

shopnut

Well-known member
Joined
Feb 22, 2006
Messages
4,237
Location
Florida
I liked those pull locations better too both in looks and I think easier to use too.

Keep up the great work!!
The only reason I was looking at the higher pull position on the lower doors was because the doors are pretty tall compared to their width (they go up behind the upper doors a ways) and I thought it might work better to put them closer the the door track so they didn't skew up if the track started getting sticky. But with them low, I think they look and work very well.
 
OP
S

shopnut

Well-known member
Joined
Feb 22, 2006
Messages
4,237
Location
Florida
Mark, now that your wrapping up the last frontier, we there be a shop expansion?:shocking:
NOOOO!! LOL. I'm going finish up the few things left and get cracking on those cars and one more bike restoration.

The one expansion that has always been in the back of my mind is a bedroom and lakeside porch addition off the apartment. Not sure if that will ever happen though.
 
OP
S

shopnut

Well-known member
Joined
Feb 22, 2006
Messages
4,237
Location
Florida
THE LAST FRONTIER, THE ASYLUM SOUTH WALL… (Part 49 of 50)

LATERAL CABINET KICK PANELS.


Another detail to finish was the kick panels. As mentioned earlier, they are not only being added for looks, but also to keep dropped items from rolling under the cabinets.

Each individual panel is held onto the cabinet cart with 6 screws. A side benefit of these panels are they form a lip to contain the cabinet a little better on the cart. Notice that I’m using some thin scraps to space the panel off the floor about a 1/4”.

attachment.php


All 4 initially test fitted.

attachment.php


I then added return panels to each end to completely hide the casters.

attachment.php


Next, I knocked down all sharp corners with the cordless router. My miter saw was out and it made a great place to clamp them during the job.

attachment.php


Here is a close-up. I rounded the bottom corners as well so they wouldn’t snag on the floor imperfections as I was rolling the cabinets around.

attachment.php


Then it was time to give them the final paint job in matching gloss black.

attachment.php


And here is the result of this job. I think it pulls the cabinets together nicely and gives them a more stable look.

attachment.php
 

Attachments

  • 4786-South-Wall-406 (Lateral Cabinet Kick Panels).jpg
    4786-South-Wall-406 (Lateral Cabinet Kick Panels).jpg
    57.4 KB · Views: 194
  • 4785-South-Wall-404 (Lateral Cabinet Kick Panels).jpg
    4785-South-Wall-404 (Lateral Cabinet Kick Panels).jpg
    141.2 KB · Views: 192
  • 4784-South-Wall-396 (Lateral Cabinet Kick Panels).jpg
    4784-South-Wall-396 (Lateral Cabinet Kick Panels).jpg
    100.5 KB · Views: 190
  • 4783-South-Wall-394 (Lateral Cabinet Kick Panels).jpg
    4783-South-Wall-394 (Lateral Cabinet Kick Panels).jpg
    156.1 KB · Views: 191
  • 4782-South-Wall-391 (Lateral Cabinet Kick Panels).jpg
    4782-South-Wall-391 (Lateral Cabinet Kick Panels).jpg
    88.7 KB · Views: 190
  • 4781-South-Wall-390 (Lateral Cabinet Kick Panels).jpg
    4781-South-Wall-390 (Lateral Cabinet Kick Panels).jpg
    52.7 KB · Views: 189
  • 4780-South-Wall-388 (Lateral Cabinet Kick Panels).jpg
    4780-South-Wall-388 (Lateral Cabinet Kick Panels).jpg
    76.8 KB · Views: 190
Last edited:

shortykorte

Well-known member
Joined
Sep 1, 2014
Messages
8,034
Location
Tallahassee, Fl
Re: The ASYLUM - Turning a Crazy Vision into a Lakefront Gearhead Getaway: Year 6

That turned out great. I like the idea of a kick plates. Guess I’ll add to the list.


Sent from my iPhone using Garage Journal
 
OP
S

shopnut

Well-known member
Joined
Feb 22, 2006
Messages
4,237
Location
Florida
OP
S

shopnut

Well-known member
Joined
Feb 22, 2006
Messages
4,237
Location
Florida
THE LAST FRONTIER, THE ASYLUM SOUTH WALL… (Part 50 of 50)

PROJECT FINISHED!, OVERALL VIEWS.


Well, it looks like this project has come to a close and it's time to start “moving in”. Yippee!! And “Part 50” is a perfect place to stop! (Geez, 50 updates to get through this one! WOW.) Thanks to all the followers and their support along the way.

There were some changes along the way, but I think it turned out functionally as planned…. a ton of storage!! Here is a repost of the initial sketches I had made. The major differences made were the elimination of the dedicated ladder cabinet on the left end, and elimination of the swing-up doors on the top. I found other ways to accomplish the same thing with less build time.

attachment.php


attachment.php


These final pictures will have to do for now because there is so much stuff currently under the lift that I can’t get any better pictures.

attachment.php


attachment.php


I will reserve a spot here, however, to place some better pictures once I move all the stuff out from under the auto lift, bring it down, and drive the Chevelle off for a better view of the wall.

*** INSERT FINAL PICTURES HERE ***

IT’S NEVER REALLY FINISHED.


Of course, no project is ever really finished, is it? I had the paint out for another job and decided to paint the framing black over on the right side. I still need to build the long stock storage cabinet here, so I didn’t bother doing anything with the rest of the framing towards the wall.

attachment.php


MOVING IN.

I had a couple hours to start moving things into the lateral cabinets. The cabinet closest in this picture has lifting gear and hoist/crane spare parts in the bottom drawer, paint and paint supplies in the middle three, and bungee cords, rope and nylon strapping in the top drawer.

The second cabinet has bulk fasteners in it and some empty drawers up on top. Cabinet 3 has cleaning supplies and I eventually will move my rags and towels into this one. The furthest cabinet will hold all my caulks, adhesives, lubes, cleaners and motor oils.

attachment.php


These six tote bins have been emptied and a few more will get emptied as the last items go in the cabinets. Eventually, these open storage racks will get moved to my 12x20 garden shed.

attachment.php
 

Attachments

  • 4791-South-Wall-420 (Moving In).jpg
    4791-South-Wall-420 (Moving In).jpg
    75 KB · Views: 162
  • 4790-South-Wall-419 (Moving In).jpg
    4790-South-Wall-419 (Moving In).jpg
    72.4 KB · Views: 165
  • 4789-South-Wall-418 (Right Side Cabinet).jpg
    4789-South-Wall-418 (Right Side Cabinet).jpg
    71.4 KB · Views: 161
  • 4788-South-Wall-416 (Overall Finished).jpg
    4788-South-Wall-416 (Overall Finished).jpg
    75.4 KB · Views: 164
  • 4787-South-Wall-415 (Overall Finished).jpg
    4787-South-Wall-415 (Overall Finished).jpg
    71.1 KB · Views: 161
Last edited:
To avoid these ads, REGISTER NOW!
OP
S

shopnut

Well-known member
Joined
Feb 22, 2006
Messages
4,237
Location
Florida
REPAINTING THE STANLEY CABINETS… (Part 6 of 6)

Here is another project I can claim as finished. The paint had plenty of time to dry on the Stanley cabinets, so I decided to put an end to the repainting project by popping all the pull handles back in.

Here are the two main walls (East and North).

attachment.php


attachment.php


Here are the finished air compressor cabinet and door chain cabinet on the West wall.

attachment.php


attachment.php


And finally, here is the stack of cabinets that really doesn’t have a home yet, but will likely end up next to the auto lift.

attachment.php
 

Attachments

  • 4792-Stanley-Cabinet-Repaint-31.jpg
    4792-Stanley-Cabinet-Repaint-31.jpg
    83.9 KB · Views: 294
  • 4793-Stanley-Cabinet-Repaint-32.jpg
    4793-Stanley-Cabinet-Repaint-32.jpg
    89 KB · Views: 297
  • 4794-Stanley-Cabinet-Repaint-33.jpg
    4794-Stanley-Cabinet-Repaint-33.jpg
    73.6 KB · Views: 297
  • 4795-Stanley-Cabinet-Repaint-35.jpg
    4795-Stanley-Cabinet-Repaint-35.jpg
    67.3 KB · Views: 297
  • 4796-Stanley-Cabinet-Repaint-34.jpg
    4796-Stanley-Cabinet-Repaint-34.jpg
    81.4 KB · Views: 300
Last edited:

drivesitfar

Well-known member
Joined
Oct 23, 2013
Messages
35,997
Location
Pacific Northwest
congrats on getting to this point. now the work begins figuring out where to put everything now that you have a ton more storage. best of luck with that!!

looks terrific from my chair too!!

VERY WELL DONE!!
 
OP
S

shopnut

Well-known member
Joined
Feb 22, 2006
Messages
4,237
Location
Florida
congrats on getting to this point. now the work begins figuring out where to put everything now that you have a ton more storage. best of luck with that!!

looks terrific from my chair too!!

VERY WELL DONE!!
Thanks. The fun is just beginning (filling the cabinets)!!
 
OP
S

shopnut

Well-known member
Joined
Feb 22, 2006
Messages
4,237
Location
Florida
TASK LIST UPDATE…

With a number of major things done, it’s that time again… Task List update time!! I really enjoy doing this because it gives me a chance to reflect on what was done and I also take some time to think about what’s left and where I’m headed.

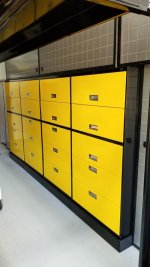
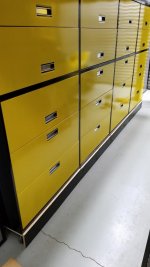
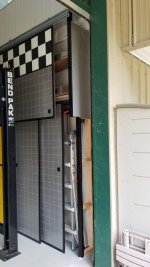
As always, the South Wall project took a little longer than expected, but the results meet my needs and satisfaction. I even repainted the Stanley cabinets over on the East and North walls as a bonus project since the yellow paint was flowin’.

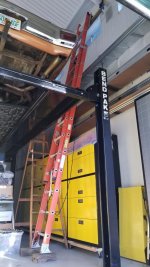
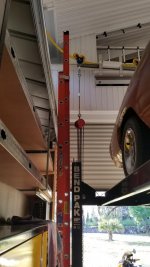
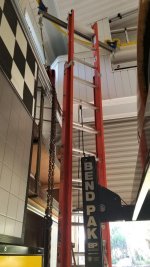
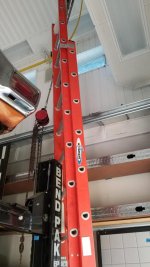
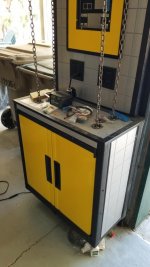
At the bottom of the South Wall list, you will see some of the tasks crossed off. All, but the power reel didn’t make sense to have located on this wall and will be integrated into the BendPak auto lift instead. This is to eliminate cords draping between the South Wall and the lift and making it an obstacle course walking through. Instead, there will be one “umbilical cord” running overhead to the lift to bring power and air to it. Once on the lift, power can be used for battery tenders, work lights, and receptacles. And I can have a couple quick disconnects for air if desired. I have moved these tasks to their respective group in this list.

I still need to finish that long stock storage cabinet by the tall roll-up door, but that is sort of a separate project all its own. And luckily, it works fine just as it is without a door.

It’s time to fill that South Wall storage!

Link to prior Task List (Reply#4252)
Link to next Task List (Reply#***)

ASYLUM Task List:

Crane
* Final leveling of crane beam

North Wall (Wall with 1 roll-up door)
* **DONE** Repaint STANLEY cabinet door faces yellow to eliminate tackiness (North Wall, 30 doors/drawers).
* Add checkered flag cover for roll-up door drum
* Install Battery Tender with matching 2-pin SAE cord reel (by man-door)

South Wall (Wall adjacent to apartment)
* **DONE** Design South Wall cabinet system
* **DONE** Search and buy 4 suitable lateral cabinets
* **DONE** Get lateral cabinets on casters
* **DONE** Clean and lubricate slides on lateral cabinets
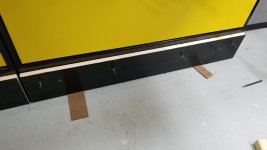
* **DONE** Build center shelf system
* **DONE** Final leveling of lateral cabinets (4X)
* **DONE** Build center sliding door set (left/right)
* **DONE** Incorporate checkered flag into center sliding door set (4X)
* **DONE** Build faux tin roof to match East Wall
* **DONE** Build left side sliding door cabinet (Door set)
* **DONE** Build right side sliding door cabinet (Door set)
* **DONE** Relocate 220VAC outlet hidden by cabinets (move higher)
* **DONE** Paint lateral cabinets black and yellow (4X, 5 door lids each).
* **DONE** Relocate auxiliary input speaker wiring hidden by storage bins
* **DONE** Build internal hangers/racks inside left side sliding door cabinet
* **DONE** Install power cord reel
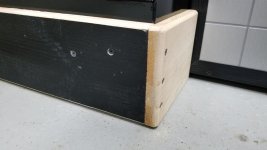
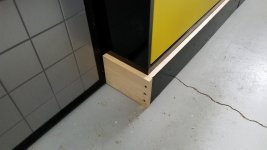
* **DONE** Build kick panel at foot of lateral cabinets
* **DONE** Build internal hangers/racks inside right side sliding door cabinet
* **DONE** Verify functioning of library ladder system past top sliding door track
* **DONE** Install pull handles on all sliding doors (8X)
* **DONE** Install kick panels on lateral cabinets (4X)
* **DONE** Add scuff plate to protect wall from step ladder
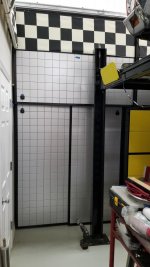
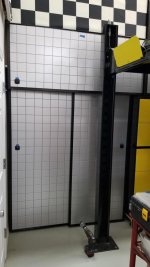
* **STARTED** Build long stock (12+ feet) vertical storage cabinet adjacent to roll-up door
* **STARTED** Fill lateral cabinets with supplies and shelving with tote bins
* **MOVED** Install air hose reel and fairlead (1X) Moved to auto lift
* **MOVED** Install Battery Tenders with matching 2-pin SAE cord reels (2X) Moved to auto lift
* **MOVED** Install work light reels and fairleads (1X or 2X) (???) Moved to auto lift
* **SKIP** Verify functioning of library ladder system past tin roof Roof is shorter than door track
* **SKIP** Build left side locker for tall items (ladders) (???) Only built single cabinet here
* **SKIP** Build right side locker for tall items (ladders) Only built single cabinet here

East Wall (Wall with main workbench)
* **DONE** Repaint STANLEY cabinet door faces yellow to eliminate tackiness (30 doors/drawers).

West Wall (Wall with 3 roll-up doors)
* **DONE** Repaint STANLEY cabinet door faces yellow to eliminate tackiness (Under Light Panel, 2 doors).
* **DONE** Repaint STANLEY cabinet door faces yellow to eliminate tackiness (Compressor Cabinet, 5 doors/drawers).
* Finish wall section in corner by man-door
* Add checkered flag cover for roll-up door drum
* Install Battery Tender with matching 2-pin SAE cord reel (between roll-up doors by other reels)

Library Ladder
* Paint ladder trolley
* Modify ladder to store in retracted position

Electrical
* **DONE** Replace T12 fluorescent fixtures in side bay (8 of 8 replaced)
* **DONE** Install dedicated outlet on porch for gas pump
* **DONE** Exchange 15A outlet on porch for 20A (for welder)
* Install switched lighting circuit for side lofts

Auto Lifts
* **STARTED** Build rolling bridge jack (3 ton)
* Install air hose reel and fairlead (1X)
* Install Battery Tenders (2X)
* Install work light reel
* Install rope-light loop for general undercarriage illumination
* Determine which new lift model suits my car renovation needs (MAX-JAX?)
* Determine where to buy it from
* Pickup and install lift

Man-Lift Upgrades
* Replace lift hose
* And rope ladder for emergencies

Exterior
* Rebuild water filter enclosure

Around the property
* Repaint pump house
* Repaint garden shed

MISC Project List:
* Install final large diameter air line loop around main bay (through side bay)
* Add air line drops for auto lift and hose reels
* Portable Air Tank – Convert spare 30gal compressor tank (with wheels) to function like one of those portable carry-around tanks.
* Add trim panels and door to drill press/bandsaw cart
* Chevelle – Replace fuel line tubing
* Chevelle – Replace transmission cooler line tubing
* Chevelle – Replace heater core
* Chevelle – Replace brake master cylinder
* Chevelle – Install Corvette valve covers
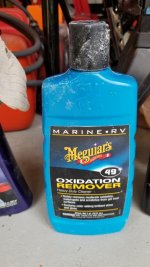
* Corvette – Fix clogged A/C expansion valve (again!)
* Corvette – Repack rear wheel bearings
* **STARTED** Sailboat – Clean up and sell
* Cargo Trailer - Repaint body white and frame black
 
Last edited:

shortykorte

Well-known member
Joined
Sep 1, 2014
Messages
8,034
Location
Tallahassee, Fl
Re: The ASYLUM - Turning a Crazy Vision into a Lakefront Gearhead Getaway: Year 6

I thought sailboat was ready. Some nice weather out.

Max Jax? What bay are you putting it in? I think if I already had a 4 post I’d go with one of the scissor style lifts over the MaxJax. I like my MaxJax but installation is more involved and not as easy to move around as expected. With the scissor lift, they also work as benches or a moto lift.


Sent from my iPhone using Garage Journal
 

Bob Heine

ALLIANCE MEMBER
Joined
Oct 24, 2009
Messages
10,703
Location
Boca Raton, Florida
* Portable Air Tank – Convert spare 30gal compressor tank (with wheels) to function like one of those portable carry-around tanks.
Mark, that portable air tank can serve two functions. 1) Use it as a portable air tank to air up tires and other quick jobs far from the compressor. 2) Use it as a buffer tank at a remote location on the property. I have a cheap hose reel on mine that I put a 50-foot 1/2" air hose on and used another 50-foot hose to connect to the 60-gallon compressor in the garage. The 30-gallon tank lets me use die grinders, air sanders and HVLP spray guns far from the main compressor and maintain decent volume and pressure with a short hose to the tools.
attachment.php


A diaphragm style pressure regulator at the tank lets me set the pressure from the remote tank. I have since replaced the heavy (and cracked) red air hose with a Flexzilla 100-foot 3/8" hose. It's a lot easier to un-spool and wind back up at the end of the day.
 

Attachments

  • Air Tank Regulator.jpg
    Air Tank Regulator.jpg
    107.4 KB · Views: 264
OP
S

shopnut

Well-known member
Joined
Feb 22, 2006
Messages
4,237
Location
Florida
Re: The ASYLUM - Turning a Crazy Vision into a Lakefront Gearhead Getaway: Year 6

I thought sailboat was ready. Some nice weather out.

Max Jax? What bay are you putting it in? I think if I already had a 4 post I’d go with one of the scissor style lifts over the MaxJax. I like my MaxJax but installation is more involved and not as easy to move around as expected. With the scissor lift, they also work as benches or a moto lift.


Sent from my iPhone using Garage Journal
The boat is not ready yet, but it's coming along nicely... almost has that new look again. Trailer and outboard are ready and all that's left is a bunch of polishing on the boat itself and a few odds and ends. I'm hoping to have it mostly finished up in April so I can get an ad listed in early May, which I'm hoping is a good time for selling, because it is certainly a good time for sailing. It's taking up quite a bit of my play time at the Asylum and it will be nice to have it gone. I'll post up some pictures soon.

I added the second auto lift to the Task List many years ago. I may actually retract the whole thought of a second lift if the BendPak bridge jack project pans out. If I do need something extra (and knowing you're not entirely satisfied with the MAX-JAX in some regards), maybe a scissors lift or something like a BendPak Quickjack setup would be a better choice. A moto lift certainly would be convenient with all the tinkering I do on them and maybe both Quickjacks side-by-side would make a satisfactory moto lift? Or maybe one with outriggers added? I think my needs will be better defined as I get working on the cars/bikes. The HD-9 with a bridge jack should be able to do most jobs to start with an the cars.
 
OP
S

shopnut

Well-known member
Joined
Feb 22, 2006
Messages
4,237
Location
Florida
Mark, that portable air tank can serve two functions. 1) Use it as a portable air tank to air up tires and other quick jobs far from the compressor. 2) Use it as a buffer tank at a remote location on the property. I have a cheap hose reel on mine that I put a 50-foot 1/2" air hose on and used another 50-foot hose to connect to the 60-gallon compressor in the garage. The 30-gallon tank lets me use die grinders, air sanders and HVLP spray guns far from the main compressor and maintain decent volume and pressure with a short hose to the tools.
attachment.php


A diaphragm style pressure regulator at the tank lets me set the pressure from the remote tank. I have since replaced the heavy (and cracked) red air hose with a Flexzilla 100-foot 3/8" hose. It's a lot easier to un-spool and wind back up at the end of the day.

That's a great idea Bob.
I agree casmurbax, that is a good idea for that extra tank Bob.

My dad just gave me a paint gun kit and the extra non-powered tank in a remote location would make for a feasible spray painting operation. I might even have enough hose to reach down to my garden shed for a needed repaint there. And I have a few spare regulators at my disposal.

I like that idea a lot for maintaining a constant pressure at the tool while in use. THANKS!
 
OP
S

shopnut

Well-known member
Joined
Feb 22, 2006
Messages
4,237
Location
Florida
IT WAS TIME TO EXERCISE THE BIKES…

With the South Wall storage wall done, it was time to give the bikes some much needed attention. And I had a great morning for a ride too. Unfortunately 1 of the 3 decided to sleep in. So it was on to the other two, the Yamaha Dynamic Duo. The RZ350 started right up with very few kicks, which was surprising considering it sat pretty long. The RZ500 took a little more coaxing and I finally had to add more gas to help prime the carbs. With a little more pressure head helping the fuel down into the 4 carbs with its convoluted piping system, she fired right up too.

attachment.php


The bike that wasn’t willing to go for a ride that day was the Suzuki DR650SE the only electric-start bike of the bunch. But it’s understandable because the last time I started it, I noted it cranked pretty slow despite the battery being on a charger. If it had a kickstarter, I’m sure it would have started too. I guess I can’t complain… that cheap $27 battery lasted 3.5 years, and that’s nearly the upper limit for me in Florida when it comes to these powersport batteries, even for the quality ones.

attachment.php


With another $27 battery installed, it lit instantly. I took it into town to grab a few groceries. All is well again!

attachment.php


attachment.php


GETTING THE SAILBOAT READY TO SELL…

I have continued to work on the boat restoration over the last year or so and I am n the downhill slope, finally.

attachment.php


The trailer has new brakes and new wheels/tires are purchased and waiting on me to get closer to the sale date. The engine purrs perfectly again. The boat itself is all that remains. I’m in the process of polishing up the hull and this oxidation remover is doing a decent job of getting rid of the rough fiberglass feel. Other things remaining are checking out the sails, fixing the mounts on the bimini top, and a final wax job. Then it is ready for a final photo shoot before listing it.

attachment.php
 

Attachments

  • 4797-RZ500-RZ350-Rides-03.jpg
    4797-RZ500-RZ350-Rides-03.jpg
    153.5 KB · Views: 240
  • 4798-DR650SE-Battery-Replacement-04.jpg
    4798-DR650SE-Battery-Replacement-04.jpg
    150 KB · Views: 231
  • 4799-DR650SE-Overall-01.jpg
    4799-DR650SE-Overall-01.jpg
    149.7 KB · Views: 231
  • 4800-DR650SE-Overall-03.jpg
    4800-DR650SE-Overall-03.jpg
    158.3 KB · Views: 232
  • 4801-Hunter-H240-Sailboat-162 (Hull Polish).jpg
    4801-Hunter-H240-Sailboat-162 (Hull Polish).jpg
    154.8 KB · Views: 235
  • 4802-Hunter-H240-Sailboat-163 (Hull Polish).jpg
    4802-Hunter-H240-Sailboat-163 (Hull Polish).jpg
    72.2 KB · Views: 233
Last edited:
OP
S

shopnut

Well-known member
Joined
Feb 22, 2006
Messages
4,237
Location
Florida
REPAIRING A WINDSHIELD CHIP…

It was pure coincidence the other day… I turned on the TV to watch it for a couple minutes as I was eating a snack and I flipped to one of my car restoration shows. It was the part of the episode where they show off various products and this time they were showcasing a windshield chip repair kit. I was intrigued because it just so happens I have pea-sized blemish in my windshield right in my normal view forward that has been bugging me for a couple years now. I was getting ready to run out for some other supplies and decided to swing by the auto parts store to grab the repair kit too.

Most insurance policies cover windshield replacement (as does mine), but I didn’t want to go through the hassle of a claim and then a repair visit. For $15, I thought I could try this out myself.

I was specifically looking for the Loctite brand they showed on TV, but settled on this Permatex kit when the stores didn’t have the other. There are plenty of youtube vids that will explain the process and that is not my intention here... just reporting on my experience with it.

attachment.php


The chip is between the blue tape tips. There was a pretty nasty divot in the surface where the stone hit and then about a 3/8’ distorted area underneath it.

attachment.php


Here’s another view looking straight at it with the applicator adhesive pad stuck on.

attachment.php


The process is pretty simple, but takes about an hour. Prep and the 10 minutes of vacuum, 20 minutes of pressure, and 15 minutes of cure time in UV sunlight. This is the vacuum stage.

attachment.php


One word of caution with using this kit… When you pull the applicator piece off the windshield, be ready for excess resin to run out/down. I was expecting it to semi-solid at this point, but it is still completely in liquid form and whatever is up in that applicator pipe will run out. Tip… don’t put too much resin down in the applicator pipe in the first place, save it for repairing more chips elsewhere (see my comments below).

I got done with the main chip and decided to use the last drips in the resin tube to seal off another 8 small chips. None of these had cracks, they were just small divots in the surface. It was just a simple matter of applying a small drop, followed by pushing on this small square of clear plastic sheet to push the resin into the divot flush with the windshield surface. I cut the supplied clear sheet into 4 smaller squares so I could do 4 chip repairs at a time with the 15 minute cure time in between. A chip is between each pair of tape pieces. Its odd that the chips seem to be converging on my viewing area... perhaps those stones are aiming at me??? LOL

attachment.php


So here are the results with the big chip (look for the middle of the seat back). The divot is gone as well as the pea-sized blemish, and these were the most annoying thing before while driving. What remains is a crack, which I didn’t even realize was there in the first place. For longevity of the windshield, I wish the crack had been filled in too to keep it from propagating into a larger one, but oh well.

attachment.php


It still think it was worth the effort because the windshield blemish is small enough now that is not a magnet for my eyes. And the other 8 chip spots are virtually invisible now. It was well worth the cost and effort (as small as either were) in my opinion.

attachment.php


So now I’m thinking is might be time to fix the chip in the Chevelle windshield that has been there since I bought it used in 1982!!
 

Attachments

  • 4808-Avalanche-Windshield-Repair-12.jpg
    4808-Avalanche-Windshield-Repair-12.jpg
    80.9 KB · Views: 207
  • 4807-Avalanche-Windshield-Repair-08.jpg
    4807-Avalanche-Windshield-Repair-08.jpg
    142.5 KB · Views: 206
  • 4806-Avalanche-Windshield-Repair-05.jpg
    4806-Avalanche-Windshield-Repair-05.jpg
    54.5 KB · Views: 208
  • 4805-Avalanche-Windshield-Repair-02.jpg
    4805-Avalanche-Windshield-Repair-02.jpg
    111.5 KB · Views: 210
  • 4804-Avalanche-Windshield-Repair-01.jpg
    4804-Avalanche-Windshield-Repair-01.jpg
    72.8 KB · Views: 209
  • 4803-Avalanche-Windshield-Repair-14.jpg
    4803-Avalanche-Windshield-Repair-14.jpg
    65.5 KB · Views: 207
  • 4809-Avalanche-Windshield-Repair-13.jpg
    4809-Avalanche-Windshield-Repair-13.jpg
    45.7 KB · Views: 209
Last edited:

shortykorte

Well-known member
Joined
Sep 1, 2014
Messages
8,034
Location
Tallahassee, Fl
Definitely a huge improvement. Thanks for the review. Mike Zmotorsport recommended a kit. I’ll have to do the same to my windshield.


Sent from my iPhone using Garage Journal
 
OP
S

shopnut

Well-known member
Joined
Feb 22, 2006
Messages
4,237
Location
Florida
Definitely a huge improvement. Thanks for the review. Mike Zmotorsport recommended a kit. I’ll have to do the same to my windshield.


Sent from my iPhone using Garage Journal

You're welcome. I didn't have perfect results, but I will definitely do it again when needed.

It makes me wonder if a longer vacuum time or pressure time (or maybe both) is the key to having the resin reach into the entire crack. I had an excess of resin and after the vac/press steps, it was still runny enough to flow anywhere, so premature curing wasn't it. Sadly, this big crack is probably sealed off now where a second attempt would be futile. I suppose the crack could be on the other side of the lamination layer where the resin couldn't get to it... then doing it on the inside would fix it. But the applicator is not really set up to do that.
 
OP
S

shopnut

Well-known member
Joined
Feb 22, 2006
Messages
4,237
Location
Florida
Re: The ASYLUM - Turning a Crazy Vision into a Lakefront Gearhead Getaway: Year 6

I know exactly how you feel, if there is anything in my field of vision I have to pull over and clean it off. I have wondered how those repair kits would work. Looks like it is worth it.

Sent from my SM-A102U using The Garage Journal mobile app
Yep, worth it. Maybe not perfect, but certainly a whole lot better for $15 and an hour of time. Pick a sunny day if you want it to cure quickly.
 

drivesitfar

Well-known member
Joined
Oct 23, 2013
Messages
35,997
Location
Pacific Northwest
I got PRETTY TIRED just looking at your TO DO LIST. WOW!! I guess if you post it maybe we'll help you help yourself?

in any case you've done a fantastic job with the Asylum!!

I always wondered if I could repair a rock chip myself. thanks for showing that and i may have to try it the next time I get one. the guys at Novus only take about 10-15 minutes so I wonder what they do different than you did? or maybe with practice you can cut your hour's time down quite a bit?

nice work and i'm sure it will not only save you and your insurance company some money you won't have to schedule and make time to go to a shop.

have a great day!!
 
OP
S

shopnut

Well-known member
Joined
Feb 22, 2006
Messages
4,237
Location
Florida
I got PRETTY TIRED just looking at your TO DO LIST. WOW!! I guess if you post it maybe we'll help you help yourself?

in any case you've done a fantastic job with the Asylum!!

I always wondered if I could repair a rock chip myself. thanks for showing that and i may have to try it the next time I get one. the guys at Novus only take about 10-15 minutes so I wonder what they do different than you did? or maybe with practice you can cut your hour's time down quite a bit?

nice work and I'm sure it will not only save you and your insurance company some money you won't have to schedule and make time to go to a shop.

have a great day!!
Yeah, think how tired I am doing all the work! LOL Just kidding though, I love any time spent in the Asylum... work or play.

Go ahead and give a windshield repair a try when the time comes. There's really no risk because any extra resin that gets slopped around on the windshield comes right off. I'm guessing the professionals use higher vacuum and pressure to speed up those steps, and maybe a faster curing resin too. Or maybe it's an entirely different process?

Thanks for the visit and kind words.
 
To avoid these ads, REGISTER NOW!
Top Bottom