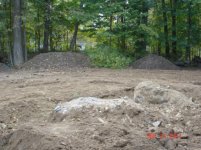
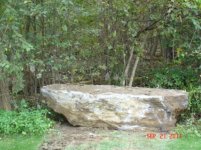
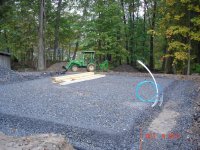
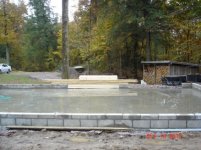
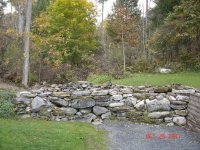
The garage build site was was started in november 2010 with one big problem, a large boulder on the mound which needed to be removed where the garage is to go. Here are some pictures.

You are using an out of date browser. It may not display this or other websites correctly.
You should upgrade or use an alternative browser.
You should upgrade or use an alternative browser.
30 x 40 Garage build
- Thread starter ktm010
- Start date


After stumps and rock removel, mound needed to be leveled, tried compact tractor which started out good till we hit some hardy rocks, not that I was surprized not to much dirt around here. I had to get some larger equipment which still had trouble.
Attachments


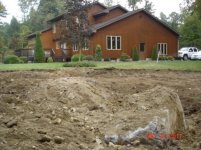


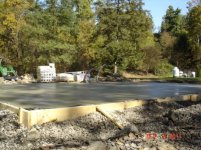
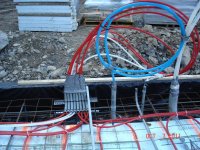
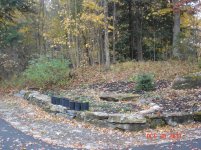
Time for forms and 3" XPS foam on inside of forms, 6 mill plastic, drain tile for perimeter, some rebar, mesh, 2" XPS foam for floor. Also pex tubing for heat layed in.
Attachments


Nighttrain
Well-known member
Those were some big rocks. Great job on getting that foundation down. Keep us posted on the build.
Zengineer
Well-known member
You could write a hole thread on just how to deal with car sized boulders... light a fire under it!


Omphaloskeptic
Well-known member
Wow, that's some pretty (rocky) country you live in! What part of the country is your rock quarry located? I don't think you have to worry about your foundation sinking into the earth. lol


Zengineer
Well-known member
Any more info? How high are your walls (looks like 10')? The proportions don't look 30x40, is it just the camera playing tricks or did you change the dimensions slightly?
Looks awesome either way!!
Looks awesome either way!!
Nighttrain
Well-known member
That's going up quick. I really like the look of the layout so far.
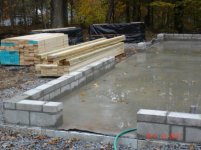
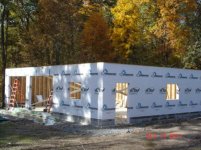
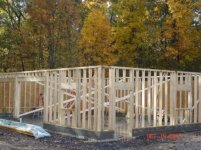
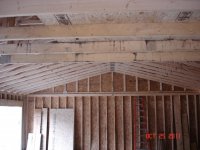
Size is 30 x 40, 10' walls, scissor trusses over the overhead doors giving a 13'6" center height, attic trusses over remainder shop area. I had no fancy plans drawn up, just ideas from this site. I'll have lots of questions and will be looking for idea's from those who have followed so far. I hope to get the roof shingled and move to the inside.
Old Gas Nut
Active member
- Joined
- Jun 13, 2010
- Messages
- 37
That's looking nice. That had to be frustrating getting rid of the rocks. Makes me appreciate my rock free yard. What size are your garage doors? Looks like it's going to be a nice size building to work in. Keep the pics coming.
jlckmj
Well-known member
After reading this thread and seeing what you had to do to get rid of those rocks, I will quit complaining about having to remove 18-24 inches of nice black top soil and replacing it with $2,000 in stone in order to get my pad poured on solid ground.
Good job, it is starting to look great!
Jim
Good job, it is starting to look great!
Jim
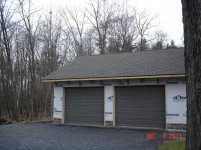
Garage door size is 10 x 8, the rock I was trying to dismantle in the opening thread was one of many, happend to be the largest from digging for the house foundation 22 years ago. I also used over 3 tri-axle loads of crushed stone to fill in the over dug holes, and bring areas back up to grade, plus back filling for good drainage
Last edited:
00si2
Active member
The garage build site was was started in november 2010 with one big problem, a large boulder on the mound which needed to be removed where the garage is to go. Here are some pictures.
I had a rock problem before my build also. The largest being 32' x 16' and about 6' thick right where i wanted to build. I used what are called feathers and wedges and broke it down into more managable sizes.


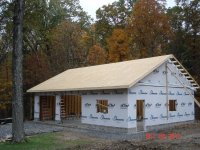
Garage update, roof finally on. Looking for advise on loft, should I box it in and use pull down stairs or leave it open and access from the garage from a ladder. Closed off easier to insulate, storage would be clean, save on flimsy stair cost. Open, easier to put things up thru large opening, things will get dirty or dusty depending on what goes on below.
Closed off easier to insulate, storage would be clean, save on flimsy stair cost. Open, easier to put things up thru large opening, things will get dirty or dusty depending on what goes on below.Attachments


I vote you put sliding barn doors on the attic with a barn door track built into the peak of the building so you can hoist stuff up there. Then build a ladder into the wall on the far side so you can climb up into the loft. Kinda like alot of barns are.
dave67fd
Well-known member
ktm010,
Shop is looking great. I know the hassle with the rocks coming from the "Granite state".
What are your ideas for Heat? Will your elec. sevice come from the house or seperate. Sorry if i missed if you already mentioned it.
Dave
Shop is looking great. I know the hassle with the rocks coming from the "Granite state".
What are your ideas for Heat? Will your elec. sevice come from the house or seperate. Sorry if i missed if you already mentioned it.
Dave
Has anyone used metal soffit and facia vs aluminium. I priced the aluminium and I have to purchase full cartons due to the color I want, so I will be stuck with lot's of extra. I thought of pricing metal, I will have metal siding on the walls with some cedar and cultured stone on the front to go with the house. I'am sure working with metal will be tougher, if I can save some money I'll have no choice.
Omphaloskeptic
Well-known member
In regard to your loft access - I don't know if anyone on GJ has done this, but if you sprung for the lift, wouldn't it be cool for it to also be the 'elevator' for loading/unloading the loft via an inside hayloft sliding door?

schwalby
Well-known member
I vote you put sliding barn doors on the attic with a barn door track built into the peak of the building so you can hoist stuff up there. Then build a ladder into the wall on the far side so you can climb up into the loft. Kinda like alot of barns are.
I like this idea. I was going to say something similar just with pull down stairs instead of a ladder but I guess it depends on how oftern you will be going up there.
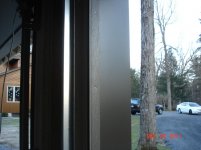
Applied some 29 guage metal to overhead door frames and applied the weather strip, also wrapped the frame on the entry door. Now at least weather tight for the winter. ")
Attachments


erlomd
Member
looking good!
Darkboones
Active member
I am still in my planing stages and would like to have kind of the same set up as you have here with tall ceiling but also a loft. Can't wait to see more!
tkbowman
Well-known member
When I built my garage, I installed a large eye bolt in the ridge to serve as a pulling point plus the ridge was re-inforced for use in pulling actions.
I would vote for leaving the loft open for storage (especially large, bulky and light items). A fitted tarp or banner could be used to close off the opening to reduce the dust transfer.
I would vote for leaving the loft open for storage (especially large, bulky and light items). A fitted tarp or banner could be used to close off the opening to reduce the dust transfer.
bileshake
Active member
I'm currently building the same size shop as we're building our house. Complete with 10' doors on the side, scissor trusses on one bay 40' x 30'.
texasranger
Well-known member
What is the load rating of the loft area? Would be awesome to store sleds up there in the summer and jet skis in the winter.
I really like your layout, my dad has a 30x40 pole building but the doors are on the short side which is great pulling in his RV but I think doors on the long side like yours would be better the other 95% of the time.
I really like your layout, my dad has a 30x40 pole building but the doors are on the short side which is great pulling in his RV but I think doors on the long side like yours would be better the other 95% of the time.