To avoid these ads, REGISTER NOW!

Bendpak 4 post Transportation, Install and Use

Dolfan

Well-known member
Joined
May 21, 2010
Messages
465
Location
Greater Atlanta
Well as some of you maybe have remembered from my previous thread on my lifts, I'm documenting the entire process of my Bendpak 4 post lift, similar to the thread on the MaxJax form last year.

http://garagejournal.com/forum/showthread.php?t=75488

OK, so onto the 4 post. I needed to install a 4 post mainly as my addition for toys had me running out of room. being able to work on the car with the 4 post was a second consideration since I have the MaxJax for most jobs.

Selection

I went with Bendpak after looking at mainly the Dannmar and Pro-Park, I like the design of the top plates on the BendPak as it doesn't cantilever over the post, and the air lock system seemed very safe to me. Since I had dealt with Garage Equipment Supply I went through them again and the customer support has been really good.

Upon order I ordered the HD-9ST as I did most of the measuring and felt it was the right lift. But in talking through the order they found out about putting corvettes on the lift and advised me to look again at the drive through width and I'm glad they did so I changed the order to a HD-9 which is a bit wider.

Selection considerations
  • Measure the width of the cars your going to be storing most often and choose accordingly.
  • Air source needed or not?
  • Electrical service available?

Delivery

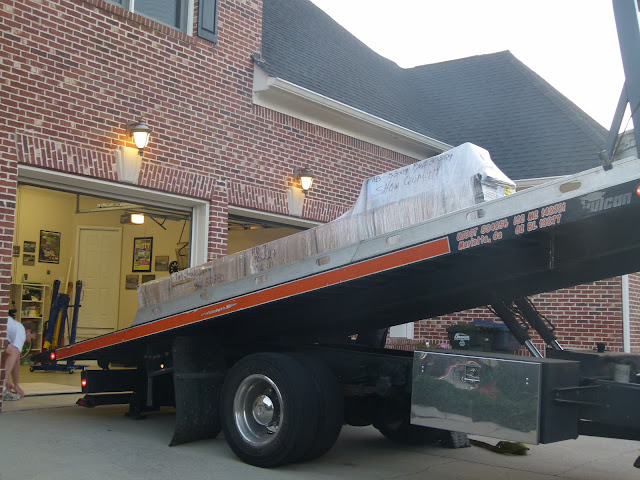
I went with the flatbed decision on the delivery instead of renting a trailer, Great decision! My driver was great personable but mad skills putting the truck into a very tight spot. We got the lift to move OK, but then I figured it was going to damage my recent floor coating. So using a few 3/4" black pipe from a pipe clamp I made a moving platform, this allowed the lift to slide much easier and only light scuff the floor. Also on a flat bed the rig need enough height to be able to angle the bed to get the lift to begin to slide so it can't be backed in too far.

Delivery on the flatbed, the truck was "slammed" into place here!
P1080134.JPG


Rolling on my moving platform
P1080152.JPG


In place, Looking back I wish I had put it in another bay
P1080169.JPG


Delivery considerations
  • If using a flat bed truck you don't need a big on, just enough to load the 15' package, this give better potential access in tight spots
  • Where to unload, I wouldn't unload into the garage bay I plan to assemble

Unpacking

Wow, these things are packed!!!!! I would recommend getting the lift delivered at least a day before you want to begin work so you can take the time to unpack the pieces before you are trying to assemble. I wanted to make sure the guys helping me were just there for the "big" work so I wanted all the pieces unloaded and ready to go. So I spent a couple hours in the evening after work unpacking everything. This included two trip to the recycle center down the road with tons of cardboard!

The lift is well packaged!
P1080175.JPG


Heavy pieces so you need a hoist or several people
P1080192.JPG


Of course even for the unpacking job your are going to need what ever tools/people you are planning to use for the heavy items. I really can't imagine doing this without a engine hoist. I borrowed one from a race buddy that I didn't' need to return immediately. It made the job so much easier. Another thing I used a bunch of was wood blocks to sit pieces on, since the pieces are heavy and you are likely to want to get a hoist under them, have a bunch of small 2x4 or 4x4 blocks to set the runways and cross pieces onto so you can get under them with your hoist. The posts themselves are fairly manageable by hand if your fairly healthy, if you have a bad back maybe get some help. Of course you should take inventory of the parts to make sure you're not missing anything before you jump in.
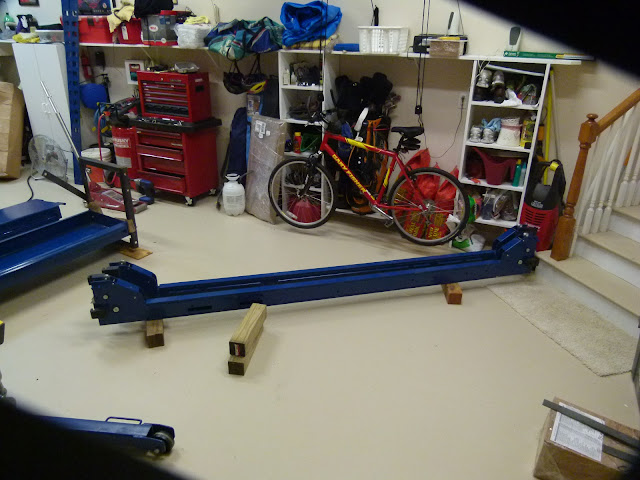
P1080205.JPG


P1080209.JPG


All unpacked
P1080212.JPG


Unpacking considerations
  • Be prepared for a bunch of cardboard to recycle
  • Get unpacked before the day of assembly if you can
 
To avoid these ads, REGISTER NOW!
OP
D

Dolfan

Well-known member
Joined
May 21, 2010
Messages
465
Location
Greater Atlanta
Installation

The most important thing I learned in doing this lift is that it is really very simple to assemble! I would have never guessed that before doing it. If you have put off getting a lift like this due to the complexity I can tell you it is very straight forward, I was surprised about how simple the product really is. That being said, remember the parts are big and heavy, so the strategy to lift and move parts into place is more important.

I wanted to do some prep to the posts so I adhered some gasket material to the bottom of the posts. I did this to help keep the lift from sliding when a car hits the ramps some people have had issues with that when the lift is not anchored. This was a quick $12 job.

Gaskets go onto the posts
IMG_0277.jpg


IMG_0281.jpg


IMG_0282.jpg


With you position mapped out in the space the first thing to do is assemble the front and back sets of post with the cross pieces. Make sure you remember that the one post with the brackets for the power unit can only go into two positions. My manual said to lift the cross piece onto the post, but me and my crew said that seemed crazy and we laid the cross piece on two jacking ramps with the ends clear and just slide the posts onto the runner, and stood the entire assembly up. Pretty simple, no nuts, bolts, or clips, just slides into place.

Assembly of post and cross piece
P1100138.JPG


Double check our distances
P1100139.JPG


Next the lock ladder pieces drop into place, pretty easy. We got a little wrapped around the axle hear double checking that they were in the right place based on some language in the manual. For the most part they go right into the slot in the plastic runner pieces and drop into place. Just run the bolts down on the threaded end and pull off the top nut.


P1100147.JPG


Now the top plates go on, pretty simple. The small 10mm bolts are pretty long so pull out the power or air tools if you have them instead of doing this by hand. We installed the top nuts to all the lock ladders and threaded them on to the same level we figured this would get everything about even, and it did. With that all in place you can lift the cross piece and the locking mechanism will engage. We lifted them just to engage and then double checked according to the images in the manual that things appeared to be done correctly.

P1100153.JPG


P1100157.JPG


P1100167.JPG


Now the fun stuff, time to put on one of the big runways, the one with the hydraulic ram goes on first. Our manual noted several steps to install the ram, but it was already done so we could just load it up! This is where the lifting comes in and navigating the piece into place, just take you time and get it lined up as best you can. The fit of the runway pieces is tight and you might encounter some issue with the piece sitting flush onto the cross pieces due to welds. We tried several things to line up the holes, including a little hammering but the best was to use a 3/8" socket extension in the holes as a pry bar to move the pieces and then my secret weapon, a bar clamp! The bar clamp was the way to go, it pulled the pieces together so we could get the bolts to lineup. Then we went onto the other side, pretty much the same drill. There are two positions on this model and I went with the outer most position.


P1100182.JPG


P1100198.JPG


P1100204.JPG


P1100209.JPG


P1100215.JPG


P1100240.JPG


P1100265.JPG


With the basic structure assembled it is not on to cables and components. The cables are all prebuilt and each is labeled to be in a specific location, this takes all the guess work out of assembly. One other thing before getting the lift I was wondering about was how would I be "securing" the cable ends? These cables are all pre made and have industrial type fittings on the end so you do nothing more than run the cable and secure with a hex nut, no cable splicing, no cable clamps to make you wonder if you have done thing properly when you park a car under it! The pulleys are easy to install, but it is best to have all the cable run first then push the pulley into place and then push through the axle piece as space is limited. We ran the cables and followed instruction to thread the the nut on at least an inch, we preset these about equal on all 4 but you will have to go back and adjust.


P1100273.JPG


P1100279.JPG


P1100287.JPG


Mounted the power unit, one thing hear is make sure you get the vibration pad on the bracket and also have the bracket for the plastic tube to install at that time. All the fittings are easy at this point, both hydraulic and return air lines. Just pay attention to the direction the lines need to run and point the fitting that direction. Also pay attention to where the cables are and where the brackets are to run the lines on the underside of the runways, they are there for a reason.

IMG_0291.jpg


P1100291.JPG


IMG_0300.jpg


P1100293.JPG


The air lines for the air lock system is super easy, just make clean straight cuts and the fitting just push together and hold nicely. I would try to fit these carefully and not leave a bunch of slack, I didn't want them to be flopping around and get caught on something.

P1100298.JPG


P1100301.JPG


P1100299.JPG


P1100304.JPG


P1100305.JPG


P1100309.JPG


At this point I filled up the reservoir with fluid and was ready to give it that first lift! After the slack was pulled from the cables up it goes. I just allowed the lift to go through some cycles of up and down to settle the cables in places, just understand with no weight the lift goes down slowly, it will go down faster with the car on it. Now I turned my attention to adjustments, as the lift is raised you can listen to the lock clicking over the safety stop positions, and if your adjustments on each post are way off you can hear the difference in timing as it goes up, some posts are rising early than others. Also you might think it is above a setting and then allow the lift to lower, only to find that it only catches 3 of the 4 post, this is just an adjustment of the cable for that cable.

Noting the relative positions of the different sides to the locking ladders
P1100314.JPG


P1100315.JPG


P1100317.JPG


I would raise the lift to an arbitrary position and us one post as a reference, I noted the height below the closest lock position, then compared that to the others, if it was lower I would tighten the cable, if it was higher I loosened that cable. I did this a few times while going up and down with the lift empty. After 2-3 time sarong you can hear the clicks are now more simultaneously and the lift won't "miss" on one post.

Making those cable adjustments
104_0002.JPG
 
Last edited:
OP
D

Dolfan

Well-known member
Joined
May 21, 2010
Messages
465
Location
Greater Atlanta
So now just put on the stops and ramps and check it all out a final time.

P1100320.JPG


P1100325.JPG


In my case a vette was not used as a guinea pig, but the wife's VW :)

P1100340.JPG


But no issue, first lift up it goes. Don't be alarmed if the post move a bit if they are not bolted this is normal. Of course be careful to note the ceiling height and always remember you need a few inches above any stop to get the lift up and then lower it. So don't think you can put the lift and it's load up right against your upper limit.

So here are a few looks at the finished lift.

P1100334.JPG


P1100341.JPG


P1100394.JPG


Installation considerations
  • It's easier than you might think
  • Make sure you have lifting equipment and help lined up
  • A pipe clamp can be a great help in getting pieces lined up


More updates soon!
 

climbabout

Well-known member
Joined
Oct 10, 2011
Messages
58
Excellent, timely thread - I am currently awaiting delivery on my 2 HD9st lifts and I plan to install myself.
Tim
 

revlover

Well-known member
Joined
Mar 27, 2008
Messages
264
Really?............

I think you just single handedly raised the benchmark of thread quality and detail.

I thought that garage looked familiar.

Kudo's:beer:
 

Cryptic1911

Well-known member
Joined
May 24, 2008
Messages
2,884
Location
Willimantic, CT
Yeah it's quite simple to assemble these.. it just seems daunting, but really its 8 major heavy pieces, a few pullies, some cables, and the misc little stuff. If you can change your oil and rotate tires, you can assemble a lift
 

funymuny

New member
Joined
Oct 21, 2011
Messages
1
Excellent article, post. But don't encourage him...he really has a sickness. Mark
 

holdover

Well-known member
Joined
Feb 15, 2011
Messages
750
Location
VA
Great documentation of the installation, I'm sure this will be an aid to those considering a Bend Pac or any other lift. I have two, a HD9 and a 14. I installed the HD9 by myself in about 6 hours with the aid of a tractor with front end loader and forks, three years later did the 14 in about 3 hours with just floor jacks, engine hoist, jackstands and 6X6 blocks, knowing how they went together. The HD9 is movable, the 14 is bolted down because it has an adjustable ramp. Every part on the lifts can be handled by hand, except the ramps, cross pieces a bit heavy, but doable, bunch of friends would be a great help. Once you get one you'll wonder how you worked without one.. and with the ecomomy the way it is you can get some great deals..
 

ket-tek

Well-known member
Joined
Jan 28, 2009
Messages
1,289
Congrats, your gonna love it. I've had no regrets on mine.


The OP mentions his floor got scuffed/scratched even with cardboard under it. These HD-9's are heavy and the shipping brackets will still scratch your floor with cardboard or moving blankets under it.

One tip for others on the delivery. I had the lifts delivered on a rollback and slid into the bay just like the pics above. As it was coming off the rollback I put 4 wheel dollies under the brackets. No scratches on the floor, and once it was off the truck I could easily roll the entire package around in the garage where I wanted them.
 
OP
D

Dolfan

Well-known member
Joined
May 21, 2010
Messages
465
Location
Greater Atlanta
Congrats, your gonna love it. I've had no regrets on mine.


The OP mentions his floor got scuffed/scratched even with cardboard under it. These HD-9's are heavy and the shipping brackets will still scratch your floor with cardboard or moving blankets under it.

One tip for others on the delivery. I had the lifts delivered on a rollback and slid into the bay just like the pics above. As it was coming off the rollback I put 4 wheel dollies under the brackets. No scratches on the floor, and once it was off the truck I could easily roll the entire package around in the garage where I wanted them.


Totally agree. I also considered getting a couple dollies and if time were not a factor I would have gone that route. I would advise anyone to pick up a couple before they take delivery.

My "hail-mary" rolling platform seen below did a good job. Three pipes and a 1/2" plywood piece.
P1080152.JPG


Honestly I think the rolling engine hoist marked up the floor almost as much as anything.
 
Last edited:
OP
D

Dolfan

Well-known member
Joined
May 21, 2010
Messages
465
Location
Greater Atlanta
Project 1

It was just one of those time where the planets align and every dang car we own is due for an oil change!!!!

Well this was the first real use of the 4 post, in the past I lift the cars on the MaxJax which is great but you do need to get the car centered properly and set the jacking pucks and what not to lift the car.

With the 4 post it went really well, just drive on a car, lift, and start working. I did the C4, shown below, then the C5, then my Dakota truck. This was much faster doing things this way. I did feel a bit like a Jiffy Lube though yesterday!


P1100341.JPG


This will really come in handy when I do the full fluid swap on the cars for racing and I can move from front to back, drain oil, then transmission, then differential, all with just driving the car onto the runways and hitting the button! Hydraulics are your friend! :beer:
 

gsport

Well-known member
Joined
Mar 1, 2008
Messages
2,176
Location
Salem Oregon
great write-up Dolfan... i've got a Dannmar lift and can't imagine not having a lift now.
nice lookin vettes you've got there. last year we did a western state national park tour with 7 vettes and before the run they all came over for oil changes on my lift...
 

Toomanytools?

Well-known member
Joined
Nov 4, 2010
Messages
855
Location
Washington
DolFan: Great post, so if I understand right you didn't bolt the posts down? I'm thinking as long as you don't drive up too fast it won't move. You know you can put in a female threaded anchor so if you ever want to move it all that is left is a flush hole which could be plugged.
Thanks Jeff
 
OP
D

Dolfan

Well-known member
Joined
May 21, 2010
Messages
465
Location
Greater Atlanta
DolFan: Great post, so if I understand right you didn't bolt the posts down? I'm thinking as long as you don't drive up too fast it won't move. You know you can put in a female threaded anchor so if you ever want to move it all that is left is a flush hole which could be plugged.
Thanks Jeff

Currently the lift is not bolted down but once I am certain that the position is good I think I will. If you noticed I did put some gasket material on the bottom of the posts to try to allow them to grip and not slide, so far I have not had it slide.

Like you said, I think I will go with some type of sleeve like threaded anchor so that I can un-bolt the lift if needed. I also will likely only put a couple bolts in place not all 12. I figure maybe a couple per post will add a ton of security and rigidness to the assembly.
 

jdub63

Well-known member
Joined
Jan 28, 2008
Messages
232
Location
Azle, Texas
Based on this picture, is there a specific reason why the runways are not centered or the left runway is not all the way to the left?


P1100334.JPG


Great write up.... thanks,

jdub
 
OP
D

Dolfan

Well-known member
Joined
May 21, 2010
Messages
465
Location
Greater Atlanta
Based on this picture, is there a specific reason why the runways are not centered or the left runway is not all the way to the left?


P1100334.JPG


Great write up.... thanks,

jdub

Jdub, yes there is a reason. This model allows the runways to be configured at two different widths depending on what you will be parking on them. Corvettes are surprisingly wide cars and so I set up the lift with the right side runway on the outer position.

Later, like 2-3 days later I actually moved it back to the narrow setting and that leaves me about 2-3" of play to put my C5 corvette on the lift. The cool thing about repositioning the runway is you just need to remove the 4 bolts and move the runway and bolt it back in. It doesn't affect the pulleys and cables.
 

jdub63

Well-known member
Joined
Jan 28, 2008
Messages
232
Location
Azle, Texas
Dolfan, Just to clarify, in your picture the runways are configured to their widest setting and you moved the right runway inward for the narrow setting. So in the narrow setting the runways are both equal distances from the columns? And, in your configuration (with the control and pump) the left runway is not adjustable?
 
To avoid these ads, REGISTER NOW!
OP
D

Dolfan

Well-known member
Joined
May 21, 2010
Messages
465
Location
Greater Atlanta
Dolfan, Just to clarify, in your picture the runways are configured to their widest setting and you moved the right runway inward for the narrow setting. So in the narrow setting the runways are both equal distances from the columns? And, in your configuration (with the control and pump) the left runway is not adjustable?

You got it! This picture was taken before I moved it back to the narrow settings.
 

lotus_guy01

Well-known member
Joined
Oct 24, 2009
Messages
129
Location
Massachusetts
Very nice write up. I could have really used it a couple of months ago when I installed mine! I purchased a used HD-9ST from a private owner. Went with a friend to take it down from the seller's garage and then installed it by myself in my garage. I love it; although, I would also go with the wider HD-9 as well if I was buying it new now. My 928 is a tight fit, and my Esprit may be too tight.

esprits4s-albums-maserati-picture12055-dsc00611.jpg


-Gary
 
Last edited:

danieldolin

Well-known member
Joined
Oct 19, 2011
Messages
189
Location
Cleveland OH
Very nice write up. I could have really used it a couple of months ago when I installed mine! I purchased a used HD-9ST from a private owner. Went with a friend to take it down from the seller's garage and then installed it by myself in my garage. I love it; although, I would also go with the wider HD-9 as well if I was buying it new now. My 928 is a tight fit, and my Esprit may be too tight.

esprits4s-albums-maserati-picture12055-dsc00611.jpg


-Gary

Gary - I am looking to get an HD9-ST next spring. In the picture is yours on the top lock or the 2nd from the top? There is a lot more room under than I would have thought, even given the height (or shortness) of your Maserati... BTW - nice looking 928. I will be using mine to store my 987 Boxster S.
 
OP
D

Dolfan

Well-known member
Joined
May 21, 2010
Messages
465
Location
Greater Atlanta
Bridge Jack

In addition to the 4 post lift itself I also have the RJ-45 rolling bridge jack. The idea of not being able to do suspension and brake work on the lift limits the use for me since I do a fair amount of work like that. This should really make the task of getting the car up of the lift easy, but then use the lift to raise the work level. Needless to say I won't be working on a vette in the up position while the other one sits underneath!!!! Dropped wrenches would be a bit costly!

Good to have the engine hoist to help with the placement into the lift. With the runways in the narrow position the jack drops right in without extending its reach.
P1100350.JPG


P1100358.JPG


P1100362.JPG


In place and added the drip trays, how dare I insinuate that the vette could have a leak! :wtf:
P1100367.JPG


I was concerned about the height of this jack but all looks good, you can see that even with my C4 corvette the rolling jack will move under the car.
P1100415.JPG


The C5 vette is lowered and that might be a bit close, at least the plastic air dam piece may get moved as I pul the jack through.

I don't have any shots of the jack in use yet as it has not made it's maiden voyage. For now I think I'll just run a airline to the jack as needed, but I can see the idea of the air line kit that Bendpak offers as an upgrade would be a nice clean installation. I may have to consider that as an upgrade in the future.

More To Come....
 

lotus_guy01

Well-known member
Joined
Oct 24, 2009
Messages
129
Location
Massachusetts
Gary - I am looking to get an HD9-ST next spring. In the picture is yours on the top lock or the 2nd from the top? There is a lot more room under than I would have thought, even given the height (or shortness) of your Maserati... BTW - nice looking 928. I will be using mine to store my 987 Boxster S.

I'm pretty sure it was 2nd from the top. Hard to check now as the lift is ******* with a half disassembled car.

-Gary
 

Steves32

Well-known member
Joined
Feb 12, 2011
Messages
845
Did you special request yellow accents or is that they way the come now?

Mine came w/ yellow ramps & stops.
I've bought drop-n anchors for mine (don't want to use the included wedge anchors) but haven't got around to installing them yet.


397351558.jpg


I have the rolling jack as well- modified by BendPak to sit lower. I just put it on a furniture dolley, raised lift up & rolled it underneath. Dropped lift, rotated the jack 90 degrees, raised lift back up & voila- done.
 
Last edited:
OP
D

Dolfan

Well-known member
Joined
May 21, 2010
Messages
465
Location
Greater Atlanta
Upgrade to aluminum ramps

Well after lugging the standard ramps on and off a few times I figured it made sense to go with the lighter aluminum ramps. For me I want to take the ramps off once putting a car up for storage and the ramps are right at the height that as I move around working in the garage I could do some real damage running into them. Also, as the hang down about 6" from level once the lift is raised without the lock in place pieces, I need that extra room to drive the cars under.

So the upgrade was simple. but it does require the installation of ramp brackets that use longer bolts at the end of the runways. Pretty simple but the biggest issue in this for me is getting those holes to line up.

P1100425.JPG


What I recommend is to do this one bolt at a time to help keep things aligned. Also the trick I used of the pipe clamp helped out again to keep the runway right in place while I installed the bracket.
P1100426.JPG


Once it is all installed the ramps just slide down onto the brackets, they too will drop at an angle if left on the lift when lifted, but they are so light it is easy to pull them off and store out of the way.

P1100430.JPG


P1100427.JPG


P1100428.JPG


P1100431.JPG


One thing to consider is these ramps attach right at the end of the lift and will make the overall length a bit longer, maybe about 4" or so. You need to factor that into your lift placement. I just got lucky!!!! Look how close to the garage door it is!
P1100434.JPG


The one idea I would have for BendPak is to add welded on brackets on the back side of 2 posts that would allow you to store the ramps in a vertical hanging position, then they would be out of the way but have a spot right where you need them.

More to come...
 

danieldolin

Well-known member
Joined
Oct 19, 2011
Messages
189
Location
Cleveland OH
Upgrade to aluminum ramps

Well after lugging the standard ramps on and off a few times I figured it made sense to go with the lighter aluminum ramps. For me I want to take the ramps off once putting a car up for storage and the ramps are right at the height that as I move around working in the garage I could do some real damage running into them. Also, as the hang down about 6" from level once the lift is raised without the lock in place pieces, I need that extra room to drive the cars under.

So the upgrade was simple. but it does require the installation of ramp brackets that use longer bolts at the end of the runways. Pretty simple but the biggest issue in this for me is getting those holes to line up.


P1100431.JPG


One thing to consider is these ramps attach right at the end of the lift and will make the overall length a bit longer, maybe about 4" or so. You need to factor that into your lift placement. I just got lucky!!!! Look how close to the garage door it is!

The one idea I would have for BendPak is to add welded on brackets on the back side of 2 posts that would allow you to store the ramps in a vertical hanging position, then they would be out of the way but have a spot right where you need them.

More to come...

I plan to get the aluminum ramps when I order for the very same reasons. Can you store them between the two runways when it the narrow position? Also, how many of the wheel stop triangles came with your lift as shown in the above picture?
 

mechamunch

Well-known member
Joined
Jun 10, 2009
Messages
177
Nice, the crane matches the lift. ;)

Really nice write up and photos. Thank you!
 
OP
D

Dolfan

Well-known member
Joined
May 21, 2010
Messages
465
Location
Greater Atlanta
I plan to get the aluminum ramps when I order for the very same reasons. Can you store them between the two runways when it the narrow position? Also, how many of the wheel stop triangles came with your lift as shown in the above picture?

Not sure if the ramps could be stored between the runways, that might be interesting. :headscrat I'll give that a try in the next couple days and let you know.

I had two wheel stops included in the package.
 
OP
D

Dolfan

Well-known member
Joined
May 21, 2010
Messages
465
Location
Greater Atlanta
Not sure if the ramps could be stored between the runways, that might be interesting. :headscrat I'll give that a try in the next couple days and let you know.

I had two wheel stops included in the package.

OK, it's worse than you think :wtf:

Look in this shot it includes my electric impact gun!!!! Blue and Yellow and actually the same goodyear brand as the crane.

P1080188.JPG


To be fair the crane was borrowed from a buddy, but I noticed the color coordination as well.
 

c39er

Well-known member
Joined
Mar 23, 2008
Messages
1,660
Location
Seattle, Washington
The ramps being in the way are a big issue for me, so I made my own flip ups for about $300.00. No problem now.
 

Attachments

  • HD14 Ramps completed (2).JPG
    HD14 Ramps completed (2).JPG
    132 KB · Views: 453
  • Custom Built HD14 Ramps (8).jpg
    Custom Built HD14 Ramps (8).jpg
    40.1 KB · Views: 444
  • Custom Built HD14 Ramps (3).jpg
    Custom Built HD14 Ramps (3).jpg
    50.5 KB · Views: 452
OP
D

Dolfan

Well-known member
Joined
May 21, 2010
Messages
465
Location
Greater Atlanta
OK, well I worked with the Bendpak team on the bridge jack, got a different set of runners that will drop the unit down lower, to make it better for the corvettes and other low cars.

The change was real easy, I just dropped the lift with jackstands under the bridge jack and replace the two end pieces Bendpak sent me. Maybe a 15 minute job tops!

Now the bridge jack sits nice and low, not going to hit it even with these low cars.

Bridge2.jpg


And then I hooked up the airline to give the unit a test.
Bridge1.jpg


More to Come.......
 
To avoid these ads, REGISTER NOW!
Top Bottom