OccupantRJ
Well-known member
I'm starting this thread to allow anyone who wishes, to post a tip or trick they have used in either welding, fabrication, machining, or woodworking. I think you get the drift of the idea. I'll start off with one.
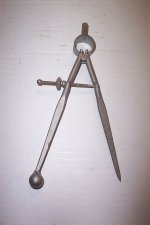
By cutting one leg of a pair of wing dividers shorter, then brazing or tig welding a steel ball to it, you can easily layout circles that are concentric to an existing hole. The leg with the ball sits partially in the hole and acts as a pivot for the marking leg, which is swung in a circle.
By cutting one leg of a pair of wing dividers shorter, then brazing or tig welding a steel ball to it, you can easily layout circles that are concentric to an existing hole. The leg with the ball sits partially in the hole and acts as a pivot for the marking leg, which is swung in a circle.