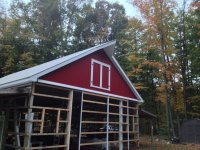
Kevin asked the question I had about the sleeve protectors. I read about them a lot when I used to sell for a company that exclusively used Perma-Collumns - I tried to convince the bosses that we should consider offering both as a way to offer longevity of post at two price points. For the price of those sleeve protectors and how easy they are to transport and install, I can't imagine why every pole barn building wouldn't use them. Lots of good reviews, glad your experience is the same. Your project is looking great!
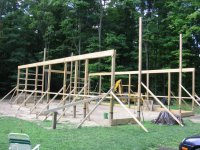
I looked at the perma-columns, very expensive, and I had an issue with the way the pole is connected, just a metal U bracket that use 2 bolts to fasten the pole, the bracket is welded to the ends of some rebar cast into the concrete, think about it, your building is only being held down by about (4) quarter size welds for each pole, it is a weak point. I would rather put the whole pole in the ground it is much more rigid.
The post protectors are simple and easy to install, slide it over the post and lag screw it to the post. They are just blow molded plastic, very light, a little bulky to transport, mine got delivered with the poles, the truck driver and I lifted the whole skid of 29 off the truck by hand. The skid probably weighed more than the post protectors on it.
I see you are from Collegeville Pa I think the post protectors are made in Pottsville pa


![090709_1322[01].jpg](/forum/data/attachments/196/196263-89226ec4037f48f062d2869689ac0a64.jpg)


")