To avoid these ads, REGISTER NOW!

1940's Craftsman drill press

jtbinvalrico

Well-known member
Joined
Jan 2, 2010
Messages
1,375
Location
Tampa FL
So I roll out at 0700 to go see what the man has listed as a "1962 Craftsman floor-standing drill press 150." - I'm buying it unless it's a complete basketcase.

Really cool old guy.....a machinist who had already parted ways with his lathe (dern.....) Seems he had asked a friend to help him list this drill press. The man thought the friend would post it in all the usual haunts. I watch Clist for my entire region.....to me that's about 1/3 the state of Florida. This definitely wasn't posted in any of the usual places. I only found it because I was researching the old Cman 150 DPs, which linked me to a site that apparently lists nothing but drill presses nationwide. You can narrow your search by city, so I start dumping in all my nearby cities and find the above referenced listing. There's no picture, and it's been posted for six days.

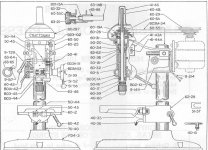
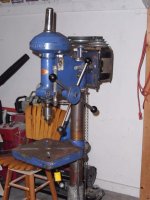
So he pops open his garage, and there's no 1960's Cman 150....but there is this. Appears to be a 1942 Atlas-made Cman bearing model number 101.03662:
IMG_0364.jpg
IMG_0365.jpg
IMG_0366.jpg
IMG_0358.jpg
IMG_0359.jpg

I'm not too keen on that bluish-purple they shot these things with back then. Probably gonna do my favorite grey on black.

On the way out, he hands me some gigantic drill bits and reminds me to always start small and work my way up through the sizes. That's my electric screwdriver for scale:
IMG_0371.jpg

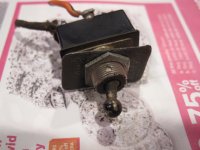
....and he threw this in too:
IMG_0372.jpg

The thing purrs......Bearings seem firm and smooth. I'm not touching these bearings; no reason to right now. It's got that extra pulley set in the middle that slows the drill down to a crawl.....And then I flipped the belts around to top speed. Holy cow! I tried to calculate it. I think the slow speed is about 200 rpm.....but my math is trying to tell me a top speed of 19,000 rpm ???? That can't be right. For you math guys: the motor is 1725 rpm, at the top speed setting the belt rides the 5" pulley on the motor shaft and drives shaft number two with a 1.5" pulley. The 5" pulley on shaft two then drives a 1.5" pulley on the spindle. Something tells me that the instruction manual I can't find would advise against that speed.....but then again, I did see some old accessory catalogs for these machines that listed shaper attachments. I suppose the "routerish" speed could be used for that. Of course, any insights are appreciated.

Total: $150.00.......and I got to talk shop with a retired machinist :beer:
 
To avoid these ads, REGISTER NOW!

mitusa

Well-known member
Joined
Dec 24, 2011
Messages
1,989
Location
SW Oklahoma
A "you ****" wouldn't even be close...... Wouldn't the bits alone be worth $150?

I think I would leave the press alone.....leave it just like you got it. It makes a great story. Talking and visiting with the "greatest generation" is always cool.
 

larry_g

Well-known member
Joined
Apr 28, 2007
Messages
16,871
Location
oregon
I believe that your speed calc's are correct, however I wouldn't try it. Nice buy.

lg
no neat sig line
 

Outlawmws

Well-known member
Joined
Aug 9, 2011
Messages
39,123
Location
The Badlands
Yep, definite suckage!

You need to review you calcs though, the CM catalogs show up to 10,000 RPM (assuming he hasn't swapped a pulley)

10K RPM max @ 1750 on the motor.

attachment.php


And a shot of the 1942 catalog page, (at least 38-42 were similar)

They show a different belt guard, but Honestly I've never seen that guard, so it might have been an artists rendition of something scrapped for the war effort to conserve material.

attachment.php
 

Attachments

  • CM speet chart.jpg
    CM speet chart.jpg
    136.8 KB · Views: 1,343
  • cm DP 41.jpg
    cm DP 41.jpg
    79.1 KB · Views: 1,342

Outlawmws

Well-known member
Joined
Aug 9, 2011
Messages
39,123
Location
The Badlands
I figured out the belt guard in the earlier pic: it was optional as was the table lift. (I'd pay $10 for the table lift! :D )

attachment.php
 

Attachments

  • cm DP extras 41.jpg
    cm DP extras 41.jpg
    46.7 KB · Views: 1,263
OP
J

jtbinvalrico

Well-known member
Joined
Jan 2, 2010
Messages
1,375
Location
Tampa FL
mitusa.....the bits were definitely a nice and unexpected addition. I got the feeling the old guy was happy to see that his tools would be taken care of and used.

emeraldcoupe.....Spring Hill has been very good to me lately....that's where I landed the Rototower nut and bolt bin. That Sun machine looks nice; of course the only automotive I do is on my own F150.

outlawmws.....yeah, I think I mis-measured the pulleys. I just did a quick visual on them. That 10k rpm is impressive, though.

Mike662.....here's the site: http://www.drillworld.info/ Search your fave cities......

I'll be updating on the cleanup.
 
OP
J

jtbinvalrico

Well-known member
Joined
Jan 2, 2010
Messages
1,375
Location
Tampa FL
Found the paperwork over at OWWM.....Specific to this machine, they have a two page parts list and diagram, no specific manual. I did check out the 1942 Craftsman Catalog which identifies it nicely. I'll be documenting this refurb and adding it to their database (.....along with a donation....I'm overdue).

Some progress - Did a grind to smooth the table....it's got two drill bit over-shoots to mark the years:
IMG_0393.jpg

Began pulling it apart. Another shot of the original blue-purple color:
IMG_0389.jpg

The motor support rods bolt up to this plate.....So far any rust on this machine has come off nicely:
IMG_0391.jpg

Going to do the column in a few days. :beer:
 

SweetD

Well-known member
Joined
Feb 8, 2010
Messages
3,263
Location
Rhode Island
What a great score! I have a mid-'40s vintage Atlas / Dunlop (Sears) scroll saw, and it has that same original blue paint. That variable speed attachment is worth the price of the whole lot by itself.

Dave
 
To avoid these ads, REGISTER NOW!
OP
J

jtbinvalrico

Well-known member
Joined
Jan 2, 2010
Messages
1,375
Location
Tampa FL
Progress:

It's completely disassembled. It's evident that this press was used over the past 70 years, but not abused. The bearings are the original SKF units...and they are near perfect. I won't be replacing any of them. The spindle assembly, the quill, all of it are pristine. I've heard that you should replace them once you've got it open, but I like the idea of putting these old guys right back to work....complete with the grease cup. Besides, you can turn this DP off and access the bearings in minutes if needed.

I'll be priming and painting the cast parts tomorrow. The rest of the parts are getting the wire wheel and are coming out nicely. Some, like this pinion, just need a quick cleanup:
IMG_0424.jpg
IMG_0425.jpg

This is the cone cover for the spindle on top of the machine. The plating on it was pitted, so I just spun on my lathe with some 100 grit to give it a machined appearance to compliment the other parts:
IMG_0431.jpg
IMG_0432.jpg

The spindle and quill are perfect:
IMG_0430.jpg

I'll begin on the motor between coats of paint.....The motor runs fine, but I can detect some slop in the shaft that might necessitate some extra work. The PO set this up with a foot pedal. The motor has an extra set of wires coming out of it that allow switched reversal. I'll be incorporating the foot pedal....and I think I've found an on-off-on toggle switch that should fit where the factory switch is (I'll box up the original switch and keep it with the DP). This should allow full function forward/reverse with factory appearance.

I'll have to wait til tomorrow to load more pix......the server seems to be getting jammed up.
 
OP
J

jtbinvalrico

Well-known member
Joined
Jan 2, 2010
Messages
1,375
Location
Tampa FL
Paint is done......assembly begins tomorrow. Here's a tease:

IMG_0471.jpg
IMG_0472.jpg

My research has shown me a number of these old DPs. I've seen a couple done in their original blue, and a lot of other colors, but none in black. I really considered doing it in blue, and who knows, maybe I'll do a 100 year anniversary repaint of it in 28 years and go blue. Here's a shot of that color from inside the motor housing. Originally, the motor ends would have been black and the middle band would have been blue:

IMG_0459.jpg
IMG_0457.jpg

The feed levers weren't too bad, but they appear to have been plated, and that plating had some pits and corrosion. They turned out great using some 60 grit and 100 grit on the lathe:

IMG_0466.jpg
IMG_0468.jpg

I need to order a testor's decal setup to make the SKF bearing decal that goes on the spindle head. Tomorrow I'll prep the motor housings for paint.

Anybody have any input on the following:
1) The motor bearings have covers that unscrew, allowing access to the bearings without further disassembly. These bearings seem fine and serviceable. Any recommendations of a grease I should use to repack these?
2) The upper spindle has a grease cup adjacent to the upper bearings. As I understand it, you fill this cup with grease, then screw it in a half-turn to provide lubrication for a given amount of use. What kind of grease should I use in that grease cup.....What's the interval for turning the grease cup given normal handyman use....And should I pre-fill that cavity with that grease during reassembly? :beer:
 

BWS

Well-known member
Joined
Sep 3, 2006
Messages
923
Location
Mnts of Va
Thats very nice,am sure it'll work out great!

Just an opinion but,I'd contact the guy you bought it from and ask him about grease and frequency.Keep an open line of contact with the guy.......If you're polite,patient and can spare the time he may prove a valuable source of info?

Did he show you how to sharpen the drills?BW
 

mitusa

Well-known member
Joined
Dec 24, 2011
Messages
1,989
Location
SW Oklahoma
I think I would call the po. Looks like he took really good care of it and probably has the answers to most of your questions. I bet he would like to look at it once you finish.

Great job!
 
OP
J

jtbinvalrico

Well-known member
Joined
Jan 2, 2010
Messages
1,375
Location
Tampa FL
I'll definitely be sending the PO a pic once it's done.....

Assembly of the main components is complete. The electrical has taken some time. The task was to restore it to an original appearance, but to retain the reversing functionality. When these where originally made, it appears that there may have been a toggle switch on the base, or at least a hole for one, and a hole on the opposite side of the base for the electrical cord. These motors seem to have been an all-purpose type that they put on different machines and sold individually. They also have shafts coming out of both ends of the motor. I don't know if they sold these as "reversing motors" or "reversible motors," assuming the latter could be quickly rewired for the given application, and the former could have come with a reversing switch....but I don't see how a dpdt switch could have fit in that small space on the motor base. I've seen a reversing switch diagram and am aware of the use of these switches back then, but I've never seen one in the wild.

Anyway, a 3pdt switch has been put into the original switch location on the drill press itself. I did tap one additional hole on the back of the head casting to feed one additional wire....it took a total of six wires to get this done: two for the main electrical, and four other wires inside the motor housing, the swapping of which allow for reversing:

The additional hole is on the right:
IMG_0505.jpg

Motor and mount on the bench. I fed the new feed wires from under the motor base and through the mount, then I secured the wires on the other side of the mount to prevent pullout:
IMG_0507.jpg

All six wires through the casting:
IMG_0506.jpg

The 3pdt switch wired up:
IMG_0509.jpg

Wires leaving the motor base and entering the rear of the main head...I got lucky here, there's just the perfect amount of free space between the motor base and the mounting plate to get this done cleanly:
IMG_0511.jpg

Next....I took the on/off switch plate and simply flipped it over; in 50 years when someone does another rebuild they can return it to stock very easily. I'm working on a decal to go on the switch plate to indicate FWD/OFF/REV....it's nearly done and should come out nicely. Also, I'm waiting on the correct decal paper to duplicate the "SKF" bearing label that these DPs had on their headstocks.

The Square-D footswitch that came with it was a nice bonus....it's getting a refurb as well to compliment the DP.
 

tool_scrounge

Well-known member
Joined
Jul 20, 2010
Messages
4,171
Location
Southern California
These motors seem to have been an all-purpose type that they put on different machines and sold individually. They also have shafts coming out of both ends of the motor. I don't know if they sold these as "reversing motors" or "reversible motors," assuming the latter could be quickly rewired for the given application, and the former could have come with a reversing switch....but I don't see how a dpdt switch could have fit in that small space on the motor base. I've seen a reversing switch diagram and am aware of the use of these switches back then, but I've never seen one in the wild...

The reversing switches do exist. Here is a photo of the reversing switch that was in the motor base of a 40's vintage Craftsman (Atlas) drill press. This one had a defective motor but the switch was kept for spare parts.
 

Attachments

  • IMG_4575.JPG
    IMG_4575.JPG
    92.2 KB · Views: 65
  • IMG_4576.JPG
    IMG_4576.JPG
    84.1 KB · Views: 60

Red Leader

Well-known member
Joined
May 15, 2011
Messages
2,688
Location
Denver, CO
Wow that is a VERY nice Craftsman/Atlas floor press. You did real well and seems relatively complete. That one is a survivor and was well cared for.

Nice pick up. :thumbup:
 

pcfithian

Well-known member
Joined
Aug 12, 2012
Messages
63
Location
Long Beach, IN
Great story about your drill press, and nice work on the refurbishment.

I've always wanted a drill press, and had a need for some accurate drilling on one of the boat projects I'm doing. I found one of these on Friday, listed on Craig's List for $75. Only 30 miles from my house. Runs perfect, quiet bearings, and fairly good condition. A bit of naval jelly, elbow grease and some WD-40, here's what it looks like now. An excellent tool, I'm sure I'd have to pay a big pile of money for something new that would match the quality of this beauty. Everything works perfectly on it.

As this is the bench model 101.03622, someone has added the pipe extension to set it up as a floor unit. Whoever did it knew what they were doing, it is very solid.

I think I'll get a Palmgren CV30 cross slide vise and a couple of starter bits so I can do some light milling on wood, plastic, or non-ferrous metal.

So from what I can tell, this is a 1941 or 1942 model, right?

Any ideas on where I can get a belt guard like shown in the previous attachments?
 

Attachments

  • Craftsman 101.03622 Pic 1.jpg
    Craftsman 101.03622 Pic 1.jpg
    126.4 KB · Views: 107
  • Craftsman 101.03622 Pic 2.jpg
    Craftsman 101.03622 Pic 2.jpg
    124.8 KB · Views: 122
  • Craftsman 101.03622 Pic 3.jpg
    Craftsman 101.03622 Pic 3.jpg
    141.5 KB · Views: 110
Last edited:

tool_scrounge

Well-known member
Joined
Jul 20, 2010
Messages
4,171
Location
Southern California
I think I'll get a Palmgren CV30 cross slide vise and a couple of starter bits so I can do some light milling on wood, plastic, or non-ferrous metal.

The bearings in these drill presses are probably not good enough for the loads of milling, unless you are using tiny endmills in plastic. My dad years ago tried that on a much larger drill press and then promptly went out and bought a "small" Rockwell mill. Small as in 800 lbs or so. The Rockwell worked much better.
 
Last edited:

Outlawmws

Well-known member
Joined
Aug 9, 2011
Messages
39,123
Location
The Badlands
SNIP

I think I'll get a Palmgren CV30 cross slide vise and a couple of starter bits so I can do some light milling on wood, plastic, or non-ferrous metal.

So from what I can tell, this is a 1941 or 1942 model, right?

Any ideas on where I can get a belt guard like shown in the previous attachments?

:+1: on the side loads for milling.

And the Belt guard is probably unobtanium. IMO your only shot is Eprey, and that's a long shot.
 

Outlawmws

Well-known member
Joined
Aug 9, 2011
Messages
39,123
Location
The Badlands
The other reason milling is a bad Idea with these DP's is the chuck is mounted on a taper, and side loading can dislodge the chuck with the bit...


attachment.php
 

Attachments

  • 42 DP chucks.jpg
    42 DP chucks.jpg
    130.9 KB · Views: 445

pcfithian

Well-known member
Joined
Aug 12, 2012
Messages
63
Location
Long Beach, IN
Upon further inspection it appears that the Chuck Release Nut 60-39 (knurled ring) is missing from my press. The Jacobs 6A 1/2" chuck on the DP has 33 taper stamped on it.

Where could I obtain a collet chuck and the 60-39 Chuck Release Nut for 3/8" diameter shank bits?
 

Attachments

  • Craftsman Drill Press 101.03662 Parts Diagram.jpg
    Craftsman Drill Press 101.03662 Parts Diagram.jpg
    149.1 KB · Views: 78
Last edited:
OP
J

jtbinvalrico

Well-known member
Joined
Jan 2, 2010
Messages
1,375
Location
Tampa FL
Great score at $75......with the speed pulley to boot. 1941/1942. Also, that appears to be the original paint on the DP; that's the color they painted these things back then. The motor looks to have been an add-on option and would've come painted as you see it.
:beer:
 
To avoid these ads, REGISTER NOW!
Top Bottom