To avoid these ads, REGISTER NOW!

My one car workshop, "The Rental"

gp_frk

Well-known member
Joined
Aug 11, 2005
Messages
48
Location
Texas
As the name implies this is not going to be a garage to park a vehicle in even to work on. My daily driver wont fit in the door so why worry about it right?
The name comes from the fact that much like I do with many things, I'm working with what I have available (at the time we are renters but I do too much with my hands to NOT have a space to use). So there will not be much going on that is a permanent change to what is there as far as the space itself.

First up was storage small shop means I need to maximize floor space. So here we go.
garage9.jpg

The cabinets I had at the last house (we moved the 1st week of Jan) but they had been sitting on the floor with a another small cabinet on top of them (you will see it below). I built the shelves out of 1x4s and 1x12.
The miss matched wood bugged me so lets paint
garage8.jpg

(note: the cubby space on the right hand side of the pic is a built in feature and is quite nice as almost ALL of our camping stuff fits into it).
Shelf/Cabinet number 2 is a conglomerate.
The shelves with the bracing underneath were already present and will be getting a new coat of paint in the next few weeks. The cabinet is the one spoken of previously with a coat of paint on it. And the curved shelves were my project this weekend inspired by Red Leader here on the board.
garage6.jpg

garage7.jpg

The curved shelves are not going to be for anything of any real mass, mainly a small shop radio(phonedoc inspired) and odds and ends (please ignore the pile of misc **** on the shelf it is in a temporary home off the floor until I can get it sorted out).
Y'all may be wondering about the tailgate hanging on the wall in those last pics. That is my other answer to a small shop.
garage1.jpg

garage2.jpg

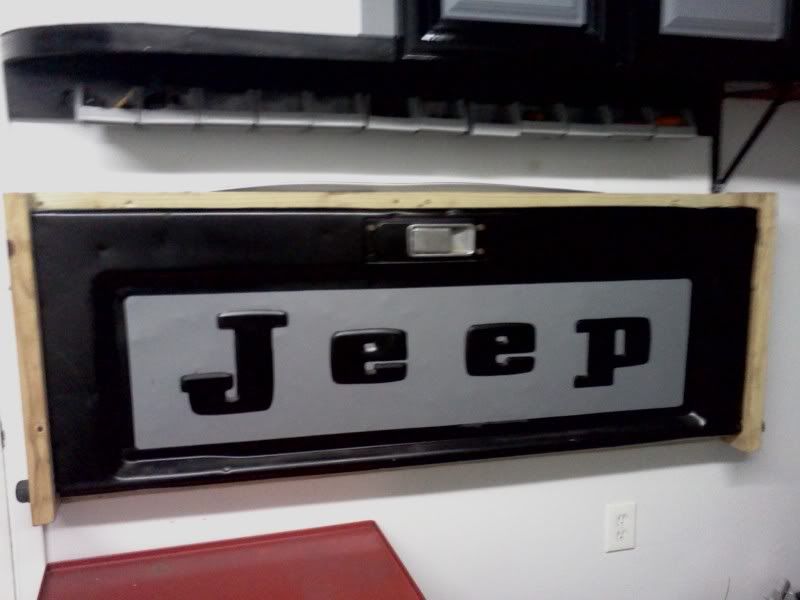
I do a bit of work with Kydex and this is basically going to be my work station. It is all that is left of my 78 J10. Having it fold up and my tool chests below it on rollers means more room AND it keeps **** from piling up on it.
The last part of the garage that is the biggest asset/hindrance is the welding table. This thing was built by a buddy of mine about 10 years ago and is STOUT 3/16" top 2x2x1/4" legs 2" x 1/4" I beam frame and 3" casters.
garage4.jpg

garage3.jpg

The last house we were at I didn't really think about the sheet rock and all the grinding/cutting that was done on the table. When we moved and I moved the table the wall was 2 different colors from being burnt by the sparks. To address this issue I bent up a piece of 24ga steel and painted it to match the gray on the cabinets and workbench. I hung it on a 1x4 cleat and all the fasteners are below the table so there are no screws visible.
 
To avoid these ads, REGISTER NOW!
OP
G

gp_frk

Well-known member
Joined
Aug 11, 2005
Messages
48
Location
Texas
The garage is small and right now the lighting consist of one 8' double T12 fixture that I installed (freebie from a buddy) this light runs the length of the garage from above the washer and drier to about the middle of the garage. This area is lit quite well. The other end has the garage door over it so its a bit dark and causes shadows when the door is open. I do a lot of work with my drill press and have a power tool storage/grinding station planned for the near future so I picked up a cheap Ikea drafting light and made a wall mount for it out of 18/16ga.
bracket.jpg


426415_10150556725131606_619711605_9570690_2125334066_n.jpg

This allows me to light the workbench directly and then move the light out of the way if need be.
 
OP
G

gp_frk

Well-known member
Joined
Aug 11, 2005
Messages
48
Location
Texas
Might as well add a pic of the daily driver (sorry it's not a Porche ;)).

runner.jpg
 
OP
G

gp_frk

Well-known member
Joined
Aug 11, 2005
Messages
48
Location
Texas
Almost forgot the small parts storage. I did not want to dedicate a 2x2 section of cabinet or wall space to screws and rivets. So I went to good old china freight and picked up one of there small parts packs and screwed the plastic brackets to a 1x4 and screwed that to the studs. Dealing with Kydex there are a bunch of little rivets and screws involved. I plan to make some labels for them in the next week or so.

garage5.jpg
 
Last edited:

SiGmA_X

Well-known member
Joined
Aug 13, 2005
Messages
1,111
Location
Portland, OR
I've had similar thoughts for small parts bins. Its time to implement! I look forward to seeing the rest of your workshop build!
 
OP
G

gp_frk

Well-known member
Joined
Aug 11, 2005
Messages
48
Location
Texas
I like the tailgate work bench alot, but why did you cover the light switches with it? Might be a PITA down the road.

Like I said this is a rental and I'm dealing with a work space that has it's limits. Those switches were there already and they go to the outside lights that are motion activated. I've been in the house a little over a month and I've never touched them they stay on all the time.
 

Dan in Pasadena

Well-known member
Joined
Feb 18, 2009
Messages
13,106
Location
Pasadena, CA
I'm STEALING the tailgate work bench idea. Now I've gotta visit a junkyard for a Chevy one. Think I'll bolt a piece of 3/4" plywood to it. THANKS for the cool idea.
 
OP
G

gp_frk

Well-known member
Joined
Aug 11, 2005
Messages
48
Location
Texas
I'm STEALING the tailgate work bench idea. Now I've gotta visit a junkyard for a Chevy one. Think I'll bolt a piece of 3/4" plywood to it. THANKS for the cool idea.

Thank you all for the props on the tailgate workbench. It is one of those deals where EVERY person who sees it goes "damn, why didn't I think of that".
 

Dan in Pasadena

Well-known member
Joined
Feb 18, 2009
Messages
13,106
Location
Pasadena, CA
Thank you all for the props on the tailgate workbench. It is one of those deals where EVERY person who sees it goes "damn, why didn't I think of that".

At the risk of the moderators chastising me for bad language: The tailgate workbench belongs in its own thread called, "Neat **** I Learned on GarageJournal.com". It's THAT good. But if we had that thread, guys would put in so-so ideas.
 
OP
G

gp_frk

Well-known member
Joined
Aug 11, 2005
Messages
48
Location
Texas
Oh, question. How'd you cut the curves on the neat lamp bracket? Do you have a metal capable band saw? Very nice piece!

Dan it is 18ga steel I laid it out with pencil and compass and cut it with snips then de-bured it with a file. I would LOVE to pick up one of the SWAG port-a-band set ups but it's just not in the cards right now.
Next big tool purchase will be a disc sander and an arbor press.
 

Richie Rich

Well-known member
Joined
May 2, 2009
Messages
190
I'm STEALING the tailgate work bench idea. Now I've gotta visit a junkyard for a Chevy one. Think I'll bolt a piece of 3/4" plywood to it. THANKS for the cool idea.

Stealing this one too!

Happen to have an extra toyota tailgate laying around and a perfect spot for it.

ETA: Nice 4runner. I have a pair of toyota 4x4 pickups (86 & 87)
 
OP
G

gp_frk

Well-known member
Joined
Aug 11, 2005
Messages
48
Location
Texas
Stealing this one too!

Happen to have an extra toyota tailgate laying around and a perfect spot for it.

ETA: Nice 4runner. I have a pair of toyota 4x4 pickups (86 & 87)

I would love to see it done with a truck gate from a Yota. I used to J10 gate because it was sitting out back rusting away and I had a moment of clarity and went for it.
 
To avoid these ads, REGISTER NOW!

Richie Rich

Well-known member
Joined
May 2, 2009
Messages
190
I have a complete bed that I am doing nothing with (been for sale for about a year).
Might cut the whole back of it off and mount it on the wall, then I wouldn't have to figure out hinges/latch/support bars (and it would look even cooler with taillights and a license plate).
Don't really like the thought of taking the plasma to a pretty much rust free 4x4 bed, but nobody wants it and I am tired of tripping over it.
Will post pics if I decide to do it.
 

fergus

Well-known member
Joined
Oct 4, 2009
Messages
1,620
Location
Yolo County CA
Dang it...ya beat me to it on the tailgate workbench idea. I want mine for different reasons, but the same general idea. Nice setup so far. Is that 4runner bobbed?
 
OP
G

gp_frk

Well-known member
Joined
Aug 11, 2005
Messages
48
Location
Texas
Dang it...ya beat me to it on the tailgate workbench idea. I want mine for different reasons, but the same general idea. Nice setup so far. Is that 4runner bobbed?

Why yes it is :thumbup:
Bobbed, caged, dual cases, shaved axle housings, new 22re, gutted interior, ya know the usual. LOL
 

fergus

Well-known member
Joined
Oct 4, 2009
Messages
1,620
Location
Yolo County CA
So, does that mean ya had to bob the top too? A little fiberglass work maybe? I'm more of a Jeep guy, but 'yotas are cool too.
 

ohmfab

Well-known member
Joined
Oct 12, 2009
Messages
72
Great job working with a small space! We recently moved up north and I went from a 2 car garage to a 1 car and it has been a battle handling storage and workshop needs from the space. The fold down bench is a great idea, I may borrow that just to keep a laptop on.

Omer
 
OP
G

gp_frk

Well-known member
Joined
Aug 11, 2005
Messages
48
Location
Texas
So, does that mean ya had to bob the top too? A little fiberglass work maybe? I'm more of a Jeep guy, but 'yotas are cool too.

Yes the top is also bobbed a normal top has 2 full sized window behind the door. Mine has 1 and 1/8 of a window (both pieces of glass are still in the slider but they are pushed all the way to the normal open position). I would show pics of the firberglass work but it was my first trip down that road and it is NOT pretty to say the least. I did all the glass work on the inside of the top and then bondo'd the exterior. It's held up for 2 years now.
 
OP
G

gp_frk

Well-known member
Joined
Aug 11, 2005
Messages
48
Location
Texas
Next big tool purchase will be a disc sander and an arbor press.

So keeping my promise on this I picked this up yesterday at a swap meet here in town.
It is a Famco model E, 3/4 ton unit w/ an 8" throw, came with another Arbor and drive gear (not sure why there's no slop in this one at all). The seller was asking 30.00 for it and I walked out with it for 25.00. I'll be tearing it down tonight to get the arbor out and clean it up and put a coat of paint on it.
 

Attachments

  • Arbor.jpg
    Arbor.jpg
    136.2 KB · Views: 64
OP
G

gp_frk

Well-known member
Joined
Aug 11, 2005
Messages
48
Location
Texas
So keeping my promise on this I picked this up yesterday at a swap meet here in town.
It is a Famco model E, 3/4 ton unit w/ an 8" throw, came with another Arbor and drive gear (not sure why there's no slop in this one at all). The seller was asking 30.00 for it and I walked out with it for 25.00. I'll be tearing it down tonight to get the arbor out and clean it up and put a coat of paint on it.


Well here it is cleaned up and ready to get down to business
I had my brother who is a machinist bore a 3/8" hole in the end of the arbor in order to mount the die that you see in this pic. It is used for pressing Kydex eyelets
526305_299137780160154_156291841111416_804612_680313265_n.jpg


The paint that was on it was apparently the factory color. When I stripped it(thank you Aircraft Stripper for making my life easier) the Bondo filling the imperfections in the casting came out too. I decided to leave them visible instead of filling them back in, add character to the piece (or something like that).
 
OP
G

gp_frk

Well-known member
Joined
Aug 11, 2005
Messages
48
Location
Texas
I was also able to pic up the belt sander I've been wanting from HF this weekend. Thanks to the coupon thread I walked out with it for 63.00

531187_299139250160007_156291841111416_804615_2134474036_n.jpg
 
OP
G

gp_frk

Well-known member
Joined
Aug 11, 2005
Messages
48
Location
Texas
also love the tailgate idea. is that a house or an apartment garage?

Attached 1 car at a house.


Next project is going to be a 24" x 24" rolling cabinet. Something I can store my power tools in so they are out of the way and put the belt sander on. It will be a few weeks though, too many side projects going on at once.
 
OP
G

gp_frk

Well-known member
Joined
Aug 11, 2005
Messages
48
Location
Texas
Well I finally got around to building a cabinet for power tool storage/a work station for my Kydex tooling.
shelf3.jpg

It started life as a shipping crate that my buddy gets from work. Rough dimensions were 65"H x 36"D x 33"W. All made out of 1x4s and 1/2" plywood.
I took it apart and cut it down to 36"H x 26"D x 33"W. Picked up four 2x4s 8' long and built a real frame into it. I'll be building a set of doors for it sometime this week.

It worked out well because I wanted something with a lip on the top to catch all the sanding dust from when I shape the Kydex. That way I can just hit it with the shop vac.

The best part was that all of this went into it and I still have PLENTY of room in it for more.
shelf2.jpg


Which cleared ALL of the clutter off of one wall.
shelf1.jpg

Oh ya and the total cost for the cabinet was 11.00 :D
 
To avoid these ads, REGISTER NOW!
Top Bottom