To avoid these ads, REGISTER NOW!

Got a Snap On YA642

Jeeper

Well-known member
Joined
Dec 25, 2006
Messages
2,124
Location
Round Rock, TX
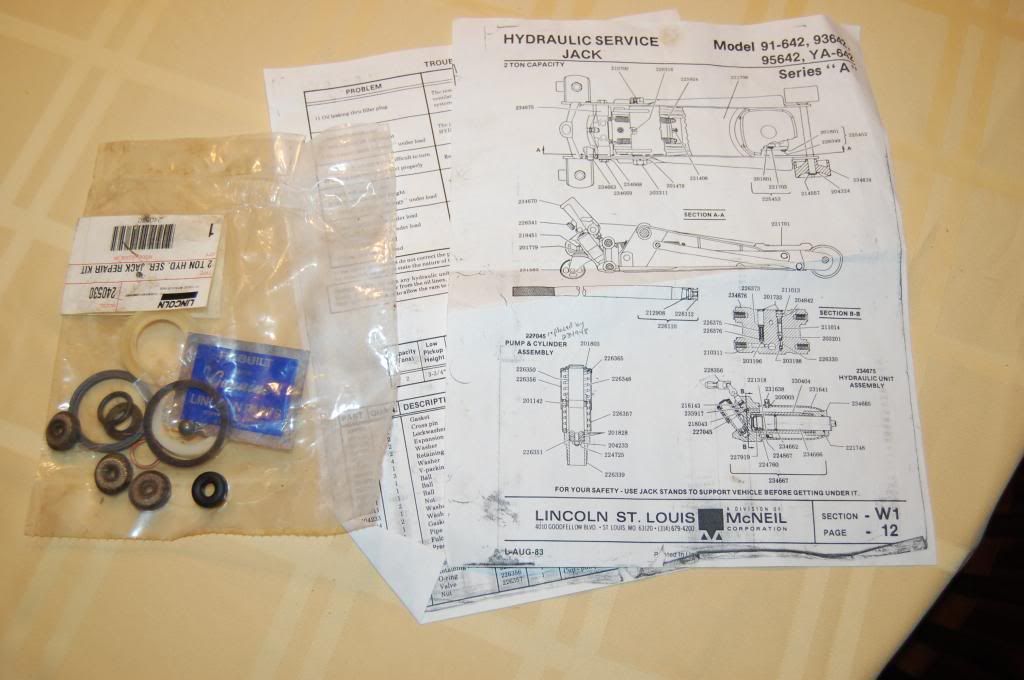
Got a Snap On YA642 off of craigslist today for $50. It isn't working but figured it would be a good jack to rebuild and finally have an American made jack. Also the jack came with a rebuild kit, or at least most of one. He mentioned that it was opened but wasn't sure if all the parts were there. I will post some pics of it later but looks like the main ram seals are there and a bunch of others.

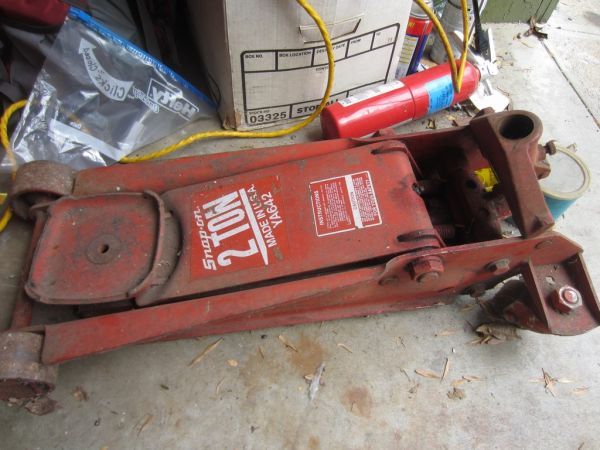
Here are some pics from the craigslist ad. I will post some more later of the rebuild kit.
snaponjack1.jpg


snaponjack2.jpg


snaponjack3.jpg
 
To avoid these ads, REGISTER NOW!

Hiball

Well-known member
Joined
Apr 30, 2009
Messages
14,027
Location
Missery
Here is a pic of the rebuild kit:
DSC_1622.jpg

The kit looks complete (seal wise)... Give that main seal a couple of squeezes and see how pliable it is. It's definitely a old seal kit.... No since and going thru all the effort of rebuilding it, only to put a aged seal in it. If it doesn't crack and shown stress cracks it should be ok.
 

GeorgiaHybrid

Well-known member
Joined
Sep 9, 2008
Messages
3,763
Location
Extreme NW Georgia
That is the same jack as a Walker 93642. Do a search for 93642 and 93632 jacks to get a lot of info on them. I can't tell from your pic if you have the "U" cap seal or not but it looks fairly complete. If you get it broke down and are short parts, Hiball should be able to get you the one or two seals you might need.
 
OP
J

Jeeper

Well-known member
Joined
Dec 25, 2006
Messages
2,124
Location
Round Rock, TX
Thanks Hiball and and Georgia. I pulled out the main seals and they seem pretty flexable. Once you read your comments, I was thinking too that they were dried, but they were surprisingly pliable.

Here are some interesting side by side pics of my Arcan 3.25 ton(costco), craftsman 4 ton and the Snap on YA642 2 ton. If you had to guess the tonnage by size you wouldn't get it right.

DSC_1627.jpg


DSC_1628.jpg
 

Hiball

Well-known member
Joined
Apr 30, 2009
Messages
14,027
Location
Missery
Thanks Hiball and and Georgia. I pulled out the main seals and they seem pretty flexable. Once you read your comments, I was thinking too that they were dried, but they were surprisingly pliable.

Here are some interesting side by side pics of my Arcan 3.25 ton(costco), craftsman 4 ton and the Snap on YA642 2 ton. If you had to guess the tonnage by size you wouldn't get it right.

DSC_1627.jpg


DSC_1628.jpg


The only one I was worried about was the Ucup that was "Darkening", forget about size.. Check the cylinder dimensions. This is where you get your tonnage, the newer models are just to appease Americans and there obsessiveness with numbers, whether its a push mower witha 7hp motor or a floor jack. I have no doubt that the Newer overrated jacks are capable of of creating the PSI to hit the tonnage numbers but when you get close to the spectrum the amount of oil transferred from reservoir to cylinder gets lower and lower as more oil bypasses versus gets used.
 
OP
J

Jeeper

Well-known member
Joined
Dec 25, 2006
Messages
2,124
Location
Round Rock, TX
Started tearing into the snap on jack today....

First created the special socket from a northern tool 1 1/2" deep well impact.
DSC_1641.jpg


Power washed with some simple green.
DSC_1643.jpg


Got the tank nut off. Tank body off. It was full of grit mixed with some of the water from me washing it.
DSC_1644.jpg


The main ram was difficult to remove. I had to twist and pull and it broke free leaving the old seal stuck in the cylinder. I am guessing this thing was bone dry for a while. I think i have my work cut out on this one. I still can't get the inner cylinder off the valve body. Using Channellocks, I could not get the cylinder/pipe to turn. Any chance it's reverse thread? Been hitting it with some Liquid Wrench. Any tricks to get it off?

DSC_1645.jpg
 
Last edited:

GeorgiaHybrid

Well-known member
Joined
Sep 9, 2008
Messages
3,763
Location
Extreme NW Georgia
Trust me, you do NOT want to pull the cylinder from the main body. Clean it up as is and put the jack back together. They can be removed but you will need a tightly fitting sleeve inside the cylinder to make sure it is not crushed or flattened from the torque it will take to get it off. We are talking 8' of pipe extension here on a BIG wrench that will grab tightly. You will also need almost the same amount of torque to put the cylinder back on.
 
OP
J

Jeeper

Well-known member
Joined
Dec 25, 2006
Messages
2,124
Location
Round Rock, TX
Trust me, you do NOT want to pull the cylinder from the main body. Clean it up as is and put the jack back together. They can be removed but you will need a tightly fitting sleeve inside the cylinder to make sure it is not crushed or flattened from the torque it will take to get it off. We are talking 8' of pipe extension here on a BIG wrench that will grab tightly. You will also need almost the same amount of torque to put the cylinder back on.


Good info. I tried with a 440 Channellocks and didn't get very far. The reason for taking it off is the Teflon spacer and parts of the ucup are stuck inside. Any thoughts on best way to remove that stuff? Maybe a deep well socket and punch it loose?

I happen to be looking at the following post when you responded. Making sense why it's so had to get the cylinder off.
http://www.garagejournal.com/forum/showpost.php?p=2301948&postcount=42

Still concerned how I am going to get this thing cleaned up enough and whether I will need some more parts (like a new teflon spacer).
 

Hiball

Well-known member
Joined
Apr 30, 2009
Messages
14,027
Location
Missery
Good info. I tried with a 440 Channellocks and didn't get very far. The reason for taking it off is the Teflon spacer and parts of the ucup are stuck inside. Any thoughts on best way to remove that stuff? Maybe a deep well socket and punch it loose?

I happen to be looking at the following post when you responded. Making sense why it's so had to get the cylinder off.
http://www.garagejournal.com/forum/showpost.php?p=2301948&postcount=42

Still concerned how I am going to get this thing cleaned up enough and whether I will need some more parts (like a new teflon spacer).

Isnt there a New Guide in the Kit? I thought i seen one under the "Rebuilt With Lincoln" sticker in the Bag? If I dont intend on removing the Cylinder i have a special Slide Hammer attachment that simply stick in the Cylinder and Pull that thing out (No Guarantee it wont be damaged and have to be cleaned up or Replaced), it will take working from Side to side to get it to come out as they tend swell and need to come out Straight. After that some Good Cleaner, Soaking and High Pressured water will remedy the aftermath of Ucup. When Done, High Pressured Air thru the Working Valve/Overload Valve will make sure there are no Particles in the Veins.

BTW.. I would have liked to see a Picture of you trying to remove the Cylinder with a pair of Channelocks.. Where you making a Real Mean looking Facial Expression? LOL Sorry to Laugh at your Expense..
 
Last edited:
OP
J

Jeeper

Well-known member
Joined
Dec 25, 2006
Messages
2,124
Location
Round Rock, TX
Isnt there a New Guide in the Kit? I thought i seen one under the "Rebuilt With Lincoln" sticker in the Bag? If I dont intend on removing the Cylinder i have a special Slide Hammer attachment that simply stick in the Cylinder and Pull that thing out (No Guarantee it wont be damaged), it will take working from Side to side to get it to come out as they tend swell and need to come out Straight. After that some Good Cleaner, Soaking and High Pressured water will remedy the aftermath of Ucup. When Done, High Pressured Air thru the Working Valve/Overload Valve will make sure there are no Particles in the Veins.

BTW.. I would have liked to see a Picture of you trying to remove the Cylinder with a pair of Channelocks.. Where you making a Real Mean looking Facial Expression? LOL Sorry to Laugh at your Expense..

Yes, just checked the bag, there is one. I will have to work on it tomorrow and see if I can get it the seal and spacer out. I may try to do the socket method to move it or loosen it or cut it form the inside.

Hiball, my face was of pure determination and a whole lot of WTF mixed in. Laugh away. Least I can do to repay for the help from you, geogia and the others. I did have the hydraulic unit wedged between 2 2x4s partially screwed into an old plywood work bench. Pulled one of the 2x4s right off the workbench.
 
OP
J

Jeeper

Well-known member
Joined
Dec 25, 2006
Messages
2,124
Location
Round Rock, TX
Got it out! Hiball when you mentioned a slide hammer i had the thought of a pilot bearing puller, which I didn't have. But went over to the puller drawer and found the puller you see on the left. Few taps with the hammer and the spacer came out. Still have some pieces of seal to get out, but big improvement. Thanks for the help....owe you a beer.

DSC_1652.jpg


DSC_1649.jpg
 
OP
J

Jeeper

Well-known member
Joined
Dec 25, 2006
Messages
2,124
Location
Round Rock, TX
I got everything back together. The jack will pump up but i have a bad leak at the base of the plunger. Is that it just not being tight enough?
 
OP
J

Jeeper

Well-known member
Joined
Dec 25, 2006
Messages
2,124
Location
Round Rock, TX
Think i got it. I took the pump piston off, clean and adjusted the packing nut. Put it back on and tightened it really well. I had the front end of the jeep on it for 10 mins and it only slightly leaked. I think it just needs just a little more tightening. It's a tough nut to get leverage on. Once the hydraulic unit was bolted in the jack frame, it can be put on the side and more leverage applied.

Here are some pics:

New u-cup:
DSC_1655.jpg


Hydraulic unit assembled:
DSC_1661.jpg


In action:
DSC_1665.jpg


With the newly freshed up CM 4-ton:
DSC_1667.jpg


All 3 of my floor jacks:
DSC_1668.jpg
 
OP
J

Jeeper

Well-known member
Joined
Dec 25, 2006
Messages
2,124
Location
Round Rock, TX
An update. I don't think that I have everything working as it should. 2 problems:

1) When jacking a vehicle up, the handle will try to rise. I am guessing this has to do something with the check valves. I have a working theory on this. When I tore the hydraulic unit down, I could not pull out the copper washer. I put the new one on top of the old one. Found that in another write up. I am guessing maybe this changes how the 2 ball bearings of the check valves are working and letting some fluid back into the plunger. Is there a trick to pull those old copper washers out?

2) The safety overload screw leaks. After a use or two, there is some oil seeping its way on top of the adjusting screw. I am thinking that my rebuild kit seemed to have everything in it except for a replacement ball bearing for the safety overload. It's the smallest of the 3 that were pulled out. This jack was dry for a while so there was some rust inside. Wondering if maybe a replace ball bearing was needed for the overload.


I may be wrong in both issues, but really curious to see if anyone has thoughts on this, especially Georgia and Hiball.

Other that those 2 things, the jack works. I have used it on my Jeep and F150.


Here is a link to a rebuild of a walker. Georgia has a good write up too on GJ, but here is another.
http://rods-n-kustoms.com/tech/Rebuilding-a-Hydraulic-Floor-Jack.pdf
 

Hiball

Well-known member
Joined
Apr 30, 2009
Messages
14,027
Location
Missery
An update. I don't think that I have everything working as it should. 2 problems:

1) When jacking a vehicle up, the handle will try to rise. I am guessing this has to do something with the check valves. I have a working theory on this. When I tore the hydraulic unit down, I could not pull out the copper washer. I put the new one on top of the old one. Found that in another write up. I am guessing maybe this changes how the 2 ball bearings of the check valves are working and letting some fluid back into the plunger. Is there a trick to pull those old copper washers out?

2) The safety overload screw leaks. After a use or two, there is some oil seeping its way on top of the adjusting screw. I am thinking that my rebuild kit seemed to have everything in it except for a replacement ball bearing for the safety overload. It's the smallest of the 3 that were pulled out. This jack was dry for a while so there was some rust inside. Wondering if maybe a replace ball bearing was needed for the overload.


I may be wrong in both issues, but really curious to see if anyone has thoughts on this, especially Georgia and Hiball.

Other that those 2 things, the jack works. I have used it on my Jeep and F150.


Here is a link to a rebuild of a walker. Georgia has a good write up too on GJ, but here is another.
http://rods-n-kustoms.com/tech/Rebuilding-a-Hydraulic-Floor-Jack.pdf

Handle feedback is a valve/seat issue and has nothing to do with the extra washer. There generally is always a little oil that will accumulate on the overload valve, more if its set too light. This oil is generally contained by the freeze plugs.. The overload ball is normally not included with the kits, because they didn't intend on you getting into this area.
 
OP
J

Jeeper

Well-known member
Joined
Dec 25, 2006
Messages
2,124
Location
Round Rock, TX
Handle feedback is a valve/seat issue and has nothing to do with the extra washer. There generally is always a little oil that will accumulate on the overload valve, more if its set too light. This oil is generally contained by the freeze plugs.. The overload ball is normally not included with the kits, because they didn't intend on you getting into this area.

When you say valve/seat, I assume you are taking about the release valve? Any tips on getting working right? Is it just cleaning it up and retrying?

Thanks for the info on the overload oil. Anywhere to source replacement freeze plugs?

Thanks again Hiball for the help.
 

Hiball

Well-known member
Joined
Apr 30, 2009
Messages
14,027
Location
Missery
When you say valve/seat, I assume you are taking about the release valve? Any tips on getting working right? Is it just cleaning it up and retrying?

Thanks for the info on the overload oil. Anywhere to source replacement freeze plugs?

Thanks again Hiball for the help.

No.. The Release is Working if its holding your vehicles. The Valve in Question would be the Working Valve, The One opposite the Overload. I would first Elevate the Rear of the Jack to position the oil away from the Valves, Then remove the Plug, Pull the Big Weight (should be Fat side UP), Then the Big Ball, Small Weight, Small Ball to make sure there is nothing preventing the Balls from Seating properly. You can generally find the Freeze plugs at Some Auto Part Stores, They are 5/8" Concave Style...
 
To avoid these ads, REGISTER NOW!
OP
J

Jeeper

Well-known member
Joined
Dec 25, 2006
Messages
2,124
Location
Round Rock, TX
No.. The Release is Working if its holding your vehicles. The Valve in Question would be the Working Valve, The One opposite the Overload. I would first Elevate the Rear of the Jack to position the oil away from the Valves, Then remove the Plug, Pull the Big Weight (should be Fat side UP), Then the Big Ball, Small Weight, Small Ball to make sure there is nothing preventing the Balls from Seating properly. You can generally find the Freeze plugs at Some Auto Part Stores, They are 5/8" Concave Style...

Thanks Hiball. I will check out the working valve. Hopefully it isn't a problem with the seat itself. Another question for you. How do you remove the copper washer to put a new one in? Is there a trick?

Also, found a p/n for those freeze plugs. Dorman 550-005.
http://shop.advanceautoparts.com/we...utograde_22140542-p?searchTerm=dorman+550-005
 

Hiball

Well-known member
Joined
Apr 30, 2009
Messages
14,027
Location
Missery
OP
J

Jeeper

Well-known member
Joined
Dec 25, 2006
Messages
2,124
Location
Round Rock, TX
So pulled the working valve apart. The order of the pieces was fine. I saw a small speck of dirt and cleaned it out with a pipe cleaner but it didn't help. It still has a the handle feedback while a load is on the jack.


Based on what has been added to this thread (Hiball and Georiga) and a few PMs with Edgar, it sounds like the big ball bearing on the check valve is leaking back into the plunger ever so slightly which forces the handle up and the lift arm comes down just a little (hardly noticable except for I can hear my Jeeps leaf springs shift.). Once the plunger is full, then then everything holds and stays put. Because of this I assume that the small ball bearing check valve holds.

Trying to determine my next steps. Should I try some light taps with a hammer and brass punch against the large ball as it rests in the seat? I have read that this helps seat a new ball bearing. Any others options?
 

Hiball

Well-known member
Joined
Apr 30, 2009
Messages
14,027
Location
Missery
So pulled the working valve apart. The order of the pieces was fine. I saw a small speck of dirt and cleaned it out with a pipe cleaner but it didn't help. It still has a the handle feedback while a load is on the jack.


Based on what has been added to this thread (Hiball and Georiga) and a few PMs with Edgar, it sounds like the big ball bearing on the check valve is leaking back into the plunger ever so slightly which forces the handle up and the lift arm comes down just a little (hardly noticable except for I can hear my Jeeps leaf springs shift.). Once the plunger is full, then then everything holds and stays put. Because of this I assume that the small ball bearing check valve holds.

Trying to determine my next steps. Should I try some light taps with a hammer and brass punch against the large ball as it rests in the seat? I have read that this helps seat a new ball bearing. Any others options?

I guess first and foremost you should verify that the balls that where in that NOS kit where correct, on the working valve it should have been a 5/16 and 7/32 IRC (away from home) but yes those valve seats can be reseated by simply using a punch, sized very close to the actual ball size. I don't recommend using a small punch as it can easily get off center and cause other issues, also... dont get Crazy with the hammer as its possible to Overseat the valve. The next course of action is more involved and requires lapping compound and some specialty tools, If your not seeing any significant damage I suspect the first option will remedy your problem.
 
OP
J

Jeeper

Well-known member
Joined
Dec 25, 2006
Messages
2,124
Location
Round Rock, TX
Latest update. I used some brass rod as a punch as my smallest brass punch is slightly too large. I did very little tapping as I didn't do want to do any damage. Got the working valve assembled and it seemed to be better as the handle rose much slower than before. I will probably go back and be a little more aggressive to seat the ball bearing to see if I can make it perfect.

On a side note, I picked up some ball bearings at ace hardware as a backup. Question for the board, would a chrome ball bearing work as a replacement? I think the original and the one from my rebuild kit were not chrome but pure steel.
 
OP
J

Jeeper

Well-known member
Joined
Dec 25, 2006
Messages
2,124
Location
Round Rock, TX
The next course of action is more involved and requires lapping compound and some specialty tools.


Hiball, what specialty tools do you use for this? I have seated the ball bearing, again I can be a little more aggressive but wanted to see what the next step would be.
 

Hiball

Well-known member
Joined
Apr 30, 2009
Messages
14,027
Location
Missery

Please send Pm's when you need quick responses, I don't spend as much time online as I'm backed up in the shop currently.

You will need to get some Valve reseating tools along with some valve grinding compound. With these tools, it takes a delicate touch and some experience to know how much cutting is actually happening, It is all done by hand. Can you see any damage to the seat? Did you verify that the ball size? Weight size is correct? How bout inspecting the seat with a otoscope?
 
OP
J

Jeeper

Well-known member
Joined
Dec 25, 2006
Messages
2,124
Location
Round Rock, TX
Please send Pm's when you need quick responses, I don't spend as much time online as I'm backed up in the shop currently.

You will need to get some Valve reseating tools along with some valve grinding compound. With these tools, it takes a delicate touch and some experience to know how much cutting is actually happening, It is all done by hand. Can you see any damage to the seat? Did you verify that the ball size? Weight size is correct? How bout inspecting the seat with a otoscope?

Hiball, no rush at all. I just happen to see you post on the overseas thread so thought I'd try to catch you. So I looked at the seat and couldn't tell much. I thought about seeing if I had a magnifying glass or something to help. I don't have an otoscope or access to one.

I did check the ball size and it was correct. The weights were in the right order but didn't check the weight of the ball bearing. Any chance you can show me what the valve seating tools look like? I think I am going to put the hydraulic unit on my bench and try to inspect it further.
 

Hiball

Well-known member
Joined
Apr 30, 2009
Messages
14,027
Location
Missery
Hiball, no rush at all. I just happen to see you post on the overseas thread so thought I'd try to catch you. So I looked at the seat and couldn't tell much. I thought about seeing if I had a magnifying glass or something to help. I don't have an otoscope or access to one.

I did check the ball size and it was correct. The weights were in the right order but didn't check the weight of the ball bearing. Any chance you can show me what the valve seating tools look like? I think I am going to put the hydraulic unit on my bench and try to inspect it further.

Ill snap a picture Tuesday (if I can remember) essentially it's a ball with a long stem and using some grinding compound you rotate the stem which translates to the ball rotating in the seat. I wasn't referencing the "weight" of the balls, I'm talking about the weight that sits on top of the ball, in particular the lower one. If its not Oem or too long it will not allow the upper ball to seat. I'm getting ready to head off to work and can't remember the exact length, but I have that info at the shop.
 

EDGAR

Well-known member
Joined
Aug 21, 2010
Messages
437
Carbide cutters for valve seats.

Also, ball gauges, normally used as inspection tools, can be used with lapping compound to restore the seat.
 

Attachments

  • SEAT TOOLS.JPG
    SEAT TOOLS.JPG
    144.7 KB · Views: 80
  • ball_gage_4.jpg
    ball_gage_4.jpg
    13.9 KB · Views: 57
Last edited:
OP
J

Jeeper

Well-known member
Joined
Dec 25, 2006
Messages
2,124
Location
Round Rock, TX
If the one I linked to is the right one, that $15.50 seems to be pretty reasonable. Looks like I have an option if I need to go that route.
 

Hiball

Well-known member
Joined
Apr 30, 2009
Messages
14,027
Location
Missery
Carbide cutters for valve seats.

Also, ball gauges, normally used as inspection tools, can be used with lapping compound to restore the seat.

I used to deal with that guy all the time, (Good guy to talk to) I actually have a few of the more common carbide tipped cutters, I wouldn't even think about trying to use them, unless the seat has been deformed,damaged etc.. If your not accustomed to using them, you can remove too much seat very quickly.

Edgar, is that guy back in business? last time i spoke with him (+6 years ago) The Old man had passed/retired maybe, cant remember but he was getting out of the business. I wish I could remember that guys name, its right on the tip of my tongue... Ill have to look for his old catalog when I get home, I know I wrote his name down on the cover.


If the one I linked to is the right one, that $15.50 seems to be pretty reasonable. Looks like I have an option if I need to go that route.

IMO.. Yes... You really should invest in some sort of cheap scope, that way you see what's really going on. I believe on that website you linked, they even sell the Non diamond imbedded version which will utilize lapping compound. A little slower, a little messier... But more forgiving.
 
Last edited:

CRTDI

Well-known member
Joined
Jan 11, 2010
Messages
1,533
I used to deal with that guy all the time, (Good guy to talk to) I actually have a few of the more common carbide tipped cutters, I wouldn't even think about trying to use them, unless the seat has been deformed,damaged etc.. If your not accustomed to using them, you can remove too much seat very quickly.

Edgar, is that guy back in business? last time i spoke with him (+6 years ago) The Old man had passed/retired maybe, cant remember but he was getting out of the business. I wish I could remember that guys name, its right on the tip of my tongue... Ill have to look for his old catalog when I get home, I know I wrote his name down on the cover.


I talked with the owner of this place a bit last year. I believe his name was Tim. He was trying to sell off the hydraulic parts stock at the time. Unfourtunately for me, he wasn't interested in parting with just specific items I was looking for...:sad:

I believe this is the same business that offered the "Jack Facts" manuals back in the day.
 

Hiball

Well-known member
Joined
Apr 30, 2009
Messages
14,027
Location
Missery
I talked with the owner of this place a bit last year. I believe his name was Tim. He was trying to sell off the hydraulic parts stock at the time. Unfourtunately for me, he wasn't interested in parting with just specific items I was looking for...:sad:

I believe this is the same business that offered the "Jack Facts" manuals back in the day.

Thanks David, Tim is correct..(that would have bugged me all day) And yes he did offer a "Jack Facts" Manual, and based off our conversations he had bookoos of parts.. Any reason why he didn't want to sell to you? I got the feeling he was wanting to cleanse his hands of the hydraulic business.
 

EDGAR

Well-known member
Joined
Aug 21, 2010
Messages
437
Tim Ganon is his name and apparently he did not have much interest in selling anything for I know a guy who needed parts and left him a couple of messages and Tim never returned his calls. I also sent him an e-mail looking for some parts and he answered it thirteen months later!:shocking: Maybe he was in jail, or in a coma? Anyway, he always took forever to answer e-mails. His site still shows up on the internet.

http://www.hydjack.com/

As for the tool to restore the seat try firts gluing, with epoxy, a 5/16" steel ball to a 3/16", or so, stem. But care should be taken to center the stem as much as possible on the ball. Maybe use a hand powered drill to spin it slowly.

Also, try to get a water based lapping compound as the grease/oil based one is sticky and difficult to remove. And using the greasy compound inside the hole where the balls go is going to be more difficult to clean. You might have to take appart the pump to flush the compound if it gets deep into the oil galleries.
 
Last edited:

CRTDI

Well-known member
Joined
Jan 11, 2010
Messages
1,533
Thanks David, Tim is correct..(that would have bugged me all day) And yes he did offer a "Jack Facts" Manual, and based off our conversations he had bookoos of parts.. Any reason why he didn't want to sell to you? I got the feeling he was wanting to cleanse his hands of the hydraulic business.


Tim seemed like a nice enough guy. He actually talked with me for quite a while about vintage jacks. I was interested in his old Blackhawk parts stock, but he was just not interested in splitting up the inventory.

He definitely gave me the impression that he was done with the day to day business, but for whatever reason still keeps the web site on and answers the phone occasionally.

I believe he has some other business interests. I'm guessing with the remaining hydraulic business, he feels like he can pick and choose the people he wants to deal with at this point in his life.
 

EDGAR

Well-known member
Joined
Aug 21, 2010
Messages
437
I spoke with Tim a couple of times and I also think he is a nice guy but he is either too busy with his hydraulic business or maybe he is doing something else besides the hydraulic business so, he may have the intention of answering the phone or the e-mails but not the time or, after a while, he simply forgets about any communications pending. I remember ordering his catalog some time ago and after two months I called him about it and he told me he had forgotten about mailing it. So you have to make follow up calls to remind him of whatever business you want with him, I guess.
 
To avoid these ads, REGISTER NOW!
Top Bottom