To avoid these ads, REGISTER NOW!

MajorLeeGassole's Garage

MajorLeeGassole

Well-known member
Joined
Apr 13, 2010
Messages
392
Location
Fairmont, WV
I cleaned the garage, white-washed the entire thing and installed new stairs. The floor had been epoxied a few years ago and it's beginning to show some wear. I was somewhat happy with the results, but I had LOTS of built-in cabinets and shelves that did nothing but collect ****. I finally tore out all the shelving and was left with two rolling toolboxes... and a small pile of **** on the floor that still needs to be sorted. Took a truckload of things I had been storing (for one reason or another) to the dump. I had JUST cleaned the garage and then my son had a party with a bunch of friends, then we got the storm and had to move everything indoors, then my neighbor keeps giving us things because he's moving. I offered to give all his tools a good home, but I guess he felt like that would be a burden and just wouldn't do it, no matter how much I insisted. ;) On top of that, we just returned from camping yesterday unloaded half of the stuff into the garage.

I wanted the stairs to be along one side of the garage so as not to take up too much floor space, but my father talked me out of it. My car still fit in front of them and the truck filled up the rest of the space. I think the stairs turned out well, but I have decided to move them to the other side of the garage. Looks like I'll be building from scratch again in order to build them against the other wall.

One thing I hate about my garage is the uneven walls. One side has a 4" overhang. It goes from drywall to painted cinder block. The remaining walls have the opposite problem. There is a 4" "shelf" that runs along the entire wall that sits on top of cinder block. The back wall is roughly 30'. The block is 4' high for roughly 12' feet. Then it drops to 2' and still has the shelf. This continues all the way around the garage. I'm going to build a frame on top of the 2' high wall that is flush with the cinder block and the higher "shelf". Then I'll install drywall across the entire lower back wall, covering the cinder block and my new frame for a nice, uniform look. I'm going to do this for the inlet where the toolboxes are and under the overhang on the other wall to continue the even look. Of course, I'll have to use 1/4" sheet rock on the back wall due to the fact I only have about 2" of clearance for parking the F150 during the winter. I'll use old plywood backer to give it some strength where the frames will be. Otherwise it will be right against the cinder block.

I have looked all over this site to find color schemes that I like. I found it after seeing "Garage Overhaul Using Rust Bullet for the Floor" @ http://www.garagejournal.com/forum/showthread.php?t=181620. Yes, I'm painting the rails! (All you Dubber fans will get it) ;) http://www.garagejournal.com/forum/showthread.php?t=182142

Light switches: There are two sets of outdoor lights and the switches are on the far side of the garage, along with a switch for the main overhead lights. The other overhead light switch is inside the house near the garage door. I would like to install switches for the overhead lights and outdoor lights right next to the door to the house, but INSIDE the actual garage. What was the builder thinking?!

I had my boys clear out a 40' x 13' room in the basement so we can move everything. Unfortunately, my son and his friends thought it would be a good idea to ride the large garden cart down a hill. Needless to say, it's bent in more than one area and needs to be fixed if we are to use that for transporting things.

Some additional things on my to do list:
Install more outlets
Replace simple light bulbs with fluorescent lights
Install sink

Outside of garage
9038670824_f9b54e753b_z.jpg


Inside left
9038672076_2783945dca_z.jpg


Inside right - with the 4" overhang. I also have that dryer vent running through the garage. Can't stand it! It's running right through the paint line I'll be creating as well.
9036449877_9473e77564_z.jpg


Close-up of the overhang. We had a stray cat find an opening and got into our basement. Pissed everywhere! Caught him and "took him for a ride". :evil:
9036456869_0ce6663f8b_z.jpg


The stairs my dad and I built. I like them, but they take up too much floor space. And, yes, my wife did tell me, "I told you so."
9038674990_caff2d720e_z.jpg


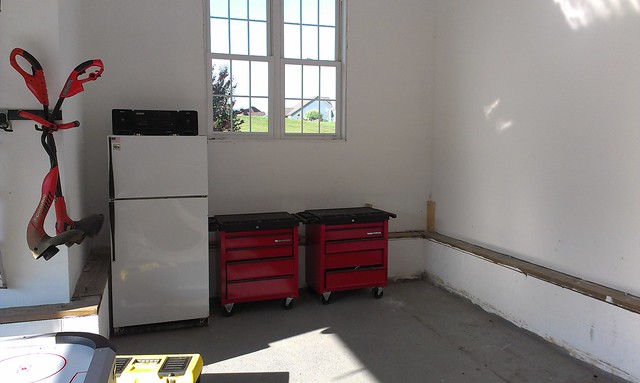
Tool "nook". It's a nice bit of extra space. In hindsight, I'd move the fridge to the other side because of the handle location. You can normally swap them, but this fridge is about two days younger than dirt. There used to be shelves and cabinets back here, but they took up way too much space and just caused me to store more **** than I needed.
9038676392_8c35046903_z.jpg


This is the ledge I was mentioning. It runs along 3/4 of the garage. The other 1/4 has the overhang.
9036454127_a0a9018b10_z.jpg


The drop off along the back wall. This is where I will start building the frame to match the higher level.
9036455661_7a75cd6960_z.jpg


Shot from the stairs. There's an air hockey table out here. Boys had some friends over and it was easier than having 10 teenagers hanging out in the house.
9036458491_be3653c783_z.jpg


Cracked concrete
9038683506_00b495ee79_z.jpg


Pitting from driveway salt. I get some rain under the door because the concrete guy put absolutely NO grade to allow for water to run AWAY from the garage. Considering one of those rubber strips along the bottom. That could cause just as many headaches though with 4 kids and not being able to sweep dirt and water out the door. But that's what Shop Vacs are for! I'd like to install a drain across the front, but I'm not cutting up concrete during this phase or in the immediate future.
9038685580_c341b7e69d_z.jpg


Wear and tear - sealed about 5-6 years ago
9036464297_076df64939_z.jpg


More wear and tear
9038689156_dceb3b2406_z.jpg
 
To avoid these ads, REGISTER NOW!

dubber

Well-known member
Joined
Dec 31, 2012
Messages
5,326
Location
Canada's Capital
Welcome to the start of your amazing race hahaha. You definitely have great bones and some unique challenges ahead of you. Its really too bad that your stairs aren't perfect as they look like you guys did a great job on them. That is actually one of the things i'm most thankful about in my little space is that my garage enters my house level without the need of stairs to rob precious floor space.

Looking forward to seeing this one develop, and I'm now subscribed. Remember to take lots of pictures as you progress; everyone enjoys them and its nice to look back through the chronology of your build.
 
OP
M

MajorLeeGassole

Well-known member
Joined
Apr 13, 2010
Messages
392
Location
Fairmont, WV
Got a lot of cleaning done tonight with the help of my kids. Three truckloads to the basement. I started building part of the frame along the back wall tonight as well. No pics of that yet. Just a few boards nailed together so far.

9072698388_f145be2386_z.jpg


9072696954_215dacbf57_z.jpg


9072695396_2bb880a81e_z.jpg


9070466991_c80ee2bb8e_z.jpg


9072692574_d79ae2e1ae_z.jpg


9070464233_916c751a45_z.jpg
 
OP
M

MajorLeeGassole

Well-known member
Joined
Apr 13, 2010
Messages
392
Location
Fairmont, WV
I have a solution for my "collection" of things that were, and are now, in the basement. My basement is not in terrible shape, but I will have to sort through everything after the garage is finished. That means I will end up cleaning the entire basement as well (2,000+/- sq ft). I have left very clear instructions with my 12- and 14- year old sons to take care of sorting, organizing and cleaning the entire basement. I normally DO NOT pay extra for chores, but this is a big one and the boys have been looking for ways to make an extra buck or two.
 
OP
M

MajorLeeGassole

Well-known member
Joined
Apr 13, 2010
Messages
392
Location
Fairmont, WV
I hope to have the framing to build up the shelf along the back wall finished tonight. There might be enough 2x material to build the frame under the overhang on the right side. I'll start at the front of the garage to help delay having to tear out the stairs. We use that entrance 95% of the time, so I'll probably wait to finish behind the stairs until after picking up the drywall and other materials, paint, etc.
 
OP
M

MajorLeeGassole

Well-known member
Joined
Apr 13, 2010
Messages
392
Location
Fairmont, WV
Almost got all the framing done. Can't get the image URLs to work with my iPad, but you're not missing much. Decided to run a few more outlets along the 3 walls in the garage nook. I am also running a couple wires for under cabinet lights and speakers as well.
 
OP
M

MajorLeeGassole

Well-known member
Joined
Apr 13, 2010
Messages
392
Location
Fairmont, WV
I did 24" on center, since this is not load bearing and just a box. I also got along the side wall where you see the horizontal bar by itself.
9078520233_e85733fe8e_z.jpg


I think this difference in the wall is exactly 1 sheet of 5/8" drywall. Call me OCD, but I think I might drywall the other half so it's even. Opinions?
9079301241_743939d88b_z.jpg


Looking at these pictures just reminds me how much I hate these jacked up walls. :mad:
 
OP
M

MajorLeeGassole

Well-known member
Joined
Apr 13, 2010
Messages
392
Location
Fairmont, WV
I will have the back framing done tomorrow and will start on the side wall as well. Gotta find my box of Romex, some outlets, trowels, etc. Gotta make a Lowe's run! Nice veterans benefit: 10% off every purchase. Home Depot, too.
 

T.E.D. Jordan

Well-known member
Joined
Nov 25, 2012
Messages
177
Location
Cumbria, UK
I'm sure I've seen another recent garage thread on here with a garage exactly like yours!

Great space anyway fella, it's going to be top.

Jordan
 
OP
M

MajorLeeGassole

Well-known member
Joined
Apr 13, 2010
Messages
392
Location
Fairmont, WV
Finished up the tool nook frame as much as I wanted. There is a 5ft span to the left that I'll close once I pick up more 2x, the drywall and some other things.
9087726723_09b8d8c471_z.jpg


Started on the frame under the overhang and ran out of material. The floor is uneven, so I built a frame to be mounted underneath.
9089975942_16f03bb02f_z.jpg


I had a few welcome delays tonight. One of my daughters spent some time with me and my boys came out to ride bikes and wreak havoc in the neighborhood. A neighborhood kid stopped by too. Nice, leisurely pace, but still making progress. :thumbup:
 
OP
M

MajorLeeGassole

Well-known member
Joined
Apr 13, 2010
Messages
392
Location
Fairmont, WV
So far I have not spent a dime. I had all the 2x material laying around for the framing. I plan on making a 10ft bench in the tool nook. I've been trying to figure out what to use for a top and it hit me. Leftover 5" solid oak flooring. We used some on the top deck of the stairs. Wide laminated look, but it will be durable and should look pretty good (fingers crossed).
 
OP
M

MajorLeeGassole

Well-known member
Joined
Apr 13, 2010
Messages
392
Location
Fairmont, WV
I will have the new shelf running all the way around the tool area and plan on making it wider under the window. Then i can install lighting under the edge to illuminate the entire workbench.
 
OP
M

MajorLeeGassole

Well-known member
Joined
Apr 13, 2010
Messages
392
Location
Fairmont, WV
No pics yet, but I got the entire staircase torn out tonight and started with their new version. Built it to comfortably fit the pressure washer, mower, ramps, jack and stands underneath.
 
OP
M

MajorLeeGassole

Well-known member
Joined
Apr 13, 2010
Messages
392
Location
Fairmont, WV
The doors under the stairs will be drywalled and "hidden" using something like the old stereo cabinets used with
DLATCH.jpg
. Press to lock, press to unlock...
 
To avoid these ads, REGISTER NOW!
OP
M

MajorLeeGassole

Well-known member
Joined
Apr 13, 2010
Messages
392
Location
Fairmont, WV
DRYWALL!!! I wanted to get better pictures, but it was after 10PM and I still had to unload the rest of the supplies from the truck. Nevertheless, it's progress!!! And boy does it look better than before. I can't believe I took this long to change this.

9113421568_c00f7ee18f_z.jpg


9111197793_5549295a2a_z.jpg


I still have to trim the top for the shelf edge. I placed 2x material under the edges before hanging it to keep the drywall safe from any moisture getting past the baseboard.
 
OP
M

MajorLeeGassole

Well-known member
Joined
Apr 13, 2010
Messages
392
Location
Fairmont, WV
I started the drywall on Friday, had no time to do anything on Saturday and finished it Sunday morning. All of it got a coat of mud and tape.

I had never made them before, but my set of stringers actually came out really well. I placed them all next to each other and they have very slight differences in only a couple spots (1/16-1/8... maybe). The way I set up the new stairs was to allow the pressure washer to fit along with the push mower. The height was almost spot on for the stringers, so the math gave me roughly 1" of play for the not-so-perfect floor. I went back out to the garage after getting back from an end-of-season soccer party and it was too late on a Sunday night to fire up the circular saw.

Where the overhang USED to be
9122856248_77e1f1271d_z.jpg


I didn't have to frame out under the stairs, which gives me roughly 5 more inches of depth for storage.
9122853574_b97637cb5b_z.jpg


Tool nook. There is one piece not fastened since that's where the wire for the outlets comes out. Have to take care of the wiring and cut for the boxes before I close that.
9120631511_664e0f230c_z.jpg


I still have a few big items in the garage (ATV, trail mower, air hockey table, etc.) which take up way too much space. After I do all this work, I still cannot get a good picture of the progress I've made. It is nice to finally step back after doing this and thinking, "Yup. This is exactly how I want it." Next step... steps. The old oak treads are being reused. Still trying to decide on a finish for everything. I liked the oak stained, but it starts to wear, so I may use something else for a finish and then cover the main part with outdorr carpet or rubber stair tread covers. I may go with something completely different, but I have to think of something.
 
OP
M

MajorLeeGassole

Well-known member
Joined
Apr 13, 2010
Messages
392
Location
Fairmont, WV
You're doing a fantastic job. Look like it's going to turn out to be top- for sure. Keep up the good work.

Thanks!

I can't wait to move that old refrigerator to the basement with the freezer. We thought the kids would use it more during the summer by having water and cold drinks within easy reach of the yard. Hasn't happened in years, so this thing is gone! It will be replaced by a smaller one that will fit under the to-be-built workbench.
 
OP
M

MajorLeeGassole

Well-known member
Joined
Apr 13, 2010
Messages
392
Location
Fairmont, WV
Just got a call from the missus. Two bad coils on the SuperCrew. She's sitting at the local garage waiting to pay just under $200 for the repairs. There goes the mini fridge! ;)
 
OP
M

MajorLeeGassole

Well-known member
Joined
Apr 13, 2010
Messages
392
Location
Fairmont, WV
I got the stringers installed tonight. MAYBE 1/32 off on one spot. Too happy with the results. My friend stopped by with a cooler filled with Ketel One, tonic and lime, so I didn't get too much done after that. I did have one kid wash the dog and the other mow the lawn, so that can be considered progress. ;)
 
Last edited:
OP
M

MajorLeeGassole

Well-known member
Joined
Apr 13, 2010
Messages
392
Location
Fairmont, WV
Hindsight is 20/20. I had reasons for doing things one way, took my time, everything came out the way I wanted, then... I should have done it the other way. Gotta stop second-guessing myself and be happy with the results,

Reagan spent some time in front of the fan yesterday. No, she is not part bear.
9129939967_56592cb018_z.jpg


Covered the deck in leftover oak flooring. I discovered I wasn't going to have enough to do my 9-10' workbench top.
9138068645_d3de6de04b_z.jpg


I want to cover the deck and stairs with carpet like Rick's Double Garage in Calgary, CAN
8375780492_7369a6b9b5_c.jpg


Here's how everything looks so far.
9138071507_8384a52abd_z.jpg
 
OP
M

MajorLeeGassole

Well-known member
Joined
Apr 13, 2010
Messages
392
Location
Fairmont, WV
I picked up some things from HD yesterday and forgot a couple minor items that ended up NOT letting me install the railing. I did, however, buy wiring, boxes and outlets. I found an outdoor carpet for the deck and stairs, but mentally thought about the measurements and I think their size will not work. Measure twice, order once? ;)

I had to go to the church last night and meet with some of the guys. I'm on the maintenance team and we have to install some signs Saturday morning. Obviously no work done on the garage, but I was able to sit in front of the TV later and make some pigtails for the new outlets. Not much, but at least I had something that could be done OUTSIDE the garage.

Another trip today, but to Lowe's this time to get more material and hopefully get the railing done this weekend. No soccer and no camping? What? A free weekend?
:beer:
 
OP
M

MajorLeeGassole

Well-known member
Joined
Apr 13, 2010
Messages
392
Location
Fairmont, WV
I just picked up new seals for the garage door, but AFTER the torrential downpour we had while I was at work. My wife and kids moved all the wood out of the way and it is EVERYWHERE. Hey, at least it's dry! ;)
 
OP
M

MajorLeeGassole

Well-known member
Joined
Apr 13, 2010
Messages
392
Location
Fairmont, WV
9161791643_53beca9ef3_z.jpg


I got tired of all the little things that were bugging me and pulled down the stringers. Put in the 1x10 on the wall and placed the stringers with the proper spacing and didn't have to rip the one step that was going to be off.

I had to put off installing the railing due to the time. More tomorrow.
 
OP
M

MajorLeeGassole

Well-known member
Joined
Apr 13, 2010
Messages
392
Location
Fairmont, WV
Oh yeah, I wasn't happy with the fact I ran out of screws and wanted to make sure everything was strong enough. Like the 2x10 stringers... Added 2x4 support to each with screws.
 

SHawkins87

Member
Joined
Jan 20, 2012
Messages
16
Location
Central Kentucky
Can you post more details/photos about the railing? What did you use for spindles? That looks similar to the design I had in my head for a railing I am getting ready to build.
 

mdkingsley

Well-known member
Joined
Nov 18, 2012
Messages
371
Location
Chickamauga Ga
Coming along nicely, I like how you evened out all the walls looks much better. I have a big fridge in my shop I have thought about going to a small one but sometimes the freezer is handy. Still can't decide.
 
OP
M

MajorLeeGassole

Well-known member
Joined
Apr 13, 2010
Messages
392
Location
Fairmont, WV
Can you post more details/photos about the railing? What did you use for spindles? That looks similar to the design I had in my head for a railing I am getting ready to build.

I bought the spindles at either HD or Lowe's. They are 26" x 3/4", black, aluminum and come in a 10-pack. You mount the included plastic ends to the material and slide everything in place. Angled ends are included for railings. Sorry, but i dont remember the price. Simply ripped some 2x material and threw it together.
 
OP
M

MajorLeeGassole

Well-known member
Joined
Apr 13, 2010
Messages
392
Location
Fairmont, WV
Coming along nicely, I like how you evened out all the walls looks much better. I have a big fridge in my shop I have thought about going to a small one but sometimes the freezer is handy. Still can't decide.

Thanks! I couldn't stand that block and all the uneven construction.
 
Last edited:

bww_mnm

Well-known member
Joined
Dec 30, 2010
Messages
673
Location
Chicago area
Can you post more details/photos about the railing? What did you use for spindles? That looks similar to the design I had in my head for a railing I am getting ready to build.

You can get the spindles at big box stores. Menards runs specials for 2 for 1, ends up being $1 each if I recall correctly. Mine didnt come with sleeves though. Just drill holes 1/2 deep on upper / lower rails.
 

SHawkins87

Member
Joined
Jan 20, 2012
Messages
16
Location
Central Kentucky
I bought the spindles at either HD or Lowe's. They are 26" x 3/4", black, aluminum and come in a 10-pack. You mount the included plastic ends to the material and slide everything in place. Angled ends are included for railings. Sorry, but i dont remember the price. Simply ripped some 2x material and threw it together.

Great, thanks for the info. I hadn't started shopping for materials yet for that project. I will look for them. I will be starting my thread soon. I have been working on my remodel for the past year and a half. I have been planning to start a thread but haven't had time. I have taken lots of pictures and am anxious to share.
 
OP
M

MajorLeeGassole

Well-known member
Joined
Apr 13, 2010
Messages
392
Location
Fairmont, WV
Great, thanks for the info. I hadn't started shopping for materials yet for that project. I will look for them. I will be starting my thread soon. I have been working on my remodel for the past year and a half. I have been planning to start a thread but haven't had time. I have taken lots of pictures and am anxious to share.

Looking forward to your new project! It's been therapeutic for me.
 
OP
M

MajorLeeGassole

Well-known member
Joined
Apr 13, 2010
Messages
392
Location
Fairmont, WV
I decided to close under the stairs. I still have access to the space, I just wanted it to look cleaner.

9178086319_aaf6c8af84_z.jpg


FINALLY installed the outlets in the tool area and closed the wall.

9180299278_75184ab8c2_z.jpg


It's amazing how much space has cleared up. I think I just need some touch-ups on a couple spots of drywall mud. I can't wait to start painting! Have to get final measurements and order carpet for the stairs.
 
To avoid these ads, REGISTER NOW!
Top Bottom