To avoid these ads, REGISTER NOW!

My neighbors Wolverine Floor

FFPL

Well-known member
Joined
Oct 12, 2007
Messages
157
Location
Massachusetts
So here I go again....

My neighbor helped me with my floor so it's now time to do his. Here's my thread http://www.garagejournal.com/forum/showthread.php?t=13347.

My neighbor originally bought a rustoleum kit from HD last year. He spent at least a week pressure washing off an existing epoxy floor and was putting in long days doing it (he didn't know about grinding at that point). However, due to winter approaching he decided to return the rustoleum kit mostly due to the temperature dropping (I think the minimum temp for these is about 55F).

At about the same time I started looking at doing my floor having just built my garage. I chose to use the Wolverine product. Since he showed some interest and likes to hang out in my garage I decided to put him to work helping me out (mixing, cleaning etc). Given I had over 1800sq ft it was certainly helpful to get some assistance. After doing my job he decided that he wanted a floor like mine (he still brings friends over to look at it) and wanted to use the same product (almost).

For the past couple of months he's been deciding on colors, doing more cleaning etc.

Here's his floor just before I started grinding. The walls have a thick acrylic and the floor has some remnants of the epoxy.
DSC_0061.jpg

DSC_0062-2.jpg

DSC_0060-1.jpg


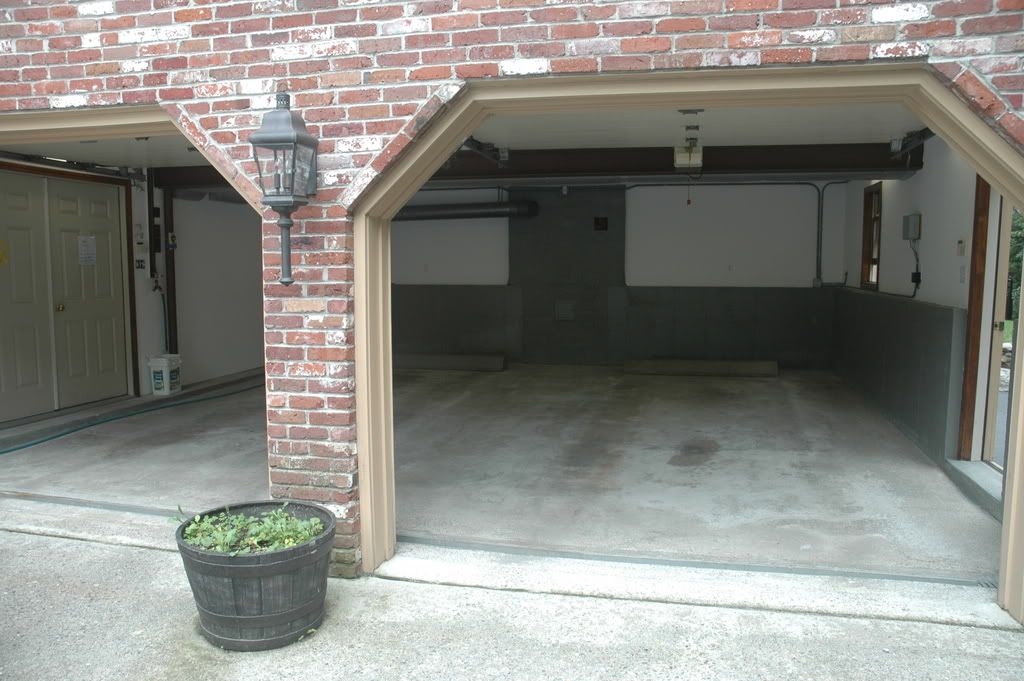
It's a pretty standard 2 car garage. About 576 sq ft of floor space and 212 sq ft of concrete walls. He wanted to do his walls similar to mine so we're doing the epoxy on those as well.

He has a really really nice house and is very fussy. I've spent almost 12 hours grinding the walls. They are almost flat and I'm yet to put the bevel on them (all edges) so I've still got more hours ahead. Should look nice though.

Today the Wolverine supplies turned up. Similar quantities to what I used, however we are putting down a UV resistant clear coat (I used bondtite). The garage doors in his case are pretty much always opened and he gets a good afternoon sun. So after some consultation (phone call/emails) with Eric and Fred he decided on the endurashield. It's rated for outdoor usage so should do nicely. Apparently harder than the bondtite but not as impact resistant. This garage is a perfect candidate for this product.

  • 1 kit (3 gallons) bondtite 1101
  • 3 kits (9 gallons) liquitile 1184 (Dark Grey)
  • 50lbs of flake (DFB-016-G Blend) (Navy Blue, Slate Blue, Moonless Midnight, Ash Gray)
  • 2 kits (2.5 gallons) endurashield 2254 (UV resistant topcoat)

They got delivered to my place today. Here they are sitting on my floor:
DSC_0126.jpg


Grinding continues .......
 
To avoid these ads, REGISTER NOW!

AlphaGarage

Well-known member
Joined
Apr 16, 2008
Messages
1,298
Location
Every Garage, AnyTown, USA
Close. It's a 68 Jensen FF (AWD and antilock brakes).

Is there a quick way to easily distinguish between the 2 on the road?

68, that must have been one of the first production cars with anti-lock brakes. Where they Jensen sourced or from a supplier?

I've had the pleasure of racing around in a Jensen Healey, and of busting my knuckles (and bank account) on an Austin Healey, but never have been in a Jensen. Very attractive, and relatively rare, Brit metal!
 
Last edited:
OP
F

FFPL

Well-known member
Joined
Oct 12, 2007
Messages
157
Location
Massachusetts
Looks like fun!

What are you using for the floor grinding? wall grinding? post a pic or two?
My trusty bosch grinder. Here's a couple of pics from when I used it on my floor.
DSC_0022.jpg

DSC_0007-2.jpg

It really is an excellent tool (and no dust). A little small for really large areas but for what I need it to do (especially the walls) it's ideal.

I'll get some updated pics of the neighbors floor next time I'm over there.
 

bigtorque

Member
Joined
Jul 12, 2008
Messages
19
That Bosch grinder is what I use. its great but a little labor intensive being on your hands and knees for a couple hours. I think its the best way to prep a floor. The concrete is clean , white and pourous when youre done.
 
OP
F

FFPL

Well-known member
Joined
Oct 12, 2007
Messages
157
Location
Massachusetts
Is there a quick way to easily distinguish between the 2 on the road?

68, that must have been one of the first production cars with anti-lock brakes. Where they Jensen sourced or from a supplier?

I've had the pleasure of racing around in a Jensen Healey, and of busting my knuckles (and bank account) on an Austin Healey, but never have been in a Jensen. Very attractive, and relatively rare, Brit metal!

It was the first production 4wd (awd) car. 320 were made between 1966 and 1971 and I have 2 (the 68 and a 70).
Easy to externally distinquish from a interceptor. The FF is 4 inches longer and has 2 vents in each of the front panels and the front styling is different (squarer). And they only came in RHD. Here's my car in California
FFpassside500.jpg


Incidentally Jensen also made all the Austin Healeys, Sunbeam Tigers and did lots of other things you might not have realised.
 
OP
F

FFPL

Well-known member
Joined
Oct 12, 2007
Messages
157
Location
Massachusetts
That Bosch grinder is what I use. its great but a little labor intensive being on your hands and knees for a couple hours. I think its the best way to prep a floor. The concrete is clean , white and pourous when youre done.
What grinding wheels do you use ?
 

willot1

Member
Joined
Oct 27, 2006
Messages
12
Ditto,
What grinding/sanding media are you using? I looked back over your garage and it did not look like you "ground" the whole floor surface. Did you in fact do all the floor with your grinder. It looks like a rotary...
 

DynoDave

Well-known member
Joined
Mar 25, 2005
Messages
1,685
Location
Michigan
Always interesting reading about your flooring adventures FFPL.

And I like you cars very much! :thumbup:
 
OP
F

FFPL

Well-known member
Joined
Oct 12, 2007
Messages
157
Location
Massachusetts
So we did some more grinding today. We're putting a 45 degree bevel on all the concrete walls. Took a little longer than I expected but there is not hurry on this job. I guess that's the nice thing about DIY.
I measured for a 3/4" bevel and marked the line with a sharpie. When I'm woodworking I would take out the line but for the concrete I just left it intact.
The inside corners are a little tricky and the photo doesn't really show the detail.
DSC_0007.jpg

DSC_0009-1.jpg

DSC_0022-1.jpg
DSC_0013-3.jpg

DSC_0020.jpg

DSC_0018-1.jpg

DSC_0019.jpg


Probably a few more sessions and we'll be ready to start coating......
 

Old Relic

Member
Joined
Nov 14, 2007
Messages
15
Where did you get the Bosch grinder with the dust cover and diamond blade.
Rent or bought? I am getting ready to do the same thing to my garage and have never done this before :headscratand know nothing about how to go about it.
Thanks.:headscrat
 
OP
F

FFPL

Well-known member
Joined
Oct 12, 2007
Messages
157
Location
Massachusetts
Where did you get the Bosch grinder with the dust cover and diamond blade.
Rent or bought? I am getting ready to do the same thing to my garage and have never done this before :headscratand know nothing about how to go about it.
Thanks.:headscrat
I bought it from amazon. It's a 1773AK Concrete Surfacing Grinder. Cheapest way to etch is with acid. The nice thing about the grinder is that it gets rid of old coatings. I didn't have this issue in my garage but I do in my neighbors.
 

menz300

Well-known member
Joined
Mar 23, 2008
Messages
72
The beveled corners look great. Did you know you can get diamond plate trim that would have saved lots of time although that is a very nice custom touch and is a one of a kind so far tile we all steel the idea.lol....
 

tojan19

Well-known member
Joined
Jul 14, 2008
Messages
67
do you have to wash the concrete after grinding or just vacuum? How fast does the grinding go 50sf/hr? 100?
 
OP
F

FFPL

Well-known member
Joined
Oct 12, 2007
Messages
157
Location
Massachusetts
do you have to wash the concrete after grinding or just vacuum? How fast does the grinding go 50sf/hr? 100?
We'll just vacuum. The grinding of the walls is slow work. Just about done though. The floor will only take a few hours (~550 sq ft). I'm sure a pro could do it much quicker.
 

GarageStyle

Member
Joined
May 10, 2008
Messages
15
Location
La Habra, CA
:drool:

Sorry to be returning to the aforementioned FF Jensen,
but it's one of my favorite cars, and I just wanted to
say, it looks awesome!
Congrats on having two, and a great garage!!! :bowdown:
 
To avoid these ads, REGISTER NOW!
OP
F

FFPL

Well-known member
Joined
Oct 12, 2007
Messages
157
Location
Massachusetts
So its been a while. In the mean time I've spent way too much time working on this job. Every corner was bevelled which really looks nice now. I even included some painting.

Here are some progress pics of the walls. The floors will follow soon

Primer (bondtite 1101)
DSC_0036.jpg

DSC_0034-1.jpg

Topcoat (dark grey liquitile 1184)
Just on the top of the wall; cutting in at this stage
DSC_0049.jpg

DSC_0051.jpg

DSC_0053.jpg

And the whole wall
DSC_00590.jpg

DSC_00610.jpg


Flakes (no top coat)
DSC_0070.jpg


Endurashield
This stuff is really water clear. This is really an excellent choice for a topcoat. When I did my floor I used Bondtite but this endurashield is really the ducks nuts.
DSC_0084.jpg

DSC_0100-1.jpg

DSC_0103-1.jpg

DSC_0114.jpg

DSC_0107.jpg

And I promised them that I would save a memento of when their young boy wrote his name in the wet concrete stucco. I did this with my finger; dipping in the liquitile to get a good outline
DSC_01160.jpg


Floor will follow
 
OP
F

FFPL

Well-known member
Joined
Oct 12, 2007
Messages
157
Location
Massachusetts
forgot the drain grates. these were blasted and then coated just like the wall was done. I reckon they'd last a couple of hundred years or so.
DSC_0106-1.jpg
 
OP
F

FFPL

Well-known member
Joined
Oct 12, 2007
Messages
157
Location
Massachusetts
and I forgot to add something. The endurashield (urethane) had me stumped for a second. Part A (resin) to Part B (hardener) to .25 to 1 (i.e 1 to 4). For all the epoxy I've done the resin is normally a higher ratio than the hardener (but then this is only my second floor). I'd love an explanation of how this stuff works from Eric. But it does. And it's hard as.
 
OP
F

FFPL

Well-known member
Joined
Oct 12, 2007
Messages
157
Location
Massachusetts
dang that looks great!! a lot of detail
Yes and its been a lot of work. There was a small section of concrete between the doors which was really really ugly (actually it was just a lump/blob of concrete). There was quite a bit of grinding done here. The 'ears' you see will be painted the wall color (white) which will show of the bevels more
After a lot of work here are the results:
primer
DSC_0031-2.jpg


color coat/flake
DSC_00580.jpg


with endurashield
DSC_0111.jpg


and the narrow/tall section next to one of the doors

primer
DSC_0035.jpg


and with endurashield
DSC_0095-2.jpg
 

Dave88LX

Well-known member
Joined
Nov 25, 2006
Messages
664
Location
York, PA
Quick question, don't want to start a new thread. I'm pretty much SOL to install this if it's raining out huh? Was going to try and put it down this weekend, freaking raining all weekend. :mad: Means wet footprints. :mad:
 
OP
F

FFPL

Well-known member
Joined
Oct 12, 2007
Messages
157
Location
Massachusetts
For such a 'normal' garage this was one huge job. I'm not sure if I could have got through it without Fred and Eric from Wolverine and the rush shipments they've done for me.
But the floor is finally done: primer (bondtite); filling cracks (integraflex); topcoat (liquitile; my favorite); and clearcoat (Endurashield; urethane).
And it looks amazing.

....

But back to the floor

To enable us (me) to do the floor out to the front (under the door) I sealed up the single garage doors very similar to what I did when I did my floor.
I used a couple of old door panels that I had as a result of my garage build and added some insulation to keep any weather out. Actually its more of a problem with leaves at this time of the year; I didn't want anything foreign on this floor.

CopyofDSC_0002.jpg


Here are a couple of before pics. Basically after it was cleaned upped and vacuumed. Floor grinding left a really nice open pore concrete floor. The floor grinding was much easier than the walls.

CopyofDSC_0003.jpg

CopyofDSC_0008.jpg

CopyofDSC_0011.jpg

CopyofDSC_0013.jpg


The 1101 bondtite primer was put down which is probably the most important part of the job. I like the nice dark appearance that lets me know its getting in and bonding to the concrete.

CopyofDSC_0029.jpg

CopyofDSC_0035.jpg

CopyofDSC_0040.jpg

CopyofDSC_0046.jpg


I also need to fills some areas (spalling or whatever it's called) on the front area of the garage. I used bondtite mixed about 6:1 with sand. All of the 'holes' in this floor are now really smooth.
CopyofDSC_0047.jpg

I also poured a thick bondtite coating over most of this to leave a glass smooth surface
CopyofDSC_0051.jpg

There where a number of cracks that we dealt with with the integraflex. I really like this stuff as it self levels and pretty much hides any imperfections caused by cracking and expansion joints. And I had some left over from my floor so I donated this to the cause.
Integraflex is a nice thick product mixed 1:1
DSC_0043-1.jpg

CopyofDSC_0048.jpg

CopyofDSC_0049.jpg

CopyofDSC_0050.jpg


My favorite step is the topcoat color. In this case the dark gray liquitile. Damn this stuff is nice.
DSC_0062-4.jpg

DSC_0072-2.jpg

DSC_0073.jpg

DSC_0070-1.jpg

DSC_0075.jpg

The flakes
DSC_0116-1.jpg

DSC_0092-2.jpg

George working the flakes
DSC_0085.jpg

And finally the Endurashield. If I could do my garage floor again this is the stuff I would use. Has a long work time and it is so hard. Actually, George asked me to add some more to the threshold and I said we should sand it first since we went over the 24hr recoat period. So I whipped out some sand paper and 'attempted' to scratch the surface to help the next coat bond. But it didn't do anything; no scratches; nothing. This stuff is really hard when it sets up.
We did 3 coats of Endurashield. We added some non-slip grip (can't remember what its called) in the second coat at which time George told me he wanted another coat. After emails and phone calls to Fred he got it out to us over night. Excellent service; thanks Fred (and Eric).
DSC_0112-2.jpg

DSC_0109-2.jpg

DSC_0111-2.jpg

DSC_0126-3.jpg

DSC_0108.jpg


So I still need to coat the inside of the drain but we're just about done. And about time as well.....

I'm really happy with this project. It took alot of time but I'm so glad I found a company like wolverine to do this with.
 

Dave88LX

Well-known member
Joined
Nov 25, 2006
Messages
664
Location
York, PA
Beautiful! Finally starting mine today. Have to go to Lowes and pick up some mixing supplies.
 
OP
F

FFPL

Well-known member
Joined
Oct 12, 2007
Messages
157
Location
Massachusetts
I really need to post some pictures taken in daylight but here are some with Georges car finally in the garage. The floor looks really superb.

He's done around 5000 miles in his 2002.

DSC_0002-2.jpg


DSC_0003.jpg


DSC_0004.jpg


DSC_0012-2.jpg


DSC_0014-2.jpg


DSC_0008.jpg


DSC_0011-1.jpg
 

gabeancounter

Well-known member
Joined
Jan 8, 2010
Messages
914
Location
east bumble
That looks awesome. I really like the concrete parking blocks. The wife likes to get real close to the wall, always scares me that one day she will keep driving.
 

dinosaur

Member
Joined
Apr 8, 2010
Messages
9
Looks great! How long does the grinding wheel last? Did you do all that with one wheel?
 
To avoid these ads, REGISTER NOW!
Top Bottom