To avoid these ads, REGISTER NOW!

Installing Rubber Cove Molding

Stephenw

Well-known member
Joined
Dec 21, 2006
Messages
1,911
Location
Utah
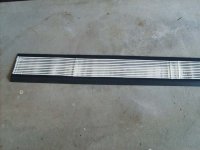
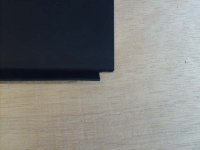
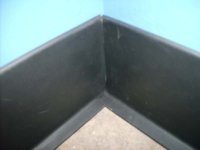
I installed rubber cove molding from Home Depot around the base of my garage. The molding came in 4 ft sections, $1.86 for vinyl, or $3.29 for rubber. I chose rubber because it looked like it was better quality.
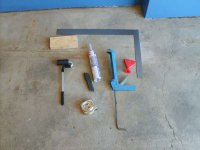
The tools…

Square
Wood (to cut the molding on)
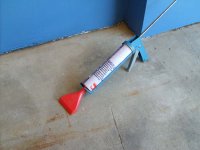
Caulking Gun
Adhesive
Adhesive Nozzle
Tape Measure
Utility Knife
Laminate Roller
 

Attachments

  • Tools.jpg
    Tools.jpg
    64.5 KB · Views: 209
To avoid these ads, REGISTER NOW!
OP
S

Stephenw

Well-known member
Joined
Dec 21, 2006
Messages
1,911
Location
Utah
The first picture shows the nozzle installed on the adhesive cartridge and the assembly installed in the caulking gun. The second picture shows the adhesive spread on the back of a piece of molding. If you apply too much adhesive, it will squeeze out and make a mess. When you apply the molding to the wall, it is important to roll it with a laminate roller to get it to stick properly. Roll from the top down. Do not stretch the molding. It will shrink when the adhesive dries and you will have large gaps.
 

Attachments

  • Nozzle.jpg
    Nozzle.jpg
    64.3 KB · Views: 170
  • Glued.jpg
    Glued.jpg
    62.1 KB · Views: 229
OP
S

Stephenw

Well-known member
Joined
Dec 21, 2006
Messages
1,911
Location
Utah
To make an inside corner joint, cut the toe off the adjoining piece of molding, as in the first picture. Use a piece of scrap to practice making the joint. Experiment with the cut angle, until you find a method that looks good to you.
 

Attachments

  • Inside Cope.jpg
    Inside Cope.jpg
    45.5 KB · Views: 243
  • Inside Corner.jpg
    Inside Corner.jpg
    33.5 KB · Views: 268
OP
S

Stephenw

Well-known member
Joined
Dec 21, 2006
Messages
1,911
Location
Utah
For an outside corner, the molding should wrap around. Fold the molding face to face as in the first picture. Cut about half the thickness of the material from the back of the joint. Cut a “Y” shape from the bottom of the joint, also half the thickness of the material. It is hard to tell from the picture, but this cut is on the portion that is on the wall. Nothing is cut from the portion that lies on the floor. I used weights to hold the outside corners in place until the adhesive set.
 

Attachments

  • Outside Fold.jpg
    Outside Fold.jpg
    51.3 KB · Views: 211
  • Outside Cope.jpg
    Outside Cope.jpg
    37.4 KB · Views: 234
  • Outside Corner.jpg
    Outside Corner.jpg
    58.9 KB · Views: 265
OP
S

Stephenw

Well-known member
Joined
Dec 21, 2006
Messages
1,911
Location
Utah
Here is the finished project. I learned that this is much harder than it looks. Outside corners are a pain to do. Also, have a roll of the blue shop type paper towels and a bucket of warm water handy. Use this to clean up glue that squeezes out.
 

Attachments

  • Finished.jpg
    Finished.jpg
    44.4 KB · Views: 280
To avoid these ads, REGISTER NOW!

FFPL

Well-known member
Joined
Oct 12, 2007
Messages
157
Location
Massachusetts
For an outside corner, the molding should wrap around. Fold the molding face to face as in the first picture. Cut about half the thickness of the material from the back of the joint. Cut a “Y” shape from the bottom of the joint, also half the thickness of the material. It is hard to tell from the picture, but this cut is on the portion that is on the wall. Nothing is cut from the portion that lies on the floor. I used weights to hold the outside corners in place until the adhesive set.
Nice job. When I did mine I mitered the outside corners. The wall is now painted so it contrasts a little nicer.
DSC_0033-2.jpg
 

RickP330

Well-known member
Joined
Apr 12, 2007
Messages
831
Location
Middle Island, NY
Oh man, You really put me to shame LOL. Mine never really stuck fully is coming off in some places, but for the most part looks Okay, at least untill I see yours LOL. Great job.
RickP
 

thrytis

Well-known member
Joined
Jan 26, 2007
Messages
52
Location
North Carolina
Nice explanation. I wish i could have found a reference like this when i was doing mine.

You can also get the cove molding in 50' rolls. You don't have to worry about gaps, but it can also be a pain at times dealing with the extra length ahead of where you are working. I applied the adhesive in sections, attached it to the wall, then moved onto the next section. Premade corners are also available so you don't have to worry about mitering, clipping the bottom, or scoring the back. I think these have to be special ordered if you're getting them from a place like Lowes or Home Depot.

Besides using weights to press on the molding while the adhesive sets, i found clamps with reversible heads (like quick grips or besseys) where helpful for applying pressure around outside corners when an opposite wall was close enough.
 
To avoid these ads, REGISTER NOW!
Top Bottom