To avoid these ads, REGISTER NOW!

Rust Removal by Electrolysis - 5 gallon bath size

Steve in Mi

Well-known member
Joined
Mar 13, 2007
Messages
1,042
Location
Mid Michigan
Small electrolysis (rust removal) bath in operation.

Rust removal by electrolysis has long been an interest of mine and a process I wanted to give a try. There is much on the WWW about it and I have read a lot of the material in preparation for the day when I would actually put together a bath and cook my first rusty part to be cleaned. This project has taken literally years to come to the top of the "To Do List". I think it was about 6 years ago when I purchased the washing soda and several cans of lye in hopes I would be building a bath soon. I'm glad not all projects take this long to accomplish. Priorities.

Finally I have a small 5 gallon pail bath operational and started cooking a couple of mildly rusty hole saws yesterday. This post is not going to deal with the merits of process or what items I use the bath to clean, there are plenty of examples already in the literature. I will only be outlining a few of the steps I took to construct my small pail bath.

I read about how the positive iron (rebar, fence post, sheetmetal etc.) sacrificial electrode required periodic cleaning for the electrolysis to work as planned and further required replacing as it eroded away, another coincidence of the process. Stainless steel was reported to erode at a much slower rate and not need the repeated cleaning. It's reported that there is a safety concern with SS being used (heavy metal - chromium ions ??) and the proper disposal of the waste, and like so much found on the WWW there are some that dispute this. Exercise caution, I will only be operating my bath outside and protected from small humans and pets. BTW, this is a report on how I did something and is not intended as an invitation to anyone on how you should do it.

To make my electrolysis bath I elected to use stainless steel and decided to fabricate a basket to fit the container. I rolled two hoops of 1/4" SS rod to fit the inside of a 5 gallon paint pail, one for the bottom diameter and another, slightly larger, to match the pail diameter near the top. These pails are not all alike - some are shorter than others and with corresponding sidewall taper to facilitate stacking of the empty pails for shipping to the customer that will fill them. Once I had the hoops shaped like I wanted, the top hoop with a tail for ease of hooking up the power supply and the bottom hoop having an extra loop to provide more 'line of sight' coverage, I stick welded them with 309L rod to fix the size. Next I sheared some ~5/8" - 3/4" strips to connect the hoops - make a basket. These ribbon strips I spot welded to the hoops judging the spacing by eye. This can be lots of fun with only two hands (and one hand is needed to operate the spot welder) ViceGrip pliers to the rescue.

The photos below will show progress for bath construction.

First SS hoop; This 1/4" SS rod rolls quite easily in the biggest grove of the ENCO rolls. After rolling a complete 360 I pulled the coil beyond the end of the rolls to continue coiling.
http://i138.photobucket.com/albums/q241/onesteve/Small%20Rust%20removal%20Bath/FirstSShoop1.jpg

Re-roll 1st SS hoop tighter; I didn't experience any evidence of work-hardening with successive passes thru the rolls. Actually the 310ss can be rolled much tighter in a single pass but I approached it without measurements or calculations - good old trial and error method.
http://i138.photobucket.com/albums/q241/onesteve/Small%20Rust%20removal%20Bath/Re-roll1stSShooptighter.jpg

SS Hoops and Pail; Estimate that a 12" high basket will fit the particular pail I have.
http://i138.photobucket.com/albums/q241/onesteve/Small%20Rust%20removal%20Bath/SSHoopsandPail.jpg


Scrap SS for ribbons; Had these two pieces of scrap stainless - got all 8 ribbons from one of them.
http://i138.photobucket.com/albums/q241/onesteve/Small%20Rust%20removal%20Bath/ScrapSSforribbons.jpg


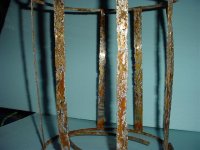
Small Bath guts; Parts to be joined - welded hoops and ribbon strips. Cut the 24" strips in half, 8 12" pieces.
http://i138.photobucket.com/albums/q241/onesteve/Small%20Rust%20removal%20Bath/SmallBathguts.jpg

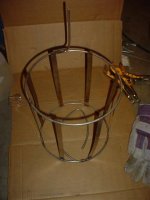
Spot Welder and Basket; Spot welded the ribbons to the bottom hoop first, clamped w/vice grip pliers two ribbons to the top hoop for alignment and spotted them into place.
http://i138.photobucket.com/albums/q241/onesteve/Small%20Rust%20removal%20Bath/SpotWelderandBasket.jpg

SS Basket in Pail; Check for fit of the assembled basket in the pail. Good enough!
http://i138.photobucket.com/albums/q241/onesteve/Small%20Rust%20removal%20Bath/SSBasketinPail.jpg

Washing Soda; This is the additive (one tablespoon per gallon of water) that adds to the conductivity of the water to allow the electrolysis to work for you.
http://i138.photobucket.com/albums/q241/onesteve/Small%20Rust%20removal%20Bath/WashingSoda.jpg

Bath in operation Aug 5, 08; The setup in operation (finally) and drawing ~4 amps at 6 volts from the battery charger.
http://i138.photobucket.com/albums/q241/onesteve/Small%20Rust%20removal%20Bath/BathinoperationAug508.jpg

First bubbles; It was exciting to see the bubbles coming off immediately, I first noticed them emitting from the wire and then from the items to be cleaned.
http://i138.photobucket.com/albums/q241/onesteve/Small%20Rust%20removal%20Bath/Firstbubbles.jpg


A bigger bath is in the works.

http://i138.photobucket.com/albums/q241/onesteve/Small%20Rust%20removal%20Bath/DrumandSShoopandrustcollector.jpg
 
To avoid these ads, REGISTER NOW!

e-tek

Well-known member
Joined
Dec 19, 2007
Messages
10,690
Location
Saskatoon, SK
I've seen this in a few posts/forums, but still haven't tried it. I figure I bought a sand-blaster for a reason! But this would work best for any parts with "hidden" areas. Nice work!
 
OP
S

Steve in Mi

Well-known member
Joined
Mar 13, 2007
Messages
1,042
Location
Mid Michigan
The electrolysis process is not generally intended for those jobs that you can do by sand blasting. Sandblasting attacks the base metal and can heat the item to be cleaned to the point of warping - electrolysis does neither.
 

george4

Well-known member
Joined
Feb 18, 2006
Messages
773
Location
N California
Nice write up. I have used this method several times with success.
Another way to the make the positive sacrificial is to take steel fencing wire (2”-4” squares), cut to fit so it makes a curved liner in your bucket. Hook your positive direct to that. The sacrificial does have to be wire brushed occasionally.
I use the stick across the top as you show to hang the part with negative attached.
Wipe down and oil the cleaned object as soon as you take it out.
 

goodfellow

Well-known member
Joined
Dec 17, 2006
Messages
2,288
Location
NoVA
I have worked with that process several years ago, and did some research on the hazards before starting. You have a very good setup, but most sources I have checked recommend against stainless electrodes in electrolysis due to severe health hazards -- as you indicated.

I can't remember the exact chemical produced, but the chromium based compound is VERY toxic. It leaches into the water and can be readily absorbed by your body through skin contact. I think even the vapors are toxic.

Good luck!!!
 
Last edited:

kbs2244

Well-known member
Joined
Nov 11, 2006
Messages
14,065
Nice workmanship.
Like the others, I am not sure about the SS.
I have not yet done it myself, but the guys around here use rebar and old lawnmower blades.
Both are throw away and thus real cheap.
And they get eaten up in the process anyway.
One fellow did the 55 gal barrel with the 4x4 hole concrete mesh rolled around the outside.
Worked fine, but after 3 cast iron fence posts spending 3 24 hour days apiece, the mesh was gone.
Now he grabs old steel fence posts whenever he can.
 

W-Cummins

Well-known member
Joined
Jan 9, 2006
Messages
1,639
Location
Iowa
I too am using the SS now. The formation of the Cr6 is not going to happen in that cell. Add more NaCO3 or use TSP and turn up the volts to 12 and hit it with as many amps as your battery charger will make. It gets it running nicely! I get a nice foam like a good head of beer on my tank when it's running. Cleans really nice and fast at about 20 amps! BTW there was some information about the possible formation of H gas, But I have run it for 20-30 min and got a good head of foam on mine and tried to light it up with a torch and nothing happened no flame :-( so I'm also not worried about running it indoors.

William...
 
Last edited:

rocketman

Well-known member
Joined
Jul 16, 2008
Messages
263
Location
Chicagoland
BTW there was some information about the possible formation of H gas, But I have run it for 20-30 min and got a good head of foam on mine and tried to light it up with a torch and nothing happened no flame


:headscrat Can you say Hindenburg??

Potential Darwin Award winner here!
 

W-Cummins

Well-known member
Joined
Jan 9, 2006
Messages
1,639
Location
Iowa
:headscrat Can you say Hindenburg??

Potential Darwin Award winner here!

So Rocket show us your super understanding of electrochemical cells and show us the balanced formula for the chemistry here with the production of the free H2, For extra credit you can also impress us with the use of the different bases and why not tackle the supposed production of the hexavalent Cr from the SS electrodes too...

William...
 
Last edited:
OP
S

Steve in Mi

Well-known member
Joined
Mar 13, 2007
Messages
1,042
Location
Mid Michigan
William, I'm in no hurry, for now I'm trying to learn about bath operation. The low setting seems to cause lots of activity - 12v even more. I have 180 amps I could feed it from my little DC welder but I must crawl before I run. Already learned that the froth on top (which btw, did start showing up after a few minutes of operation) disappears when you turn the power off - and I think it collected on the SS. There was a bunch of fuzzy rusty looking crud on the ss basket but movement of the basket up and down seemed to dislodge it fairly easily.

How do you remove the froth, if you do?
Do you ever have to do anything more than rinse the stainless to clean it?
What if anything happens to the item being cleaned if it is left in way past clean?
 

rocketman

Well-known member
Joined
Jul 16, 2008
Messages
263
Location
Chicagoland
Actually there is an abundance of hexavalent chromium in common ground water. Whether it builds up on the stainless electrodes or not during electrolysis is immaterial. It is toxic as hell.

Using a torch to check for the presence of hydrogen.... who's the *****. :)
 

W-Cummins

Well-known member
Joined
Jan 9, 2006
Messages
1,639
Location
Iowa
Steve it will not attack the base metal just the oxide layer. I don't recommend using your welder to get more amps! I have noticed that the current is kinda self limiting as the electrodes and solution seems to limit it. When you first start out you get more current and after a while it drops off as the SS gets "covered" with the deposits that form on/from it. When I was using the rebar it was getting chewed up fast and would get covered fast too. I was rinsing off the crud to make it run faster every 30+ min or so. The froth on the top just goes away when the small bubbles all pop. The other kinda nice thing about TSP is it also removes grease/carbon from the parts.

William....
 

W-Cummins

Well-known member
Joined
Jan 9, 2006
Messages
1,639
Location
Iowa
Actually there is an abundance of hexavalent chromium in common ground water.

Not unless you live in a toxic waste dump it isn't!

Whether it builds up on the stainless electrodes or not during electrolysis is immaterial. It is toxic as hell.
No WRONG!
That's the question we are interested in here, it's not immaterial at all, it's the central point claimed as to why you should not use SS as the electrode. If your going to be in this discussion you should at least try to follow along :headscrat

Using a torch to check for the presence of hydrogen.... who's the *****. :)

The one that thinks that the lots of H2 is produced in this process?? I don't think it is. As for testing for what, if it was present at all, would be a tiny amount of H gas, the torch was as good of a method to identify it as any I have here. So tell us how you would test for the presence of Hydrogen??

BTW I'm still waiting for the balanced formula...


William...
 
Last edited:

rocketman

Well-known member
Joined
Jul 16, 2008
Messages
263
Location
Chicagoland
Gee... I love love yanking your chain...

There are a few litmus tests for detecting even small amounts of the stuff that goes bang.

I'll stay out of the conversation. Back in the beginning, I was just commenting on the decision to "see" if any hydrogen is produced by the process by using a torch. Working and playing with many chemicals that have pretty explosive properties under the right conditions (APCP Ammonium Perchlorate Composite Propellant) I thought that choice of test kind of.... stupid.
 
OP
S

Steve in Mi

Well-known member
Joined
Mar 13, 2007
Messages
1,042
Location
Mid Michigan
Actually there is an abundance of hexavalent chromium in common ground water. Whether it builds up on the stainless electrodes or not during electrolysis is immaterial. It is toxic as hell.

If you believe what you wrote, I'll ask, where do you get your drinking water? I bet either Lake Michigan or a well - both ground water.

The heavy metal (chromium) of concern in this process would be from the stainless steel used as an electrode.

I find lots about hexavalent chromium mostly in processes where high temperatures are involved. I'm interested in SAFETY but not "the sky is falling" chants from fear driven woosies.

http://www.osha.gov/SLTC/hexavalentchromium/index.html
http://www.osha.gov/OshDoc/data_General_Facts/hexavalent_chromium.pdf
http://www.osha.gov/Publications/OSHA_small_entity_comp.pdf
http://solutions.3m.com/wps/portal/3M/en_US/OH-ESHexChrom/Hexavalent_Chromium/
 

jerry j

Well-known member
Joined
Feb 16, 2006
Messages
102
Location
eastpointe, mi.
Steve,

Very well put ! ! ! I've used S/S in my 50 gal. drum for 5 yrs. now....
Never a problem... I guess if you were to stand over the barrel and covered
your head with visqueen.... Nah, that wouldn't do anything either..
Also my set-up is in my workshop, closed up in the winter.. No pwoblm !!

If "your" worried about the S/S, Don't use it...... I will not use anything but ! ! ..... :beer:
 
OP
S

Steve in Mi

Well-known member
Joined
Mar 13, 2007
Messages
1,042
Location
Mid Michigan
Steve,

Very well put ! ! ! I've used S/S in my 50 gal. drum for 5 yrs. now....
Never a problem... I guess if you were to stand over the barrel and covered
your head with visqueen.... Nah, that wouldn't do anything either..
Also my set-up is in my workshop, closed up in the winter.. No pwoblm !!

If "your" worried about the S/S, Don't use it...... I will not use anything but ! ! ..... :beer:

Jerry, I would be interested in knowing how you do it/seeing pictures of your setup. My little ss basket was about destroyed after only 72 hours of operation.
 
OP
S

Steve in Mi

Well-known member
Joined
Mar 13, 2007
Messages
1,042
Location
Mid Michigan
My electrolysis rust removal bath is a big disappointment. 2 hole saws (each approximately 3" diameter), only moderately rusty, were hung in the bath with 6 volts @ 4 amps being fed from the battery charger for 72 hours. Observations before switching off the power and removing the samples - constant flow of bubbles to the surface of the bath but no froth. The basket was covered with lots of crud. The whole saws as removed appeared to have no rust and are black in color (no shiny metal). The Stainless steel basket was removed and had a crusty buildup on all surfaces below the water line. Most all of the crusty material was removed by a hard spray of water and slight rubbing of the surface. Way more material was on the basket than that removed from the hole saws, way more. The 0.025" thick ribbons are eroded/eaten away from the edges and have multiple pin-holes through them well in from the edges. The bottom hoop is badly pitted. Based on what was reported by others I choose to use SS primarily for these two reasons;

1.) Stainless steel erosion is much slower than for iron electrodes, last longer.
2.) Little to no buildup on stainless as compared with iron electrodes, less cleaning.

Certainly not my experience! Did I do something wrong, use the wrong stainless, are the reports in error - what went wrong with my experiment?

An immediate thought I had as I was washing the basket - if SS is slower eroding, then the guys that use iron for electrodes and walk away for days (some report this as a process you start and come back in a few days to retrieve your cleaned parts) ... Well ... they have to be tossing in whole automobiles as the sacrificial electrode.
 

Attachments

  • SS Basket 72 hours 2 (Small).jpg
    SS Basket 72 hours 2 (Small).jpg
    48.7 KB · Views: 65
  • Spot Welded basket (Small).jpg
    Spot Welded basket (Small).jpg
    22.5 KB · Views: 62

Rory Bellows

Well-known member
Joined
Jan 14, 2006
Messages
1,083
Location
Ohio
It sounds like everything worked exactly as it should have. I think the ss bar was too thin though causing excessive corrosion of the anode. .025" is way too thin in my opinion but if you have it use it.
BTW, I just pulled some brackets out of an electrolysis bath today. Worked as it always does ---Good. I did however pick up a new product you might want to try called Evapo-Rust. I put two hub pullers from an auction in overnight. They came out factory fresh. Pretty good for two pullers that are 30 years old and covered in rust. It's not cheap at $20 a gallon but it's reusable and can be dumped down the drain or in the yard safely. It can be found at Harbor Freight in gallons or Autozone in 32oz.
I still plan on using electrolysis and I even picked up another battery charger for $2 at the auction with the pullers. But in some instances Evapo-Rust is better, and faster but not cheaper.
 
To avoid these ads, REGISTER NOW!

W-Cummins

Well-known member
Joined
Jan 9, 2006
Messages
1,639
Location
Iowa
I guess I should have taken some before and after pictures of the stuff I just ran.... I suppose I could go and find some nasty rusty stuff and run it again.... you tank looked like it was hardly running in the pictures. here is mine running with some re-bar

quincy390-014.jpg


it gets that much foam in about 2-3 min of running. Put some more electrolyte in it and a heavy duty electrode in it, and kick up the voltage


William....
 

kbs2244

Well-known member
Joined
Nov 11, 2006
Messages
14,065
I think your problem may be that the SS is resisting the corrosion.
That is what it is designed to do.
But in this case we want the electrode to corrode.
It is called a “sacrificial” anode.
Switch to a piece of rebar or some other mild steel scrap and try again.
 

W-Cummins

Well-known member
Joined
Jan 9, 2006
Messages
1,639
Location
Iowa
Ok So I went out and found a nasty rusted part outside... this drum ( Chevy 14 bolt) had been on the truck since 1979. And has been sitting outside in the weather next to the road for about 6 years after I took them off the truck... Nice and rusty

I put it into the bath for 1 hour at 12v 10 amps and used a SS electrode... here are the results you can see where the surface was machined and not rough cast it's all ready cleaning up nicely...

wheel60-1.jpg


wheel60-2.jpg


wheel60-3.jpg


wheel60-4.jpg


And back into the bath this time for 2 more hours ... more pics to follow....

wheel60-5.jpg
 
Last edited:

goodfellow

Well-known member
Joined
Dec 17, 2006
Messages
2,288
Location
NoVA
In my case, I had a steep learning curve and not so good results using a plain battery charger. A friend that does his own plating suggested that I use a better power supply. I bought this Lambda adjustable unit on e-bay and it was the answer to my problems as far as electrolysis is concerned.

I've also used it to nickel plate some small parts, and will try my hand at larger pieces once I get setup in my garden shed.
 

Attachments

  • PICT0034-400.jpg
    PICT0034-400.jpg
    10 KB · Views: 12
  • PICT0035-400.jpg
    PICT0035-400.jpg
    14.5 KB · Views: 33
Last edited:

W-Cummins

Well-known member
Joined
Jan 9, 2006
Messages
1,639
Location
Iowa
Here is 3 hours total time under power. As you can see the inside is cleaning up nicely. I probably should take the drum out and hose it off and clean off the dark stuff so it has a better surface to chew on but I want to show the lazy mans method here. :shocking:

wheel180-1.jpg


So I also should have moved the electrode as the closer it is to the part the better it cleans the area. The outside did not get as clean as it had to go around the part to get to it. Remember this process follows standard chemical equilibrium and diffusion principles. It will reduce the stuff that is closest to the electrode and the more "easily" reduced compounds get it first...

wheel180-3.jpg


So back in it goes for another 2 hours but with the electrode on the other side!

wheel180-2.jpg


William....
 

jerry j

Well-known member
Joined
Feb 16, 2006
Messages
102
Location
eastpointe, mi.
Steve,

Sorry for the LATE get back, but have been away from computer
for a while....

I wrote an article for the oldgas.com site with picts. of my setup and results.

If I get some time tomorrow I'll send 'em along..

There are skeptics everywhere....

Regards Jerry......
 

jerry j

Well-known member
Joined
Feb 16, 2006
Messages
102
Location
eastpointe, mi.
William, Yours is working pretty good... Need patience with this process
though.. I start mine and then go do something else...

Couple of pointers...

Do Not use an automatic charger..
Make sure the sacrificial piece is near the size of the part..
The closer the part is the quicker it works.. (not enough to touch
Though .
Generally works only "line of sight". Best to turn when 1 side is done.
MAKE Sure the charger clips make GOOD contact. I use a wire
wheel on drill motor to clean spot for clamps..
works Great for, not only rust, but paint too....

Right now I have a fire hydrant in my barrel, ready to come out.
Very thick paint....... GONE.....

Jerry......
 

W-Cummins

Well-known member
Joined
Jan 9, 2006
Messages
1,639
Location
Iowa
Yep I know it can take time to work but it also can crank up well too... here is the last set I'm doing for now 300 min under power in the tank

I wanted to see that that slightly dark area was on the machined drum surface so I scraped it off came right off and underneath the "Crust" it was nice and clean....

wheel300-1.jpg


Here is the out side after moving the electrode to that side it's still not 100% done but very close...

wheel300-2.jpg

wheel300-3.jpg


Here is a few pictures of the SS electrode I used it's 1.25"X125" X .125" 304 tube it has been used for other runs and shows little "wear"

electode01.jpg


electode02.jpg


BTW I was talking to a buddy the other day and he had a great idea that I have not tried yet. He uses a old dish towel and places it over the electrode and then sets the part right on it. It prevents the shorting out of the electrode and the part and you can't get much closer to the part than that!

William....
 

kbs2244

Well-known member
Joined
Nov 11, 2006
Messages
14,065
I have to say that in all the reading I have done about this, you are the first one to use SS that works.
You sure are getting good results.
I like the dish towel idea.
 

Firefyter-Emt

Well-known member
Joined
Sep 29, 2005
Messages
171
Location
CT
Hey guys, getting in a bit late on this one, but I thought I would share my 5gal tank. I have replaced the anodes once in three years and have used it maybe a few dozen times. I always keep it filled and the bucket has a lid that stays on when not in use.

Pay no mind to the bag, it is washing soda, not baking soda... I was not thinking when I marked the bag!
When I rebuilt this, I dropped down to 4 anodes just because it gave me more room to fit things in the bucket without hitting them.
What is nice is that with the nuts on the outside, I can still unbolt the old used anodes and throw them away. Then I just need some 1" stove bolts and a 4' length of 3/4" strapping from the hardware store to replace them. Also, If I were to do it again, I would buy a braded copper ground strap and run that around the bucket and just poke the bolts thru it with some washers to make the outside connections. I also changed the clip cables to the parts to fit outside the tank. Make the wire just long enough so both ends can be clipped around the bucket and to each other. Nice storage this way and they do not stay in the bucket.


electrolysis-1.jpg


electrolysis-3.jpg
 
Last edited:

e-tek

Well-known member
Joined
Dec 19, 2007
Messages
10,690
Location
Saskatoon, SK
You guys with this chemistry class....my sand blaster would make short work of this stuff and look much cleaner!
 

rinny_tin_tin

Well-known member
Joined
Dec 20, 2008
Messages
636
Location
Northern Virginia
This is all so fascinating. For Steve in MI: Steve - as you stated - there are different grades of SS. In response to you puzzle regarding why yo got relatively poor results: Is there a SS makeup difference between the SS longitudinal strips and the collector ring - such that the electrolysis process addressed the gradient between those two parts in lieu of focusing on your rusted holesaws? Looking at the excellent results Cummins received with what appears to be a relatively crude setup (in contrast to your basket design)- I note that in the Cummins case, there is only one (type) SS electrode - namely the thick rectangular (and homogeneous) tubing.
 

Junkman

Well-known member
Joined
Dec 18, 2006
Messages
6,624
Location
Northeastern CT
I have been considering this for a long time, and thought that there might just be a better and easier way to do this. I did consult with a friend that has been using this method for a number of years, and he has devised a way to found a way to completely eliminate the foaming crud, and can run a tank 24/7 without any electrode cleaning. I have learned some of the technique, but have yet to get all the exact details. I will have them this spring when I set up my cleaning tank. Knowing him the way that I do, I know that it works the way that he says it does. So far, he has kept this information close to the vest, and will only share it if you sign a non disclosure document and he has trusts in you. I believe that he intends to market this new idea.
 
OP
S

Steve in Mi

Well-known member
Joined
Mar 13, 2007
Messages
1,042
Location
Mid Michigan
This is all so fascinating. For Steve in MI: Steve - as you stated - there are different grades of SS. In response to you puzzle regarding why yo got relatively poor results: Is there a SS makeup difference between the SS longitudinal strips and the collector ring - such that the electrolysis process addressed the gradient between those two parts in lieu of focusing on your rusted holesaws? Looking at the excellent results Cummins received with what appears to be a relatively crude setup (in contrast to your basket design)- I note that in the Cummins case, there is only one (type) SS electrode - namely the thick rectangular (and homogeneous) tubing.

I have no idea what stainless the thin strips are, the 1/4" rings at top and bottom of the basket 310 and the stick weld joining the rings/hoops was 309L. The 309L weld was not effected (no pitting) and the 304 SS that Cummins used appears to hold up well. I can't speak to the effect of dissimilar SS's, don't know. I have some heavier SS electrodes to try (don't know what SS they are and again I've combined possibly 3 different SS's in there makeup - useing what I have on hand) but I'm not sure when I will next have a chance to test a bath.

Firefyter-Emt
Your bath is just too pretty - great job. Do you have any examples, with photos of coarse, of items you have cleaned in it?
 

rinny_tin_tin

Well-known member
Joined
Dec 20, 2008
Messages
636
Location
Northern Virginia
I have no idea what stainless the thin strips are, the 1/4" rings at top and bottom of the basket 310 and the stick weld joining the rings/hoops was 309L. The 309L weld was not effected (no pitting) and the 304 SS that Cummins used appears to hold up well. I can't speak to the effect of dissimilar SS's, don't know. I have some heavier SS electrodes to try (don't know what SS they are and again I've combined possibly 3 different SS's in there makeup - useing what I have on hand) but I'm not sure when I will next have a chance to test a bath.

Firefyter-Emt
Your bath is just too pretty - great job. Do you have any examples, with photos of coarse, of items you have cleaned in it?

You might want to try just one type of SS like Cummins - regardless what it is such that its only the SS and the rusty part. Good work and I'll watch this thread for more pics/news
 
To avoid these ads, REGISTER NOW!
Top Bottom