To avoid these ads, REGISTER NOW!

New work bench area for my shop

75Dually

Well-known member
Joined
Dec 5, 2013
Messages
444
Location
Lubbock, TX
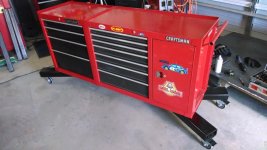
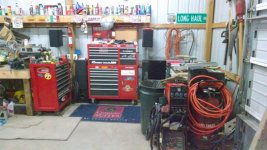
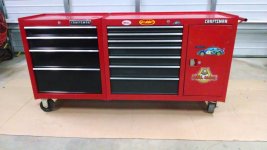
I am about to start rearranging my work bench area in my shop. My shop is 1200 square feet. I mainly build car and truck projects, along with maintaining my dirt bikes. I am hoping to get some good ideas from this website and forum. Right now I have 3 Craftsman boxes and they are stacked full of tools. So it is my plan around Christmas break to make additional counter tops where I can slide some new boxes under the counter tops, and make new recesses for the existing boxes.

I will try and get a before shot so you can see what I am starting out with, and then some pics of how I am progressing.

Can some of you guys that have US General boxes let me know how you are getting along with them. Heard some good and some not so good stories about them. Just looking for some input from folks that own them.

Here was the post i put in the toys section just now. Check it out! http://www.garagejournal.com/forum/showthread.php?t=226902
 
To avoid these ads, REGISTER NOW!

DIC

Well-known member
Joined
Aug 2, 2009
Messages
698
I don't have one But a lot of people brag on them for the price
 
OP
7

75Dually

Well-known member
Joined
Dec 5, 2013
Messages
444
Location
Lubbock, TX
Here is the current pictures of my tool area for my shop. I really need additional room, more tool storage, and work counter space. I need to move some items around, like my table saw to a different part of the shop so I can build shelves and place some new tool boxes.

So I am going to make up some plans and ask Santa for some new tool boxes! Trust me he is a very generous guy and we get along well...

My Dad is coming for the holidays, and if he is like your dad he needs a project to keep him busy. So I will get all the items ready and we can get started once he shows up.

Enjoy the pics, and I will update as I progress.
 

Attachments

  • Garage 1.jpg
    Garage 1.jpg
    88.9 KB · Views: 1,255
  • Garage 2.jpg
    Garage 2.jpg
    91.5 KB · Views: 1,085
  • Garage 3.jpg
    Garage 3.jpg
    80.8 KB · Views: 974

kbs2244

Well-known member
Joined
Nov 11, 2006
Messages
14,065
I have found that I do not use my work bench much anymore.
I have two roll around work tables about 3 x 4.
They are HD enough to put a lawn tractor on.
I like being able to walk around, or sit and spin around, what I am working on.
 
OP
7

75Dually

Well-known member
Joined
Dec 5, 2013
Messages
444
Location
Lubbock, TX
Good luck organizing can be on of the most difficult things to do in a shop

Mitchell you are very right. I try to keep a clean shop, and clean up every so often. I was doing some planning on where I want some of the items and new counters. I think what I have come up with will work. I looked at your shop, very nice!
 
OP
7

75Dually

Well-known member
Joined
Dec 5, 2013
Messages
444
Location
Lubbock, TX
I have found that I do not use my work bench much anymore.
I have two roll around work tables about 3 x 4.
They are HD enough to put a lawn tractor on.
I like being able to walk around, or sit and spin around, what I am working on.

I would like to see your roll around work benches. Any pics?
 
OP
7

75Dually

Well-known member
Joined
Dec 5, 2013
Messages
444
Location
Lubbock, TX
Here is a nice little portable table I made for the shop a while ago. It is a aluminum restaurant tray from a restaurant supply house, and some 1" mild steel tubing. It is very stable and holds more than you can think it can. I use it all over the shop mostly as a tool holder and assembly tray when I am doing small jobs close to the action.
 

Attachments

  • Tray 1.jpg
    Tray 1.jpg
    54.7 KB · Views: 315
  • Tray 2.jpg
    Tray 2.jpg
    139.9 KB · Views: 353

bowtie1972

Well-known member
Joined
Jan 10, 2008
Messages
71
Location
yuba city
this is the ONLY way to keep the shop neat and clean
as soon you put something it you have lost!!!!!!!!!!
 

Attachments

  • IMG_0380.jpg
    IMG_0380.jpg
    146.5 KB · Views: 531
  • IMG_0379.jpg
    IMG_0379.jpg
    144.1 KB · Views: 569
  • IMG_0378.jpg
    IMG_0378.jpg
    144.7 KB · Views: 753
  • IMG_0377.jpg
    IMG_0377.jpg
    146.1 KB · Views: 714
OP
7

75Dually

Well-known member
Joined
Dec 5, 2013
Messages
444
Location
Lubbock, TX
You need a floor plan with door locations.

Funny you should say that... My first degree is in Architecture. I was working on the plans just the other night. OK more like rough drafts, but you are correct. Never start a project without a plan in hand!:thumbup:
 
OP
7

75Dually

Well-known member
Joined
Dec 5, 2013
Messages
444
Location
Lubbock, TX
this is the ONLY way to keep the shop neat and clean
as soon you put something it you have lost!!!!!!!!!!

So what year is the 3/4 ton up in the air? Short bed or long bed?

We have a 3/4 ton 61 fleet side short bed big window we just brought home. And on the 20th I am picking up a 64 fleet side short bed with a 327 in it. Both of these are project trucks for my son, his first ride.

This is what I am currently working on. Here is the build thread. http://www.duallyscene.com/forums/projects/dually-project-and-stylin-t7688.html
 

67carl

Well-known member
Joined
Dec 10, 2013
Messages
3,881
Location
California
Can some of you guys that have US General boxes let me know how you are getting along with them. Heard some good and some not so good stories about them. Just looking for some input from folks that own them.

I've got a US general toolbox. It's my first big toolbox so I have nothing to compare it to, although I did look at other brands (Crafstman, Kobalt, etc...) and the US General felt sturdier and built just as well, if not better, for half the price. It had tall casters on it and my plan is to build a torsion top workbench bench (plans I found on this site - thanks guys!) and be able to roll the box under it. For this reason I took the tall casters (6 inch) off and put on steel 2" ones I got at Home Depot to lower it's overall height. I think it's a great deal and would do it again.
 
OP
7

75Dually

Well-known member
Joined
Dec 5, 2013
Messages
444
Location
Lubbock, TX
During the Christmas break I have started working on the new metal working table. My idea came to me when I was in Sears doing some Christmas shopping and I came across a 26" 5 drawer box that was on clearance. Mega good deal!! I already had an older 40" box of the same height. I have had this 40" box for a very long time. So I joined the two together tonight and made one very long box.

I could have done the standard 4 leg table with casters build, but I wanted a large drawer system below the table. So my plan is to build an exoskeleton around these boxes (and try not to make it look hideous!). I will also update the casters as well. The top will be 2'x8'.

As we progress with this build I will take some more pics.
 

Attachments

  • Metal table 3.jpg
    Metal table 3.jpg
    75 KB · Views: 403
  • Metal table 1.jpg
    Metal table 1.jpg
    70.4 KB · Views: 577
Last edited:

carcajou

Well-known member
Joined
Dec 7, 2012
Messages
879
Location
SW Alberta
75 dually I would make your top a little deeper leaving room for C clamps if needed. Nice looking box set up.
 

Aquaticbob

Well-known member
Joined
Dec 3, 2013
Messages
488
Location
Seattle
75 dually I would make your top a little deeper leaving room for C clamps if needed. Nice looking box set up.

Make sure to have at least a little overhang to clamp things down on the edge. Also if you're gonna be welding on this table (I'm sure you will be) you could make a dedicated spot to place your ground cable to the table. In terms of under table, would also be cool to have a shelf to put the welder on to. I see you have your carts to tote the welders around, but if you plan on doing most welding at the table that's always an option
 
OP
7

75Dually

Well-known member
Joined
Dec 5, 2013
Messages
444
Location
Lubbock, TX
75 dually I would make your top a little deeper leaving room for C clamps if needed. Nice looking box set up.

That is my plan. The boxes are 18" deep and I plan on the top being 24", but I might go wider...

Make sure to have at least a little overhang to clamp things down on the edge. Also if you're gonna be welding on this table (I'm sure you will be) you could make a dedicated spot to place your ground cable to the table. In terms of under table, would also be cool to have a shelf to put the welder on to. I see you have your carts to tote the welders around, but if you plan on doing most welding at the table that's always an option

You guys are right on target! I planned on making a dedicated ground tab, and I will also have a rod(s) for clamps and other items. I will have 2 power strips, one on each end. I wont make a shelf for the welders because I use them all around the shop and if they are stuck with this big monster then I wont be able to get around as easy. I really like to bring my tools to the job at hand and not bring everything back to the bench.
 
OP
7

75Dually

Well-known member
Joined
Dec 5, 2013
Messages
444
Location
Lubbock, TX
To avoid these ads, REGISTER NOW!

1/2 Cup

Member Emeritus
Joined
Apr 28, 2012
Messages
19,283
Location
Shepparton. Victoria. Australia

ez-duzit

Well-known member
Joined
Jun 24, 2013
Messages
5,094
Location
Marina del Rey
Roll-away cabinets make a great base for a workbench. I have 2 Kennedy's and 3 Craftsman. None are ever moved. Some have had the wheels removed, for stability, and to allow vertical space for a substantial frame for the bench top while maintaining a comfortable height. This raises the heavy bench top far enough above the top drawer that the substantial overhangs do not impede access.
 
OP
7

75Dually

Well-known member
Joined
Dec 5, 2013
Messages
444
Location
Lubbock, TX
Here is what I did for a bench with (US General) tool storage:

http://www.garagejournal.com/forum/showthread.php?t=126086

Steevo that is an excellent build. You should be proud of that.

1. How well have those cabinets held up so far?
2. What kind on mill do you have? Where did you get it? (I am looking for one)

I was working on the base for my roller welding station today. I will post pics tomorrow once I get it tacked up.

Have you seen my Dually build? Check it out. Let me know what you think... http://www.duallyscene.com/forums/projects/dually-project-and-stylin-t7688.html
 
OP
7

75Dually

Well-known member
Joined
Dec 5, 2013
Messages
444
Location
Lubbock, TX
Here is the backbone that the cabinets and the caster wheels will be attached to. This will be on the underside of the cabinets. I will attach the upper structure to this backbone as well. It is made out of 3"x5" 1/4 wall box tubing. Super heavy stuff let me tell you!

Tomorrow I will drill and tap the holes for the casters and get the cabinets mounted to it. Should be something fun to do on Christmas afternoon!
 

Attachments

  • Metal table 4.jpg
    Metal table 4.jpg
    53.1 KB · Views: 150
OP
7

75Dually

Well-known member
Joined
Dec 5, 2013
Messages
444
Location
Lubbock, TX
So the table build is moving along :D
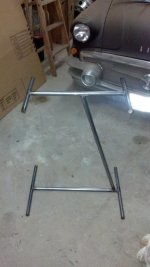
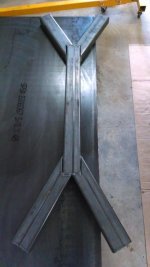
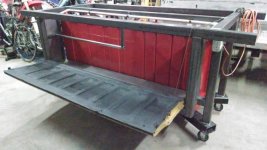
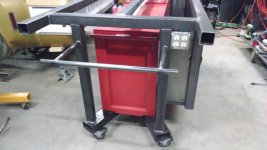
. With my son's help we got all the holes drilled to mount the backbone to the boxes and the casters. My son got to use the tap set for the first time tonight. "Dad this is easy", that is until you try to do it by yourself...:thumbup: Then he got a quick lesson and he was off to the races!

After all the drilling and tapping we had a completed backbone, well almost... The underside got a good coat of Rustoleum black, and tomorrow night the topside will get it's coat as well. Then we can get it bolted back to the boxes for the final time.

Once that all gets completed I can move on to the top frame portion of the build and move closer to having this table up and working. And I need it soon because my dually needs a lot of work still.
 

Attachments

  • Metal table 5.jpg
    Metal table 5.jpg
    52.9 KB · Views: 201
  • Metal table 6.jpg
    Metal table 6.jpg
    58.3 KB · Views: 199
OP
7

75Dually

Well-known member
Joined
Dec 5, 2013
Messages
444
Location
Lubbock, TX
OK I got the boxes and the backbone flipped right side up. See pic below.

This thing rolls so easy with the casters I bought. Yeah they were not cheap, but you get what you pay for...

So I started to cut the upper frame work today. I got some of it tacked together, and now I am mocking it all up. So far it is starting to look really cool. I will post some additional pics tomorrow.
 

Attachments

  • Metal table 7.jpg
    Metal table 7.jpg
    82.8 KB · Views: 308
OP
7

75Dually

Well-known member
Joined
Dec 5, 2013
Messages
444
Location
Lubbock, TX
Got to work early today in the shop. I finished up the upper frame work and a handle to steer this beast.

Tomorrow I will paint the frame and see if I can get the top installed.

I have one last surprise left on the backside of this table. I think a lot of you are going to like my idea... Stay tuned your going to want to see this!
 

Attachments

  • Metal table 9.jpg
    Metal table 9.jpg
    93.4 KB · Views: 310
  • Metal table 8.jpg
    Metal table 8.jpg
    91 KB · Views: 310
OP
7

75Dually

Well-known member
Joined
Dec 5, 2013
Messages
444
Location
Lubbock, TX
OK so here is my surprise. I could not figure out what I wanted to do with the backside of the table. Then I saw how guys were using old tailgates mounted to a wall as a work bench, and it hit me like a ton of bricks! Why not take my old beat up tail gate off my 75 dually and use it as the door to a storage compartment. So I added a C-Clamp storage rod, and bulk storage for large tools and tool cases.

The tail gate is rather abused and has lots of patina. But that is why I think it makes this project rather cool. In the pictures below the tail gate is only being held by some para cord because I have not made a hinge system yet. I still have to do the latch as well, but I think it looks cool and it is not your normal welding table by any means.

I also got the electrical finished up today. I have 2 double gang boxes on either end. Fully tested and now ready to go. :shocking:

All I have left is to paint the frame and install the top.

Let me know what you guys think...:thumbup:
 

Attachments

  • Metal table 11.jpg
    Metal table 11.jpg
    81.5 KB · Views: 339
  • Metal table 12.jpg
    Metal table 12.jpg
    69.3 KB · Views: 334
  • Metal table 13.jpg
    Metal table 13.jpg
    73.2 KB · Views: 309
  • Metal table 14.jpg
    Metal table 14.jpg
    63.9 KB · Views: 281

BRIANBB

Well-known member
Joined
Aug 27, 2010
Messages
394
Location
Katy Texas
Looks great. Just one question. Wont it be hard to get into the top drawers with that big overhang?
 
OP
7

75Dually

Well-known member
Joined
Dec 5, 2013
Messages
444
Location
Lubbock, TX
Looks great. Just one question. Wont it be hard to get into the top drawers with that big overhang?

As far as the top drawers on the box go I did a lot a measurements taking them into account. I also mocked up the top and you can access all the way to back of the top drawer. Yes you do have to lean over a bit, but it works for me!

I might put an LED under top light sometime in the future, but I really just want to get this thing done first because I need to finish up my dually. Spring is coming and I want that hot rod done!
 

ez-duzit

Well-known member
Joined
Jun 24, 2013
Messages
5,094
Location
Marina del Rey
I was with you up until you added the tailgate, which looked like it would just make it harder to grab a clamp. Or might encourage someone to set something down on it, tipping your bench over.
 
OP
7

75Dually

Well-known member
Joined
Dec 5, 2013
Messages
444
Location
Lubbock, TX
I was with you up until you added the tailgate, which looked like it would just make it harder to grab a clamp. Or might encourage someone to set something down on it, tipping your bench over.

First of all I can tell you are not a hot rodder... Secondly never be in a hurry to grab a clamp, slow down this is supposed to be fun! Third, I could sit or stand on this tailgate and never come close to tipping my table over.

The idea was not supposed to be just a functional part, but bring more art and style into something that normally is boring. If I wanted a simple functional table I would have done 4 legs and a top, and been done with it. However I wanted something that reflects what I think a good design should have, function, art, and some soul...

That is why you failed my Padawan learner...
 
Last edited:

ez-duzit

Well-known member
Joined
Jun 24, 2013
Messages
5,094
Location
Marina del Rey
Sorry, never meant to impugn your high school teacher (?) or imply you built crappy stuff (?) But thought perhaps you would tell us your thinking behind your surprise, placing such a large, heavy object between you and your tools. Maybe this is what is meant by "hot rodding" these days? It seemed to mean something different when I began hot rodding and racing in the '50's.
 
OP
7

75Dually

Well-known member
Joined
Dec 5, 2013
Messages
444
Location
Lubbock, TX
Sorry, never meant to impugn your high school teacher (?) or imply you built crappy stuff (?) But thought perhaps you would tell us your thinking behind your surprise, placing such a large, heavy object between you and your tools. Maybe this is what is meant by "hot rodding" these days? It seemed to mean something different when I began hot rodding and racing in the '50's.

Slow down there big boy! EZ-Duzit, EZ-Duzit! Take a chill pill dude! :beer:

See my posting above for my reasoning. :thumbup:
 

archirelic

Well-known member
Joined
Sep 24, 2010
Messages
2,263
Location
texas
Looking good and I def like the twist on a traditional workbench! Another Lubbock resident here as well!
 
To avoid these ads, REGISTER NOW!
Top Bottom