To avoid these ads, REGISTER NOW!

The making of a table

RivennHewn

Well-known member
Joined
Jun 4, 2011
Messages
10,356
Location
PNW
I've been meaning to photo a project start to finish, but I always forget and before you know it I'm half done with no pics.

I ended up with an amazing piece of vintage cast iron, and I've been thinking about what to do with it for a couple months.

I'm pretty excited to see how this one turns out.

Project: Bar table.

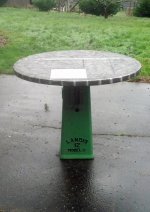
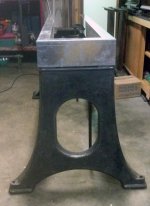
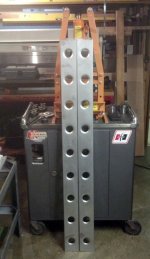
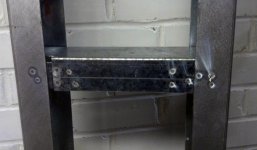
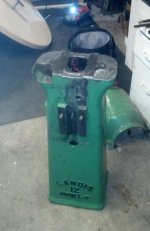
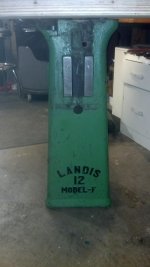
1) Landis Shoe Stitcher Base

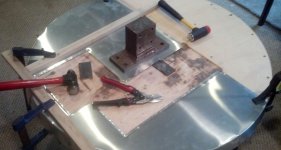
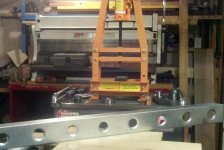
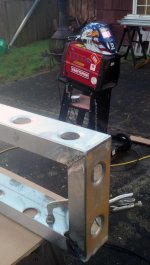
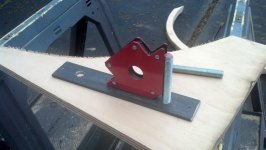
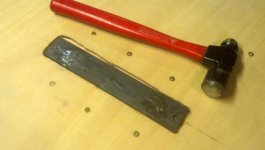
2) **** load of clamps

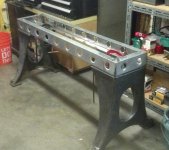
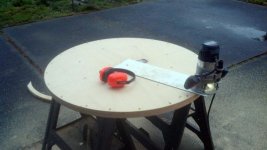
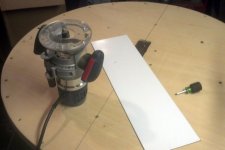
3) Top getting fitted to base
 

Attachments

  • tablebase2.jpg
    tablebase2.jpg
    139.2 KB · Views: 4,765
  • IMG_20131213_213533_233.jpg
    IMG_20131213_213533_233.jpg
    145.3 KB · Views: 4,167
  • tablebase.jpg
    tablebase.jpg
    140.3 KB · Views: 3,531
To avoid these ads, REGISTER NOW!
OP
R

RivennHewn

Well-known member
Joined
Jun 4, 2011
Messages
10,356
Location
PNW
After rough cutting the plywood into a circle, I fashioned a bracket to mount the top to the base.

I drilled some bar stock and inserted 5/8" all thread. Ran a bead around the joint, and puddle welded the flush side.

I routed the bracket into the wood, so it would be flush. No need for anything pretty here, it will all get covered up.

1) Bracket

2) placing bracket into routed top

3) Bracket is home
 

Attachments

  • tablebraket.jpg
    tablebraket.jpg
    144.6 KB · Views: 1,286
  • tablebracket.jpg
    tablebracket.jpg
    143 KB · Views: 1,267
  • tablebracket2.jpg
    tablebracket2.jpg
    136.2 KB · Views: 1,214
OP
R

RivennHewn

Well-known member
Joined
Jun 4, 2011
Messages
10,356
Location
PNW
The next step was to true up the top.

I made a jig for the router, and made it a perfect circle. The jig pivots on a center screw. I set the router to cut half way thru the plywood and followed with a second pass to finish the cut.
 

Attachments

  • routerpivot.jpg
    routerpivot.jpg
    147.1 KB · Views: 1,205
  • routerjig3.jpg
    routerjig3.jpg
    146.6 KB · Views: 1,027
  • routerjig2.jpg
    routerjig2.jpg
    146.9 KB · Views: 1,050
  • routerjig1.jpg
    routerjig1.jpg
    137.5 KB · Views: 1,136
OP
R

RivennHewn

Well-known member
Joined
Jun 4, 2011
Messages
10,356
Location
PNW
Don't look too close at my welds, I'm a carpenter with a Craftsman.
 

Attachments

  • carpwithacrap.jpg
    carpwithacrap.jpg
    148.1 KB · Views: 1,995
OP
R

RivennHewn

Well-known member
Joined
Jun 4, 2011
Messages
10,356
Location
PNW
Here is a pic I pilfered off the web.

It is the target for the finished top.

I have been playing with soldering zinc sheet metal. Need to keep practicing, the hand-eye coordination just ain't there yet.
 

Attachments

  • zincsamples.jpg
    zincsamples.jpg
    133.2 KB · Views: 1,741
  • zincradius.jpg
    zincradius.jpg
    154.1 KB · Views: 1,767
  • zinccladding.jpg
    zinccladding.jpg
    150 KB · Views: 1,691
  • patch_table.jpg
    patch_table.jpg
    12.3 KB · Views: 807
  • zinc-top-industrial-round-t-895x1024.jpg
    zinc-top-industrial-round-t-895x1024.jpg
    147.5 KB · Views: 2,341

DoghouseForge

Well-known member
Joined
May 11, 2013
Messages
374
Location
Lakeland, Fl
Nice!

That base is a beauty!

Do you have acces to any scap yards? Sometimes old roofing tin gets dropped off already good and tarnished. We picked up some with an awesome green and gold patina that would be sweet with that base.

The guy at our yard ( scrappy Thomas :lol: ) sells us everything at scrap price plus a 6 pack of Pabst per visit. :thumbup:

we just call with what we need and he keeps his eye out.

Excited to see the rest of the project!

Jp
 

ilovevocs

Well-known member
Joined
Jun 26, 2009
Messages
1,966
Location
Toledo, Ohio
The fastest and easiest way to solder sheet metal joints is to use a tinning troph. I couldn't imagine soldering joints with out pre tinning in the troph. If may not be your ability but more your technique.


Link:


Sent from my iPhone using Tapatalk
 
Last edited:
OP
R

RivennHewn

Well-known member
Joined
Jun 4, 2011
Messages
10,356
Location
PNW
To give the table the look of an "old factory", I'm adding some patches.

I want them to look different from each other, so they look like they were added at different times.

Since I want the top to remain level, I had to relieve the plywood so the patches won't add thickness and unevenness to the top.

I then added a backer strip of zinc under where the joint will be.

The next step was to form the edges of the main panel to fit the patches. Kinda like the patch panels you'd do on a rusty floor board or trunk.

Then I started on the edge detail. Each flap will be soldered.

Last pic is a sneak peak of what it will look like complete.
 

Attachments

  • sneakpeak.jpg
    sneakpeak.jpg
    150.5 KB · Views: 1,831
  • edgedetail.jpg
    edgedetail.jpg
    138.1 KB · Views: 1,229
  • beadroller.jpg
    beadroller.jpg
    125.7 KB · Views: 1,230
  • jointbacker.jpg
    jointbacker.jpg
    126.4 KB · Views: 1,188
  • tablerelief.jpg
    tablerelief.jpg
    140 KB · Views: 1,266
  • routingtable.jpg
    routingtable.jpg
    144.2 KB · Views: 1,245
OP
R

RivennHewn

Well-known member
Joined
Jun 4, 2011
Messages
10,356
Location
PNW
Work is getting in the way of me completing my table!

I did make some progress this afternoon.

At work, we just finished a 17' X 3' X 2-1/4" thick walnut table that pivots.

7' of it is removable, and will hang on the wall.

The lights above the table are on an arm that pivots with the table.

The lights above the removable section are on pulleys, so you can adjust the height depending on if there is a table, or not.
 

Attachments

  • longtable2.jpg
    longtable2.jpg
    144.6 KB · Views: 1,909
  • longtable1.jpg
    longtable1.jpg
    145.9 KB · Views: 2,271
  • Patchtable.jpg
    Patchtable.jpg
    139.1 KB · Views: 2,358
OP
R

RivennHewn

Well-known member
Joined
Jun 4, 2011
Messages
10,356
Location
PNW
This afternoon I was able to make it to the shop for some playtime.

Used my new Harbor Freight punch and flange tool to punch holes in all the tabs before I bent them down and tacked to the bottom side.
 

Attachments

  • punchflange.jpg
    punchflange.jpg
    133.3 KB · Views: 1,494
OP
R

RivennHewn

Well-known member
Joined
Jun 4, 2011
Messages
10,356
Location
PNW
Check this one off the list: Done.

Soldered all the tabs around the perimeter last night, then added the last patch panel this morning.

This one's ready for shipping.

Now, I just need a buyer.
 

Attachments

  • completepatchtable.jpg
    completepatchtable.jpg
    144.4 KB · Views: 3,418
  • finishedtop.jpg
    finishedtop.jpg
    150 KB · Views: 2,935
To avoid these ads, REGISTER NOW!

DoghouseForge

Well-known member
Joined
May 11, 2013
Messages
374
Location
Lakeland, Fl
Turned out nice.

You have a good eye.

Now load it up and take it to the Brooklyn or LA farmers markets and somebody will actually pay you what its worth.

JP
 

archirelic

Well-known member
Joined
Sep 24, 2010
Messages
2,263
Location
texas
OP
R

RivennHewn

Well-known member
Joined
Jun 4, 2011
Messages
10,356
Location
PNW
One table done, and on to the next....

Lathe legs from an old monster. I bought them from a guy who was restoring a 16' long lathe. I didn't catch the brand, or even see the lathe. Seems it was in parts.

I got the two end legs, and a center leg that I'll use on another project.

This one will be the legs with a 4" high metal stud frame as a stretcher and support for the top.

I'm thinking of drilling and dimpling holes in the sides and end pieces and then powder coating the whole base one color.

The top will be either reclaimed maple, or zinc.
 

Attachments

  • lathetable1.jpg
    lathetable1.jpg
    143.9 KB · Views: 803
  • lathetable3.jpg
    lathetable3.jpg
    146.5 KB · Views: 784
  • lathetable2.jpg
    lathetable2.jpg
    142.7 KB · Views: 1,066
OP
R

RivennHewn

Well-known member
Joined
Jun 4, 2011
Messages
10,356
Location
PNW
I'm talking to a photographer about setting up a shoot with several of my projects.

I'm looking at on old parking garage. It should be a cool setting for some professional pics that I can add to my online sales and portfolio.
 
OP
R

RivennHewn

Well-known member
Joined
Jun 4, 2011
Messages
10,356
Location
PNW
After all the crappy phone pics, I finally got a good one of the round zinc table.
 

Attachments

  • roundtablegood.jpg
    roundtablegood.jpg
    145.9 KB · Views: 1,536

BDAZSVT

Well-known member
Joined
Jun 22, 2010
Messages
204
Tables look good.
I would punch holes and dimple die the metal frame on the lathe table.
 
OP
R

RivennHewn

Well-known member
Joined
Jun 4, 2011
Messages
10,356
Location
PNW
Got to drilling the frame for the dimple dies this afternoon.

Used a new carbide tipped metal cutting hole saw in the drill press.

Definitely want to think about safety glasses before you hit the switch.

It threw hot shavings everywhere. Glad I had a magnet around to pick it all up.

Next step is setting up the press.

And, one more pic of the round top 'cuz I can't get enough of it.
 

Attachments

  • cutter.jpg
    cutter.jpg
    141 KB · Views: 788
  • mainstruts.jpg
    mainstruts.jpg
    144.2 KB · Views: 706
  • Roundtop.jpg
    Roundtop.jpg
    152.5 KB · Views: 952

1/2 Cup

Member Emeritus
Joined
Apr 28, 2012
Messages
19,283
Location
Shepparton. Victoria. Australia
Got to drilling the frame for the dimple dies this afternoon.

Used a new carbide tipped metal cutting hole saw in the drill press.

Definitely want to think about safety glasses before you hit the switch.

It threw hot shavings everywhere. Glad I had a magnet around to pick it all up.

Next step is setting up the press.

And, one more pic of the round top 'cuz I can't get enough of it.

The dimples will add a nice touch to the frame.:thumbup:
 
OP
R

RivennHewn

Well-known member
Joined
Jun 4, 2011
Messages
10,356
Location
PNW
Finally got around to setting up the press, and cranked out the dimples in no time.

Pretty happy with how they turned out.

I started with a new hole saw, and then clean and de-burred the holes.

I also set up the welder and did a couple test welds. I'm really not a welder so it takes me awhile to figure out what combination of heat and speed works.

I've never welded 14 gauge material before, but I'm feeling comfortable enough to give it a go next time I get some shop time.
 

Attachments

  • dimples1.jpg
    dimples1.jpg
    146.4 KB · Views: 625
  • dimples2.jpg
    dimples2.jpg
    141.3 KB · Views: 612
  • dimplepress2.jpg
    dimplepress2.jpg
    133.2 KB · Views: 618
  • dimplepress1.jpg
    dimplepress1.jpg
    131.7 KB · Views: 602
  • dimples3.jpg
    dimples3.jpg
    131.9 KB · Views: 608
  • dimplediegrinder.jpg
    dimplediegrinder.jpg
    144.9 KB · Views: 604
OP
R

RivennHewn

Well-known member
Joined
Jun 4, 2011
Messages
10,356
Location
PNW
Took off work early today, and the sun was shinning.

Great day to work in the back yard.

After a frustrating start, I managed to get the frame welded up.

I started by removing the galvanizing from the weld areas, then clamped it all up, or so I thought.

Check and double check for square, clamp, clamp and clamp, but the parts kept moving out of square from the heat.

Had to cut it apart and start over. I just about headed for the couch, but I knew I wouldn't get another afternoon anytime soon.

Again, I'm no welder. Feel free to critique my welds, just no laughing.

The last pic is as it sits tonight.
 

Attachments

  • base1.jpg
    base1.jpg
    139.1 KB · Views: 806
  • weld3.jpg
    weld3.jpg
    137 KB · Views: 624
  • weld1.jpg
    weld1.jpg
    132.4 KB · Views: 669
  • cornerweld.jpg
    cornerweld.jpg
    138.9 KB · Views: 615
  • dimpleswelder.jpg
    dimpleswelder.jpg
    146.7 KB · Views: 594
  • dimplescompressor.jpg
    dimplescompressor.jpg
    143.7 KB · Views: 574
  • shadetreemech.jpg
    shadetreemech.jpg
    151.5 KB · Views: 614
OP
R

RivennHewn

Well-known member
Joined
Jun 4, 2011
Messages
10,356
Location
PNW
I just got some prices for media blasting the cast iron legs. Ouch!

These things are 24" tall, and fairly heavy. I wouldn't want to carry them very far.

How much should going rate for blasting be?
 
OP
R

RivennHewn

Well-known member
Joined
Jun 4, 2011
Messages
10,356
Location
PNW
Started playing with my new HF spot welder today. I've never used on before, and have a few questions.

Are the tips supposed to glow like cherries?

Is the main body supposed to get quite hot?

Is there a optimum trigger time chart for different gauges?

How often do you clean the tips?

Like I said, I've never used on before.

I did manage to get the intermediate supports installed.

I hope they hold!
 

Attachments

  • spots3.jpg
    spots3.jpg
    137.8 KB · Views: 464
  • spots2.jpg
    spots2.jpg
    137.5 KB · Views: 430
  • spots1.jpg
    spots1.jpg
    122.4 KB · Views: 480
  • spotwelder.jpg
    spotwelder.jpg
    145.2 KB · Views: 473
OP
R

RivennHewn

Well-known member
Joined
Jun 4, 2011
Messages
10,356
Location
PNW
I have given up on the spot welder for now. Very frustrated with it.

The welds were easily taken apart by hand.

On to rivets!

Drug out the clecos and Zypher countersink and the Usatco 3X and hammered it together.

Question for the body work guys: What is the the latest and greatest for filling small voids.

I have a few very small areas around the rivet heads that need to be filled.

I used to use spot glazing putty for such things, but that was years ago.
 

Attachments

  • rivet2.jpg
    rivet2.jpg
    135.3 KB · Views: 357
  • rivet1.jpg
    rivet1.jpg
    144 KB · Views: 354
  • rivet5.jpg
    rivet5.jpg
    147.1 KB · Views: 337
  • rivet4.jpg
    rivet4.jpg
    138 KB · Views: 338
  • frame6.jpg
    frame6.jpg
    119.9 KB · Views: 498
To avoid these ads, REGISTER NOW!
Top Bottom