To avoid these ads, REGISTER NOW!

The making of a table

racingtadpole

Well-known member
Joined
Dec 3, 2011
Messages
2,029
Location
The far side of crazy.. but sometimes Australia
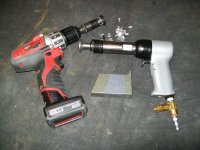
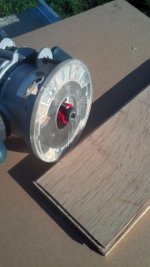
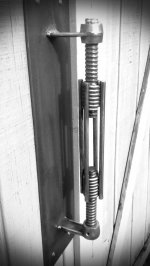
Started playing with my new HF spot welder today. I've never used on before, and have a few questions.

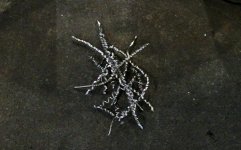
Are the tips supposed to glow like cherries?

Is the main body supposed to get quite hot?

Is there a optimum trigger time chart for different gauges?

How often do you clean the tips?

Like I said, I've never used on before.

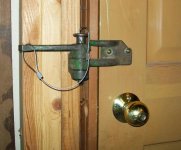
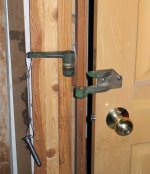
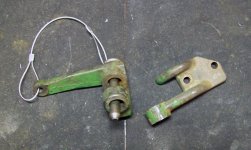
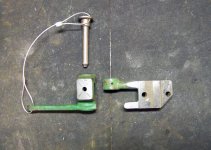
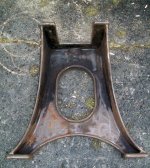
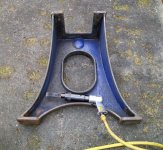
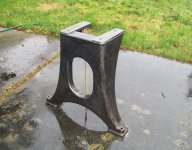
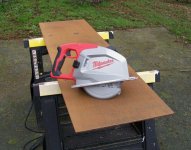
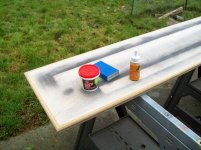
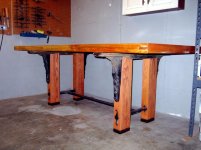
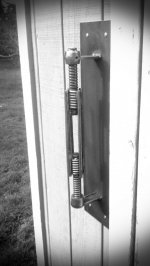
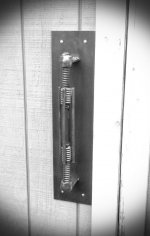
I did manage to get the intermediate supports installed.

I hope they hold!

Can't speak for HF ones in particular but in general yes the tips may glow, you are using them to apply enough electricity to heat metal to melting point.
The body may get hot over a period of time if you are doing a lot of spots.
You need to apply a firm pressure on the electrodes when you close them.
 
To avoid these ads, REGISTER NOW!
OP
R

RivennHewn

Well-known member
Joined
Jun 4, 2011
Messages
10,370
Location
PNW
Had the day off today, so I got some time in the shop!

With the riveting of the middle members done, it was time to get a coat of primer on the frame.

Hit the minor voids around the rivets with spot glazing putty.
 

Attachments

  • Primer.jpg
    Primer.jpg
    138.9 KB · Views: 263
  • spotglazing.jpg
    spotglazing.jpg
    135.9 KB · Views: 279
OP
R

RivennHewn

Well-known member
Joined
Jun 4, 2011
Messages
10,370
Location
PNW
With the riveting of the frame done, I turned to finishing the legs.

They had a hundred years worth of grease, oil, metal shavings, grime and gunk under a coat of paint.

I took the needle scaler to what I couldn't get with the wire wheel.
 

Attachments

  • grime.jpg
    grime.jpg
    117 KB · Views: 351
  • scaler.jpg
    scaler.jpg
    109.7 KB · Views: 454
OP
R

RivennHewn

Well-known member
Joined
Jun 4, 2011
Messages
10,370
Location
PNW
Then I cleaned them with foamy engine cleaner to degrease them.

Next, I'll wipe them all down with acetone prior to a final coat of Penetrol.
 

Attachments

  • cleaned.jpg
    cleaned.jpg
    95.1 KB · Views: 400
  • foamy.jpg
    foamy.jpg
    107.9 KB · Views: 325
OP
R

RivennHewn

Well-known member
Joined
Jun 4, 2011
Messages
10,370
Location
PNW
After wasting yesterday on the couch with a towel over my eyes due to a metal shaving in the eye (yes, I was wearing glasses) I actually made some progress today.

I prepped the rivets, and got a coat of primer and paint on the frame.

I then cut the 1" AC plywood and edged it with a small molding.

Prepped and painted the sub top.

I've had a piece of 1/4" steel rusting in my backyard for a couple years, and thought it would make a perfect top.

Pulled out the Milwaukee metal cutting saw, and it cut the 1/4" steel like it was 1/4" plywood. It leaves a very nice cut that only needs a file on the edge for finish.

I love this saw. It has increased my metal working capabilities more that any other tool I own. Quick, easy cuts.
 

Attachments

  • cut.jpg
    cut.jpg
    70.1 KB · Views: 306
  • cutsteel.jpg
    cutsteel.jpg
    79.2 KB · Views: 363
  • edgeband.jpg
    edgeband.jpg
    79.3 KB · Views: 290
  • base.jpg
    base.jpg
    46.4 KB · Views: 294
OP
R

RivennHewn

Well-known member
Joined
Jun 4, 2011
Messages
10,370
Location
PNW
Check another one off the list. It is sitting in it's final resting place.

I was going to put a much larger top on it, and sell it as a table.

I decided I couldn't part with it, and it's going to be a stand instead of a table.

Now, I just need to figure out how to get a 500 lb. hunk of cast iron on top of it.
 

Attachments

  • Done.jpg
    Done.jpg
    44.8 KB · Views: 500
  • end.jpg
    end.jpg
    55.7 KB · Views: 480
  • corner.jpg
    corner.jpg
    43.2 KB · Views: 420
OP
R

RivennHewn

Well-known member
Joined
Jun 4, 2011
Messages
10,370
Location
PNW
I busted the table down and took it to an old parking garage to shoot some more pics before I stack my 48" brake on it. At that point, it will be close to 1000 lbs. and won't be going anywhere.

Lighting wasn't optimal today, but a few pics came out OK. Overall, I'm disappointed with my camera, and my phone camera.
 

Attachments

  • brakebase1small.jpg
    brakebase1small.jpg
    68 KB · Views: 616
  • brakebasesmall.jpg
    brakebasesmall.jpg
    71.9 KB · Views: 518
  • base1.jpg
    base1.jpg
    59.1 KB · Views: 534

Brad54

Well-known member
Joined
Jun 13, 2006
Messages
4,646
I'm intrigued by the building you're shooting those pics in! Is that where you live, or a shop you rent?

-Brad
 
OP
R

RivennHewn

Well-known member
Joined
Jun 4, 2011
Messages
10,370
Location
PNW
Some pics are in my shop, but the cool space is actually a parking garage downtown Seattle.

One of those spaces you'd never know was there unless you worked for the parking company.

It was built around 1926.

I'd love to set up shop there, but parking lots are money makers downtown.
 
OP
R

RivennHewn

Well-known member
Joined
Jun 4, 2011
Messages
10,370
Location
PNW
Too nice today not to work out in the yard.

Decided to put a top on a garage sale find. $10 for a tool base. Fairly heavy duty, definitely not HF type ****.

Needed to clear out some quarter sawn oak flooring left overs out of the shop. Been taking up space for too long.

Hard to tell from these pics, but this stuff has some crazy grain to it.

Once finished, it's gonna pop!
 

Attachments

  • oakbase.jpg
    oakbase.jpg
    77.4 KB · Views: 407
  • chopsawer.jpg
    chopsawer.jpg
    43.2 KB · Views: 360
  • oak.jpg
    oak.jpg
    45.9 KB · Views: 408

DenisG

Well-known member
Joined
Jul 14, 2013
Messages
1,278
Location
Milwaukee
I have given up on the spot welder for now. Very frustrated with it.

The welds were easily taken apart by hand.

On to rivets!

Drug out the clecos and Zypher countersink and the Usatco 3X and hammered it together.

Question for the body work guys: What is the the latest and greatest for filling small voids.

I have a few very small areas around the rivet heads that need to be filled.

I used to use spot glazing putty for such things, but that was years ago.

I have the 230V version of this spot welder. The capacity on both is listed at 1/8" (combined metal thickness). If you were using 14 gauge (0.0781'), then you exceeded the maximum capacity. I usually spot weld thinner gauge (about 0.030") and have good welds for that.
 
OP
R

RivennHewn

Well-known member
Joined
Jun 4, 2011
Messages
10,370
Location
PNW
Every once in awhile you just need to make something out of scrap.

The off-cuts from the baseboards made an interesting diversion, I mean box.

I have no idea what I'll use it for.

After cutting up the table pieces, I used the bizquick joyna and prepped all the joints for glue up. Just like Nahm from This Old House.

In trying to make your items unique, I've learned to never use stock material sizes.

All I had was 3/4" material for this project, but didn't want a skinny edge treatment.
I mitered the border pieces so that now I have a 1-1/4" wide edge. An extra step, but should make the top look a bit more substantial.
 

Attachments

  • oddbox.jpg
    oddbox.jpg
    48.8 KB · Views: 373
  • bizquickjoyner.jpg
    bizquickjoyner.jpg
    41.1 KB · Views: 354
  • bisquickjoyner.jpg
    bisquickjoyner.jpg
    36.1 KB · Views: 380
  • miter.jpg
    miter.jpg
    37.7 KB · Views: 349
OP
R

RivennHewn

Well-known member
Joined
Jun 4, 2011
Messages
10,370
Location
PNW
Routed a rabbit around each board for a joint detail.

Bisquited, glued, and clamped.

Will let it cure up for a bit, and then attach the end pieces.
 

Attachments

  • clamped.jpg
    clamped.jpg
    44 KB · Views: 258
  • routing.jpg
    routing.jpg
    43.8 KB · Views: 239
OP
R

RivennHewn

Well-known member
Joined
Jun 4, 2011
Messages
10,370
Location
PNW
Blast from the past: Here's pics of a table I put together a few years ago.

It has become my main workbench. The top is made from timbers I salvaged from an 1880's building in downtown Seattle. They are 3" thick, and 18" wide Douglass Fir.

The leg corbels came out of a basement machine shop from another 1900's building on Capitol Hill in Seattle. They are cast iron, and weigh 145 lbs. each.

The double rattail washers were made by me.
 

Attachments

  • workbench2.jpg
    workbench2.jpg
    67 KB · Views: 450
  • workbench3.jpg
    workbench3.jpg
    69.6 KB · Views: 466
  • workbench4.jpg
    workbench4.jpg
    68.6 KB · Views: 573
  • workbench5.jpg
    workbench5.jpg
    67.1 KB · Views: 426
  • workbench1.jpg
    workbench1.jpg
    77 KB · Views: 359
To avoid these ads, REGISTER NOW!
OP
R

RivennHewn

Well-known member
Joined
Jun 4, 2011
Messages
10,370
Location
PNW
Now that's one beautifully executed table, just awesome:thumbup:
Question? What did you use ( the black line ) to seal between the edge timber and the top? It looks neat.

Cheers


Basically, it's the same stuff used on old wooden boats.
 

Attachments

  • th.jpeg
    th.jpeg
    11.3 KB · Views: 277
OP
R

RivennHewn

Well-known member
Joined
Jun 4, 2011
Messages
10,370
Location
PNW
I belt sanded everything flat, then masked off all the joints. If you were wondering why I routed all the edges, this will start to explain .

The grooves created with the router are filled with polysulfide rubber. Like the lines on the bow of the boat above.

This takes a good 3-4 days to cure, then it is sanded flush. It turns grey when sanded, but goes back to black when a finish coat is applied.
 

Attachments

  • masked.jpg
    masked.jpg
    44.2 KB · Views: 304
  • caulked.jpg
    caulked.jpg
    46 KB · Views: 326
OP
R

RivennHewn

Well-known member
Joined
Jun 4, 2011
Messages
10,370
Location
PNW
Here's what it looks like de-masked.

Still a little tacky. Will have to wait to sand it all flush.
 

Attachments

  • stripped.jpg
    stripped.jpg
    28.8 KB · Views: 443
OP
R

RivennHewn

Well-known member
Joined
Jun 4, 2011
Messages
10,370
Location
PNW
Here's another one I just finished yesterday.

It's a Zinc topped Bistro table. Great for drinking coffee on the deck in the morning.

I formed the zinc on a plywood base, and soldered the corners. I then gave it a random pattern patina, because plain old zinc gets kinda boring after awhile.

The base is just a restaurant supply type that you can pick up anywhere.

It was free on CL.
 

Attachments

  • bistro1.jpg
    bistro1.jpg
    38.4 KB · Views: 410
  • bistro2.jpg
    bistro2.jpg
    38.2 KB · Views: 397
  • bistro3.jpg
    bistro3.jpg
    42.1 KB · Views: 363
  • bistro4.jpg
    bistro4.jpg
    37.2 KB · Views: 275
OP
R

RivennHewn

Well-known member
Joined
Jun 4, 2011
Messages
10,370
Location
PNW
I just realized that I missed posting a pic of the round table with the mating base.

Motivation eludes me today, so I spent it with my dog, some fire, and some tequila.
 

Attachments

  • tabledog.jpg
    tabledog.jpg
    29.7 KB · Views: 501
  • tank5.jpg
    tank5.jpg
    39.7 KB · Views: 707
OP
R

RivennHewn

Well-known member
Joined
Jun 4, 2011
Messages
10,370
Location
PNW
Knotty 3-Hole box.

Wife hates the title.
 

Attachments

  • 3holebox.jpg
    3holebox.jpg
    45 KB · Views: 375
OP
R

RivennHewn

Well-known member
Joined
Jun 4, 2011
Messages
10,370
Location
PNW
These are not tables:

Strut arm light w/ dimples. Hard thing to get a good pic of. Not sure where it will end up in the shop, or Etsy. The canister rotates, so you can aim the light.

The arm lights are going on Etsy, as the are too long for my short ceilings, even though they are flexible and you can aim them any direction.

The vintage welding hood is a drawing my daughter did for me. Sure better than I could of done.
 

Attachments

  • weldinghood.jpg
    weldinghood.jpg
    85.3 KB · Views: 283
  • 3armlight.jpg
    3armlight.jpg
    89.8 KB · Views: 235
  • 1armlight.jpg
    1armlight.jpg
    117 KB · Views: 227
  • strutlight3.jpg
    strutlight3.jpg
    97.2 KB · Views: 248
  • strutlight1.jpg
    strutlight1.jpg
    133 KB · Views: 261
  • strutlight2.jpg
    strutlight2.jpg
    101.2 KB · Views: 3,106
Last edited:
OP
R

RivennHewn

Well-known member
Joined
Jun 4, 2011
Messages
10,370
Location
PNW
The rubber finally dried enough to sand it out, so I got it all flat and smooth and got a 1st coat of OSMO.

http://www.osmona.com/interior/Original_polyx.shtml


Got the metal stand washed up and the top installed.

Not sure where this one will end up living. It may have to be a CL deal.
 

Attachments

  • toolstand1.jpg
    toolstand1.jpg
    104.6 KB · Views: 411
  • toolstand2.jpg
    toolstand2.jpg
    136.2 KB · Views: 381
  • toolstand3.jpg
    toolstand3.jpg
    102.6 KB · Views: 362
OP
R

RivennHewn

Well-known member
Joined
Jun 4, 2011
Messages
10,370
Location
PNW
The stand top was made from quarter sawn oak, left over from a flooring job.
 
OP
R

RivennHewn

Well-known member
Joined
Jun 4, 2011
Messages
10,370
Location
PNW
Interest moved from tables to doors this week.

I'm working on a 7' door with 3 portals. It was a total POS, but I'll give it a second life.

The handle is some old vintage cast iron with some construction hardware.

The back plate is 3/16" rusted steel that is 24" X 6".

I have a matching steel kick plate, and a few other ideas........
 

Attachments

  • pull1.jpg
    pull1.jpg
    149.5 KB · Views: 242
  • pull2.jpg
    pull2.jpg
    83.9 KB · Views: 239
  • pull5.jpg
    pull5.jpg
    100 KB · Views: 256
  • pull4.jpg
    pull4.jpg
    89.5 KB · Views: 318
  • portal3door.jpg
    portal3door.jpg
    30.1 KB · Views: 229
  • portal.jpg
    portal.jpg
    73.4 KB · Views: 240
OP
R

RivennHewn

Well-known member
Joined
Jun 4, 2011
Messages
10,370
Location
PNW
little things that make me happy: Sharpening a dull bit, and getting results like this. Nice consistent 3-4" curly Q's.

Little things that piss me off: Breaking the point off my favorite punch, right where I wanted a hole. Took me sharpening the drill bit 3 more times to clear the broken point out of the hole.
 

Attachments

  • shavings.jpg
    shavings.jpg
    68.7 KB · Views: 206
OP
R

RivennHewn

Well-known member
Joined
Jun 4, 2011
Messages
10,370
Location
PNW
Between rain showers, I managed to finish welding up another door pull.

This one is smaller than the 1st one, but I like that it has the vertical and horizontal section for your hand to grab.

The last pic is a bunch of parts & pieces that need to find a project.
 

Attachments

  • stuff.jpg
    stuff.jpg
    106.2 KB · Views: 329
  • crosshandle1.jpg
    crosshandle1.jpg
    94.4 KB · Views: 220
  • crosshandle4.jpg
    crosshandle4.jpg
    116.8 KB · Views: 215
  • crosshandle3.jpg
    crosshandle3.jpg
    63.8 KB · Views: 227
  • crosshandle2.jpg
    crosshandle2.jpg
    105.8 KB · Views: 235
OP
R

RivennHewn

Well-known member
Joined
Jun 4, 2011
Messages
10,370
Location
PNW
In keeping with my industrial door theme, I made a pin-bolt lock.

The parts came from the Landis Shoe Stitcher that is the base for my zinc round table.

Simple, but very secure.
 

Attachments

  • pinbolt4.jpg
    pinbolt4.jpg
    84.5 KB · Views: 242
  • pinbolt2.jpg
    pinbolt2.jpg
    61.5 KB · Views: 240
  • pinbolt3.jpg
    pinbolt3.jpg
    98.3 KB · Views: 229
  • pinbolt.jpg
    pinbolt.jpg
    95.9 KB · Views: 188
  • pinboltback.jpg
    pinboltback.jpg
    130.3 KB · Views: 182
To avoid these ads, REGISTER NOW!
Top Bottom