To avoid these ads, REGISTER NOW!

Single Car, multipurpose Shop (11x25')

Ainsley

Well-known member
Joined
Jun 12, 2014
Messages
557
Location
Ontario, Canada
I purchased my first house in January of 2014. After 4 months of renovations on the house we moved in. We ended up gutting about 2/3 of the house and replacing all plumbing and electrical.
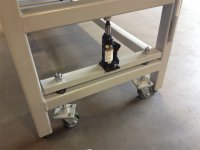
In august I finally got started on the garage, a 11'x25' single car with some water problems. The issue causing the water problems was the surrounding grade so my solution was to lift the whole garage and lay another two courses of 6" concrete block in order to get the grade where it needed to be.
Lifting:
cdvIPYwl_zpsmejlsd1h.jpg


kzJ1luhl_zpswsfeltvq.jpg

After laying block, setting it back down, parging exterior and applying waterproofing membrane. After this I installed weeping tile and stone in the trench, graded area and topped with 1" river rock and landscaping fabric:
Dv4uTbgl_zps8ffb4oqj.jpg


Next up was fixing up some of the framing, moving the man-door and then electrical. No pictures of this part as I always get into the work and forget to document.

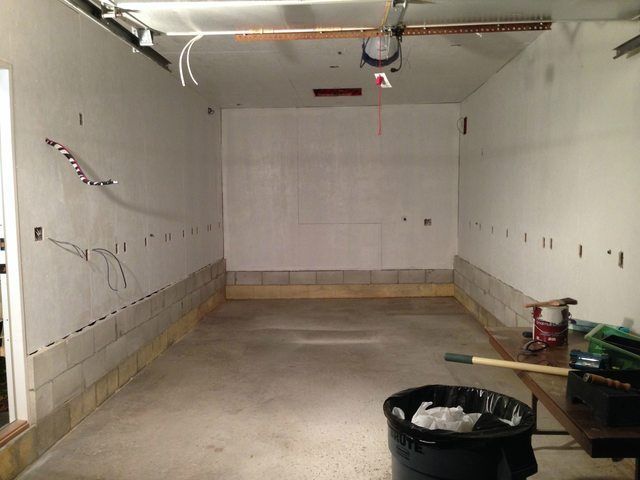
My floor was quite pitted as you can see:
rFZf26Il_zpstuntgsgv.jpg


I used quikrete concrete resurfacer, let it set for a few weeks and then applied epoxy.
Pre-epoxy:
rLYvA4kl_zpswaugkjwd.jpg

this is after the final coat:
qwy9SSnl_zpszi3jolcz.jpg

e7Kd6qpl_zpsfasaihef.jpg


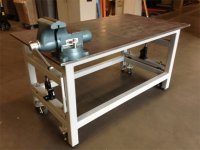
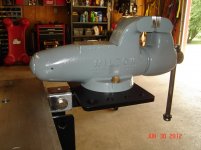
I am now in the process of installing storage shelving and then I move the equipment in. I will try and keep this thread updated with my progress.
 
Last edited:
To avoid these ads, REGISTER NOW!

BearsFan315

Well-known member
Joined
Jun 12, 2014
Messages
689
Location
Portsmouth, VA
Very Nice...

basically what i need to do with my 20x30 Garage !! Yard Drains TOWARDS it not AWAY !!

when it rains it floods :/
 

drivesitfar

Well-known member
Joined
Oct 23, 2013
Messages
35,997
Location
Pacific Northwest
Ainsley: I'm assuming your drainage is correct to have gravity take the water to the street because you are very handy. great fix on the foundation and any full size pictures from the street to get a little better idea.

sounds like you did a great job on the house too.

I have a storage unit about that size so i know how much stuff you can get in that space if you need any help. are you planning on parking your car in there or just using as a work shop?

good luck
 
OP
A

Ainsley

Well-known member
Joined
Jun 12, 2014
Messages
557
Location
Ontario, Canada
drivesitfar, I was able to correct the grade and drainage on the one side of my shop, but the grade in my yard is a bit of a mess and will be corrected in the spring. for now I just built the dirt up against the knee wall so there is enough slope to keep the water away from it and backfilled the trench with stone so that any water that gets in there drains away from the block.
Took this pic on lunch to show the side that was giving me the biggest problem. The neighbor's garage pad sits almost 2' higher than mine and the soil was built up onto my siding before I lifted it.
FGk68WYl_zpsze4a31w1.jpg


I should add that the original electrical to the garage was two circuits fed through rusted out 1/2" EMT. I busted up the concrete between the shop and the house and layed 1 1/2" PVC to feed a 16cct QO panel. I also ran another 1 1/2" PVC for data-com and a 1/2" black pipe (wrapped in bituitous tape) for future gas.
DqKEAWCl_zpsec5558tu.jpg
 
Last edited:

drivesitfar

Well-known member
Joined
Oct 23, 2013
Messages
35,997
Location
Pacific Northwest
Ainsley: all I see is professional work so far. nice fixes to a common problem. any before pictures of the side of garage that the siding was sitting in the dirt to show the guys and gals that might have a similar issues with a garage, outbuilding or even their home?

did you say you are going to use the 10 x 25 for a car, storage or shop?

great job so far :thumbup:
 
OP
A

Ainsley

Well-known member
Joined
Jun 12, 2014
Messages
557
Location
Ontario, Canada
I don't think I have any before pictures. I'm usually in a rush when I actually get time to work on it so proper documentation is the last thing on my mind. I've been working on the shop a couple hours each weekend while my son is napping, so its been ongoing for 4 months now.

I forgot to mention that there will not be any cars parked in here. This will purely be a shop. I did a lot of small projects in my previous shop like knife making, coat racks, as well as any general repair work. I do my own mechanic work on my cars but I won't have the room for it in this shop. Fortunately we have a massive shop where I work doing industrial maintenance so I do all my wrenching there.

To give you an idea here are some of my recent projects:
my '04 Subaru forester:
6PHl06ll_zpsh6iotefm.jpg


wine barrel coat racks:
Wf25mQYl_zpsfddg8xmy.jpg


hardware tray storage rack:
PNLz3Fyl.png_zpsvjmzxgsm.jpeg

you can see some of my previous shop in that pic. It was about two feet larger in both dimensions and I was running out of space... So I need to be as efficient as possible with my current shop.

some of the 1971 sea ray I restored with some friends:
V3ukJQIl_zps3ag9iuvm.jpg

I made new trim out of Ipe to match some existing Teak.
better pic of the smaller accent pieces with the original teak step strips (right:
4A4rFTil_zpsybjxgk1h.jpg
 
Last edited:

drivesitfar

Well-known member
Joined
Oct 23, 2013
Messages
35,997
Location
Pacific Northwest
Ainsley: great pictures even if you can't always remember to take the before pictures of a project just like me. i have the camera in my pocket because my cell takes pictures almost as nice as my Kodak camera. i still forget.

are you going to build that awesome dust collection system again in this garage? i'd love to see that documented either on this thread of a thread of it's own over in the general tool sections where the grinder guys are hanging their hats.

I have been thinking of buying a luggage carrier like yours for on top of my Honda Pilot and it looks like you have a light on yours. yes? do tell where you bought that or how you made it.

your coat racks rock and you know what the initials for BOAT stand for so i had 5 kids and couldn't add that to my inventory.
 
OP
A

Ainsley

Well-known member
Joined
Jun 12, 2014
Messages
557
Location
Ontario, Canada
I will be doing a double dust collection system. A 2.5" duct system hooked to my rigid shop vac and a 5 or 6" trunk with 4" drops hooked to my HF dust collector.
The high static pressure shop vac works well for my grinders and sanders and the high CFM dust collector works well for the larger woodworking tools.
Just have to figure out how I want to trigger them easily. There are systems available for this but they can get quite expensive.

As for the light rack, check out my journal on the subaru forester forum: http://www.subaruforester.org/vbulletin/f115/ainsley-s-2004-xs-252258/
Long story short I put the light on myself and it was no easy task.
 

drivesitfar

Well-known member
Joined
Oct 23, 2013
Messages
35,997
Location
Pacific Northwest
Ainsley: i'd love to see how you build your new one and what all the particulars are because i need one with all my grinders and buffers too. i picked up a little device that you can plug in your grinder or tool into and when you turn it on it turns on the shop vac or vacuum system that is plugged into it to. i got it from a 75 year old client that had an awesome wood shop in his basement, but he sold me a lot of his stuff because he was moving into a condo.

when we get to that point i'll ask him more details and try to find that part.

by the way did you put the light on your roof basket or did it come with the basket. how does it work?
 

dubber

Well-known member
Joined
Dec 31, 2012
Messages
5,326
Location
Canada's Capital
I like what you've done to the Forrester. Looks like a winter beast! Also digging that coat rack. My wife and I love spending time at Vineyards and I'm often day dreaming about using a barrel somehow.
 

drivesitfar

Well-known member
Joined
Oct 23, 2013
Messages
35,997
Location
Pacific Northwest
Ainsley: sorry i missed your link to your thread about the Subaru's basket and that awesome lighting you installed. i'm pretty handy, but i think that is a bit more than i personally would want to do if I could.

I still would be interested in seeing a thread or the process of the great dust collection system you are going to design like you had in your last shop.

I was wondering when you raised the wood framing and siding up out of the dirt did you have to replace any of it? or is all the siding new because it looks great now?
 

Terranova

Well-known member
Joined
May 12, 2008
Messages
854
Location
Grove City, OH
Ainsley, I always feel like I had a lot to do with just dry walling my garage and then I see guys like you who have to raise their garage and dig.
kudos to you.
As for working while the kid is napping, we're in the same boat. Isn't it great when they end up taking a longer than expected nap and you get some bonus time!?
Great work. Good luck tackling the working more efficiently because of a smaller space. A different kind of challenge.

T
 
Last edited:
OP
A

Ainsley

Well-known member
Joined
Jun 12, 2014
Messages
557
Location
Ontario, Canada
I like what you've done to the Forrester. Looks like a winter beast! Also digging that coat rack.

Thanks, the forester is great in the snow, especially with the proper tires.

The wine barrel coat racks were a good bit of work and really didn't sell as wellas I had hoped. I probably won't be doing another barrel any time soon.
 
OP
A

Ainsley

Well-known member
Joined
Jun 12, 2014
Messages
557
Location
Ontario, Canada
Ainsley: I still would be interested in seeing a thread or the process of the great dust collection system you are going to design like you had in your last shop.

I was wondering when you raised the wood framing and siding up out of the dirt did you have to replace any of it? or is all the siding new because it looks great now?

I will do my best to document the process with the DC system. I'm trying to plan my layout at the moment.
I didn't end up replacing any siding or framing. I contemplated doing the sill plate on the one side but it wasn't as bad as I had expected once I took a closer look. I would like to re-side the shop at some point because I had to move the garage door header down and I also moved the man-door.
 
OP
A

Ainsley

Well-known member
Joined
Jun 12, 2014
Messages
557
Location
Ontario, Canada
Took a few pics last night after I was done putting a coat of primer on the 3/4" birch ply for the upper shelves.
This is my ventilation control system:
3ChXIFnl_zpsvtbuew7b.jpg

and the innards:
akGLRWul_zpsvfg4akcq.jpg

"auto" mode varies by the device. For the intake and exhaust fan it is controlled by the call for "cool" from the t-stat. For the wall and ceiling fans it is controlled by the "fan" output from the t-stat, so that it will come on with either a call for cool or heat. Lastly the filter is controlled by the light switch, so when you walk in and turn the lights on it turns on the ceiling mounted filter units.
I should add that I have some more controls to add since some of the fans ended up being multi-speed and I didn't make provisions in the control unit for that yet. I did however run some low voltage cable and build a 24V coil relay pack for those fans.

Here are a few quick shots of the current state of the shop
cveae0sl_zpsc1mvvpck.jpg

in this one you can see the garage door I insulated, the panel, one of the wall fans that I have installed, the lumber rack, and the Uni-strut frames I built for the upper shelving units.

2uh64Fnl_zpsc3cdte2g.jpg

in this picture you can see the exhaust fan and the temporary 240V heater I have hooked to a contactor so it can be controlled by the t-stat.
You can also see the uni-strut pieces I have above the outlets on the left wall. This will carry my airline and the 2.5" dust collector line. I am still contemplating with running these below my workbench top that I plan to build along that wall using two 44" HF cabinets and then notching the work top where I want to bring them up.
 
Last edited:

drivesitfar

Well-known member
Joined
Oct 23, 2013
Messages
35,997
Location
Pacific Northwest
Ainsley: if you are not an electrician you could be with all the wiring i see in your garage and on your Subaru's rack lighting. nice work and great pictures.

if you can hide the dust collection system under the bench you'll have more bench and wall space, but you might loose some floor space if you have to move your tool boxes out from the wall.

I've been looking for great ideas to use multiple grinders and vises without taking up a ton of floor space or bench top so maybe you could have less venting it you had a couple dedicated spots for multiple tools.

here's a thread that might give you a few ideas if you need some. i'm leaning towards building this white steel bench and putting some trailer hitch type attachments on it. i can either roll it outside or hook up to some venting system inside the shop. It doesn't sound like you need a steel one so maybe a nice wood one for your shop.

http://www.garagejournal.com/forum/showthread.php?t=252799&highlight=vise
 

Attachments

  • bench1.jpg
    bench1.jpg
    97.1 KB · Views: 470
  • bench2.jpg
    bench2.jpg
    89.8 KB · Views: 425
  • null_zps96f6b03c.jpg
    null_zps96f6b03c.jpg
    65.7 KB · Views: 422
  • attachmentVN34XJY9.jpg
    attachmentVN34XJY9.jpg
    123.8 KB · Views: 407
To avoid these ads, REGISTER NOW!

wasfast

Well-known member
Joined
Apr 10, 2014
Messages
874
Location
San Diego CA
Can you show a closer shot of how you constructed the upper shelves? Looks like U channel but hard to tell from that far back.
 
OP
A

Ainsley

Well-known member
Joined
Jun 12, 2014
Messages
557
Location
Ontario, Canada
Looking good! Great work on the control box.
Thanks, I've been thinking about the design in my head for a while. I built it before I had the fans so I need to install some switches to control the speeds. for example the exhaust fan has a 4 speed motor on it. Luckly I ran some low voltage multi-conductor and am going to use 24VAC to switch a relay pack at the fan to control the speeds.

Loving the work, especially lifting the garage.
That was a pretty big job for me. I had never done something like that before and I didn't have a ton of time to do it. I jacked it up and laid a whole skid of block by myself in a day... I was pretty sore the next day.

Can you show a closer shot of how you constructed the upper shelves? Looks like U channel but hard to tell from that far back.
I'll snap a pic when I get a chance but a quick once over is that I use uni-strut for the front length and the pieces that tie the front to back. I used 1"x1/8" angle for the back support, to keep the top surface flat for the ply I notched the uni-strut where it met the angle and then welded everything together.
 
OP
A

Ainsley

Well-known member
Joined
Jun 12, 2014
Messages
557
Location
Ontario, Canada
Ainsley: if you are not an electrician you could be with all the wiring i see in your garage and on your Subaru's rack lighting. nice work and great pictures.
I have an electrical background, I was in school for Electrical Eng but wasn't able to finish. I am currently doing my electrical apprenticeship where I work.

if you can hide the dust collection system under the bench you'll have more bench and wall space, but you might loose some floor space if you have to move your tool boxes out from the wall.
I am going to be basing the design of my workbench around the HF 44" cabinet, which is only 18" deep. I want a full 24" work surface so I will be loosing 5" or so (not 6" because of the knee wall) anyways. I figure I can use some of this space by routing my vac lines back there. It will be harder to reconfigure if I do this as I will be cutting holes in the worktop but it will be better use of my limited space.

I've been looking for great ideas to use multiple grinders and vises without taking up a ton of floor space or bench top so maybe you could have less venting it you had a couple dedicated spots for multiple tools.
I have actually designed and built a flip top stand that holds my Oscillating spindle sander and my dewalt planer but I hate the thing! I would much rather have my main tools in a set location so I don't need to disconnect dust collection hoses etc. to move them out of the way to use other tools.
I think I am going to group some bench tools together ie. my belt grinder and 6" bench grinder will be together and then my OSS and scroll saw will be together beside my wood bandsaw.

Thanks for the interest and the Ideas. I'm starting to get into the layout of my shop and can use all the ideas and help I can get to maximize the space I have.
 

JohnnieMo

Well-known member
Joined
Nov 25, 2014
Messages
1,175
Location
Calgary, Alberta
I'm really glad I stumbled across this thread.

My garage has a low 8' ceiling, and is really unusable for most of the things I need a higher roof to do. I was considering removing the roof and building up, however this approach could likely work. My garage is a bit larger (24x22)

Can you give more information on how the lifting process went? How many jack points? What sorts of beams? Fasteners? Your approach looks almost exactly like what I dreamed up in my head.

For the blocks, did you fill any of the cavities with concrete or fasten them to the ground in any way?

Thanks!
 
OP
A

Ainsley

Well-known member
Joined
Jun 12, 2014
Messages
557
Location
Ontario, Canada
Awesome updates every time!

Loving the shelving, like that they're not clunky looking.

I love the shelves on top. Thanks for the pics.. Did you build those or?

Fantastic work Ainsley..:thumbup:

Thanks all! I'm anxious to get the shop setup to the point that I'm well organized and comfortable working in there. Still have to decide where a lot of the larger pieces are going.
Wuaname, I built those shelves myself from 1"x1-5/8" Uni-strut, 1"x1/8" angle and some 3/4" birch ply.

Can you give more information on how the lifting process went?
I'll try and go over the process as best I can. The lift went well; better than I expected. I needed ALOT of blocking. I used some 6x6s that I cut into 12" lengths
How many jack points?
- 4 jack points, as close to the side walls as I could get while still having room to work. I used 3 toe jacks (also heard them called railroad jacks) and one bumper jack. I wanted to use all bumper jacks so it would be less messing around with blocking but I'm glad I didn't, the bumper jacks have a pinned base so they are not all that stable.
What sorts of beams?
- I used 2"x6"x12's but for the cross pieces I should have used larger and doubled them up. ran them the length of the shop on either side screwed into the studs and then two ran across the shop, underneath the beams on the sides. These were also screwed into the studs to prevent them from tipping.
Fasteners?
- I used #8x3" deck screws for everything but if I did it again I would probably use lags to attach the side beams to the studs. deck screws are **** in shear... although I used three per stud and didn't have any problems.

For the blocks, did you fill any of the cavities with concrete or fasten them to the ground in any way?
I left the cavities empty and didn't fasten them to the ground. I contemplated setting some rebar into the slab through the existing blocks but then I'd have to deal with slipping the blocks over the rebar... no easy task when working UNDER a building I just lifted ~22"

If you don't need the extra high knee wall to fix a grading issue then I'd just lift it and extend the bottom of the wall down, or just build a wall section you can slip in there. You could even build all the sections ahead of time to reduce the amount of time you have the thing in the air.
If you have any other questions feel free to ask, although I'm no authority on the subject, I just made it up as I went along.
 
OP
A

Ainsley

Well-known member
Joined
Jun 12, 2014
Messages
557
Location
Ontario, Canada
For those interested in the shelving I took some pictures of the latest frame I built.
Notched end of uni-strut to sit nicely on the 1" angle:
Sus9FIRl.png


clamped and tacked up the connecting pieces of uni-strut:
wkzB6idl.png


First mid-support in:
eKTeWNx.png
 

JohnnieMo

Well-known member
Joined
Nov 25, 2014
Messages
1,175
Location
Calgary, Alberta
If you don't need the extra high knee wall to fix a grading issue then I'd just lift it and extend the bottom of the wall down, or just build a wall section you can slip in there. You could even build all the sections ahead of time to reduce the amount of time you have the thing in the air.
If you have any other questions feel free to ask, although I'm no authority on the subject, I just made it up as I went along.

Thanks for the great replies. I never thought of just using wood. You are blowing my mind here. In my head I had it all sorted to take the roof off and build up, but this option seems so much easier (if not a lot more dangerous!) However wood would be a lot faster and I could probably get the garage up and down in a single day. No need to worry about wind or weather.

In Canada, I need to consider insulation, so leaving the blocks empty really wouldn't work.

I also have a 22' wide span to contend with. That would mean laminating some beams, or getting something bigger (like a 6x6 beam).

In other research, I've seen screw jacks recommended.

Thanks for sharing your knowledge.
 
OP
A

Ainsley

Well-known member
Joined
Jun 12, 2014
Messages
557
Location
Ontario, Canada
I'm located in canada as well and you're right on the heat loss through the block. I plan on covering it with foam before I re-do my siding eventually.

If I was just looking for extra height I'd probably just raise the roof. What kinda shape is the roofing and sheathing in?
 

JohnnieMo

Well-known member
Joined
Nov 25, 2014
Messages
1,175
Location
Calgary, Alberta
The roof is solid, but the shingles would need to be done within 3 to 5 years. If I did take off the roof, I'd likely rebuild it rotated 90 degrees so I could take advantage of a vaulted ceiling.

I suppose detaching and lifting the roof is a possibility. I think it would be messier because then there is work to move the garage door opener, all the electrical running up there, plus the siding. The advantage to the cinder blocks is that the interior and exterior remain pretty much untouched. I'd just add one more panel to the garage door, and fix up the people door. The windows would be higher in the air, but I don't think that would look as silly with cinder bricks as it would with siding. I guess I could also just stucco the wood as easily as the block.

I'm researching a variety of options in the thread in my signature line. I either try to modify this garage, knock it down and start new (with a triple) or leave this one mostly alone and build a second garage for my lift. It's just money afterall...
 

drivesitfar

Well-known member
Joined
Oct 23, 2013
Messages
35,997
Location
Pacific Northwest
Ainsley: great job so far and since i have a garage i'm changing from a gym back to a small shop i'll be watching your progress and adding ideas if i can think of any.

Merry Christmas
 
To avoid these ads, REGISTER NOW!
Top Bottom