To avoid these ads, REGISTER NOW!

60s Shopsmith 10e restoration

Scimonetti

Well-known member
Joined
Aug 25, 2014
Messages
431
Location
VT
1947 Shopsmith 10e restoration

I recently picked up this shopsmith 10e (e for expirimental) along with a 15 inch planer for 50 bucks! I'm fixing this up completely to put in my dad's garage
It was not made by Shopsmith but by the Magna Engineering corp. Both of the machines came with good motors but were all beat up.

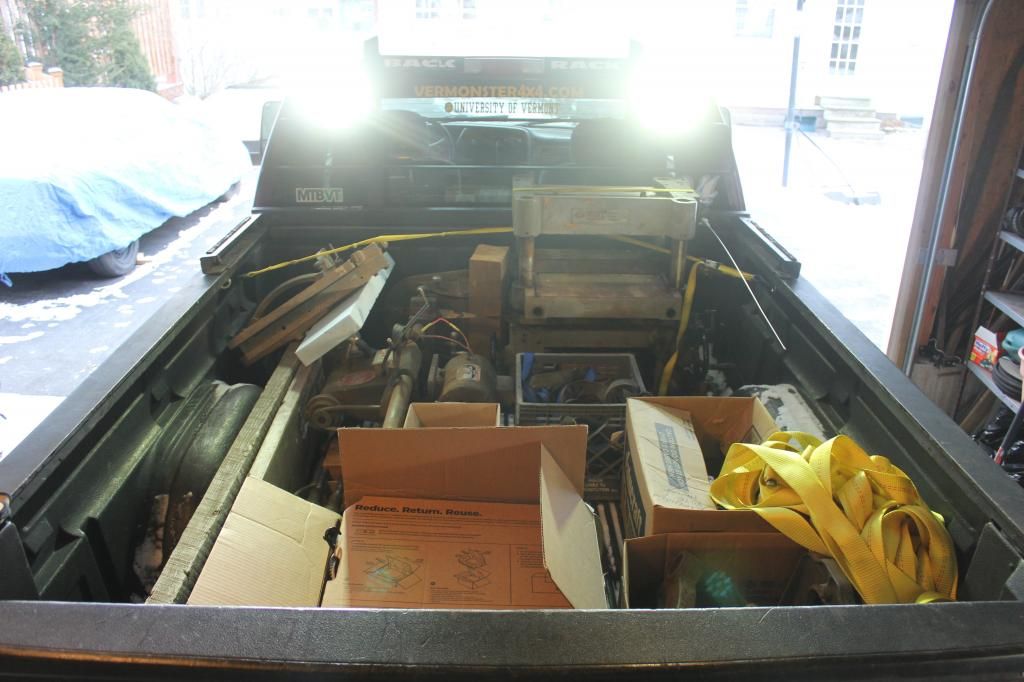
Here is the main frame as I got it. The handle for the DP was replaced with a wooden one at some point, shouldn't be hard to fabricate though.

It came with a whole box full of accessories and a manual.

The coolest piece in my opinion is the "speed changer" It mounts between the motor and headstock and acts as a variable diameter pulley like a Vari slow on a drill press.


It runs so many accessories for different applications that it needs to change speeds easily and without losing torque.

Here are some accessories.
I spy a few lathe faceplates, one welded badly, a lathe drive center, lathe tool rest arm with broken rest, tailstock, mortising attachments and hold downs, miter gauge and table extensions and a few pieces to hold the bars spread evenly and mount it to the table.
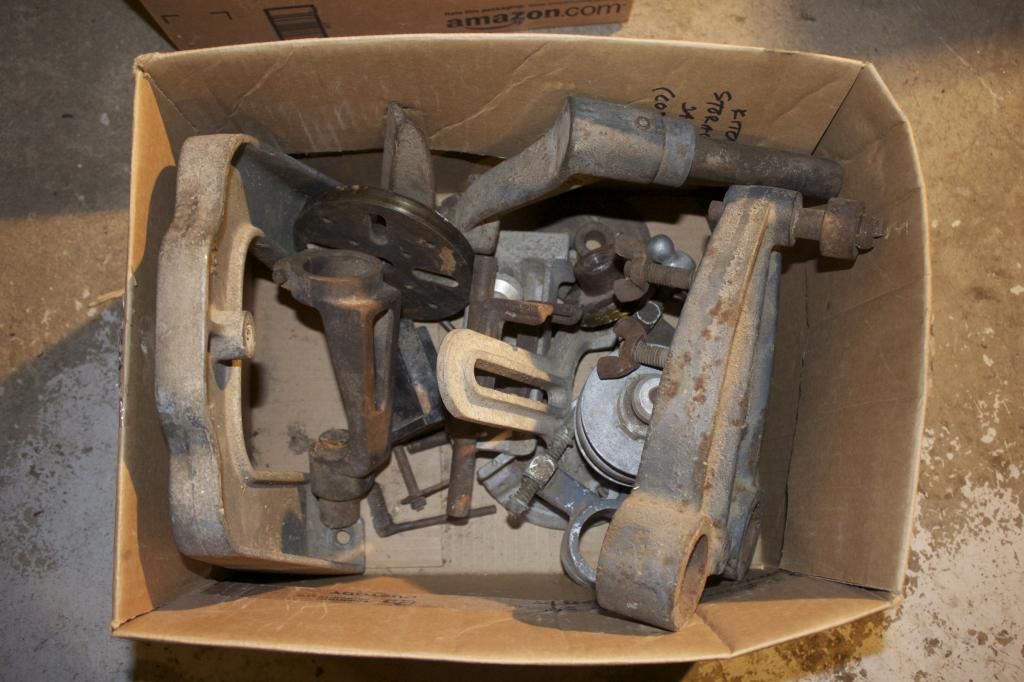
In this picture added are the table for DP, saw, horizontal mortiser, sander, drill chuck, drum sander, moulding head and loads of cutters. Even one in the box still!

It has a 3/4 Hp Dayton motor.

This is just a preliminary run through of how I got it, I have 3 restorations going on right now, the planer being a huge one so progress will be slow. Hope you enjoy!
 
Last edited:
To avoid these ads, REGISTER NOW!

7th Kahuna

Well-known member
Joined
Aug 4, 2012
Messages
1,704
Location
Los Angeles, CA
Looked at the picture before I read your description. First thing I saw was the planer and figured that must be one beefy Shopsmith. :lol: I am unfamiliar with the 'e' series. In any case, looks like you've got yourself a serious project there. One thing I don't see are the legs. Did it come without them?
 

7th Kahuna

Well-known member
Joined
Aug 4, 2012
Messages
1,704
Location
Los Angeles, CA
^ Interesting, bench mounted. Yes, I imagine you got a workout. I have been looking for a deal on a planer. I found one last year but had to pass because I couldn't move it by myself. It was a beautiful, if rusty, Parks machine. Oh well, another will come along. Looking forward to seeing you get it all reassembled.
 

PBCampbell

Well-known member
Joined
Feb 2, 2009
Messages
871
Location
WV
There were legs with casters. They mounted to a wooden plank and the machine was then mounted to that plank.
 

Squashfest81

Well-known member
Joined
Jan 14, 2012
Messages
1,475
Location
MA
Looking forward to following the resto. I've got a 60's Magna mark VII and a later mark V, which I will be cutting down by about 18 inches come spring.
Great gift for your father. There is something intriguing about these machines.
The 'e' is, I believe, the first shopsmith, followed by the 'er' for revised.
 

7th Kahuna

Well-known member
Joined
Aug 4, 2012
Messages
1,704
Location
Los Angeles, CA
The parks are great, that's my ideal planer. Even though this one is Taiwanese I couldn't pass it up.

Nor would have I! I have picked up a handful of Taiwanese and Chinese tools along the way. Some before I knew better, but always because the price was right. Several have now been replaced and each has been resold for a profit. :thumbup:
 

Hephaestus29

Well-known member
Joined
Mar 13, 2011
Messages
2,978
Location
Indianapolis
If you watch you could get a Mark V for 2-3 hundred. I bought one for two hundred that had a bandsaw, and a table with an extra motor, it may have been for a dust collector or something. I see them regular on craigslist very reasonable and their not rusted all up either.
 

7th Kahuna

Well-known member
Joined
Aug 4, 2012
Messages
1,704
Location
Los Angeles, CA
I don't know what you have for a vehicle but with the truck's tailgate removed, some custom width shouldered ramps and a come along I could have loaded it myself. Luckily I had some help but brought everything just in case.

A truck would definitely help. I drive an Expedition. It limits my options a bit but I have a six foot long piece of 3/4" plywood I lay out the rear and a couple of runners on the floor inside. I've had reasonably good luck tipping machines onto that, then lifting and sliding the whole thing in. I have also gotten really good at dissembling machines on the go. I do my research ahead of time if possible. There is a lot of helpful information at vintagemachinery.org. Check it out if you haven't already.
 
OP
S

Scimonetti

Well-known member
Joined
Aug 25, 2014
Messages
431
Location
VT
A truck would definitely help. I drive an Expedition. It limits my options a bit but I have a six foot long piece of 3/4" plywood I lay out the rear and a couple of runners on the floor inside. I've had reasonably good luck tipping machines onto that, then lifting and sliding the whole thing in. I have also gotten really good at dissembling machines on the go. I do my research ahead of time if possible. There is a lot of helpful information at vintagemachinery.org. Check it out if you haven't already.
I love that site. I spend a lot of time there looking at machines just in case I find one at a garage sale or something haha
 
OP
S

Scimonetti

Well-known member
Joined
Aug 25, 2014
Messages
431
Location
VT
I decided to swap the motors around a couple machines so I could get the best possible combinations and match brands. The shopsmith will get the chicom 2hp table saw motor. It's 220 and my dad has 220 but I don't. these pictures are for putting it back together.
 
OP
S

Scimonetti

Well-known member
Joined
Aug 25, 2014
Messages
431
Location
VT
I was pretty surprised when I took it apart. The blower fan is a piece of very warped plastic. it wobbles at least and inch. Heat and tweak!
Easy to work with capacitors
The whole thing was painted when assembled. the paint was in bad enough shape that a Milwaukee holeshooter and wire wheel took off all of it. Much quieter and easier than an angle grinder. after some sanding and prepping the surface with mineral spirits I put the can in a pitcher of hot water. It was 25 out and sunny so I went for it. I sprayed lightly with the warm paint and let it dry outside.
 
Last edited:
OP
S

Scimonetti

Well-known member
Joined
Aug 25, 2014
Messages
431
Location
VT
I should add that it is not actually from the 60s, but rather 47. The owner said 60s but that was for a different model. I wish I could change the thread title.
 
OP
S

Scimonetti

Well-known member
Joined
Aug 25, 2014
Messages
431
Location
VT
I made a lot of progress on the accessories the past weekend. I'll spread out the posts over the next few days. Here is the speed control cleaned up. I took it down almost fully, except for the pressed in shaft the bronze bushinged pulley rides on. I'll just mask that off. The hinge was gummed up with old motor oil and pot metal powder from the friction. Mineral spirits cut right through that. all of the pot metal castings, threads and knobs got wire wheeled. The castings will get primed and painted back to original and the knobs polished back up to how the peeling plating looked with some mothers metal polish. I'm very happy with how they match the old plating.
polish the aluminum tag too. here's a quick test of the hinge
 

turbowoodworker

Well-known member
Joined
Mar 18, 2012
Messages
3,524
Location
Apex NC
I have my dad's model 10B. It looks just like yours but does not have the speed changer. I never knew the "e" stood for "experimental". Do you think that is for the changer?

My dad bought his used about 1960.

Concerning the legs, the 10B came mounted on a wood base with some classic retractable rolling wheels that were common on the 10 series and later V series. The wood base is about 14 inches high. Mounting this machine on a bench (assuming typical bench height of 30+ inches) would make the drill press feature virtually unusable as the yoke would be very high off the floor.

The obvious big disadvantage of the 10 is the limitation of three speeds improved by the variable speed control on the V series. I tend to use mine as a disc sander now as I have dedicated tools that are much more efficient and accurate.

Thanks for posting. Subscribed.
 
OP
S

Scimonetti

Well-known member
Joined
Aug 25, 2014
Messages
431
Location
VT
I have my dad's model 10B. It looks just like yours but does not have the speed changer. I never knew the "e" stood for "experimental". Do you think that is for the changer?

My dad bought his used about 1960.

Concerning the legs, the 10B came mounted on a wood base with some classic retractable rolling wheels that were common on the 10 series and later V series. The wood base is about 14 inches high. Mounting this machine on a bench (assuming typical bench height of 30+ inches) would make the drill press feature virtually unusable as the yoke would be very high off the floor.

The obvious big disadvantage of the 10 is the limitation of three speeds improved by the variable speed control on the V series. I tend to use mine as a disc sander now as I have dedicated tools that are much more efficient and accurate.

Thanks for posting. Subscribed.
No problem, thanks for the info. From what I've found online magna made the 10e to test the market pretty cheaply. They used sand castings and after selling about 6000 units started to roll out the 10er in 48, or experimental revised. It had some minor upgrades and some die casting molds they invested in. The speed changed was an optional accessory on both I believe.
 

Two Sheds

Well-known member
Joined
Jan 16, 2014
Messages
101
Nice find. The speed changer alone goes for over $100 as a spare part. I have a 10ER from about 1952 or 1953 that I've had for several years. It makes a good drill press, lathe and horizontal boring machine. Not as good as a stand-alone table saw. There is a listserve on Yahoo Groups devoted to the restoration of the 10E and 10ER. Well worth subscribing to if you are trying to restore or repair one of these. They were built to last.
 

Toymeister

Well-known member
Joined
Nov 30, 2011
Messages
595
Location
North Florida
I have three of these. One 10e and two 10ers. I enjoy rebuilding them. There are 4 bearings in the head. I can tell you from 6,000 miles away in Afghanistan, that those are bad. The motor bearings are bad as well. I converted one to a wall mounted drill press. I will make another a vertical mill (bridgeport style) They can easily be converted to DVM motors. DC variable speed. A treadmill motor works quite well.

The stand was an option as well as the motor. The planks on the stand from my first restore came from trees that were alive when President Lincoln was Senator Lincoln.

Its quite easy to get collets which allow the use on machine tools for the verical mill.

The machine is a horrid table saw. Its an excellent drill press and spindle lathe. The speed changer (a bolt on reeves drive) expands the lathe uses to include a great bowl lathe as well.

It is possible to get the extras that allow the use of modern Mark V Shop Smith Accessories call Special Purpose Tools to operate on this machine like a band saw, belt sander, strip sander, the more modern scroll saw.

I have attached a image of a ER10 mounded to the wall as a DP. Its not mine but you get the idea.

There is not much I don't know about these machines if you have question
shopsmith-10er
 
OP
S

Scimonetti

Well-known member
Joined
Aug 25, 2014
Messages
431
Location
VT
Nice find. The speed changer alone goes for over $100 as a spare part. I have a 10ER from about 1952 or 1953 that I've had for several years. It makes a good drill press, lathe and horizontal boring machine. Not as good as a stand-alone table saw. There is a listserve on Yahoo Groups devoted to the restoration of the 10E and 10ER. Well worth subscribing to if you are trying to restore or repair one of these. They were built to last.

Thanks, I'll check it out. It will stay in an unheated 2 car garage behind a racecar and boat to get used every once in a while for pretty basic stuff. I can see using the horizontal boring feature too!
 
OP
S

Scimonetti

Well-known member
Joined
Aug 25, 2014
Messages
431
Location
VT
Here are some more of the random stuff I've been cleaning up. I still haven't decided how pretty I want it to look and how much I should make things shine. The first run through will just be paint stripping and rust removal
 
To avoid these ads, REGISTER NOW!
OP
S

Scimonetti

Well-known member
Joined
Aug 25, 2014
Messages
431
Location
VT
Here is the fence assembly
The screw wouldn't come out all the way so I just gently wire wheeled the knurling.
the fence was poorly fly cut machined but I retained the look.
Here's the mortising hold down base after a wire wheel and a quick scotch brite.
I used the same treatment for the table on the machined fence.
 
OP
S

Scimonetti

Well-known member
Joined
Aug 25, 2014
Messages
431
Location
VT
On the tool rest I went to go remove the set screw. As soon as I applied torque I heard a sudden crack. It turns out it was the 5/16" screw itself. after some head scratching I took a 5mm Allen key and pounded it in. this enabled me to get it out no problem.
 
Last edited:
OP
S

Scimonetti

Well-known member
Joined
Aug 25, 2014
Messages
431
Location
VT
Anything round gets carefully spun in the lathe. be very careful with longer objects, and use tailstock support or go slow and keep one hand on the power and the other around the rod.
The other table support is very pitted, I might get some cold rolled steel to replace it.
 
OP
S

Scimonetti

Well-known member
Joined
Aug 25, 2014
Messages
431
Location
VT

Here are some of the castings. They were brought down to almost bare with a wire wheel and drill. Much more time consuming than electrolysis or an angle grinder or blaster but I don't have a bead blaster, the angle grinder is too stiff and aggressive, and it's heavy winter right now. Good paint stripper I can't use in the basement and its nasty stuff. The 1/2" Milwaukee hole shooter is getting some serious use. Bolts and other small assorted hardware gets cleaned with a bench grinder and wire wheel. I am currently designing an exposed wheel pedestal buffer and wire wheel. That will shave tons of time off by me not having to use a drill, wimpy grinder, or polish and sand by hand.
 

turbowoodworker

Well-known member
Joined
Mar 18, 2012
Messages
3,524
Location
Apex NC
Watching with great interest.
Do you know what material the fence clamps are made from? they look like a cast aluminum but seem heavier. I have one with a broken lip on the back side clamp, which makes the fence unstable. Wondering if it can be welded back in place.
Thanks for the pics,
Rick
 
OP
S

Scimonetti

Well-known member
Joined
Aug 25, 2014
Messages
431
Location
VT
Watching with great interest.
Do you know what material the fence clamps are made from? they look like a cast aluminum but seem heavier. I have one with a broken lip on the back side clamp, which makes the fence unstable. Wondering if it can be welded back in place.
Thanks for the pics,
Rick
Do you mean this?
I don't know. It might be a pot metal containing zinc and many other metals. Pot metals do feel heavier. It could also be cast aluminum. I do not know how to tell other than finding density. You might want to try the yahoo shopsmith groups. Here is a thread I found about it. http://www.practicalmachinist.com/vb/general-archive/aluminum-pot-metal-79369/
 

turbowoodworker

Well-known member
Joined
Mar 18, 2012
Messages
3,524
Location
Apex NC
Thanks. I will put a magnet on it too. I'll check out the link.
I'm looking at the opposite end. On my older 10b the far end clamp has a lip like yours but it is only about an inch or less and the lip broke off.
 
OP
S

Scimonetti

Well-known member
Joined
Aug 25, 2014
Messages
431
Location
VT
A bunch of the molding cutters were slightly rusted and dirty, but not pitted and very sharp still. I didn't want to dull them wheeling so I put them in vinegar for 6 days After removing them they had crud loosely caked on and an overall black tarnish.
You must immediately do something or else they will rust. Also any part not submerged in the vinegar fully will rust right off. I used a brass toothbrush type thing to not dull them and knocked off a bunch of the crud. I then rinsed them thoroughly in the sink with dawn and a sprayer. Keep them submerged and scrub away all tarnish with the brass brush. If one gets out of water and dries it will flash orange rust. Immediately dry and coat everything in oil. sharp, bare, high carbon steel cutters!
 
OP
S

Scimonetti

Well-known member
Joined
Aug 25, 2014
Messages
431
Location
VT
I spent some time on a friends buffer today. 1/2 HP baldor with some Tripoli and red rouge. when I get my own buffer I'm afraid I'll go crazy making everything shiny. I've been talking with my dad and he might not want it in the garage (only home 2 days a month and it takes up space) so I will probably end up with it in the basement. I decided to go all out on it then because I will see it everyday and rusting isn't an issue.
 
OP
S

Scimonetti

Well-known member
Joined
Aug 25, 2014
Messages
431
Location
VT
I got the head mostly apart. It was pretty straightforward. I used a gear puller on the headstock pulley and pushed the quill through with that. There was tons of earwax like grease in the gears and quill.

Then to remove the pulley from the hollow shaft I put a washer over it.
That got it off
The problem is I cannot remove the headstock bearing and pulley. One of the setscrews was replaced with a bolt and ground smooth. I'll pick up some screw extractors.

The headstock bearing I'd like rocks in a tin pail, but the quill bearings are completely smooth but a bit loud. I'll probably replace all them.
 
OP
S

Scimonetti

Well-known member
Joined
Aug 25, 2014
Messages
431
Location
VT
got off the rails.
the sledgehammer was NOT used in this process, a rubber mallet then screwdriver. It twisted apart easily. the blind screws were able to be pulled with diagonal cutters. My plan is to hit the badge with jewlers rouge all over to freshen up the metal and paint.
 
OP
S

Scimonetti

Well-known member
Joined
Aug 25, 2014
Messages
431
Location
VT
I ended up fully polishing the other knobs, and the speed control pulley too.
I polished one of the step pulleys too. I put it in the lathe gripping outward on the bore and for pot metal go green scotchbrite and oil, then white and oil then dry and mothers polish.

This is the pole after scotch brite by hand. It looks good but there is light pitting on the other end.
I am going to spin it in the lathe and take off a tiny bit with sandpaper, then wet sand up with auto body stuff.

Here is the quill all cleaned up. You can still see some machining marks on it I blasted it with brake cleaner and cleaned the grooves with a nylon brush. Then I used white scotchbrite. The bearings are a bit noisy but I cannot feel any play at all. I might flush them and regrease.
 
OP
S

Scimonetti

Well-known member
Joined
Aug 25, 2014
Messages
431
Location
VT
I gave the table a quick sanding with 220 and a ros. it didn't help, the pits were too deep.

My finish sander was not pleased
 
Last edited:
OP
S

Scimonetti

Well-known member
Joined
Aug 25, 2014
Messages
431
Location
VT

The pulleys fresh off the lathe.

I chucked up a bolt from either side and spun the chuck.

Getting the base support pins out was a pain. I got scared tapping them out hard so I grabbed some vise grips and just barely caught them and carefully twisted and pried them out.
 
OP
S

Scimonetti

Well-known member
Joined
Aug 25, 2014
Messages
431
Location
VT
Slipping some pex pipe down the quill shaft and using a rubber mallet removed the pulley bearing. Pb blaster helped too. I like using pex as a "hammer extension" as it absorbs some force and keeps me from breaking things. Next step up is PVC, then wood, then black iron pipe for maximum oomph!

I think my gear puller should get these off
 
To avoid these ads, REGISTER NOW!
Top Bottom