To avoid these ads, REGISTER NOW!

Black Pipe Airline Project

600SL

Well-known member
Joined
Apr 26, 2012
Messages
1,794
Location
Connecticut
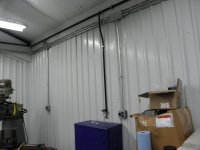
I'm just about done with the install of my airline system. The system involved 252' of pipe. 11 3/4" and 1 1/2 21 ft lengths. It has 5 drops plus plumbing overhead to two lift outlets.

Thanks to the help I received from people on this thread I was able to cut thread and bend the pipe as required.

http://www.garagejournal.com/forum/showthread.php?t=272732&highlight=threading+pipe

My comments on the Harbor Freight portable electric pipe threaded can be found here.

http://www.garagejournal.com/forum/showthread.php?t=274084

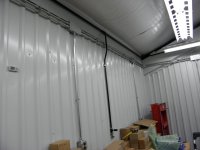
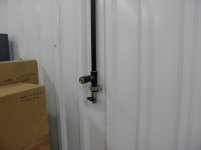
This system uses a 3/4" schedule 40 black iron pipe around the perimeter of a 48' x 30' building with 1/2" drops. Schedule 80 fittings and pipe along with a 2' flex hose are used from the compressor to the Maxline filter regulator. The five outlets are fitted with Prevost safety push button QD's. I may also get a couple of these for the ends of my hoses and reals.

All fittings were sealed with Mil spec grade Teflon tape only and have been 100% leak checked for the fittings installed to date. During the process three leaks were found and addressed.

The first two leaks were caused by the Harbor Freight thread die needing adjustment. It is a non adjustable die but you can see how I addressed this in the above link. The other leak came from one of 2 Home Depot ******* I purchase in a pinch.

All fitting used in this system were US made "Ward" purchased from McMaster-Carr. Pipe was purchased locally and was made in Oman.

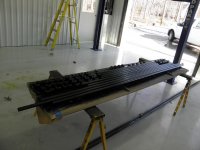
All pipe and fittings were painted prior to install and will of course need to be touched up where the wrench was applied.

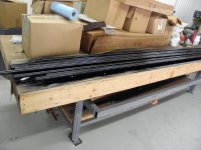
The last picture shows the remaining hardware needing installation and is waiting on more US made fittings.

Total cost of this installation including the Harbor Freight Threader was $1776. including everything from fitting on the compressor to the outlet QD's, paint, and mounting hardware. That was a surprise to me. As usual I was expecting to come in at half that.
 

Attachments

  • P1010014.jpg
    P1010014.jpg
    138.2 KB · Views: 819
  • P1010015.jpg
    P1010015.jpg
    138 KB · Views: 731
  • P1010024.jpg
    P1010024.jpg
    129.2 KB · Views: 809
  • P1010043.jpg
    P1010043.jpg
    130.2 KB · Views: 858
  • P1010042.jpg
    P1010042.jpg
    148.1 KB · Views: 846
  • P1010044.jpg
    P1010044.jpg
    129.6 KB · Views: 905
  • P1010045.jpg
    P1010045.jpg
    142.4 KB · Views: 891
To avoid these ads, REGISTER NOW!

Streetbu

Well-known member
Joined
Jan 7, 2014
Messages
3,082
Location
Central NY
Great job! I know how expensive it can be when done properly. Mine is no where near as large as your setup, but I have over $500 in mine.
 

CNGsaves

Well-known member
Joined
Sep 26, 2012
Messages
13,233
Location
KS and OK
Fabulous job on Lifetime install of black pipe airline system !! :thumbup:

Future generations of owners of that building will be thanking you for your planning and execution of the plan. Excellent !
 

Swobber

Well-known member
Joined
Dec 31, 2014
Messages
85
Location
Denmark
Once you have used those safety couplers, you Will want them everywhere!
-we tested them some 5 years ago at my job at two outlets and one hose. Now ALL our couplers are this type!
 

buildyourown

Well-known member
Joined
Jan 8, 2010
Messages
185
I surprised it bent so well. Did you use a conduit bender or a pipe bender?
FWIW, Loctite makes an anaerobic sealant that will guarantee zero leaks even with less than perfect threads. It is my goto on stuff that can't leak. (inside walls)
 
Last edited:
OP
6

600SL

Well-known member
Joined
Apr 26, 2012
Messages
1,794
Location
Connecticut
Thanks for all the compliments. The only difficult part was getting my son to help and having to go back and forth for fittings. Two good men in there thirty's with an unlimited supply of fittings could knock this out in a day.
 
OP
6

600SL

Well-known member
Joined
Apr 26, 2012
Messages
1,794
Location
Connecticut
I surprised it went so well. Did you use a conduit bender or a pipe bender?
FWIW, Loctite makes an anaerobic sealant that will guarantee zero leaks even with less than perfect threads. It is my goto on stuff that can't leak. (inside walls)

I used the same conduit bender I used for the EMT. The 1/2" bends are real easy the 3/4" bend was pushing the limits of what a conduit bender could do. Fortunately I only had one of those.

I like the Teflon because I'm old and have been using it too long.:p
 

Cyberbear

Well-known member
Joined
Nov 23, 2013
Messages
1,524
Location
California
I am wondering how the black pipe air line system has worked regarding the rust factor?
I once added a black pipe extension to my old system and immediately found rust particles in my filter's clear bowl. Did you install water filters at the air compressor, or at the end of the system ??
 
OP
6

600SL

Well-known member
Joined
Apr 26, 2012
Messages
1,794
Location
Connecticut
nice job!
things always cost more & take more time than we figure they should.
( if you would have plumbed with PVC you wouldn't have had all that expense & frustration :D:lol:)

I did my shop in CT with PVC some 20 years ago. About 1 week after getting the install complete, I had a plumbing job to do in the house and I went to McMaster-Carr to order some fittings. At the time on every page with PVC in the catalogue was a warning stating not to use PVC for compressed air. OH well it lasted me 20 years and never blew up.

This time I did it in the most tried and true of way I'm aware of.
 
OP
6

600SL

Well-known member
Joined
Apr 26, 2012
Messages
1,794
Location
Connecticut
I am wondering how the black pipe air line system has worked regarding the rust factor?
I once added a black pipe extension to my old system and immediately found rust particles in my filter's clear bowl. Did you install water filters at the air compressor, or at the end of the system ??

It will be at the compressor.
 

boomer12831

Well-known member
Joined
Jan 6, 2013
Messages
526
Location
northern New York
That looks like an awesome job. I can tell you take pride in your work. The valves that you used for the moisture drains on the outlets look like they are high quality, where did you get them? Also do you know if there is a " color standard " for air lines in an industrial application? When mine is finished I will post some pictures, Ed.
 

RickP

Well-known member
Joined
Jan 15, 2013
Messages
1,547
Location
Annapolis, MD
That looks great - nice job on the install and thanks for writing it up here.

I'm planning to start on a smaller system for my garage and I'm starting to think about how to plumb the drops. How did you do yours? It looks like each drop is coming from the side of a reducing tee? Did you consider coming off the top?
 
To avoid these ads, REGISTER NOW!

Tarnished

Well-known member
Joined
Feb 8, 2012
Messages
721
Location
SW Ohio
The other leak came from one of 2 Home Depot ******* I purchase in a pinch.

Total cost of this installation including the Harbor Freight Threader was $1776. including everything from fitting on the compressor to the outlet QD's, paint, and mounting hardware. That was a surprise to me. As usual I was expecting to come in at half that.

Nice job 600. Looks great and the bends worked out well. Nice install! :rocker:
I'm with you on the ****** from Homers. Thought I would save some drive time and pick up some reducers from the BB store. Every one leaked and even dope and tape couldn't stop them. Replaced with USA fittings and problem solved.
For my install I used copper, and have about 50' of 1-1/4in, 25' of 1in and about 40' of 1/2in. By the time I purchased all fittings, valves, etc, I am well over the $1K mark. At $8/elbow, and$45/valve it mounts up quickly. :eyecrazy: But now it is done, and we don't have to worry with it anymore. Enjoy you install! :beer:
 

Trey T

Well-known member
Joined
Aug 3, 2011
Messages
3,749
Location
Houston, TX
OP:

Wow. nice job. Each drop has a z-bend, is it pre-made or you bent it yourself?

What made you choose black pipe over copper or HDPE?
 
OP
6

600SL

Well-known member
Joined
Apr 26, 2012
Messages
1,794
Location
Connecticut
That looks like an awesome job. I can tell you take pride in your work. The valves that you used for the moisture drains on the outlets look like they are high quality, where did you get them? Also do you know if there is a " color standard " for air lines in an industrial application? When mine is finished I will post some pictures, Ed.

Valves are from McMaster-Carr

http://www.mcmaster.com/#4912k89/=vc805c

I had no idea there was a color standard except according to Prevost there are color standards for each countries industry standard connectors. US is blue, hence the blue dot on my QD push button.

If there is a color standard for pipes I hope its Black:D
 
OP
6

600SL

Well-known member
Joined
Apr 26, 2012
Messages
1,794
Location
Connecticut
That looks great - nice job on the install and thanks for writing it up here.

I'm planning to start on a smaller system for my garage and I'm starting to think about how to plumb the drops. How did you do yours? It looks like each drop is coming from the side of a reducing tee? Did you consider coming off the top?

In the end I used a 3/4" x 1/2" x 3/4" reducing "T" pointed down at 45° with a 45° street elbow installed. Then to my 1/2" bent down pipe.

I did consider coming off the top using 2 street 90's to the down pipe. But I realized with that set up another set of separate drains drops would need to be installed. While it may be a little more dry, the system was getting overly complex and the ugly factor was starting to loom. So I kept it simple. And because I kept it simple I had 16 street 90's that were painted and non returnable so they are now up on E-bay.

If you paint I might consider the top exit. If not I wouldn't recommend it.

http://www.ebay.com/itm/231441601078?ssPageName=STRK:MESELX:IT&_trksid=p3984.m1555.l2649
 
OP
6

600SL

Well-known member
Joined
Apr 26, 2012
Messages
1,794
Location
Connecticut
OP:

Wow. nice job. Each drop has a z-bend, is it pre-made or you bent it yourself?

What made you choose black pipe over copper or HDPE?

I made the offset bends myself using my EMT conduit bender. The 1/2" pipe was very easy. The 3/4" was approaching the limit. But I had plenty of practice with the offsets when I did my electrical drops. There sere about 20 of them.

Black over copper or HDPE? After doing my Garage in CT in PVC 20 years ago, I decided to go with tried and true. I really was in a toss between the black pipe and the Max line system: I liked the Maxline system because it had 20' straight pieces and really cool drops. I didn't like the appearance of the bulky connectors and don't really care for the pale blue color.

http://www.northerntool.com/shop/tools/product_200582745_200582745
 

C96

Well-known member
Joined
Nov 30, 2013
Messages
1,251
Nice job, doesn’t get much better than black pipe for air lines and EMT for the electrical.

Glad to see you didn’t take the easy way out and use plastic tubing for air and the other plastic (PVC) for the electrical.

I personally dislike plastic in a shop / garage environment, just doesn’t seem rugged enough, more like rinky-dink than anything.

Nice work! :thumbup:
 

NUTTSGT

Super Moderator
Staff member
Joined
Sep 14, 2009
Messages
50,864
Location
Northern Central Ohio
Your system came out looking nice, very nice. It must have been nice plumbing the inside of a rectangular box and not having to go around from room to room like mine.

:beer:
 
OP
6

600SL

Well-known member
Joined
Apr 26, 2012
Messages
1,794
Location
Connecticut
Your system came out looking nice, very nice. It must have been nice plumbing the inside of a rectangular box and not having to go around from room to room like mine.

:beer:

I did have two rooms and had to jump over the partition in two places.
 

75gmck25

Well-known member
Joined
Jul 21, 2014
Messages
1,317
Location
Alexandria, VA
A little off topic - I was watching a This Old House episode a few weeks ago and they were installing black pipe for a new gas appliance. Instead of threading the ends and using connectors they had some type of crimp on connector to connect the unthreaded cut ends of the pipe.

The special connector slipped over the ends of the pipe and there was a battery-operating compression/crimping tool that made each connection. It took him about 30 seconds to connect the two cut ends of each pipe, so the installation went very quickly. It was inspected by the local AHJ (probably somewhere near Boston) and approved for gas.

Has anyone used that type of tool? Can you rent one?

Bruce
 

CNGsaves

Well-known member
Joined
Sep 26, 2012
Messages
13,233
Location
KS and OK
^ ^ Saw that episode too. What you need to make note of . . . .
. . . that was OUTSIDE location of NG line for a guy's outdoor BBQ grill.

Have never seen that method used indoors, so curious if some plumbing guru can comment on indoor use . . . not allowed ?? :dunno:
 

rharman

Well-known member
Joined
Apr 22, 2012
Messages
8,741
Location
SoCal
That is a very nice, clean installation. The EMT too.

Always appreciate looking at craftsmanship and that's what I see here.
 
OP
6

600SL

Well-known member
Joined
Apr 26, 2012
Messages
1,794
Location
Connecticut
Well I finally completed the pipe today. All except there are two leaks I need to fix. on both the inlet and outlet of the regulator. Last week I didn't work on the plumbing since the weather was good I started to finish up my compressor shed. Hope to get the leaks fixed and the shed finished next week. But its nice to have air in the garage.

I actually got to use my impact wrench today to dis assemble one of my hose reals. Hanging hose reals in a metal garage with no studs is tricky. I had to install 4 nut-serts into the purlins to bolt 1.5" x 0.75" rectangular tube onto and then install 4 nut-serts onto the tubes to bolt the hose real to. Every thing went well until I realized I needed a 17/32nds drill, which I don't have for the 3/8" nut-serts. Oh-well another job to finish next week.
 

Attachments

  • P1010002.jpg
    P1010002.jpg
    137.7 KB · Views: 164
  • P1010001.jpg
    P1010001.jpg
    124.9 KB · Views: 183

Divcod

Well-known member
Joined
Jan 9, 2015
Messages
319
Location
Pacific Northwest
Plumbed my system with 3/4 copper but on each drop installed a ball valve followed by an extension below the air fitting connection. Result dealt with the lack of an air dryer for the plasma cutter and spray painting drop. Also have a series of coper u-tubes ,total of 100ft, at the compressor outlet to also help with air drying and cooling.
 

whitedogone

Well-known member
Joined
Jan 20, 2014
Messages
230
^ ^ Saw that episode too. What you need to make note of . . . .
. . . that was OUTSIDE location of NG line for a guy's outdoor BBQ grill.

Have never seen that method used indoors, so curious if some plumbing guru can comment on indoor use . . . not allowed ?? :dunno:

It's a Viega press system. Approved for concealed locations.
 
OP
6

600SL

Well-known member
Joined
Apr 26, 2012
Messages
1,794
Location
Connecticut
Plumbed my system with 3/4 copper but on each drop installed a ball valve followed by an extension below the air fitting connection. Result dealt with the lack of an air dryer for the plasma cutter and spray painting drop. Also have a series of coper u-tubes ,total of 100ft, at the compressor outlet to also help with air drying and cooling.

Is that 100' of U tubes or 100' of air lines. Please post pics. I want to investigate something similar I believe its called a Frankeniser.
 

Man Cave

Well-known member
Joined
Oct 29, 2009
Messages
94
Location
southern Indiana
Good looking installation 600sl. I did my 30 x 48 pole building shop in black iron 24 years ago and have no regrets on the expense and time, its been trouble free. I did learn that my biggest water trap was a drop I had near my lathe. I ended up teeing in a valve at the bottom and drain the system there often. I plumbed in a quality hose real with 50' of hose in the middle of the shop ceiling and that's pretty much what I use 99% of the time.
 
OP
6

600SL

Well-known member
Joined
Apr 26, 2012
Messages
1,794
Location
Connecticut
Good looking installation 600sl. I did my 30 x 48 pole building shop in black iron 24 years ago and have no regrets on the expense and time, its been trouble free. I did learn that my biggest water trap was a drop I had near my lathe. I ended up teeing in a valve at the bottom and drain the system there often. I plumbed in a quality hose real with 50' of hose in the middle of the shop ceiling and that's pretty much what I use 99% of the time.

I have a partition so I will be installing two hose real's. I have a T and valve at the bottom of each drop. I believe I may want to increase the length of the ******* at the ball valves. Right now they are only about 3". I don't paint so I'm not too concerned with moisture but I will be plasma cutting.
 
OP
6

600SL

Well-known member
Joined
Apr 26, 2012
Messages
1,794
Location
Connecticut
600SL,

You're looking for a Franzinator

http://www.garagejournal.com/forum/showthread.php?t=186531&highlight=franzinator

Mr OneTwo built a nice one using all threaded pipe.

Keep up the good work !
Steve

That's it. I'm still a bit skeptical of it. But just having a second tall chamber with a large diameter for reduced speed should be useful. But so would an AC condenser coil arranged properly. I understand that if you office the air into a chamber that you will get a cooling effect, orficing an maintaining flow are to confliction goals. And with a 1/4" or so orifice there really shouldn't be a significant pressure drop.

One night when I have nothing to do I may crack open the old heat transfer book and see if I can model this.
 

WhoWhatNow

Well-known member
Joined
Feb 22, 2011
Messages
1,884
Location
Collegeville, PA
That's it. I'm still a bit skeptical of it. But just having a second tall chamber with a large diameter for reduced speed should be useful. But so would an AC condenser coil arranged properly. I understand that if you office the air into a chamber that you will get a cooling effect, orficing an maintaining flow are to confliction goals. And with a 1/4" or so orifice there really shouldn't be a significant pressure drop.


One night when I have nothing to do I may crack open the old heat transfer book and see if I can model this.


Great setup. I finished running mine in 3/4 black pipe about 9 months ago. It is great to finally have enough air in the shop. My next step is a line back to the shed were I have a vise stuck in the ground for the really dirty work.

Something you may want to consider instead of a frazanator is a simple after cooler plumbed in before the tank. I just picked one up from Zoro for ~$135 (w/ 30% off). Good for 400psi and 25cfm I think. I'm going to mount it opposite the flywheel on my Quincy 325 so it gets airflow without adding a second fan. I know a few people here have used transmission coolers with electric fans.
 
Last edited:
To avoid these ads, REGISTER NOW!
Top Bottom