rslaback
Well-known member
So I've wanted for a while now to dabble into the Ryobi line of 18v tools. They seem to have a homeowner tool for just about everything and since I am no longer in construction to put food on the table, that should suit me just fine.
Most of my power tools are Ridgid with the exception of a Dewalt jacket (conversion coming soon) and my Paslode impulse. Ridgid isn't what I would consider a professional brand but I am no longer a professional carpenter either. The problem with getting a few of the Ryobi tools is that I hate the idea of having multiple battery types to track and charge. For that reason, I begged a few dead Ryobi battery packs and made myself an adapter to use a Ridgid pack in a Ryobi tool.

Some caveats before we get started:
1. If you are fine with having multiple types of batteries and chargers, this project is not for you. Just buy the Ryobi batteries which are cheap enough and decent quality.
2. If you are interested in doing something like this and plan to use lithium packs make sure you are aware of the discharge protection circuitry. Lithium batteries must be protected from fully discharging. Some manufacturers have chosen to put the protection in the batteries like Ridgid and Ryobi while others have chosen to put it in the tool like Dewalt. Do not make an adapter to run a nonprotected battery (Dewalt for example) in a nonprotected tool like a Ryobi. The tool will work but it will completely discharge your battery and likely prevent it from ever recharging. You can probably put the protection circuitry from a donor tool or battery in your adapter but I haven't actually tried this as I have no need to.
3. This adapter should never be used for charging. Lithium cells are pretty specific to charge rates and voltages. Your charger should always be matched to your battery.
4. I did not want to modify the actual tool, nor the actual battery. I don't like the hacked together look it provides.
5. Yes I wish the adapter was more sleek. The reason it isn't is that Ryobi uses side spring latches to hold the pack in. The springs for these lock pieces go all the way to the bottom of the pack. I would've needed to completely re-engineer the springs in order to make the adapter shorter. At this point I didn't want to do that. I've seen guys that have forgone the latches and just used velcro to hold the adapter and pack on the base of the other tool. That looked more half-assed to me than the longer adapter.
The first thing that I did was to order part 270015155 from a Ridgid parts dealer. This part is the battery connector and switch for the 18V flashlight.

I didn't need the switch for obvious reasons and I wanted heavier gauge wire so I snipped off the leads to the connector.

Next it was time to rough out the piece to hold the Ridgid connector. This piece needed to be about the same thickness as the housing on the Ridgid tool. A piece of .100 lexan worked perfectly. I highly recommend Lexan instead of acrylic plexiglass if you do this. Lexan is much more resistant to shattering when cutting, drilling and flexing. Ridgid uses the battery connector as well as some slides on the side of the pack to hold the battery up. The battery is then held in position by two wedges built into the battery top. I needed a shape into which I could slide the connector, that would fit the top of the Ridgid battery and would have a catch for the retaining wedges. Something like this:

Next it was time to check if the connector fit.


And then mock it all up on the battery.

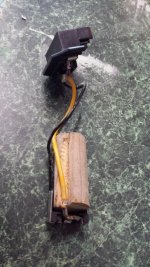
Now it was time to move on to the Ryobi pack. I used a Nicad pack so it was pretty simple inside. The final cell in the stalk of the pack held the 3 connectors: negative, positive and thermal switch.

The thermal switch is used to stop the charging of a Nicad pack. It isn't needed here so that lead is just clipped. Instead of trying to figure out a way to hold the plastic piece inside the stalk, I opted to leave it secured to that last cell and glue the cell in place inside the stalk. It worked well.
Manipulating the bottom of the Ryobi battery case came next. I needed the shape to fit the top of the Ridgid connector (the trapezoid) have the cut out for the retaining wedges and have that all located in roughly the correct spot.

It was a close fit with the screw placement in the housing but it did all fit.
Before going any further I double checked the fit.

Like I mentioned before I wanted some heavier gauge wire than the light application used. That meant I needed to cut some hunks of 10 AWG stranded wire,

desolder the factory wires from the Ridgid terminals

solder the larger capacity wires on the Ridgid terminals

and then solder the other ends onto the corresponding terminals on the top of the Ryobi cell.

It should be noted that even though the cell remains in place, it isn't doing anything. Both leads bypass the cell.
I fished the leads through the Lexan plate and then installed the connector. There weren't going to be a lot of durable methods of attaching the connector and the Lexan. I could've used an epoxy but I opted for rivets with backing washers instead.


After shoving the cell and Ryobi terminals up into the adapter stalk I squirted some super glue up to hold the cell in place.
Finally it was time to put it all together. I screwed the adapter pack halves together and then used pop rivets to hold the Lexan plate in place.


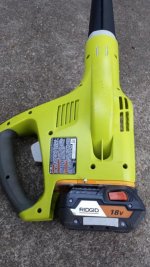
It works perfectly.

You may notice that the only thing holding the pack on vertically is the battery connector. I'm pretty confident that will be just fine, but if it does end up problematic then I'll have to figure out something to mate with the lateral slides in the battery.
Most of my power tools are Ridgid with the exception of a Dewalt jacket (conversion coming soon) and my Paslode impulse. Ridgid isn't what I would consider a professional brand but I am no longer a professional carpenter either. The problem with getting a few of the Ryobi tools is that I hate the idea of having multiple battery types to track and charge. For that reason, I begged a few dead Ryobi battery packs and made myself an adapter to use a Ridgid pack in a Ryobi tool.
Some caveats before we get started:
1. If you are fine with having multiple types of batteries and chargers, this project is not for you. Just buy the Ryobi batteries which are cheap enough and decent quality.
2. If you are interested in doing something like this and plan to use lithium packs make sure you are aware of the discharge protection circuitry. Lithium batteries must be protected from fully discharging. Some manufacturers have chosen to put the protection in the batteries like Ridgid and Ryobi while others have chosen to put it in the tool like Dewalt. Do not make an adapter to run a nonprotected battery (Dewalt for example) in a nonprotected tool like a Ryobi. The tool will work but it will completely discharge your battery and likely prevent it from ever recharging. You can probably put the protection circuitry from a donor tool or battery in your adapter but I haven't actually tried this as I have no need to.
3. This adapter should never be used for charging. Lithium cells are pretty specific to charge rates and voltages. Your charger should always be matched to your battery.
4. I did not want to modify the actual tool, nor the actual battery. I don't like the hacked together look it provides.
5. Yes I wish the adapter was more sleek. The reason it isn't is that Ryobi uses side spring latches to hold the pack in. The springs for these lock pieces go all the way to the bottom of the pack. I would've needed to completely re-engineer the springs in order to make the adapter shorter. At this point I didn't want to do that. I've seen guys that have forgone the latches and just used velcro to hold the adapter and pack on the base of the other tool. That looked more half-assed to me than the longer adapter.
The first thing that I did was to order part 270015155 from a Ridgid parts dealer. This part is the battery connector and switch for the 18V flashlight.
I didn't need the switch for obvious reasons and I wanted heavier gauge wire so I snipped off the leads to the connector.
Next it was time to rough out the piece to hold the Ridgid connector. This piece needed to be about the same thickness as the housing on the Ridgid tool. A piece of .100 lexan worked perfectly. I highly recommend Lexan instead of acrylic plexiglass if you do this. Lexan is much more resistant to shattering when cutting, drilling and flexing. Ridgid uses the battery connector as well as some slides on the side of the pack to hold the battery up. The battery is then held in position by two wedges built into the battery top. I needed a shape into which I could slide the connector, that would fit the top of the Ridgid battery and would have a catch for the retaining wedges. Something like this:
Next it was time to check if the connector fit.
And then mock it all up on the battery.
Now it was time to move on to the Ryobi pack. I used a Nicad pack so it was pretty simple inside. The final cell in the stalk of the pack held the 3 connectors: negative, positive and thermal switch.
The thermal switch is used to stop the charging of a Nicad pack. It isn't needed here so that lead is just clipped. Instead of trying to figure out a way to hold the plastic piece inside the stalk, I opted to leave it secured to that last cell and glue the cell in place inside the stalk. It worked well.
Manipulating the bottom of the Ryobi battery case came next. I needed the shape to fit the top of the Ridgid connector (the trapezoid) have the cut out for the retaining wedges and have that all located in roughly the correct spot.
It was a close fit with the screw placement in the housing but it did all fit.
Before going any further I double checked the fit.
Like I mentioned before I wanted some heavier gauge wire than the light application used. That meant I needed to cut some hunks of 10 AWG stranded wire,
desolder the factory wires from the Ridgid terminals
solder the larger capacity wires on the Ridgid terminals
and then solder the other ends onto the corresponding terminals on the top of the Ryobi cell.
It should be noted that even though the cell remains in place, it isn't doing anything. Both leads bypass the cell.
I fished the leads through the Lexan plate and then installed the connector. There weren't going to be a lot of durable methods of attaching the connector and the Lexan. I could've used an epoxy but I opted for rivets with backing washers instead.
After shoving the cell and Ryobi terminals up into the adapter stalk I squirted some super glue up to hold the cell in place.
Finally it was time to put it all together. I screwed the adapter pack halves together and then used pop rivets to hold the Lexan plate in place.
It works perfectly.
You may notice that the only thing holding the pack on vertically is the battery connector. I'm pretty confident that will be just fine, but if it does end up problematic then I'll have to figure out something to mate with the lateral slides in the battery.