To avoid these ads, REGISTER NOW!

Aussie Garage starts this week!

Mudnut

Well-known member
Joined
Mar 29, 2015
Messages
284
Location
FNQ Australia (North of Cairns)
It has been since March 2014 that I have been working on this. Finally got if approved through council. Start the ground work this weekend.

To say I am excited is an understatement. Will keep a running progress report as it happens.

Cheers,

Ken
 

Attachments

  • Garage elevation.jpg
    Garage elevation.jpg
    39 KB · Views: 491
  • Garage.jpg
    Garage.jpg
    136.4 KB · Views: 397
Last edited:
To avoid these ads, REGISTER NOW!
OP
M

Mudnut

Well-known member
Joined
Mar 29, 2015
Messages
284
Location
FNQ Australia (North of Cairns)
Benched out for the main slab. Still have 10 stump holes to dig, and a bit more benching. The shed in the background is the neighbours shed. The trench is dug from my other shed for power. Will run 2x 4mm try core wire from the meter to a sub panel in the new garage. Should be enough power. Unfortunately no 3 phase on our street, so that is out. Stupid work keeps getting in the way of working on the garage.

More to follow as it progresses.

Cheers,

Ken
 

Attachments

  • IMG_3048.jpg
    IMG_3048.jpg
    147.4 KB · Views: 176
  • IMG_3049.jpg
    IMG_3049.jpg
    148.2 KB · Views: 198

Bib Overalls

Well-known member
Joined
Dec 4, 2006
Messages
3,318
Location
Jonesboro, Arkansas
Neat stuff on your blog. Interested in seeing how you detail out and finish the inside. If your blog is any indication you won't let the bare walls stay unadorned for long.
 
OP
M

Mudnut

Well-known member
Joined
Mar 29, 2015
Messages
284
Location
FNQ Australia (North of Cairns)
Garage pad being backfilled with crushed rock, and sand. Benching out for the storage portion to the side. Still need to get an auger to dig the 10 stump holes.
Concreter that I had lined up fell through, so will need to get an other one. Need 300mm formwork for the outside of the slab. All the inner formwork will come out once the outer formwork is ready.
Steel has arrived, and will have to figure out how to lift it. Very heavy beams. I know we have cyclones here, but this is overkill. Especially seeing what kit sheds use. Oh well, if nuclear war ever eventuates I will have an above ground shelter.
 

Attachments

  • IMG_3052.jpg
    IMG_3052.jpg
    140.7 KB · Views: 186
  • IMG_3055.jpg
    IMG_3055.jpg
    146.2 KB · Views: 169
OP
M

Mudnut

Well-known member
Joined
Mar 29, 2015
Messages
284
Location
FNQ Australia (North of Cairns)
Had 5 days off last week (well 4 because I was finishing up a night shift) and it was productive!!

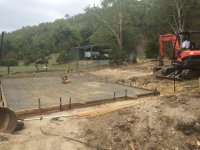
Finished the 10 post holes. Had to jackhammer the hard clay, as the Dingo was not heavy enough to cut through it. Auger, scoop out bottom, jackhammer the next layer. The last bit was much easier, as I filled the holes with water, and let soak in between working shifts. Lots of rocks that had to come out also.

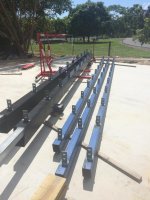
Concreter came on Tuesday, and we started the form work, and ordered steel. Already had the profiles set up just above the level needed.

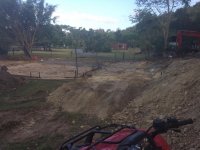
Wed. Plastic, and mesh in place.

Thursday, the footings inspection complete, and passed.

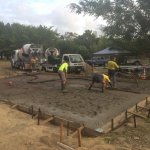
Friday, pour started at 0530. Truck, and pump arrived 1.5 hours early. Called and woke up my concreter, and he insisted that I don't let them leave. He arrived 20 minutes later. The guys on the pump were already filling the trench to below the mesh.

Slab poured on Friday.

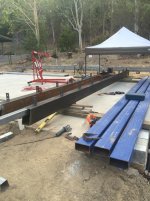
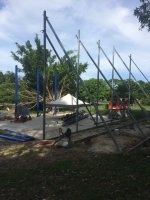
My job was to sink the steel plates for welding the columns to. Went like clock work, and they did a great job.

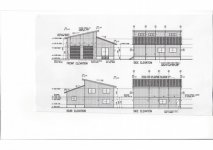
In the photo's the slab looks smaller than it is. It is 12m by 7.5m, or essentially a 4 car garage. the storage space next to will be on stumps.
 

Attachments

  • IMG_3058.jpg
    IMG_3058.jpg
    146.6 KB · Views: 200
  • IMG_3060.jpg
    IMG_3060.jpg
    141.3 KB · Views: 199
OP
M

Mudnut

Well-known member
Joined
Mar 29, 2015
Messages
284
Location
FNQ Australia (North of Cairns)
Been cutting steel, and welding on tangs to attach the Z purlins. Have done limited MIG welding, but blowing a gale up here at the moment (and 34C), so used Stick welding to attach the brackets. Is a steep learning curve for ARC welding, but am finally getting the hang of it. I will get an experienced welder to attach the beams together, and weld the base of the columns to the plates.
Two beams done, only 3 more to go for this side.

In the background you can see the two bearers and stumps attached ready for the concrete footings to be poured next week, after my upcoming work shifts.

These columns are very heavy, so invested in an engine hoist, and some slings to lift, and move them around the slab. The excavator is a mates, but don't have the keys to use.

At least some progress is continuing!
 

Attachments

  • IMG_3073.jpg
    IMG_3073.jpg
    143 KB · Views: 178
  • IMG_3074.jpg
    IMG_3074.jpg
    148.3 KB · Views: 164
OP
M

Mudnut

Well-known member
Joined
Mar 29, 2015
Messages
284
Location
FNQ Australia (North of Cairns)
Had a bit of a delay this week, but got some more welding completed on the main cross beams. Have the upright columns cut, and will try and get them up after the weekend (I am working). After they are up and braced, time for the crane to get the cross beams up, and welded in place.

Cheers,

Ken
 

Attachments

  • IMG_3088.jpg
    IMG_3088.jpg
    143.5 KB · Views: 119

spectral

Well-known member
Joined
Nov 16, 2008
Messages
46
Location
Brisbane - Australia
Hi Ken,
Love the semi-commercial style of construction. Looking forward to seeing it take shape, its going to be a top building.

Just with your power, is your sparky OK with 2 x 4mm2 T&E? I was going to do that as I had 3/4 of a roll left over from my previous build, but he said he wanted 1 x 6mm2. I don't understand it personally as 2 x 4mm2 has more surface area, but he was quite insistent... I didn't argue, as he is the one that needs to sign it off.
 
To avoid these ads, REGISTER NOW!
OP
M

Mudnut

Well-known member
Joined
Mar 29, 2015
Messages
284
Location
FNQ Australia (North of Cairns)
My electrician didn't seem to have a problem with running 2 x 4mm copper. I think there might be some heat issues for a long run, by using parallel cables, but it is only 35m from my panel to the new shed.

Cheers,

Ken
 

1/2 Cup

Member Emeritus
Joined
Apr 28, 2012
Messages
19,283
Location
Shepparton. Victoria. Australia
Ken,
In terms of your electrical install the first thing you need to consider is what load you may have, secondly the distance as distance = voltage drop and that is the total distance and not just the length of the sub mains. You should also look at your existing install as to wether you have the capacity and space.
Personally I am not a big advocate for running parallel cables. Can you posts some pics of your existing install and give me an idea of what loads you are likely to have.

Regards
 
OP
M

Mudnut

Well-known member
Joined
Mar 29, 2015
Messages
284
Location
FNQ Australia (North of Cairns)
Spent the day getting the uprights in place. Lifted with the excavator, and tacked plum. Followed by full 3 pass welding. Still have 2 columns to go, and one plate extension where my measurements were off.

It looks incredibly tall!!!!

Will be better once the other bay is in place, and I keep reminding myself it is a 2 story shed.

Still have a bit of welding on the cross beams, and lots of propping to do before they go on top.

Starting to get hot!

Cheers,

Ken
 

Attachments

  • IMG_3092.jpg
    IMG_3092.jpg
    148.7 KB · Views: 164
  • IMG_3093.jpg
    IMG_3093.jpg
    146.3 KB · Views: 137
  • IMG_3094.jpg
    IMG_3094.jpg
    146.9 KB · Views: 144
OP
M

Mudnut

Well-known member
Joined
Mar 29, 2015
Messages
284
Location
FNQ Australia (North of Cairns)
Hi Ken,
Love the semi-commercial style of construction. Looking forward to seeing it take shape, its going to be a top building.

Semi-commercial is because of the wind and cyclone ratings up here. Is certainly over engineered. Would have liked to use smaller and lighter steel, along with timber, but it took so long to get these plans approved, I just went ahead with what was designed. Trusses would have been cheaper, and easier to utilise, but again I think it was a challenge for the draftsman, and engineer.

Cheers,

Ken
 
OP
M

Mudnut

Well-known member
Joined
Mar 29, 2015
Messages
284
Location
FNQ Australia (North of Cairns)
When you get a chance, interested to see just how you are set up in terms of electrics.

Here are some photo's of my electrical panel down at the other shed.

The meter on the left is for the main house, and on an 80A circuit. The right has the smaller dwelling. The power for my new shed is temporarily on the 20A circuit to the right, and from the smaller dwellings supply. Will upgrade to a 32A circuit, once I put a board in the shed. 2 phase run to board.

Cheers,

Ken
 

Attachments

  • IMG_3096.jpg
    IMG_3096.jpg
    139.8 KB · Views: 90
  • IMG_3097.jpg
    IMG_3097.jpg
    141.7 KB · Views: 90
Last edited:
OP
M

Mudnut

Well-known member
Joined
Mar 29, 2015
Messages
284
Location
FNQ Australia (North of Cairns)
Well after a long period. Six weeks overseas trip (spent looking after my 85 yo father with Alzheimers), and getting back into work and the tropical heat of FNQ. I have started the progression again. Have propped the uprights getting ready for the main cross beams to be craned into position. Just waiting for my welder mate to be available to weld the high welds, as I certainly don't trust my welding for them. Should be happening in the next few weeks.

More to follow

Ken
 

Attachments

  • IMG_3553.jpg
    IMG_3553.jpg
    101 KB · Views: 109
OP
M

Mudnut

Well-known member
Joined
Mar 29, 2015
Messages
284
Location
FNQ Australia (North of Cairns)
Thanks for the update Mudnut:thumbup:

I trust your Dad is Ok.

All the best with your build, we will be following.

Regards

Thanks for the reply. At least dad is not in any pain. Alzheimers is a terrible disease. He was a brilliant engineer, now reduced to a child mentality. Tough work, but got to take him on one last big holiday. Took him on a cruise through the Caribbean, and spent some time on the island where we used to live.

Need my shed finished to have a place to unwind from the world.

Cheers,

Ken
 

AndrewP

Well-known member
Joined
Jul 17, 2014
Messages
117
Location
Qld, AU
Keep up your good work - love it in FNQ.
Spent a week in Port Douglas in January, and would have liked to have spent a whole lot more time there.
Envy your lifestyle :fingersx:
 

Terrick down Under

Well-known member
Joined
Jul 2, 2015
Messages
1,904
Location
Royalla, NSW, Aust.
"Push on young man"
I lost my dad to leukaemia, about 5 years ago. When I am doing something out in the garage I can feel him beside me saying "Do it right", like Mike Holmes from Canada. It is a comforting feeling.
Did you put a small hole ( just 1/4" or 6mm) in the bottom of your uprights, these will let out the condensation that builds up over time and starts to rust out your steel. Just a suggestion.
 

Todd.Brock

Well-known member
Joined
Jul 15, 2008
Messages
4,248
Location
Cincinnati
Sorry to hear about your Dad. The build looks great. I am always amazed how different approaches are taken to a garage. By the way-, your Land Rover is fantastic. Any other photos?
 
OP
M

Mudnut

Well-known member
Joined
Mar 29, 2015
Messages
284
Location
FNQ Australia (North of Cairns)
Sorry to hear about your Dad. The build looks great. I am always amazed how different approaches are taken to a garage. By the way-, your Land Rover is fantastic. Any other photos?

Yes lots of photo's of the Land Rover. My wife thinks I'm crazy, but it is my dream car. I wanted one since I saw "Born Free" as a child. Have had it for over 10 years now, and will keep it until it gets passed on to my son.

Will have to wait on photo's due to Telstra, and their inability to fix our ongoing phone line issues.

Cheers,

Ken
 
OP
M

Mudnut

Well-known member
Joined
Mar 29, 2015
Messages
284
Location
FNQ Australia (North of Cairns)
"Push on young man"
I lost my dad to leukaemia, about 5 years ago. When I am doing something out in the garage I can feel him beside me saying "Do it right", like Mike Holmes from Canada. It is a comforting feeling.
Did you put a small hole ( just 1/4" or 6mm) in the bottom of your uprights, these will let out the condensation that builds up over time and starts to rust out your steel. Just a suggestion.

Thanks for the reminder. It was on my list of things to do, so I just went and drilled holes in the bottom of all posts. Was amazed at how much water drained out. I guess they were just giant rain guages. I estimate about 600mm over this wet season!! Will pour a bit of used motor oil in each now that there is no welding to do at the base. Should help protect the internal post in this climate. Any other suggestions to help with internal rust? or maintenance?

Cheers,

Ken
 
To avoid these ads, REGISTER NOW!
Top Bottom