To avoid these ads, REGISTER NOW!

Aussie Garage starts this week!

OP
M

Mudnut

Well-known member
Joined
Mar 29, 2015
Messages
284
Location
FNQ Australia (North of Cairns)
Well it is the Easter weekend, the rain has finally stopped, heat seems to be less, so I got some welding done yesterday.

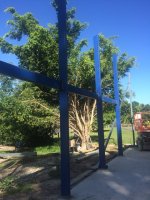
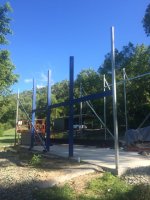
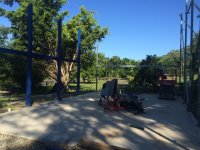
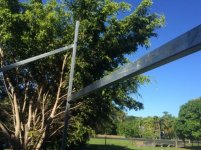
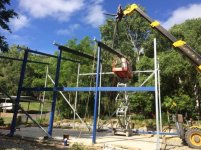
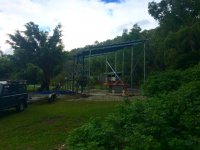
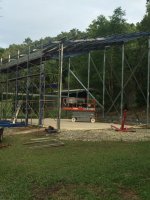
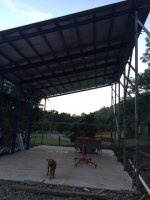
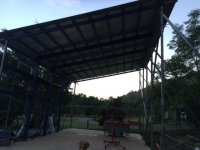
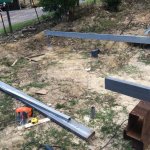
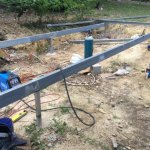
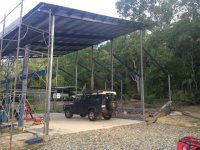
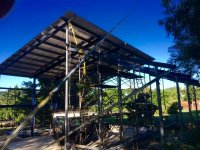
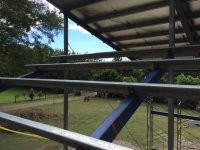
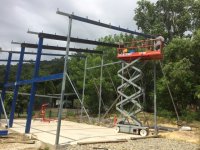
Still waiting on the overhead beams, but started filling in bracing. Yes this is what the engineer specified. 200mm x 100mm x 5mm RHS bracing. Seems we get a few cyclones here, and he wanted it to be strong! Will finish off the welds today, and add some more around the back. I am just having difficulty moving the 8m beam to the slab from where it is laying. Guess I'll have make some friends.

Before anyone says anything, yes the first beam is welded across the top, and back side. Just tacked on the easy side.


Cheers,

Ken
 

Attachments

  • IMG_3574.jpg
    IMG_3574.jpg
    109.4 KB · Views: 115
  • IMG_3575.jpg
    IMG_3575.jpg
    126.9 KB · Views: 114
  • IMG_3576.jpg
    IMG_3576.jpg
    106.7 KB · Views: 113
To avoid these ads, REGISTER NOW!

Bob Heine

ALLIANCE MEMBER
Joined
Oct 24, 2009
Messages
10,703
Location
Boca Raton, Florida
Mudnut, I think you are well on your way to having a neighborhood cyclone shelter. You may be very popular when then next Cat 5 storm gets close. Well done!
 

joeyp

Member
Joined
Mar 15, 2014
Messages
10
Location
AU
Some serious steel! just curious how deep the piers are and how the uprights are attached to the slab?
 
OP
M

Mudnut

Well-known member
Joined
Mar 29, 2015
Messages
284
Location
FNQ Australia (North of Cairns)
Some serious steel! just curious how deep the piers are and how the uprights are attached to the slab?

Hey joeyp,

There are no piers. Just a slab with a 450mm wide, and 300mm deep edge. Lots of rebar. The uprights are welded onto 10mm gal plates with tangs extending into the slab. Not going anywhere!

Have done some more work before I am off to my job tonight. Got the big beam across the back. This will support the floor joices for my mezzanine level. Had to drag it over using the scissor lift. Hoisted it in place with 2 x chain blocks. Worked really well. I am almost tempted to raise the main roof beams using them. Just have to figure out how to get the chain blocks higher than the columns safely. Probably still use a crane for safety sake, and time to accomplish the task.

More photo's:
first: shows the main beam. 100mm x 150mm x 5 across the rear of the garage and at a height of 2.4m

second: Just a photo of the beam

Ken
 

Attachments

  • IMG_3582.jpg
    IMG_3582.jpg
    110.5 KB · Views: 88
  • IMG_3584.jpg
    IMG_3584.jpg
    71.3 KB · Views: 77

Terrick down Under

Well-known member
Joined
Jul 2, 2015
Messages
1,904
Location
Royalla, NSW, Aust.
Before my fear of heights got to me, we used to have a slip in section that would slide loosely into the top of the upright with a cross arm welded to it with a eye bolt welded up side down. it would suspend the chain block about 10" above where we wanted the beam to be lifted to. Like a very short Davit arm. There was a flat bar (collar) welded on the davit arm to stop it sliding right down into the upright.
Does that give an idea?
 
OP
M

Mudnut

Well-known member
Joined
Mar 29, 2015
Messages
284
Location
FNQ Australia (North of Cairns)
Before my fear of heights got to me, we used to have a slip in section that would slide loosely into the top of the upright with a cross arm welded to it with a eye bolt welded up side down. it would suspend the chain block about 10" above where we wanted the beam to be lifted to. Like a very short Davit arm. There was a flat bar (collar) welded on the davit arm to stop it sliding right down into the upright.
Does that give an idea?

I think I have it, but will wait for the crane. It is funny mentioning your fear of heights. I am fine in the scissor lift by myself, but if anyone else is in it and moving, I have this overwhelming desire to lie down flat on the floor. Once my welder is ready, will organise the crane, as time and safety come into play. The taller posts are over 7m high, which is a fair way up.

Cheers,

Ken
 
OP
M

Mudnut

Well-known member
Joined
Mar 29, 2015
Messages
284
Location
FNQ Australia (North of Cairns)
Well a milestone happened. Got the 5 main beams up today on the main part of the shed. John my welder had the crane on it's way in 2.5 hours. Then finished up the welds. All went well in spite of my measurements, and levels.

Spent the afternoon getting one of the rafters up, and bolted in. Only 11 to go!

Cheers,

Ken
 

Attachments

  • IMG_3585.jpg
    IMG_3585.jpg
    85.5 KB · Views: 97
  • IMG_3591.jpg
    IMG_3591.jpg
    70.4 KB · Views: 101
  • IMG_3594.jpg
    IMG_3594.jpg
    128.5 KB · Views: 122
OP
M

Mudnut

Well-known member
Joined
Mar 29, 2015
Messages
284
Location
FNQ Australia (North of Cairns)
Well had a few hours between rain up in FNQ. With the help of my son, got the rafters up on the tall bit. Only about 1/3 of them are bolted on, but unless we get a cyclone they are not going anywhere until they are bolted down. Next cross brace strapping, and insulation before the roof sheets go on. Hopefully have the roof on by the end of the month.

And yes, I have to position them before bolting down.

Cheers,

Ken
 

Attachments

  • IMG_3601.jpg
    IMG_3601.jpg
    119 KB · Views: 84
  • IMG_3602.jpg
    IMG_3602.jpg
    94.8 KB · Views: 88
  • IMG_3603.jpg
    IMG_3603.jpg
    95.7 KB · Views: 96
OP
M

Mudnut

Well-known member
Joined
Mar 29, 2015
Messages
284
Location
FNQ Australia (North of Cairns)
No new pics today. Spent a good part of the day drilling and bolting on the rafters. Laying in bed, I can still feel the scissor lift move!! Maybe some day will get over my fear of heights.

Will put bracing strapping on tomorrow if the weather holds. Next is insulation and roof iron.

Cheers,

Ken
 

Bob Heine

ALLIANCE MEMBER
Joined
Oct 24, 2009
Messages
10,703
Location
Boca Raton, Florida
No new pics today. Spent a good part of the day drilling and bolting on the rafters. Laying in bed, I can still feel the scissor lift move!! Maybe some day will get over my fear of heights.

Will put bracing strapping on tomorrow if the weather holds. Next is insulation and roof iron.

Cheers,

Ken
Ken, if you start screaming when the airplane gets to 30,000 feet, you have a fear of heights. If standing on a wobbly 6-foot ladder makes you queasy, you have a fear of falling. My very very strong fear of falling hasn't gone away and I'm 71. Can you rig a safety harness to the roof rafters? It might help. A safety line through an eye-bolt with a bowline loop around my waist helps slow my heartbeat when I'm on a roof.
 
OP
M

Mudnut

Well-known member
Joined
Mar 29, 2015
Messages
284
Location
FNQ Australia (North of Cairns)
Ken, if you start screaming when the airplane gets to 30,000 feet, you have a fear of heights. If standing on a wobbly 6-foot ladder makes you queasy, you have a fear of falling. My very very strong fear of falling hasn't gone away and I'm 71. Can you rig a safety harness to the roof rafters? It might help. A safety line through an eye-bolt with a bowline loop around my waist helps slow my heartbeat when I'm on a roof.

I am not sure if it is the fear of falling, or the fear of landing that bothers me more! :willy_nil

I do have a harness, and use it. Being in the lift by myself is o.k. If I am with someone else, and they move I can't stand it.

Ken
 

Terrick down Under

Well-known member
Joined
Jul 2, 2015
Messages
1,904
Location
Royalla, NSW, Aust.
"the fear of landing"....that gets to me.
Our neighbour was putting the last screw into his roof and said to all 3 of us everyone down...I want to put in the last screw.....as soon as he had finished he pushed up of the cordless and his feet slipped.....sliding down a 7 meter (21 feet) 30 degree slope...then over the guttering...straight down 4 meters (12feet) almost missing a pallet of bricks, his elbow caught the edge....and sheared it offffffff.
Well 27 screws later in his arm, a new ball to fit his socket and he has about 50% use of it now. I still wake up at night hearing him groaning on the way down and the sound he made hitting the ground wakes me up.

Yes by all means..be careful. !!!!!
 

dlcwent

Member Emeritus
Joined
Feb 24, 2014
Messages
8,427
Location
coastal maine
Ken, another awesome undertaking. That will be the envy of a lot of folks here on the GJ. What a fantastic build you're doing. I'll be watching.
 
OP
M

Mudnut

Well-known member
Joined
Mar 29, 2015
Messages
284
Location
FNQ Australia (North of Cairns)
Well not a lot done on the shed itself, as the weather has been too rainy. All the rafters are bolted on, and strapping complete on the top. The main work or improvement I accomplished was to purchase, collect, and then erect 7 bays of scaffolding. 4m working platform, and 1 meter of railing at the top. Only have 5 bays erected, but covers most of the low side of the structure.

Not new, but in good condition, bar some surface rust on some of the planks. I forgot how difficult it it to erect scaffolding by myself. Always much easier with an other set of hands.

Weather permitting, plan on starting of the roof tomorrow.

Cheers,

Ken
 

Attachments

  • IMG_3610.jpg
    IMG_3610.jpg
    96.8 KB · Views: 65
  • IMG_3611.jpg
    IMG_3611.jpg
    114.1 KB · Views: 92
To avoid these ads, REGISTER NOW!
OP
M

Mudnut

Well-known member
Joined
Mar 29, 2015
Messages
284
Location
FNQ Australia (North of Cairns)
Well a long day, and morning rain put a damper on my mood. A mate from work arrived at 0800, and we got started on getting the sheets up. Finally got my teenage son out of bed at around 0900. The three of us got the 8.5m sheets up 5.2m and on to the "low" side of the roof. These were then hauled up, and moved into position. Would have been much easier if we were not putting down insulation. This part was the most difficult, as it was windy. All the sheets are up and tacked down. Need to finish off screwing the sheets down, but they are not going anywhere at the moment. My 53 year old body is feeling pain in places I didn't know I had, but I do feel really good that the hard part is complete.
Said good bye to Patrick, at around 4pm, supplied smoko, lunch, drinks (non alcoholic) and a sealed bottle of Vodka. Cheap day's labour for the amount of work we did.
Have to purchase some more screws to finish off tying it down, but will have to wait until they are shipped in, as the colour is not common.
Dusk photo's of our work.
 

Attachments

  • IMG_3618.jpg
    IMG_3618.jpg
    77.2 KB · Views: 85
  • IMG_3619.jpg
    IMG_3619.jpg
    73.2 KB · Views: 77
Last edited:
OP
M

Mudnut

Well-known member
Joined
Mar 29, 2015
Messages
284
Location
FNQ Australia (North of Cairns)
Update on shed. Ran out of roofing screws, and the batch that was ordered came in the wrong colour.
Decided to fix one of my mistakes, and get it ready for the "office" section. When I poured the footings for the bearers, I mis measured the height needed. I was off by 350mm. So I ended cutting the welds, raising both bearers by the required height, and re welding in a section to each stump.
Was a full day, as working by myself takes much longer to get things accomplished. Also had to look after SWMBO for mothers day.

Planning on cutting rafters for the new section, and welding tangs for the roof tomorrow.

Nice having a few days off to get things done.

Cheers,

Ken
 

Attachments

  • IMG_3632.jpg
    IMG_3632.jpg
    96.5 KB · Views: 59
  • IMG_3631.jpg
    IMG_3631.jpg
    96.9 KB · Views: 64
OP
M

Mudnut

Well-known member
Joined
Mar 29, 2015
Messages
284
Location
FNQ Australia (North of Cairns)
Well an other couple of big days. Yesterday dragged the 5mm thick steel beams on to the slab, and cut them to length (5.6m). Made a few beams from offcuts, so conserving steel as much as I can. Then welded on the tangs to bolt the rafters to the top. Today I cut, and installed the 5 uprights for the "office". I then dragged a beam over to the first post, and rigged up 2 chain hoists. One to each end of the beam. I then lifted the beam in place. Much slower than a crane, but also much cheaper. Have it tacked in place, but not welded fully.
Is going to be an nice space, as the scissor lift is over 2m high, and it looks tiny. Plan on getting the others in place tomorrow, as the scissor lift goes back to it's home on Thursday morning :(

Cheers,

Ken
 

Attachments

  • IMG_3636.jpg
    IMG_3636.jpg
    105.4 KB · Views: 76
  • IMG_3637.jpg
    IMG_3637.jpg
    101.9 KB · Views: 71
  • IMG_3639.jpg
    IMG_3639.jpg
    118.2 KB · Views: 70
  • IMG_3640.jpg
    IMG_3640.jpg
    115.5 KB · Views: 76
  • IMG_3642.jpg
    IMG_3642.jpg
    126.6 KB · Views: 94
  • IMG_3643.jpg
    IMG_3643.jpg
    140.4 KB · Views: 76
  • IMG_3644.jpg
    IMG_3644.jpg
    69.1 KB · Views: 67
OP
M

Mudnut

Well-known member
Joined
Mar 29, 2015
Messages
284
Location
FNQ Australia (North of Cairns)
An other few busy days. Had to return the scissor lift this morning, so had to finish off the welding of the high beams. All high welds completed, and got the lean to office beams in place and welded up. Finally got a couple of coats of paint on the primed beams, in the roof structure as I didn't want to try later. Have some upright columns to go up on the roller door entrance, but will use scaffolding to weld them in place. Still waiting on the roofing screws, to finish off the main section of roofing. Once complete, will move the scaffolding to the other side, and repeat the process. Steeper pitch (20 deg vs 12.5) but much lower.

Photo's show the 5 roof beams in place on their posts for the office, and the eventual floor level. Short flight up to more space above my workshop area. The Land Rover is parked in there for the first time, and gives an idea of the size of the shed.

Now back to work to pay for some of it!!

Will resume in a few days time.

Cheers,

Ken
 

Attachments

  • IMG_3653.jpg
    IMG_3653.jpg
    125.6 KB · Views: 84
  • IMG_3654.jpg
    IMG_3654.jpg
    130.9 KB · Views: 91
  • IMG_3655.jpg
    IMG_3655.jpg
    109.7 KB · Views: 79
OP
M

Mudnut

Well-known member
Joined
Mar 29, 2015
Messages
284
Location
FNQ Australia (North of Cairns)
That looks so good. You won't have to worry about the hoist going too close to the ceiling.

Looking at your avatar, I see you have that concern. It is actually taller than I wanted, but the designer made it this tall so I can have full 2.7m high ceilings at the lowest point upstairs. Passed council, so figured why not. Had to pay a lot extra on heavy duty steel though, due to wind loads on the walls.

Cheers,

Ken
 
OP
M

Mudnut

Well-known member
Joined
Mar 29, 2015
Messages
284
Location
FNQ Australia (North of Cairns)
As luck would have it, my days off the past week were full of rain. Welcome to the dry season in FNQ.

Finally had some days off, and no rain. Moved 3 bays of scaffolding over to the other side (which took a long time), and then started to hoist the rafters up. Got 2 up so far, with 5 more to go. Each rafter is about 80kg, so have to use the chain hoist to lift, and then drag into place. Much easier to get them up when I had the scissor lift, but alas could not use it here in the mud anyways.

Photo of my slow but steady progress.

Cheers,

Ken
 

Attachments

  • IMG_3663.jpg
    IMG_3663.jpg
    120.8 KB · Views: 64
OP
M

Mudnut

Well-known member
Joined
Mar 29, 2015
Messages
284
Location
FNQ Australia (North of Cairns)
Well I had a few days off between night shifts, and spent my time getting the rafters up on the office section. Would have been an easy job with a crane, but funds don't allow. Hauled one end up with a chain hoist, and then dragged them in place once they reached the balance point. Slow time consuming work, but made easier with the scaffolding. Once in place, they were bolted off at least in the first three bays. Have the last two bays to do, but need to move scaffolding to do so safely.
The high working is made a little more scary, as the Dr. is trying to get my blood pressure medicine right, and can get dizzy if I sweat too much, and move rapidly. So slowly, and lots of fluid. Have adopted the old saying "One hand for the ship and one for myself" Safety harness is also in place, as I am by myself.

First photo: Hauling rafters up.
Second is a shot towards the front of the block from the scaffolding.

Cheers,

Ken
 

Attachments

  • IMG_3664.jpg
    IMG_3664.jpg
    128.5 KB · Views: 69
  • IMG_3665.jpg
    IMG_3665.jpg
    106.2 KB · Views: 67
To avoid these ads, REGISTER NOW!
Top Bottom