To avoid these ads, REGISTER NOW!

Need help with our new pantry

aka Larry

Well-known member
Joined
May 2, 2012
Messages
8,011
Location
Eastern, NC
Now that racing season is over, Mama wants some long overdue house projects done. The first on the list is a pantry. Currently we don't have one and the existing cabinets just don't have enough room. I attempted to get a price from a local contractor who never never showed up to give me a price. I was shocked...yeah right. I told the boss I could do it if it came down to it, it has, so here we are. I have an overall plan, but I need help from my fellow GJ members on the details.

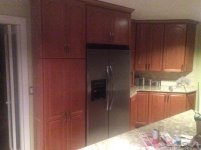
Take a look at this pic. This was before we moved in around fall 2008:

09_kitchen.jpg


The plan is to remove the door seen in the pic, frame it back in, hang drywall like it was never there. The new pantry will go between the existing cabinet beside the refrigerator on the left and the wall on the right.

I want to build a face frame across the opening, from floor to ceiling, and add a pair of doors with glass inserts. I'll build shelves inside and have LED lighting under the front lip of each one.

Here's a quick sketch of my idea for the face frame:

Pantry_design_01_zpsaguddanj.jpg


The above face frames would be attached the existing cabinet on the left with pocket screws, but how do I attach it to the wall on the right and the ceiling? Does it even need to be attached at the ceiling? After it's in place, I'll add the crown molding to blend in with the rest of the kitchen.

How would you guys do it? I'm open to all suggestions as long as the are DIY suggestions.
 
To avoid these ads, REGISTER NOW!

slickgt1

Well-known member
Joined
Oct 11, 2010
Messages
1,674
Wait you want to build just the face frame? Not the rest of the cabinet?

Why not buy some pre finished ply, and make a big box first. Then add the face frame as desired.

It can probably be done. But you may want to at a 1"x 2" to the face frame, and screw through it into the wall. Attach the 1"x 2" on edge to the face frame.
 
OP
A

aka Larry

Well-known member
Joined
May 2, 2012
Messages
8,011
Location
Eastern, NC
Why not buy some pre finished ply, and make a big box first. Then add the face frame as desired.

Not saying that's wrong (that's why I'm asking here) but it seems redundant to build a separate 'box' when three sides of the 'box' will already be in place (one existinf cabinet side. The face frame would essentially just be completing the fourth side.
 
Last edited:

creativecars

Well-known member
Joined
Nov 15, 2010
Messages
4,300
Location
Indiana- where horse and buggies still roam
I like your basic idea of a custom fit space. You will need something strong enough on the sides and in the back to hold the shelves and or pullouts.

I did a custom fit kind of thing around a nice stove during our kitchen reno. My wife is really happy with the convenience of pull out drawers.
 
OP
A

aka Larry

Well-known member
Joined
May 2, 2012
Messages
8,011
Location
Eastern, NC
I like your basic idea of a custom fit space. You will need something strong enough on the sides and in the back to hold the shelves and or pullouts.

The shelves will be supported via 1x2 cleats on three sides (two walls and existing cabinet) so I think (hope) I'm OK there.

I'm planning a pull-out on the lower section for the garbage can and storage of my dogs food.
 

aggierailroad

Well-known member
Joined
Jan 8, 2012
Messages
581
Location
Houston, TX
You wont regret building a box that you set in place, the other thing I would do is to build a small 2x4 wall and frame it in. A tall door will really have some bounce in it with the lumber you have shown.

I'm not saying these are the only two ways to do it.. Once you settle on a method, we'll help you from there! Lots of great cabinet building videos on youtube - try a guy that goes by mrbigerock or something like that.
 

slickgt1

Well-known member
Joined
Oct 11, 2010
Messages
1,674
Not saying that's wrong (that's why I'm asking here) but it seems redundant to build a separate 'box' when three sides of the 'box' will already be in place (one existinf cabinet side. The face frame would essentially just be completing the fourth side.

the 3 sides you are talking about, 2 of which are sheetrock. One of which is not a wall, but a cabinet hanging on top of the fridge. Am I missing a wall somewhere?

Big doors, will knock that face frame off in no time. Even if you do hit a stud to secure it to. Bottom will flap, top will flap. You will basically have a rigged structure.

I guess you missed the second part of my first post. Yea attaching shelves around internal framing will ****. That's why screwing a big box to put in there, will be way easier, and last a whole lot longer.
 

54FordPanel

Well-known member
Joined
Aug 7, 2009
Messages
5,711
Location
Fort 54, Littleton, Co
You have a nice looking kitchen and cabinets.

If it was my kitchen, and I didn't want it to stick out like I built it myself, and I wanted it to match the other cabinets and look classy….I'd buy a pantry to match the cabinets. Our pantry has slide out drawers and they are wonderful instead of digging around in there.

Is there a brand name on the existing cabinets? I doubt even a contractor could match it very well.

You can get them in 3" increments to just about any size, then use matching strips to make up the less than 3" difference on the side.

I agree that just a facing door would be a bad idea. You'd need something going down the fridge wall anyway all the way to the floor…unless I missed the plan on that.

JMO.
 

404

Well-known member
Joined
Aug 23, 2014
Messages
3,463
Location
Mass
Agree with

slickgt1

Getting everything square and true and level will be a real big pain if part of it is supported by the sheet rock. Making a big sturdy plywood box allows putting drawer slides or shelf standards where they make the most sense, not where the studs are behind the sheet rock. One can cheat a bit and use the thickness of the wall the door was in, that gives more depth, or a hidden compartment for your copies of the Constitution and Bible..:beer:
 

Zeke

Well-known member
Joined
Aug 13, 2009
Messages
17,176
Location
Long Beach CA, the sewer by the sea.
You will need a side next to the fridge. It won't be any more work to have a duplicate to attach to the wall at the left and you will have the basis for many shelf systems. No, you don't need a back but backs finish off a cabinet. But you do need a floor which will sit on the toe kick to match the rest of the cabinets. So that's 3 sides of a box and that's about the minimum that you can use along with your face frame.

Each side will help strengthen the stiles for hinging purposes. With glass inserts I'd use a min of 3 hinges per door even if you have a bin drawer below. Full length doors are not recommended especially in pairs. you'll never get them to line up perfectly. Don't put yourself in that bind. Put a center rail just above the pull-outs and end the doors there. If you can build a door with a glass insert, you can build a drawer front to attach to your pull-out. Just use a piece of 1/4" ply for the panel.

One question: are you using obscure glass? And why glass? Don't get me wrong, I like glass in cabinet doors but I don't want to see what's inside. Glass in that location and nowhere else is going to look odd.

One more suggestion: think about the depth. A 24" deep cabinet with fixed shelves is nearly impossible to stock and retrieve (really impossible on the extreme upper and lower). U-shaped shelves do wonders for this situation. So do pull-out trays.
 
OP
A

aka Larry

Well-known member
Joined
May 2, 2012
Messages
8,011
Location
Eastern, NC
the 3 sides you are talking about, 2 of which are sheetrock. One of which is not a wall, but a cabinet hanging on top of the fridge. Am I missing a wall somewhere?

It's hard too see (no contrast in the pic) but the right side of the upper cabinet above the fridge extends all the way to the floor, essentially making one side of the box. The other two sides would be sheetrock as mentioned.

If I were to go with building a separate box, I'd have to build it in place right? Otherwise how would I maneuver something that large and heavy? I'm also not sure how I'd 'tip it into place' with it being so tall.

Since the left side is already one side of the box, how about attaching a 3/4" plywood side to the right side wall which would form side number two? I don't see why the back couldn't be sheetrock (like the back of a closet) but I'm learning as I go on this from you guys.

Thanks for all the help so far. Keep the comments and ideas coming!
 
OP
A

aka Larry

Well-known member
Joined
May 2, 2012
Messages
8,011
Location
Eastern, NC
Thanks for the comments Zeke.

You will need a side next to the fridge. It won't be any more work to have a duplicate to attach to the wall at the left and you will have the basis for many shelf systems. No, you don't need a back but backs finish off a cabinet. But you do need a floor which will sit on the toe kick to match the rest of the cabinets. So that's 3 sides of a box and that's about the minimum that you can use along with your face frame.

See my comment about the fridge side, it's already there. I'll take a better pic this weekend so you guys can see and understand that side.

Each side will help strengthen the stiles for hinging purposes. With glass inserts I'd use a min of 3 hinges per door even if you have a bin drawer below. Full length doors are not recommended especially in pairs. you'll never get them to line up perfectly. Don't put yourself in that bind. Put a center rail just above the pull-outs and end the doors there. If you can build a door with a glass insert, you can build a drawer front to attach to your pull-out. Just use a piece of 1/4" ply for the panel.


Thanks for the tip, and that is exactly the plan...to have a rail above the pull-out bins and two glass panel doors above.


One question: are you using obscure glass? And why glass? Don't get me wrong, I like glass in cabinet doors but I don't want to see what's inside. Glass in that location and nowhere else is going to look odd.


The glass will be frosted of course. The wife wants something like this:


6002132121_916bfda0d1.jpg


One more suggestion: think about the depth. A 24" deep cabinet with fixed shelves is nearly impossible to stock and retrieve (really impossible on the extreme upper and lower). U-shaped shelves do wonders for this situation. So do pull-out trays.

Good point. I'd like to do the pull-outs, but I think the U-shaped shelves may be easier.
 

shoot summ

Well-known member
Joined
Jun 8, 2010
Messages
2,950
As you already figured out, you can't stand up an 8' box, in a room with an 8' ceiling.

You get around this by building a base for the box to sit on, that essentially matches the toe kick of your existing cabinets.

There are 2 ways to do this, the right way, that looks like it was part of the kitchen initially. And the other way that looks like someone hacked something together on the cheap.

You will never be disappointed in doing it the right way...

You could do it the way you seem to want to do it, and it might work. Cabinets were job built for decades back in the 40's, 50's, and 60's. When done properly they are as sturdy as shop built boxes.

To job build that cabinet you will still need 2 sides, and a top and bottom as well as some way to accommodate the toe kick. Once you get it built you still have the issue of matching the finish on your existing cabinets, not an easy task...

If it were me I would shop build that cabinet, and spray the finish much like the original cabinets seem to be. I would also make it deeper than the cabinet over the refrigerator(same depth as base cabinets), it's a pantry, you want the depth. This will also make it easier to hide the joint at the crown molding up top, you can cope onto the exiting crown on the cabinet, and cope onto the existing wall crown. Plus the multi-step cabinet makes for an interesting appearance, and helps hide any issues with color match as you won't be looking directly at the old/new together, and lighting will help shade the difference as well.

BTW, I'm out on the frosted glass as well, kind of trendy now, but I know how our pantry looks, and I wouldn't want to have it even remotely visible...
 
Last edited:

ilovevocs

Well-known member
Joined
Jun 26, 2009
Messages
1,966
Location
Toledo, Ohio
Im not going to comment on the construction but moving from a house with a deep pantry that had fixed shelves into a house with similar pantry and sliding shelves I would make every shelf slide out.
 
OP
A

aka Larry

Well-known member
Joined
May 2, 2012
Messages
8,011
Location
Eastern, NC
Again, thanks for all the replies so far. I'm learning a lot!

One other idea I had toyed with was to make it like an actual walk-in type pantry with a regular door like the one I'm planning to remove. Any advice on the construction of doing it that way? Would it be easier? Would it look better?
 

ilovevocs

Well-known member
Joined
Jun 26, 2009
Messages
1,966
Location
Toledo, Ohio
My mom and dads pantry is a walk-in of similar size as your and with fixed shelves I feel my pantry that is smaller has much more usable space.
 
OP
A

aka Larry

Well-known member
Joined
May 2, 2012
Messages
8,011
Location
Eastern, NC
Here's an updated drawing reflecting changes based on some of your comments. More of the built-in-place type box concept. More comments welcomed!

Pantry_design_02_zpsiibikddq.jpg
 

racingtadpole

Well-known member
Joined
Dec 3, 2011
Messages
2,029
Location
The far side of crazy.. but sometimes Australia
How deep is the pantry? The reason I ask is because shelving that is deeper than 12-18" becomes a pain to organise things in efficiently and find things towards the back.
The last two pantrys I have built, and the third I am planning for early next year have all had slides in one form or another. The first two had sliding shelves, and the the current plan is to have the whole lot slide out (this is a lot narrower than the previous two were and individual slides will waste already limited space).
If you have an IKEA store nearby I would recommend going and having a look at some of the products they offer to get some ideas. Whilst Im not really a fan of their products on the whole, some of the ideas are quite good and they are worth duplicating into a custom application.
Hope thats of some help to you.
 
To avoid these ads, REGISTER NOW!

rslaback

Well-known member
Joined
Jul 24, 2010
Messages
4,062
Location
Westcentral Wisconsin
I'd take a good look at a factory premade pantry cabinet. They are expensive as hell but they blow a simple shelved cabinet out of the water and will install faster/easier. With your existing cabinets being pretty basic and a white finish you should be able to match the existing cabinets pretty easily and it will look like it has always been there.

SOpantry.jpg
 

rslaback

Well-known member
Joined
Jul 24, 2010
Messages
4,062
Location
Westcentral Wisconsin
put a few of these on the shelves and make getting to cans without having to reach to the back:

If you make this consider leaving off the last piece he puts on. It will allow you to load from the front instead of the top which means your next shelf can be closer and you have less wasted space.
 

slickgt1

Well-known member
Joined
Oct 11, 2010
Messages
1,674
If you want a regular door walk in pantry, frame up a door and install a double one. Build custom wrap around shelves inside. I've don't this too. Won't match the cabinets exact.

Your latest spec looks great. But you don't need 3/4 ply on back. 1/2 is more than enough to keep your box square. You also don't need to drywall that door from the cabinet side.

I still don't see that wall by the fridge.

So this is how you would do a big *** box and make it fit. You build the toe kick to match your existing toe kick, but you make it onto a low box. You install said toe kick box in the space your cabinet has to sit. You screw it to floor by making L brackets out of plywood. Or just a 2x4, I'm sure you can figure this out. You then bring your big box, lift it on the toe kick and slide in. Put screws or finish nails through cabinet into toe kick box. Put screws to join to fridge wall and into Sheetrock wall to help door swinging not rock the box. You should not have to build anything on the spot.

Put screws under hinges or shelves so they aren't visible, or use fancy screws.
 
OP
A

aka Larry

Well-known member
Joined
May 2, 2012
Messages
8,011
Location
Eastern, NC
I still don't see that wall by the fridge.


Here's a pic that better shows the wall. We repainted the kitchen after we moved in:

20151002_074048_zpsq518hjag.jpg


20151002_074057_zpsjwfcxurw.jpg


So this is how you would do a big *** box and make it fit. You build the toe kick to match your existing toe kick, but you make it onto a low box. You install said toe kick box in the space your cabinet has to sit. You screw it to floor by making L brackets out of plywood. Or just a 2x4, I'm sure you can figure this out. You then bring your big box, lift it on the toe kick and slide in. Put screws or finish nails through cabinet into toe kick box. Put screws to join to fridge wall and into Sheetrock wall to help door swinging not rock the box. You should not have to build anything on the spot.


Thanks so much for the info. I've learned a lot since I've started this thread, and the design has evolved accordingly. I've decided the walk-in idea isn't what we want so I'm back to the original concept which should look something like this when complete:

Pantry_design_03_zpsnrxtq3x9.jpg


The toekick "box" you are describing can be seen at the bottom in the above drawing. The bottom panels are pull-out 'drawers' that will house the kitchen trash can and my dog's food. The top doors will have frosted glass inserts.

I'm still working on the actual component drawings, and I do have a few other questions I hope you guys can help me with. I make another post with those.
 
OP
A

aka Larry

Well-known member
Joined
May 2, 2012
Messages
8,011
Location
Eastern, NC
Moving forward on the design phase...

My idea is to build the base box for the toe-ck as suggested, put it in place, and build the cabinet 'box' next. I'm thinking it will be easier to build this portion without the shelves in a fixed position for a few reasons:

1. The cabinet box will lighter and easier to move without the shelves in place.
2. The wiring of the LED strips will be easier if I can move the shelves in/out.
3. The shelves will easier to paint if they can easily removed.
4. The wife will likely want to raise/lower the shelves before I'm done anyway!

Our other cabinets use the 1/4" pin system to adjust the shelves, so I'm thinking it should work well in the pantry. I'm thinking of buying the jig from Rockler to make it easier and more accurate.

This is my basic shelf design, nothing too fancy, except the lighting addition. Let me know your thoughts and suggestions!

Pantry_design_04_zpsyp16nk3e.jpg
 

slickgt1

Well-known member
Joined
Oct 11, 2010
Messages
1,674
Don't buy the jig. That **** is ********. Buy man tools instead. Drilling shelf pins is super easy. Take a sliding square, adjust depth of pin. Draw lines inside cabinet, basically the vertical lines where the pin corners would be. Then take a tape measure, a wood owl, or anything that will make a drill indent where you want the pin to be. Measure every inch if you want. Or don't, you can always drill more anytime.

Now take a peice of wood, something solid. This wood will be a rectangle. It will about half inch shorter than total length of drill bit when it is in the drill. You drill through this wood. From every axis. The longest hole is for the drill to go through, and this will provide depth stop so that you don't drill trough the cabinet. The other holes are so that the wood shavings don't clog up your home made jig and just fall out sideways. Don't make it too big. You want to be able to use it in corners. Don't make it too small. You actually have to hold it with other hand for alignment and to make it not spin around with drill bit. You don't want it to spin against your finished wood, creating a giant circle scratch around the shelf pin.
 

slickgt1

Well-known member
Joined
Oct 11, 2010
Messages
1,674
Oh before I forget. When you install the toe kick box, this is where you shim / level / and scribe it. That way, your top box is that much easier square up.
 

mbatarga

Well-known member
Joined
Sep 14, 2005
Messages
883
Location
GA
I've used pegboard scraps before as a template for shelf pin holes. Just cut a strip about 2-3 feet long and attach a scrap 1x2 or so to it to register from the edge of the cabinet sides.

I do own a real nice Veritas brand jig now. I bought it at a steep discount from another woodworker that was selling off his shop contents.
 

Shiftless

Well-known member
Joined
Mar 9, 2014
Messages
14,479
Location
East Bay SFO
+1 on the pegboard idea
That is how I did it. Interestlingly enough, once the shelves were in place the first time they haven't moved in almost 10 years.
I built the slide in boxes..easier to square up on a workbench. Slide them in, shim 'em up and cover with the face frame.
 
Last edited:
OP
A

aka Larry

Well-known member
Joined
May 2, 2012
Messages
8,011
Location
Eastern, NC
OK, here's yet another drawing. These are for the lower drawers. The one on the left will have a trash can suspended from the opening, planning on one pair of 14" sliders. The one on the right will have a similar, but smaller container suspended from the top shelf with a lower shelf for storing bottled water, planning on have two pair of 14" sliders.

None of this has been built yet, so I'm still very open to input and suggestions, especially about the actual construction. You guys have been a big help so far and I'm listening!


Pantry_design_06_zps6pwufnuw.jpg
 
OP
A

aka Larry

Well-known member
Joined
May 2, 2012
Messages
8,011
Location
Eastern, NC
OK, I finally have real progress and pics to share vs. just drawings!

After lots of sawdust and pockets screws I got the structure assembled, and got the back on. I borrowed a friend's table saw to rip the stiles and rails for the face frame and got it installed also. I went ahead and dropped the (3) adjustable shelves in place so the boss could see the progress. A few pics:

20151107_115759_zps3s5jrkkz.jpg


20151107_115808_zpsr2y5iloh.jpg


20151107_115847_zpsmlyhbw1q.jpg


Next I worked on adding the drawer and drawer slides for storage of the kitchen trash can (left), along with my dog's food (upper right) and bottled water (lower right). There will be a front on these of course, but the guts that make it all work is pretty much done as seen here:


20151107_163927_zpsivouplmo.jpg


20151107_164001_zps0c7hpho0.jpg


Next up will be the doors for the top section and drawer fronts for the lower portion. Stay tuned.
 

JieselDeep

Active member
Joined
Jul 23, 2014
Messages
31
Location
Captain Cook, Hawaii
I'd take a good look at a factory premade pantry cabinet. They are expensive as hell but they blow a simple shelved cabinet out of the water and will install faster/easier. With your existing cabinets being pretty basic and a white finish you should be able to match the existing cabinets pretty easily and it will look like it has always been there.

SOpantry.jpg
My grandparents have this style pantry, hand built by a friend in the sixties and I love it! It makes everything so much more accessible and I'm planning to redo our pantry one of these days to match.

Basically just a center rib sticking out from the back and piano hinge so that the shelves can swing toward you. Several options out there for premanufactured versions of these if you Google it.

Good luck! (Also read to the current end of this thread and would recommend buying a couple of backup Rubbermaid tubs that you store the dogs food in, in case this one cracks.
 
OP
A

aka Larry

Well-known member
Joined
May 2, 2012
Messages
8,011
Location
Eastern, NC
For those who have been kind enough to chime in with suggestions on this project, I really appreciate it. I'm moving forward and have a few more questions for you.

1. Do I need to apply some sort of sealer to the wood before painting? If so, what type? Link? FYI, I plan to spray paint all of the components prior to installation.

2. Any suggestions on how to remove the existing crown molding without damage to the ceiling sheetrock?
 

slickgt1

Well-known member
Joined
Oct 11, 2010
Messages
1,674
If it is real wood, I would wood primer it before painting. You really want to close the pores up. If it is veneer, it depends. Oil based paint will be faster and easier, but I know that isn't an option that much these day.

Remove crown by cutting caulk bead that is against the sheetrock, if you have this. Either way run a utility knife down the edge. New sharp blade, change blade fairly often to get clean cut. Use a thin, metal putty knife to get in there and gently pry. If it was me installing the crown, it would deff have finish nails, and PL Premium glue, so there would be a need for some significant prying. This would be your worst case scenario. In which case, you will need to accept some damage to the ceiling.

Sometimes installers don't caulk the finish nail holes before painting, so you might be able to tell where the nails are. Do not attempt to pry out nails with a round hole (23 ga hole), just pull the crown through, let them pull out and stay in the wall. Easier to pull those nails through. If they used big nails with a hat, you might be screwed, and have massive crown damage. But really inspect the crown and decide on the approach.

You really need to get that back wall crown out solid, nice long piece to re-use on the front.
 
OP
A

aka Larry

Well-known member
Joined
May 2, 2012
Messages
8,011
Location
Eastern, NC
This weekend's progress...

First up was assembly of the door frames with the glass panel inserts. I was extra careful to be sure everything was intact including my fingers as well as the glass. Just to be double sure these stayed together I used wood glue in addition to the pockets screws. Here's a in-process pic I took right before securing the final stile in place:

20151115_132031_zpszzkgey2k.jpg


After routing the reveal along the door inset panel and outer edges, I used wood glue and brads to secure the drawer fronts to the drawers. Once the glue was set, I was able to remove the drawers as a unit and secure the fronts from behind with screws. Here's what will be the trash receptacle drawer:


20151115_150925_zpsv4jdsrxc.jpg


...And the other drawer with a place up top for my dog's food bin and a lower shelf for bottled water:


20151115_150912_zpsfwfnxi2p.jpg


Here the drawers are finished, sans drawer pulls that I still need to purchase. BTW, that hole seen in the back will be for a receptacle inside the cabinet:

20151115_150842_zpsjf04uqxw.jpg


Since I was anxious to see what it would look like, I just laid the doors in place as the hinges will be installed after painting:


20151115_170951_zpsnhx3xlxt.jpg


The doors still need have their outer edges rounded over to match the drawer fronts, and since the pocket holes on the back of the doors will show when open, I glued wooden dowels in place and that will be trimmed flush the next workday. I still have a more sanding to do before primer and paint also, but it's getting there!
 
To avoid these ads, REGISTER NOW!
Top Bottom