To avoid these ads, REGISTER NOW!

Weaver WA-72 Jack Repair & Resto

vertguy

Well-known member
Joined
Apr 6, 2010
Messages
1,259
Location
SE WI
I had my brother buy this for me in MN a couple weeks ago and finally got it home this weekend. Man, this thing is a beast! After a quick bath with the pressure washer, I started poking around to see what I had bought. Seems fairly complete except the ram cover. The ram is dry, which is obviously an issue... but I wanted to do some additional investigating before pulling the trigger on a rebuild kit since it runs >$80 from Castle Equipment.

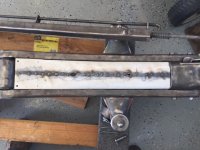
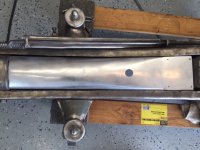
My only initial concern is the with the oil fill hole on the ram as the threads are definitely compromised and the homemade looking fill bolt threads in, but will not tighten. I assume this needs to be addressed first and was considering either drilling/tapping to larger size or use a Heli-coil... thoughts??

Also need some advice on cross referencing the rear pivot wheel bearings as all 4 are pretty well shot (sealed, but filled with crud). I was able to find "Nice 6509" stamped into the outer ring, but I was unsuccessful with online searches. Open to suggestions here as well??

My plan is to fix everything mechanical first (including wheels) before starting any cosmetic work. I need to finish up a couple "honey-do's" before I can really start tearing it apart, but that will hopefully get wrapped up this weekend.

Weaver%20Rebuild%20phase%201%20001_zpss32gxrkg.jpg


Weaver%20Rebuild%20phase%201%20002_zpswt4ncfqz.jpg


Weaver%20Rebuild%20phase%201%20009_zps43hwdxjz.jpg


Homemade fill plug (cross drilled as well into the center hole)
Weaver%20Rebuild%20phase%201%20007_zpsfjxdmukr.jpg


Rear wheel pivot bearings
Weaver%20Rebuild%20phase%201%20003_zpsiq3k2tbz.jpg
 
To avoid these ads, REGISTER NOW!
OP
V

vertguy

Well-known member
Joined
Apr 6, 2010
Messages
1,259
Location
SE WI
Bump for some advice/help...

Fill hole repair strategy and sourcing the rear wheel pivot bearings.

Thanks guys!
 

1930artdeco

Well-known member
Joined
Dec 28, 2010
Messages
1,099
Location
Lynden, Wa
If that bearing is the one I am thinking of I don't think they are made anymore. Give Accurate Bearing a call they could tell you for sure. But that is a great jack and when you get her all fixed up you will love her even more.

Mike
 

Hiball

Well-known member
Joined
Apr 30, 2009
Messages
14,027
Location
Missery
Castle equipment for all your hard/soft parts and a phone call can decipher stamping into date codes.
 
OP
V

vertguy

Well-known member
Joined
Apr 6, 2010
Messages
1,259
Location
SE WI
Although I don't have time to tear into it yet, I had to do a quick test and filled the reservoir with fluid. And I was able to confirm 2 key things:

1 - It does work and the jack successfully raised to 2 ft!
2 - Both the ram and pump plunger seals leak.. so I assume there will be some nice puddles by tomorrow :D

So I plan to call Castle on Monday and get the seal kit ordered. I still need figure out the fill plug as I believe the tank is supposed to be vented via this plug, correct? I know the stripped thread and sloppy fit, homemade plug is not correct... but I need to confirm how it should be set up and find an appropriate replacement/potential repair strategy.

And thanks for the advice on Accurate Bearings as I plan to call them next week as well.
 
Last edited:
OP
V

vertguy

Well-known member
Joined
Apr 6, 2010
Messages
1,259
Location
SE WI
I called Castle and they were very helpful in answering all my questions. They carry replacement rear wheel bearings, so I ordered 4 of those along with a seal kit. Also confirmed this jack was built in 1965.

Wish me luck as the next big task is loosening the tank nut.
 
OP
V

vertguy

Well-known member
Joined
Apr 6, 2010
Messages
1,259
Location
SE WI
Success!!! Tank nut removed :bounce:

The new Reed vise definitely came in handy as did a recommendation from Hiball's sticky about making a prop to hold up the end of the tank. It only took a couple full weight pulls with a 2ft pipe wrench to make it move. So the rest of the tear down is underway.

IMG_0172_zps7xfloftg.jpg


The ram plunger was in surprisingly good shape, but there was a lot of debris in the reservoir.

IMG_0175_zpsieuveyum.jpg


[
IMG_0174_zpsxfshogqt.jpg
 

dewalt378g

Well-known member
Joined
Mar 17, 2012
Messages
180
I love that triangle saddle. Is this jack a 2 or 4 ton? A welder will take care of that fill hole easy peasy. If you don't have a welder, then tapping a new thread would be the simplest and fastest way to go. I would go with a fine thread. I don't think there is enough wall thickness on the tank to make a heli-coil effective.
 
OP
V

vertguy

Well-known member
Joined
Apr 6, 2010
Messages
1,259
Location
SE WI
Dewalt - this is a 2 ton and while ordering some additional parts from Weaver, I asked about fitment for current production jack cover on mine. He thought it "should fit" and I figured for $27 it was cheaper and easier than starting from scratch... so I have one in route. I was thinking the same thing for the tank plug and will either go with a rubber plug or I may even just weld a thin nut over the hole.

I was stalled as Castle sent the wrong pump plunger packings, so I spent some more time derusting the rear wheel assemblies. Hoping to get the cylinder reassembled next weekend.

Tank seal nut question
As I get closer to reassembly, had a question about the type of tool used for tightening the packing spanner nut. I was able to loosen it with some bent tip needle nose, but I assume I may need a purpose built tool for proper tightening. Any recommendations appreciated...

Found one like this for $30 on Amazon and since I don't have anything for cutting heavier steel, trying to fabricate one could be a challenge.

s-l500.jpg
 
Last edited:

Hiball

Well-known member
Joined
Apr 30, 2009
Messages
14,027
Location
Missery
Vertguy, just get you a adjustable face spanner for that packing nut. Attempting to use that heavy duty face spanner will result with visions of monkeys and footballs. There is no need to crank that inner packing but down, you will just wear the seals prematurely, it's designed to be tightened over the years as a renewable seal.
 
OP
V

vertguy

Well-known member
Joined
Apr 6, 2010
Messages
1,259
Location
SE WI
Good point Hiball. I ended up finding an Armstrong fixed face wrench with the correct spacing for $20, which will be a dedicated tool for this nut. Any recommendations on a reasonably priced adjustable faced spanner wrench as everything I found was pricey?
 
OP
V

vertguy

Well-known member
Joined
Apr 6, 2010
Messages
1,259
Location
SE WI
Progress... thanks to Evaporust :thumbup:

Handle locking pin that was partially submerged with the rear wheels
Jack%20handle%20rod_zpssrvy3qut.jpg


And the rest of it was soaking in a PVC tube I used for my DP column
Handle%20rod%20soaking_zpsi2ude8tk.jpg


Rear wheels... before and after (bearings were toast, so replacements already in hand)
Jack%20wheels%20before%20derust_zpssikhdndt.jpg


Jack%20rebuild%20007_zpsgtu92mfc.jpg
 
Last edited:

Hiball

Well-known member
Joined
Apr 30, 2009
Messages
14,027
Location
Missery
Good point Hiball. I ended up finding an Armstrong fixed face wrench with the correct spacing for $20, which will be a dedicated tool for this nut. Any recommendations on a reasonably priced adjustable faced spanner wrench as everything I found was pricey?

eBay will be your best bet, common brands are Williams, Proto and Armstrong.
 
OP
V

vertguy

Well-known member
Joined
Apr 6, 2010
Messages
1,259
Location
SE WI
Thanks once again Hiball as there are lots of options on ebay :thumbup:

It always helps to have the right hardware as the vented NPT plugs arrived today and the 1/8 tightens perfectly (which means no drilling and retapping needed). The homemade drilled bolt that was being used as a plug had regular threads, which explains why it would not tighten correctly.

Although I am still awaiting the new rear wheel bearing races, the caster assemblies spin like butter with the new bearings. I can't wait to get it assembled for some real testing this weekend.
 

econotrk

Well-known member
Joined
Aug 27, 2013
Messages
275
Location
Western Pa. near Pgh. n dat
Following along on this, I really like the look of the older floor jacks. I'm trying to digest as much information as I can on rebuiding these old workhorses as I have five of them that need done, so I appreciate you're taking the time to document this.

Looks like you're doing a first rate job on the Weaver.:thumbup:
 
OP
V

vertguy

Well-known member
Joined
Apr 6, 2010
Messages
1,259
Location
SE WI
Well, strike 2 for Castle/Weaver as I just received the 2nd wrong set of pump plunger packings :headscrat:

My jack is considered an earlier model that takes a 1-1/8 inch OD packing and they keep sending the 1-1/4 inch. And this time I spoke with directly Weaver. Hopefully the 3rd time is the charm. It just delays reassembly yet again.

Econotrk - glad to hear this may help with your rebuilds. Looks like I am going to end up with several extra sets (3 and counting) of these plunger packings, so if you need the larger/newer version for one of yours, let me know.
 
Last edited:

econotrk

Well-known member
Joined
Aug 27, 2013
Messages
275
Location
Western Pa. near Pgh. n dat
Well, strike 2 for Castle/Weaver as I just received the 2nd wrong set of pump plunger packings :headscrat:

My jack is considered an earlier model that takes a 1-1/8 inch OD packing and they keep sending the 1-1/4 inch. And this time I spoke with directly Weaver. Hopefully the 3rd time is the charm. It just delays reassembly yet again.

Econotrk - glad to hear this may help with your rebuilds. Looks like I am going to end up with several extra sets (3 and counting) of these plunger packings, so if you need the larger/newer version for one of yours, let me know.

Thanks for the offer, I have no idea what I'm in for on this pair of Walkers. They're very complete, but I was told the fluid runs out as fast as you pour it in.:shocking:

Hopefully they get it right for you this time, it's frustrating waiting for parts that end up being wrong.
 
OP
V

vertguy

Well-known member
Joined
Apr 6, 2010
Messages
1,259
Location
SE WI
Man, these jacks are a thing of beauty as everything is way over engineered. While awaiting the arrival of the correct plunger packings, I pulled the jack handle mechanical assembly and cleaned it before an over night in Evaporust.

I also swapped the 2 small O-rings for the release valve pin assembly, so I am pretty much at stop until those new packings arrive!


DP%20speed%20pulley%20001_zpsclmgzdrm.jpg
 

econotrk

Well-known member
Joined
Aug 27, 2013
Messages
275
Location
Western Pa. near Pgh. n dat
I've noticed throughout this thread the blue keeps showing up along with the red. I thought the color for Weaver jacks is red, but from where I sit it looks like the blue is the underneath most paint. Which one is original and which one is the repaint? :headscratAlso, do you have a color in mind?
 
To avoid these ads, REGISTER NOW!
OP
V

vertguy

Well-known member
Joined
Apr 6, 2010
Messages
1,259
Location
SE WI
From what I can tell, the original color is a teal green as the red appears to be a newer coat. I am still contemplating refinish color as part of me wants to take it back to original (assuming I can get a good color match) or just use a color that would look cool in the garage :D
 

Hiball

Well-known member
Joined
Apr 30, 2009
Messages
14,027
Location
Missery
From what I can tell, the original color is a teal green as the red appears to be a newer coat. I am still contemplating refinish color as part of me wants to take it back to original (assuming I can get a good color match) or just use a color that would look cool in the garage :D

The Weaver Color was Greenish, Although Weaver sold there Jacks under Many different brands including Blackhawk, Which was in the Red Family, I believe the Early US Jack models where Red also. Of Course they also carried there respective Badging, So it would be easy to distinguish.
 
OP
V

vertguy

Well-known member
Joined
Apr 6, 2010
Messages
1,259
Location
SE WI
Mine was missing the tag and tank cover, but it was definitely "greenish" as all the hard to reach areas including the inner front wheels are still that color.
 
OP
V

vertguy

Well-known member
Joined
Apr 6, 2010
Messages
1,259
Location
SE WI
Weaver WA-72 Jack Repair & Resto

The elusive plunger pump packings finally came today, so I jumped right into reassembly. Man, the ram packings were a but tricky to install, but everything seemed to go fairly smooth. Some good news as the jack is working, but I do need to address a couple issues.

First, the pump plunger is very stiff and does not return out on its own. The return spring does need replacing as it appears to have a couple missing coils, but would a weak spring cause this or is there something else causing it? Would an over tight packing nut cause it to be stiff?

Second issue is a small leak from the tank nut. I assume this is my fault as I probably did not tighten it enough. But the rather thin replacement gasket that came with the kit is not near as beefy as the original copper crush washer. I almost reinstalled the original, but I try to crank it down some more on the vise before taking things apart.

Any suggestions on the tight pump plunger is appreciated.
 
Last edited:
OP
V

vertguy

Well-known member
Joined
Apr 6, 2010
Messages
1,259
Location
SE WI
I called Castle and they sent me to Weaver for some additional guidance on the tight pump plunger. No real solution as it appears like there is some tolerance issues between the original cup material and the neoprene version they provide now. I confirmed the cup was not over tightened on the plunger with no bulging and it is still overly snug even before I installed the packings. About all Weaver could recommend is trying to do a light hone on the cylinder, so I may go this route and order a flexible hone.

I also tightened the tank nut some more and it still has a very small leak in the same area. So I am definitely going back to the original copper washer when I tear the ram back apart to deal with plunger... this is becoming quite the project :headscrat
 

Hiball

Well-known member
Joined
Apr 30, 2009
Messages
14,027
Location
Missery
Any ideas on how to deal with the tight pump plunger cup??

I would first rule out a weak spring, compress the spring on the rod and use a pair of Vise grips to keep tension and see if that addresses your problem.The material shouldn't matter, the OD should be the same, and the New piston seals are fairly pliable, so I don't feel like there should be a lot of drag issues. I would take the seal off and try inserting the piston only to rule out any burrs on the rod surface. Maybe bent? How about a picture of the pump piston with the seal installed, maybe I can spot something. It's also common for people to overtighten the nut, which swells the backside and pulls the face inward, this causes issues on both ends. In regards to whether or not a overtightened packing nut cause the piston to drag? Absolutely, when you tighten that nut down, it clamps that packing down on the Rod, which is why you start light and tighten it up over the years as needed
 
Last edited:
OP
V

vertguy

Well-known member
Joined
Apr 6, 2010
Messages
1,259
Location
SE WI
Ok... It is amazing how a couple days away from a project along with some good feedback can do to help solve a problem. I had confirmed earlier the pump plunger moved freely in the cylinder without any binding, so it had to be something with the cup and or packings.

I removed the pump plunger and wanted to ensure there was no cup bulging issues from over tightening. So I used a punch to crush a couple stud mounting bolt threads so I could tighten the nut without over torquing the cup.

Then I only hand tightened the packing nut. I saw an immediate difference with the pump pedal as it was returning normally (still not fully, but a new spring and lube on the pump pedal mechanics will help that issue). I also cranked down on the tank again and I am fairly sure that leak was addressed as well. I still need to test with a vehicle, but I am very satisfied with the results. Now I can start the fun stripping process for paint. Think I may look for a used sand blaster.

Thanks again HiBall!!! :rocker:

Here's a picture of the pump plunger cup:
Pump%20plunger%20001_zpsc3qebpqa.jpg


And the replacement return spring from McMaster. They came in package of 5 and matched all the specs (wire size and OD), but I cut it to length. The old one is on top.

return%20spring%202_zps2zymrg7s.jpg


return%20spring_zpsmveljjec.jpg
 
OP
V

vertguy

Well-known member
Joined
Apr 6, 2010
Messages
1,259
Location
SE WI
Spent some time stripping the paint. There are remnants of a "WEAVER" logo spelled out on the lift arm, so I did some measurements and tried to match up the font and letter size with some custom vinyl letters. Found a very reasonable option ($10 shipped), so we will see how they match up later in the week.

Still debating on final color, but I am leaning towards red even though the original color was a teal green.
 

Attachments

  • Stripped Weaver jack.jpg
    Stripped Weaver jack.jpg
    128 KB · Views: 92
  • Weaver logo.jpg
    Weaver logo.jpg
    129.5 KB · Views: 81
OP
V

vertguy

Well-known member
Joined
Apr 6, 2010
Messages
1,259
Location
SE WI
Since the ram packing nut requires a special (ala hard to find) wrench, I decided to make one out of scrap 1/8in metal strips and a couple roll pins that I matched up to the slots. It is definitely not pretty, but it worked perfectly.
 

Attachments

  • Spanner wrench.jpg
    Spanner wrench.jpg
    78.6 KB · Views: 70
OP
V

vertguy

Well-known member
Joined
Apr 6, 2010
Messages
1,259
Location
SE WI
Hey Hiball... I am at a wits end with trying to get the ram packings to seal. I have taken it apart a couple times now to ensure the packing washers are starting off flat and slowly tightened the nut after letting it sit for a day or so and noticing leaks. I really want to save this jack, but this leaking is driving me nuts.
 
Last edited:
OP
V

vertguy

Well-known member
Joined
Apr 6, 2010
Messages
1,259
Location
SE WI
In an effort to not let this jack get the best of me, I tore the ram apart again to try and figure out the cause of the leak. Think I got it as 2 of the 3 packings showed signs of being partially rolled (which I assume happened during assembly). So I tried a couple different approaches with installing them and think I got it, but it was very tricky trying to get them into the ram nut and to keep them flat... hoping 3rd time is the charm as it has sat for several hours now with no signs of leakage.

Since I appeared to have solved the leak, I decided to tackle modifying a new ram cover to fit in this frame. The new one is ~1/2 wider (but otherwise fits), so I removed a strip of material from the middle of the cover with a cut off wheel and proceeded to test my novice welding skills with the mig. After making a power adjustment following a blow through on the first tack, the rest seem to lay down ok. I definitely need some more time on the welder, but this project will put me to the test.

We shall see how things go with finishing the seam tomorrow. But for a $27 investment for the cover, I figured it was worth a shot to try and make it work. This was also a great day to spend time in the garage while temps hovered in the mid 50s :beer:
 

Attachments

  • Cover modification.JPG
    Cover modification.JPG
    102 KB · Views: 70
  • Cover modification 2.JPG
    Cover modification 2.JPG
    120.7 KB · Views: 79

dewalt378g

Well-known member
Joined
Mar 17, 2012
Messages
180
If you're blowing out on light gauge metal, then turn your heat down just a little and use a stitch welding method. Play with the feed rate too and once you find the sweet spot for your heat, feed, and base metal you can poke right along until your done. Also throw a couple of tacks on the other/under side to help control the warp/pull from the weld process. I'm no expert, but from your second pic I would have a slight gap (about < 1/16) between the pieces and turn down my feed a little. Some of those "nuggets" just make for more work when it comes to cleaning up the surface...grinder or not.

I'm Not being critical of your work. It's just that I'm seeing flashbacks of my own learning curve and I can see where this is going. I'm sure some of the real weld guys here can really help you out if you post in the fab section.

Glad to hear you got your leak fixed. I can't wait to see the paint go on.
 
OP
V

vertguy

Well-known member
Joined
Apr 6, 2010
Messages
1,259
Location
SE WI
Thanks for the feedback Dewalt. I remember reading about needing a gap when stitching metal like this and totally forgot about it when clamping them together. I did make a power and speed tweak after the initial blow through, which definitely helped on the remaining tacks. All this feedback is definitely welcomed!

Yep, paint is up next... once spring finally arrives and we have some warmer temps.
 
OP
V

vertguy

Well-known member
Joined
Apr 6, 2010
Messages
1,259
Location
SE WI
I decided to get the cover completely stripped the easy way, so I coated it with a citrus stripper overnight... which made for a quick clean up this morning. Then it was time for some more trial and error with the mig, followed by lots of time with the die grinder and the cover is in much better shape. It still needs some finish work along with redrilling the vent/fill plug access hole, but I am very satisfied with the results. I was also very excited to see no signs of ram packing leaks :thumbup:
 

Attachments

  • Cover final.JPG
    Cover final.JPG
    136 KB · Views: 79

dewalt378g

Well-known member
Joined
Mar 17, 2012
Messages
180
That looks fantastic! Nice job! I'm excited and this is not even my project...LOL!!!

Now I'm having urges to start on my 80's era Blackhawk 2 ton that I had put on the back burner.....just too busy with work.
 
OP
V

vertguy

Well-known member
Joined
Apr 6, 2010
Messages
1,259
Location
SE WI
Another great weather weekend, so I was able to wrap up the cover this morning. Welded up the last little section, followed by some sanding with the DA. Pretty much ready for another nice spring day so I can do some final paint prep and shoot the color.
 

Attachments

  • Cover final clean up.JPG
    Cover final clean up.JPG
    123.2 KB · Views: 75
To avoid these ads, REGISTER NOW!
Top Bottom