To avoid these ads, REGISTER NOW!

How I lifted my double garage for $500

JohnnieMo

Well-known member
Joined
Nov 25, 2014
Messages
1,175
Location
Calgary, Alberta
Like the title says, this is a quick overview of how I lifted my 24x22x8 double garage by 21" My build thread contains all the gory details, but I thought the avarage passerby might benefit from something a little shorter.

The goal was to increase height to accomodate a 4 post lift for vehicle storage and maintenance. I also wanted room for my boat. I didn't have the space (or money) to look at a complete replacement or expansion. Having not found a lot of resources online, I mostly referred to a couple Youtube videos, and a thread on GJ which was light on details. (http://www.garagejournal.com/forum/showthread.php?t=272678) Quotes to do the job were $5000!!!

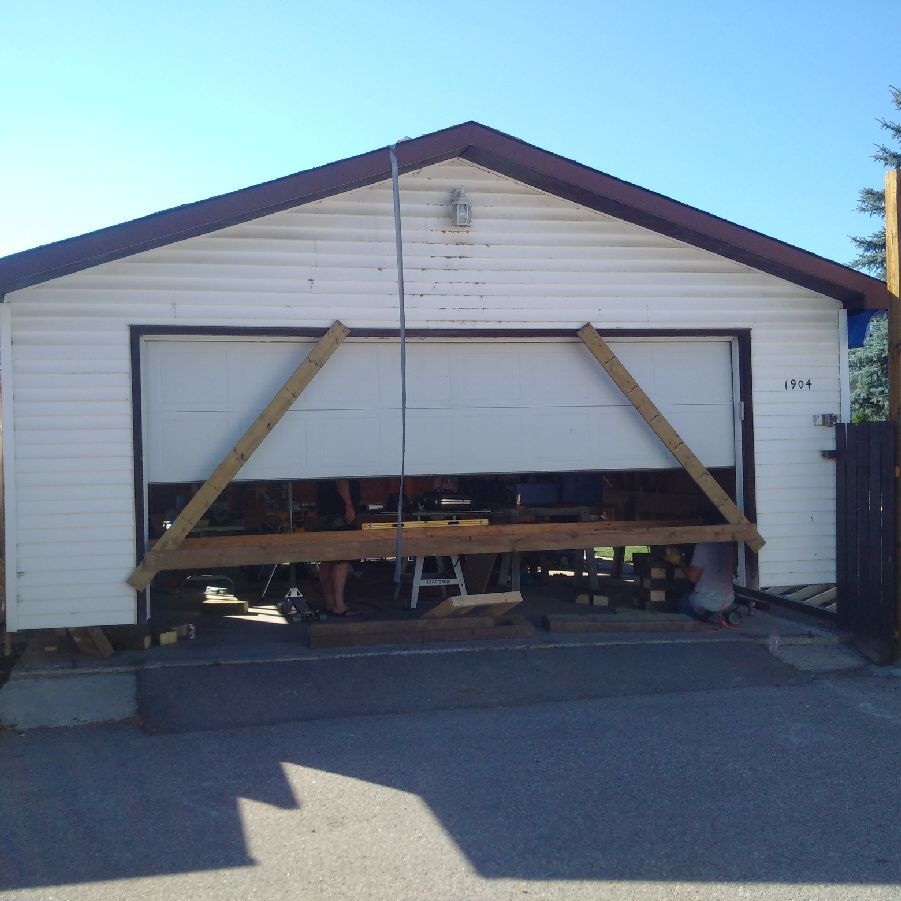
Here is what I was working with.


As for cost, the lifting itself was the cheapest part of the entire project. I spent $20 each on 4 12 ton bottle jacks, $200 on custom 22' wide LVL beams, and $200 on throw away 4x6 blocking. I already had plenty of 2x10's for reinforcement, so those could cost you if you don't have them. Total cost was $500.

Here is the video I created which covers what was done.


Here are some in process pictures. I chose to create "pony walls" because it was easier.


After it was up I sistered in a lot of 2x4's for support.


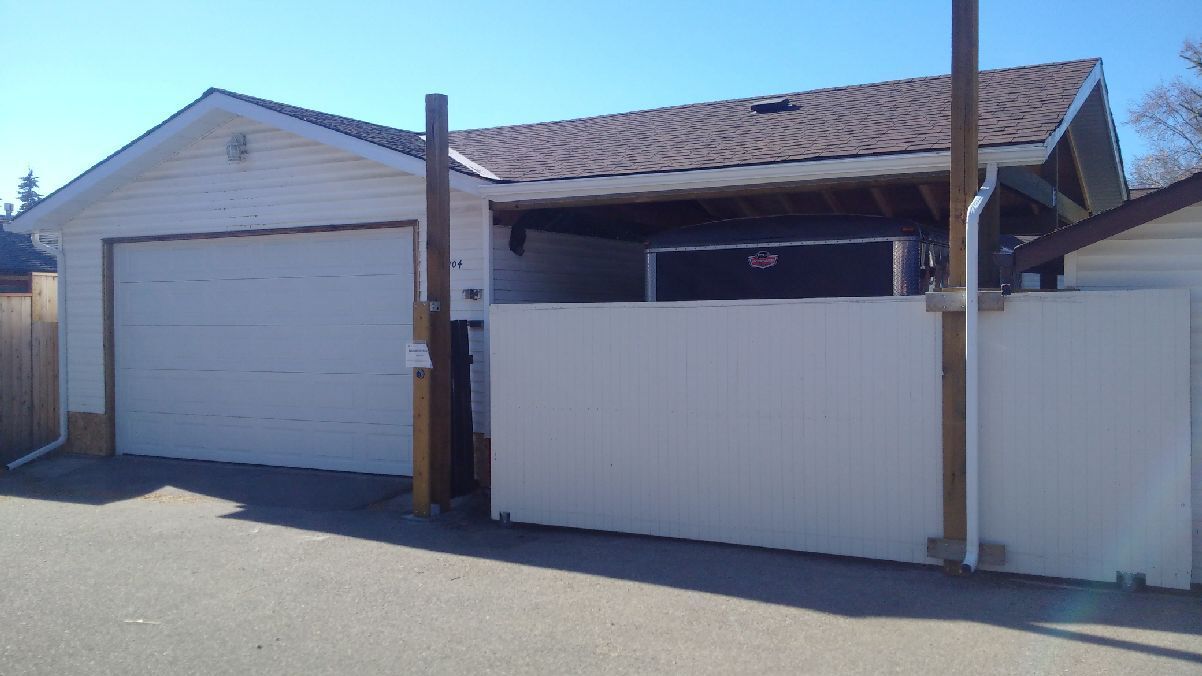
If you are interested in following the rest of the project (including the carport) then please come subscribe to my build thread.

http://www.garagejournal.com/forum/showthread.php?t=283853
 
Last edited:
To avoid these ads, REGISTER NOW!

rsnip988

Well-known member
Joined
Apr 2, 2015
Messages
143
Location
Elon NC
That's Awesome! I had thought that that could be done, but never seen anyone do it!
Great work!
 

matt_i

Well-known member
Joined
Mar 14, 2008
Messages
10,741
Location
SE Michigan
Good work there. I am wondering if there was a lot of creaking and groaning from the structure as you lifted this? I'd be a little nervous to work inside as it was being lifted but there really isn't any other choice.

Also, looking at pics, it looks like you cut down thru the top plate and added the new studs. I think this is a great idea as now you don't have to worry about the short wall racking.
 

Ainsley

Well-known member
Joined
Jun 12, 2014
Messages
557
Location
Ontario, Canada
looks like your lift turned out great! I know you put a lot of thought and planning into it. I like your method with the knee wall sections and then the sistered studs.
I hope some of my suggestions were of some assistance.
 

bczygan

Well-known member
Joined
Nov 4, 2009
Messages
22,002
Location
DETROIT! Arsenal of Scrappers
Nice job!

I especially like how you sistered full length studs to avoid having a hinge point in the wall.

Did you re-frame headers for the man door and garage door before or after the lift?

Did you need a come-along to get things plumb and straight after lowering?

Did you reuse the LVL's for the door header?

Bill
 

Keel

Banned
Joined
Jun 12, 2015
Messages
1,917
Location
LaLaLand
Awesome job! My only question is how the hell did you get that boat in there in the first pic???

I'm guessing here.. but car dollies..


RCD-1500_Go_Cart.png
 

theoldwizard1

Well-known member
Joined
Feb 22, 2011
Messages
43,235
Location
SE MI
Great job ! A bit of overkill with those LVLs, but I guess it would be hard to find 2x10 that are 22' long.
 

captain14

Well-known member
Joined
Dec 19, 2012
Messages
7,061
Location
Near College Park Maryland 20740
How long did it take from start to finish to lift the building. Did you do it all at once or in swipe increments? I know when others have straightened out the garage walls they did some each day over a period of time.
 
To avoid these ads, REGISTER NOW!

ishiboo

Well-known member
Joined
Oct 27, 2010
Messages
9,481
Location
Oshkosh, WI
Nice job!

I especially like how you sistered full length studs to avoid having a hinge point in the wall.

Agreed. I saw the picture before with the separate pony wall and thought 'ew'. Full length-studs and removing the continuous top/bottom plates in the middle fixed that!

Great work.
 
OP
J

JohnnieMo

Well-known member
Joined
Nov 25, 2014
Messages
1,175
Location
Calgary, Alberta
Wow! Thanks for all the glowing responses. I usually turn around replies much faster... didn't expect so many over night :) I'll try to address all the questions. For the rest, thank you very much.


Ingenious! Congrats.

I don't suppose you pulled permits, got inspections, etc?

As noted, yes I did. I spoke with the city extensively throughout the spring and summer about it. They basically didn't care. My building plans were much more elaborate than just the lift, so if I was only doing a lift I could possibly do it without a permit (although not legally). In my case I needed a development permit AND a building permit. I also talked to an engineer who gave me pointers. He signed off on the carport, but through a serious of mix-ups, never gave me drawings on the pony walls. I got tired of waiting and did it myself.

What's odd is the city didn't care how I did it. They only care about the result. So the inspection is still pending. He may freak out when he comes in, but I doubt it. My plans had it all listed, although they didn't seem concerned. They are far more concerned about goofy things like non-vented soffits.

Good work there. I am wondering if there was a lot of creaking and groaning from the structure as you lifted this? I'd be a little nervous to work inside as it was being lifted but there really isn't any other choice.

Also, looking at pics, it looks like you cut down thru the top plate and added the new studs. I think this is a great idea as now you don't have to worry about the short wall racking.

There was surprisingly little noise once it got off the ground. With all the bracing, it all came up in unison. I expected more issues, but didn't have any. A few hidden bolts (to the slab) caused some grief right off the hop, but that was it. The main issue, which isn't covered in the video, but was in my build thread, was that the one corner of the structure slid 2" to the south during one of the north side lift sequences. As such, I would recommend only lifting about 2" per side at a time.

looks like your lift turned out great! I know you put a lot of thought and planning into it. I like your method with the knee wall sections and then the sistered studs.
I hope some of my suggestions were of some assistance.

Ainsley - you were not only my inspiration, but pretty much my only resource. Can't thank you enough. Hope you are fairing well with the new baby. I know how time consuming that can be.

Awesome job! My only question is how the hell did you get that boat in there in the first pic???

This was a job in itself. I bought a 12V ATV winch and bolted it to the back wall. I then used it to tug the boat inside. Once inside I put it on wheel dollies and slid it into the corner. The issue was the furnace was in the way, so it needed to be put in backwards. I no longer have this issue :)


Nice job!

I especially like how you sistered full length studs to avoid having a hinge point in the wall.

Did you re-frame headers for the man door and garage door before or after the lift? No. The garage door was already done properly with a big 2x10. The man door didn't need much. The windows were the biggest issue. I added headers to each out of dual 2x10. (I had a lot of spare 2x10)

Did you need a come-along to get things plumb and straight after lowering?
My thought was that since it worked before it would work after. The slab isn't perfect, but it is okay. So the structure will follow the slab exactly as before.

Did you reuse the LVL's for the door header? I was intending to use them for the windows, but in the end they weren't needed. I am pondering some other uses. Right now they make terrific scaffolding./COLOR]


Bill


How long did it take from start to finish to lift the building. Did you do it all at once or in swipe increments? I know when others have straightened out the garage walls they did some each day over a period of time.

The lift itself happened in a couple hours. Prep started in March for the permit, then June for stripping out the garage, September for final prep and lift. Sistering the studs and straightening the walls took a few weeks. I wasn't in a rush.

Nice to see someone getting it done while others are saying it can't be.

I'm surprised people are saying this. The pros do it all the time. Honestly, it was one of the easier parts of this project, albeit, the most stressful. I found some videos where guys lifted complete garages, interior shelves still full of junk, and left it that way for weeks. Having done it now, I can tell you I went WAAAY overkill. The whole thing was maybe 8000lbs. You could lift it all with a 4 post lift :p
 

Homerr

Well-known member
Joined
Mar 16, 2012
Messages
379
Location
Seattle, WA
Very interesting video, I liked listening to your method.


This was of particular interest to me from a practical engineering perspective. It represents the weak point (though it was obviously adequate!) and I was curious how much weight could theoretically be held. That looks like a 1.75" wide LSL and 2x10 Doug-Fir ledger on the studs.

Area: 1.75" x 1.5" = 2.626 square inches

Max. allowable compression in this orientation (vs. the end grain) of Doug-Fir is 625 psi.

2.625 x 625 = 1,640 lbs.

Since you had (4) lift points you, theoretically, were able to lift 6,560 pounds. I'm guessing you were near the limit and it is a good thing you did as much weight reduction as you could. (An argument could be made for the lift jack pad to LSL being the weak point here as well.)

For those doing this in the future may I suggest wider (3.5") lift beams and blocking. Add in small square/rectangular steel plates on top of the jack to spread the load to the wood, say 3"x3" minimum. The same setup with 4x's would support 30,625.


One other item, in retrospect. This lift would have been a great opportunity to create some separation of the ground level to siding as it looks like you're pretty close. Adding a single course of 4" wide CMU on top of the slab would have been an option. Maybe it isn't so much a concern since it looks like the new slab area out back was a mono-pour without a stem wall sticking up.


Overall, nice work and great presentation on what you did! :thumbup:
 
Last edited:

Gummi Bear

Well-known member
Joined
Nov 5, 2006
Messages
524
Location
Sunset, Texas
Very cool!

You did a good job.

Anxious to see the 100% final product.


I've jacked up pier and beam houses to replace beams that had water damage, but never an entire structure.


I went to the woods because I wished to live deliberately - Thoreau
 
OP
J

JohnnieMo

Well-known member
Joined
Nov 25, 2014
Messages
1,175
Location
Calgary, Alberta
Great thoughts Homer. I should have talked to you prior.

My concern was not that junction, but rather the head of the jack itself pushing up on the LVL. It is basically taking 1/4 of the entire garage weight and putting it on the top of that jack. This is one of the reason why I wanted LVL. I looked a putting steel on there but I was concerned that would make it "slip". I went back and forth with a few GJ members about whether or not to go with 2x10 on the walls, or another LVL, and we decided 2x10. The screws were another factor.... I bought special grade screws for this.

In the end, I knew if there was a problem I would have found it immediately, when the garage was 1/4" off the ground. So I wasn't too concerned.

Of note, the LVL was also lagged to the wall stud to keep it vertical, but also to add some lifting strength.

I was also slightly concerned about the concrete, but after running the numbers I found that the concrete could handle 10X more weight.

Regarding the siding, I've chosen to finish the bottom of the walls with 21" of water proof exterior rated cement/fiberboard. The bottom plate is also pressure treated. I also cut the OSB a bit short so it wouldn't sit in any water. The old garage survived 30 years (although a bit worse for wear), so I assume the new walls will survive that long also. Again details are in my build thread.

@ford33

This was actually pretty clever. My brother in law had seen the pros do this on a garage they moved to his acreage. You put a jack on an angle and start to lift it right in the middle of the LVL beam. As it comes up slightly you tap on the outside wall with a sledge. It eventually tips the jack over and it falls down a few quarters of an inch further over. We did this about 5 times and it was perfect. Unfortunately I was the guy with the sledge, so I didn't get any pictures, or even see how it was working. He just kept yelling "Good!"
 
Last edited:

theoldwizard1

Well-known member
Joined
Feb 22, 2011
Messages
43,235
Location
SE MI
Awesome job! My only question is how the hell did you get that boat in there in the first pic???
... I bought a 12V ATV winch and bolted it to the back wall. I then used it to tug the boat inside.

I am about to start on my version of your solution for the same problem ! I park my boat in a buddy's garage. Narrowest garage door you have ever seen. About 1" clearance on each side of the boat. And I am not very good at backing up a trailer (usually takes 3 or 4 times at the boat ramp). He also has a gravel driveway and an up-slope ramp going into the garage, so hand pushing is pretty much out of the question.

I am going to make about a 3-4" hole in the floor near the back wall centered on the door. Dig it out about 6-12" and set a 1/2" bolt with washer down and a coupling nut in, blot head and washer down. Fill with Quikrete Anchor cement. The other end of the coupling nut will be flush with the finish grade.

Once everything is set, I have a lifting eye that will screw into the coupling nut, then a shackle and a pulley. Back the boat up close to the garage, tie a rope on the trailer, run it up through the pulley and then back out under the boat trailer which is now unhitched. Use the truck to PULL the boat backwards into the garage !
 

CNGsaves

Well-known member
Joined
Sep 26, 2012
Messages
13,233
Location
KS and OK
Nice end result . . . . every garage should be that tall to begin with !! :thumbup:

Curious if you considered concrete stub wall instead of wood pony wall ?? Looks like you had sections that did have water damage beforehand.

Also did you pay the helpers jacking up garage the other $4,500 above your $500 cost to get up that $5K quote for raising the garage ?? :D
 
OP
J

JohnnieMo

Well-known member
Joined
Nov 25, 2014
Messages
1,175
Location
Calgary, Alberta
I am about to start on my version of your solution for the same problem ! I park my boat in a buddy's garage. Narrowest garage door you have ever seen. About 1" clearance on each side of the boat. And I am not very good at backing up a trailer (usually takes 3 or 4 times at the boat ramp). He also has a gravel driveway and an up-slope ramp going into the garage, so hand pushing is pretty much out of the question.

I am going to make about a 3-4" hole in the floor near the back wall centered on the door. Dig it out about 6-12" and set a 1/2" bolt with washer down and a coupling nut in, blot head and washer down. Fill with Quikrete Anchor cement. The other end of the coupling nut will be flush with the finish grade.

Once everything is set, I have a lifting eye that will screw into the coupling nut, then a shackle and a pulley. Back the boat up close to the garage, tie a rope on the trailer, run it up through the pulley and then back out under the boat trailer which is now unhitched. Use the truck to PULL the boat backwards into the garage !

The hard part is turning the boat once you disconnect it from the truck. If you have a tandem axle, this is almost impossible. However if you can get it straight first, its not hard at all. The back wall made a lot of noise, but I knew I was replacing it anyways, so I went in all guns blazing.
 
OP
J

JohnnieMo

Well-known member
Joined
Nov 25, 2014
Messages
1,175
Location
Calgary, Alberta
Nice end result . . . . every garage should be that tall to begin with !! :thumbup:

Curious if you considered concrete stub wall instead of wood pony wall ?? Looks like you had sections that did have water damage beforehand.

Also did you pay the helpers jacking up garage the other $4,500 above your $500 cost to get up that $5K quote for raising the garage ?? :D

I did consider concrete bricks at first. That is what Ainsley did. My water damage actually came from the inside, not the outside. The slab drains poorly. I added in a drainage trench to help fix this. I also plan to do a better job water proofing the interior.

My helpers were rewarded with the coldest beer they could drink (and free access to my future 4 post lift)
 

cspcrx

Well-known member
Joined
May 2, 2014
Messages
608
Location
Phoenix, AZ
Well done! That's one way of killing several birds with one stone and not what I thought I was going to see!
 

Homerr

Well-known member
Joined
Mar 16, 2012
Messages
379
Location
Seattle, WA
Doing a few calcs and looking up the LVL that you used -

1.25" diameter jack head, 850psi = 1,042 lbs.

Adding two screws per stud probably added around an additional 600 lbs., so really similar overall to the 2x crushing.
 

bczygan

Well-known member
Joined
Nov 4, 2009
Messages
22,002
Location
DETROIT! Arsenal of Scrappers
Very interesting video, I liked listening to your method.


This was of particular interest to me from a practical engineering perspective. It represents the weak point (though it was obviously adequate!) and I was curious how much weight could theoretically be held. That looks like a 1.75" wide LSL and 2x10 Doug-Fir ledger on the studs.

Area: 1.75" x 1.5" = 2.626 square inches

Max. allowable compression in this orientation (vs. the end grain) of Doug-Fir is 625 psi.

2.625 x 625 = 1,640 lbs.

Since you had (4) lift points you, theoretically, were able to lift 6,560 pounds. I'm guessing you were near the limit and it is a good thing you did as much weight reduction as you could. (An argument could be made for the lift jack pad to LSL being the weak point here as well.)

For those doing this in the future may I suggest wider (3.5") lift beams and blocking. Add in small square/rectangular steel plates on top of the jack to spread the load to the wood, say 3"x3" minimum. The same setup with 4x's would support 30,625.


One other item, in retrospect. This lift would have been a great opportunity to create some separation of the ground level to siding as it looks like you're pretty close. Adding a single course of 4" wide CMU on top of the slab would have been an option. Maybe it isn't so much a concern since it looks like the new slab area out back was a mono-pour without a stem wall sticking up.


Overall, nice work and great presentation on what you did! :thumbup:

I was wondering if the LVL's were needed at all. If he had doubled the 2x10's and bolted them together, it would give a 3" wide jack point inside of the face of the wall framing. Some steel plates to spread the load and good to go. Of course lag bolts into enough studs.

Bill
 
OP
J

JohnnieMo

Well-known member
Joined
Nov 25, 2014
Messages
1,175
Location
Calgary, Alberta
Doing a few calcs and looking up the LVL that you used -

1.25" diameter jack head, 850psi = 1,042 lbs.

Adding two screws per stud probably added around an additional 600 lbs., so really similar overall to the 2x crushing.
Probably a good thing we didn't talk prior.... I would have gotten scared off!! Just kidding. The neither the LVL or 2x10 showed any signs of compression or damage. Shocking really. The garage may be even lighter than I expected.


Sent from my Passport
 
OP
J

JohnnieMo

Well-known member
Joined
Nov 25, 2014
Messages
1,175
Location
Calgary, Alberta
I was wondering if the LVL's were needed at all. If he had doubled the 2x10's and bolted them together, it would give a 3" wide jack point inside of the face of the wall framing. Some steel plates to spread the load and good to go. Of course lag bolts into enough studs.

Bill
The LVL did other things. Not only did it offer a lifting point, but it also kept the left and right walls equidistant. (Ie. It prevented the walls from pushing out or in). It didn't need to be heavy duty for that purpose though. But where else do you find a 22' board??
still not taller enough, you going need 12'6 for your lift
Not sure what lift you use but the 4 post Lift King I've got my eye on works in an 8' garage let alone a 10. With that being said I could have used a few more inches to stack my Trans Am on top of my Avalanche. As it stands the T/A will hump the Vibe instead.

Sent from my Passport
 
To avoid these ads, REGISTER NOW!
Top Bottom