To avoid these ads, REGISTER NOW!

CM Block Grinder plastic eye shield clean-up

torqueman2002

Well-known member
Joined
Jun 3, 2009
Messages
6,138
Location
SE Michigan
Feb. 04 2018 - Because of PhotoBucket's change in 3-rd party hosting, this thread has been edited to post pictures directly. Therefore, the first post has been split and continued begning in post #8 , below.

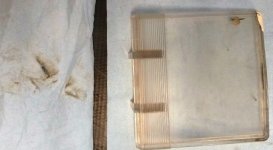
I thought a short thread on how I restore the plastic eye shields (PES) for Craftsman Block grinders might be of interest.

Note: I have not found OEM replacements. If you want/need to replace your eye shields, here's a link for non-OEM replacements.
http://www.garagejournal.com/forum/showpost.php?p=3323239&postcount=465

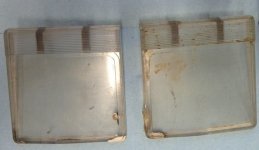
These dirty and less than perfect PES are from a 1/2-HP m-397.19440 (APR 17, 1975 A).
http://www.garagejournal.com/forum/showthread.php?t=311149

attachment.php


attachment.php


attachment.php


attachment.php


attachment.php


attachment.php


Continued in post #8, below.

Thanks for looking. :)

Comments and suggestions are encouraged.
 

Attachments

  • Fi P1110043.JPG
    Fi P1110043.JPG
    90.5 KB · Views: 223
  • Fi P1110048.JPG
    Fi P1110048.JPG
    77.3 KB · Views: 219
  • Fi P1110047.JPG
    Fi P1110047.JPG
    72 KB · Views: 217
  • Fi P1110046.JPG
    Fi P1110046.JPG
    57.1 KB · Views: 220
  • Fi P1110045.JPG
    Fi P1110045.JPG
    69.7 KB · Views: 220
  • Fi P1110044.JPG
    Fi P1110044.JPG
    84.1 KB · Views: 219
Last edited:
To avoid these ads, REGISTER NOW!

sector9

Well-known member
Joined
Jun 17, 2012
Messages
62
Location
PA
This thread is quite timely for my current project. I have a pair I am trying to clean up now. I was wondering if anyone has taken a series of progressively increasing sandpaper grits to theirs to get rid of deeper defects? Mine are looking much better after being cleaned up with some toothpaste then Meguiar's PlastX plastic cleaner and polish, but there are still some deep marks on the inner side of the shield that I would be interested in removing if possible.
 
To avoid these ads, REGISTER NOW!
OP
T

torqueman2002

Well-known member
Joined
Jun 3, 2009
Messages
6,138
Location
SE Michigan
This thread is quite timely for my current project. I have a pair I am trying to clean up now. I was wondering if anyone has taken a series of progressively increasing sandpaper grits to theirs to get rid of deeper defects? Mine are looking much better after being cleaned up with some toothpaste then Meguiar's PlastX plastic cleaner and polish, but there are still some deep marks on the inner side of the shield that I would be interested in removing if possible.
Nice close up. Good job on the lens.

I have those kind of scratches, as well.

Today, I used FLITZ on the RH PES above.
attachment.php

http://www.amazon.com/gp/product/B001447VB2/?tag=atomicindus08-20

It left slightly more scratches than the Cleaner/Wax.

FLITZ did, however, shine up the aluminum molding on the bench top. ;)

The Cleaner/Wax was used after the FLITZ and the RH and LH PESs look about the same. Sorry, no pictures.

I wonder about using a headlight restorer product on the PES.
 

Attachments

  • Flitz.jpg
    Flitz.jpg
    117.7 KB · Views: 207
Last edited:
OP
T

torqueman2002

Well-known member
Joined
Jun 3, 2009
Messages
6,138
Location
SE Michigan
Continued from post #1, above.

Below are pictures of the LH PES, after a rinse with warm water to remove the dust.
attachment.php


This is a pan of slightly used Simple Green for the next step of restoring the PES.
attachment.php


attachment.php


attachment.php


The next step uses a Cleaner /Wax, soft cloth, and brushes.
attachment.php


The cleaner/wax is applied and removed in back and forth motion in 1 direction, and that same direction on each side. This avoids circular and hatch patterns of fine scratching.
attachment.php


Continued on next post, below.
 

Attachments

  • Fi P1110055.JPG
    Fi P1110055.JPG
    78.1 KB · Views: 211
  • Fi P1110054.JPG
    Fi P1110054.JPG
    65.1 KB · Views: 6
  • Fi P1110053.JPG
    Fi P1110053.JPG
    72.1 KB · Views: 208
  • Fi P1110052.JPG
    Fi P1110052.JPG
    84.9 KB · Views: 207
  • Fi P1110051.JPG
    Fi P1110051.JPG
    60 KB · Views: 207
  • Fi P1110050.JPG
    Fi P1110050.JPG
    58.6 KB · Views: 210
  • Fi P1110049.JPG
    Fi P1110049.JPG
    91.2 KB · Views: 208
OP
T

torqueman2002

Well-known member
Joined
Jun 3, 2009
Messages
6,138
Location
SE Michigan
Continued from previous post, above.


attachment.php


attachment.php


The white and silver paint in the upper RH corner in the above picture is removed with as little force as possible.

Here is what is used to remove the paint in the next step - the dental pick (ask your dentist for some he/she's ready to discard) and plastic razor blade are very useful.
attachment.php

The Scotch Bright is used only on the portions of the lens that are not 'line of sight'.

The LH PES ready to be put into service; while it is not perfect, it is an improvement from the RH one that has not had the cleaner/wax & paint removal steps performed on them.
attachment.php


attachment.php
 

Attachments

  • Fi P1110060.JPG
    Fi P1110060.JPG
    67.9 KB · Views: 206
  • Fi P1110059.JPG
    Fi P1110059.JPG
    100.8 KB · Views: 10
  • Fi P1110058.JPG
    Fi P1110058.JPG
    69.5 KB · Views: 204
  • Fi P1110057.JPG
    Fi P1110057.JPG
    89.6 KB · Views: 204
  • Fi P1110056.JPG
    Fi P1110056.JPG
    79.1 KB · Views: 204
  • Fi P1110054.JPG
    Fi P1110054.JPG
    65.1 KB · Views: 201
To avoid these ads, REGISTER NOW!
Top Bottom