To avoid these ads, REGISTER NOW!

Record No. 6 Vise Restore

bulletpruf

Well-known member
Joined
Nov 28, 2013
Messages
10,971
Location
San Antonio
Fellas -

First vise restore. Have been looking for one for a while, but no luck on the local websites. Member here recommended eBay.it (Italy eBay) and lo and behold - found this beauty with a reasonable buy it now price. Ended up setting me back $250 with shipping.

Arrived yesterday, and it's in pretty good shape.

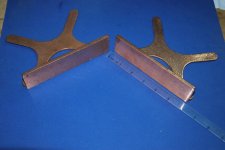
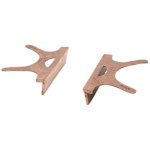
This morning I got the jaws off -- had to use Kroil, impact screwdriver, etc. Last one was quite stubborn, but was able to persuade it with more Kroil and a healthy dose of heat from the propane torch.


Also got the screw removed, and it's in pretty good shape, too.

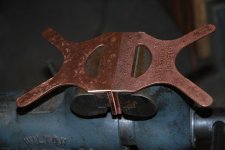
How do I separate the two halves of the vise? Not sure exactly what is holding it together at this point.

Also, how do I remove the handle? Are the end caps threaded?

Once I get it completely apart, I'll strip the paint off with a wire wheel, clean up the screw and handle, paint it factory colors, and put it back into service.

If anyone has any recommendations, please feel free to chime in.

Thanks,

Scott
 
To avoid these ads, REGISTER NOW!

Techie1961

Well-known member
Joined
Feb 18, 2014
Messages
1,520
Location
Pickering Ontario Canada
That's a great vise; I have the same one and just did a restore on it. To remove the two halves, you need to knock out a small pin on the underside. Once you do that, the nut comes off and that is what keeps the dynamic from sliding out.

I didn't remove the end caps and just polished the handle while attached. You can see the components in this photo.
23791245219_60927fb504_c.jpg
[/url]
 

Techie1961

Well-known member
Joined
Feb 18, 2014
Messages
1,520
Location
Pickering Ontario Canada
Nice job Techie! What brand of paint and paint code did you use? I have a couple to get to.

If you like that colour, have a look at my shop thread; everything's getting that colour.:lol_hitti For the record, it's Tremclad Royal Blue and I love it. I've paired it with Tremclad Burnt Orange and it's a nice combination.

This is the before of the same vise.
24025994912_e8c86151ff_c.jpg


And put back together.
24078994401_576026e306_c.jpg
 
OP
B

bulletpruf

Well-known member
Joined
Nov 28, 2013
Messages
10,971
Location
San Antonio
Gorgeous vice, Techie! Thanks for sharing.

How are y'all stripping the paint? Chemically? Wire brush on a drill/angle grinder? Or sandblasting? I like the way sandblasted metal give the paint something to adhere to, but would imagine that you protect the machined surfaces if you do blast. If you don't sandblast, do you paint directly on the metal or do you use an etching primer?

Thanks

Scott
 

Techie1961

Well-known member
Joined
Feb 18, 2014
Messages
1,520
Location
Pickering Ontario Canada
Sandblasting is the way to go for me. I have been doing a lot lately and it is definitely a good prep for the paint. I tape off anything that I don't want hit and blow off any other areas. I prefer to remove any oil and grease before blasting as I don't want to go back into the parts cleaner after blasting. I like the fresh metal surface and don't want any oils to get on it while in the parts cleaner again.
 

drivesitfar

Well-known member
Joined
Oct 23, 2013
Messages
36,012
Location
Pacific Northwest
BP: if you do sand blast i've heard it can be pretty tough on old cast unless you are using glass beads. most of the guys are using Electrolysis and here's a great thread if you want to know how that should help you with car parts and other rusty stuff down the road.

http://www.garagejournal.com/forum/showthread.php?t=237752&highlight=Homemade+electrolysis

your Record looks great and nice of Techie to show off his so you'll have a good example and somebody to help you through the process.

Good Luck

Techie: is your bench always that clean?? love the Record and that BLUE is OK by me and you might as well show us a picture of your BLUE grinder on the VERY COOL orange stand on your next post. it might start a trend to put those colors together in our shops.
 

Techie1961

Well-known member
Joined
Feb 18, 2014
Messages
1,520
Location
Pickering Ontario Canada
BP: if you do sand blast i've heard it can be pretty tough on old cast unless you are using glass beads. most of the guys are using Electrolysis and here's a great thread if you want to know how that should help you with car parts and other rusty stuff down the road.

http://www.garagejournal.com/forum/showthread.php?t=237752&highlight=Homemade+electrolysis

your Record looks great and nice of Techie to show off his so you'll have a good example and somebody to help you through the process.

Good Luck

Techie: is your bench always that clean?? love the Record and that BLUE is OK by me and you might as well show us a picture of your BLUE grinder on the VERY COOL orange stand on your next post. it might start a trend to put those colors together in our shops.
Great point on the harshness of sandblasting. I've been very happy with the finer recycled glass that I'm using and it's pretty gentle.

This is the grinder and stand that Drives is referring to.
25070905036_709b19214a_c.jpg
 

JZiggy

Well-known member
Joined
Dec 1, 2014
Messages
990
Location
Atlanta
Idea: throw a needle bearing, with thrust washers on top and bottom, under the screw spindle. I did this with my 6" Paramo (same design as your Record) and it works awesome.
 

Techie1961

Well-known member
Joined
Feb 18, 2014
Messages
1,520
Location
Pickering Ontario Canada
Idea: throw a needle bearing, with thrust washers on top and bottom, under the screw spindle. I did this with my 6" Paramo (same design as your Record) and it works awesome.

Cool, I like that idea. Did you have to change the spring to accommodate the extra thickness from the bearing and hardened washers?
 

drivesitfar

Well-known member
Joined
Oct 23, 2013
Messages
36,012
Location
Pacific Northwest
Ziggy: do you have a couple pictures of what you just described because i don't totally understand so guessing that Bulletproof might not either?

thanks

Techie: i do like that stand and grinder look and color combo.
 

JZiggy

Well-known member
Joined
Dec 1, 2014
Messages
990
Location
Atlanta
I did in fact change the spring. Even without the bearing I thought the spring had too much force.

I swapped out the spring for a bronze spacer sleeve and a wave washer (or 2 or 3 doubled up, I dont remember). Just enough force to eliminate backlash, but not enough to cause unnecessary friction.

From left to right: cotter pin, sleeve, wave washer, slide, bearing, spindle.

IMG_3657_zps13saxfqp.jpg
 

Techie1961

Well-known member
Joined
Feb 18, 2014
Messages
1,520
Location
Pickering Ontario Canada
I did in fact change the spring. Even without the bearing I thought the spring had too much force.

I swapped out the spring for a bronze spacer sleeve and a wave washer (or 2 or 3 doubled up, I dont remember). Just enough force to eliminate backlash, but not enough to cause unnecessary friction.

From left to right: cotter pin, sleeve, wave washer, slide, bearing, spindle.

IMG_3657_zps13saxfqp.jpg

:thumbup: I like it.
 
OP
B

bulletpruf

Well-known member
Joined
Nov 28, 2013
Messages
10,971
Location
San Antonio
What are you guys using on the unpainted surfaces to get them clean and shiny? Wire wheel followed by fine grit sandpaper?

Thanks

Scott
 

drivesitfar

Well-known member
Joined
Oct 23, 2013
Messages
36,012
Location
Pacific Northwest
BP: a lot of the guys are using scotch brite pads on their hand grinders or wire wheeling to start on the cast iron parts. the shiny parts are working from one grit to the next until you get the finish you like. when you have time you might want to read the vise repair 101 thread. it has lots of ideas and facts from other members.

your vise is looking a lot better without that crappy spray bomb paint job on it.

good luck
 

JZiggy

Well-known member
Joined
Dec 1, 2014
Messages
990
Location
Atlanta
Also, KMScott's jaws for 6" Wiltons should fit this vise, except for the jaw thickness being slightly larger (5/8 vs. 1/2") which I see as a positive. :thumbup: I am running such jaws on my Paramo right now. Most English vises have pretty fine serrations while the Wiltons have deep, aggressive ones. I swap them occasionally depending on the work needed.

Paramo%20w%20Kevin%20Jaws_zps3i7smgnx.jpg
 

Packard V8

Well-known member
Joined
Mar 16, 2009
Messages
7,380
Location
Spokane, WA
BP: if you do sand blast i've heard it can be pretty tough on old cast

Just another GJ urban legend. Having worked in a foundry, I could almost guarantee the shot blaster (MUCH tougher than sand) was the first stop for the castings.

I've used steel shot on vise castings, cookware and daily on engine heads and blocks. Cuts the rust and/or paint quickly with no harm to the parent metal.

Sand blasting is less abrasive than steel shot and again, I've used it for fifty years with no damage to cast iron.

In fact, the only place on a vise it's contra-indicated is a close-tolerance machined surface or a plated surface. Most vise slides are so loose, the slight raising of the grain doesn't hurt a thing.

And yes, it gives the best tooth for a good paint job.

jack vines
 

Techie1961

Well-known member
Joined
Feb 18, 2014
Messages
1,520
Location
Pickering Ontario Canada
Just another GJ urban legend. Having worked in a foundry, I could almost guarantee the shot blaster (MUCH tougher than sand) was the first stop for the castings.

I've used steel shot on vise castings, cookware and daily on engine heads and blocks. Cuts the rust and/or paint quickly with no harm to the parent metal.

Sand blasting is less abrasive than steel shot and again, I've used it for fifty years with no damage to cast iron.

In fact, the only place on a vise it's contra-indicated is a close-tolerance machined surface or a plated surface. Most vise slides are so loose, the slight raising of the grain doesn't hurt a thing.

And yes, it gives the best tooth for a good paint job.

jack vines

100% agree with you.:thumbup: As a machinist, I have had to come up with techniques for metal removal and many would be amazed at how little metal is removed with sanding/blasting techniques. I sometimes wish that there was more metal removed so if could be used as a fitting method. You can mic something, sandblast it, and mic it again and virtually nothing has come off.

Even aggressive emery cloth and sanding on a component will be frustrating as a metal removal process unless you are working to tenths (0.0001").
 
OP
B

bulletpruf

Well-known member
Joined
Nov 28, 2013
Messages
10,971
Location
San Antonio
BP: a lot of the guys are using scotch brite pads on their hand grinders or wire wheeling to start on the cast iron parts. the shiny parts are working from one grit to the next until you get the finish you like. when you have time you might want to read the vise repair 101 thread. it has lots of ideas and facts from other members.

your vise is looking a lot better without that crappy spray bomb paint job on it.

good luck

Thanks, Drives.

Scott
 
To avoid these ads, REGISTER NOW!
OP
B

bulletpruf

Well-known member
Joined
Nov 28, 2013
Messages
10,971
Location
San Antonio
Also, KMScott's jaws for 6" Wiltons should fit this vise, except for the jaw thickness being slightly larger (5/8 vs. 1/2") which I see as a positive. :thumbup: I am running such jaws on my Paramo right now. Most English vises have pretty fine serrations while the Wiltons have deep, aggressive ones. I swap them occasionally depending on the work needed.

Nice! I'm assuming y'all are using jaws made from cast iron, right? What about aluminum jaws to keep from mangling stuff?

FYI - the jaws on my vise are in pretty good shape. I'll probably just clean them up and use them. Serration is quite fine; not much bite to it.

Thanks
 
OP
B

bulletpruf

Well-known member
Joined
Nov 28, 2013
Messages
10,971
Location
San Antonio
Just another GJ urban legend. Having worked in a foundry, I could almost guarantee the shot blaster (MUCH tougher than sand) was the first stop for the castings.

I've used steel shot on vise castings, cookware and daily on engine heads and blocks. Cuts the rust and/or paint quickly with no harm to the parent metal.

Sand blasting is less abrasive than steel shot and again, I've used it for fifty years with no damage to cast iron.

In fact, the only place on a vise it's contra-indicated is a close-tolerance machined surface or a plated surface. Most vise slides are so loose, the slight raising of the grain doesn't hurt a thing.

And yes, it gives the best tooth for a good paint job.

jack vines

That's good info. Have a large blasting cabinet that gets a lot of use. And blasted surfaces do have excellent tooth for paint adhesion.
 

drivesitfar

Well-known member
Joined
Oct 23, 2013
Messages
36,012
Location
Pacific Northwest
BP: before Techie confirmed Jack's preference to sand blasting and not spending the extra money on glass beads the rest if the guys and gals here prefer glass on cast. Id love to se a thread with just the facts and maybe some pics of side by side tests. I dont own a blast cabinet yet but have paid extra on advice of 75 year old friend to use glass bead. Your vice so your call.

If you have ability yes make some aluminum and or copper replacement jaws or covers. Not everything needs to me bitten in a vise to hold it.
 

Techie1961

Well-known member
Joined
Feb 18, 2014
Messages
1,520
Location
Pickering Ontario Canada
BP: before Techie confirmed Jack's preference to sand blasting and not spending the extra money on glass beads the rest if the guys and gals here prefer glass on cast. Id love to se a thread with just the facts and maybe some pics of side by side tests. I dont own a blast cabinet yet but have paid extra on advice of 75 year old friend to use glass bead. Your vice so your call.

If you have ability yes make some aluminum and or copper replacement jaws or covers. Not everything needs to me bitten in a vise to hold it.

I'm out of town but once i get back, I'll take that challenge on. I'll get some samples of different metals and mic them, sandblast them, polish them, and mic them again.

BTW, the jaws will be some sort of carbon steel, and not cast iron.
 

drivesitfar

Well-known member
Joined
Oct 23, 2013
Messages
36,012
Location
Pacific Northwest
Techie: i actually did just start a Sandblasting 101 thread so if you want to take your sandblasting comments and testing over there that would be AWESOME.

Also BP said his current jaws were in good shape so making new copper or aluminum ones so he doesn't scratch up his projects might be a good fit or he can make jaw COVERS like these copper ones i use that were made by Wilton.

thanks
 

Attachments

  • 6_inch_Copper__02411_1360778928_1280_1280.jpg
    6_inch_Copper__02411_1360778928_1280_1280.jpg
    89.5 KB · Views: 51
  • Copper_schiller_1__63039_1360778943_1280_1280.jpg
    Copper_schiller_1__63039_1360778943_1280_1280.jpg
    95.8 KB · Views: 59
  • 24408_main.jpg
    24408_main.jpg
    10.8 KB · Views: 53

Fretters

Well-known member
Joined
Jan 25, 2014
Messages
4,217
Location
South Yorkshire, England
I'm out of town but once i get back, I'll take that challenge on. I'll get some samples of different metals and mic them, sandblast them, polish them, and mic them again.

Forget the polishing part and just show photo's of machined surfaces before and after. The surface finish left after blasting is the sticking point with blasting more than tolerances, though if polishing is required to bring things back to original, then tolerances pretty much by virtue will have been affected, and why is polishing necessary if blasting doesn't affect surface finish?

I've been told that certain media does work extremely well and makes little discernible difference to finish, and I have no reason to disbelieve the people who've said that, but personally, I've yet to see any blasted, machined surface which doesn't look dog rough afterwards.
 

Techie1961

Well-known member
Joined
Feb 18, 2014
Messages
1,520
Location
Pickering Ontario Canada
Forget the polishing part and just show photo's of machined surfaces before and after. The surface finish left after blasting is the sticking point with blasting more than tolerances, though if polishing is required to bring things back to original, then tolerances pretty much by virtue will have been affected, and why is polishing necessary if blasting doesn't affect surface finish?

I've been told that certain media does work extremely well and makes little discernible difference to finish, and I have no reason to disbelieve the people who've said that, but personally, I've yet to see any blasted, machined surface which doesn't look dog rough afterwards.

I figured the polishing would bring me back to a baseline in finish quality, from start but I'll post photos of the journey as well.:thumbup:
 
OP
B

bulletpruf

Well-known member
Joined
Nov 28, 2013
Messages
10,971
Location
San Antonio
BP: did you get a chance to do any more work on your Record this weekend? have any questions or need help just ask.

good luck

Drives -

Spent the day yesterday at a local (few hours away) car show/swap meet. Picked up some DBE wrenches, but that was it.

Got the vise completely apart. Headed to the garage now to do a bit more paint removal. I've been using a Roloc on an angle grinder, some chemical paint stripper, razor blade + heat gun, and now I'm going to finish off the rough cast areas with sandblasting. I'll cover the machined areas with tape to protect them.

I'll hit the machined areas with fine sandpaper to see if that does the trick.

Anyone know what thread size/pitch the jaw screws are? Mine aren't in great shape; not sure whether to use or order some new ones.

Pics to follow.

Thanks

Scott
 

Fretters

Well-known member
Joined
Jan 25, 2014
Messages
4,217
Location
South Yorkshire, England
Quite possibly around 1/4" or 5/16" BSW. Measure the O.D of the screw and the TPI, then look at the BSW chart to double check it is BSW, and not metric or suchlike. If it's just the heads which are a bit mangled, a session with a flat needle file will usually smarten those up a treat.
 
OP
B

bulletpruf

Well-known member
Joined
Nov 28, 2013
Messages
10,971
Location
San Antonio
Quite possibly around 1/4" or 5/16" BSW. Measure the O.D of the screw and the TPI, then look at the BSW chart to double check it is BSW, and not metric or suchlike. If it's just the heads which are a bit mangled, a session with a flat needle file will usually smarten those up a treat.

Thanks, Fretters. The threads are what I'm concerned with. They will be fine, but would feel better with new stuff.

I'll check the OD.

Scott
 
OP
B

bulletpruf

Well-known member
Joined
Nov 28, 2013
Messages
10,971
Location
San Antonio
Got 90% of the paint off with stripper, Roloc, and wire wheel. Then finished it up with sandblasting. Had to use a dental pic to finish up a few hard to get to spots.

After blasting, I hit the machined areas again with Roloc and wire wheel to get rid of the roughness from the blasting.

Headed to the local hardware store now to see if I can find the right shade of blue.

Pics to follow.

thanks

Scott
 
OP
B

bulletpruf

Well-known member
Joined
Nov 28, 2013
Messages
10,971
Location
San Antonio
Overall length of the screws is .990"

Width is .307" or so. 5/16" should be .3125" right? The threads aren't in great shape, so maybe it was .3125 at some point?

TPI is 18, I think.

Thanks

Scott
 

ZRX61

Well-known member
Joined
Aug 15, 2006
Messages
28,716
Location
Solar Blight Valley, SoCal
What are you guys using on the unpainted surfaces to get them clean and shiny? Wire wheel followed by fine grit sandpaper?

Thanks

Scott
For the jaws I bead blast them clean, then buzz the edges on my deburring wheel. For the slide I use either #220 on a DA or roloc scotchbrite pads on a diegrinder.
 
OP
B

bulletpruf

Well-known member
Joined
Nov 28, 2013
Messages
10,971
Location
San Antonio
Ok, backtracking a bit. Spent a lot of time with the wire wheel and Roloc bristle brush getting paint off.


That, along with spray on chemical stripper and a scraper got the vast majority of the paint off. Used a razor blade, too.

Then I blasted it in the driveway. Used a tarp so I could reclaim the sand. Media was blasting sand - medium grit, I think.

This is the before picture.


10 minutes later, I was done.


BTW, if you're sandblasting, make sure you read up on silicosis before you use sand as your media.

After it was all blasted, I masked off the machined surfaces and shot it with rattle can dark blue. Must have gotten a bad can or I didn't shake it up enough. Seemed to lay down fine, but when it dried, it looked horrible. Will have to try it again; this time, I'll shake the can for a few minutes and heat up the area a bit; was probably 60 degrees when I painted today.
 
Last edited:
OP
B

bulletpruf

Well-known member
Joined
Nov 28, 2013
Messages
10,971
Location
San Antonio
For the jaws I bead blast them clean, then buzz the edges on my deburring wheel. For the slide I use either #220 on a DA or roloc scotchbrite pads on a diegrinder.

I sandblasted the jaws and then hit them with a wire wheel. The tops of each jaw was quite beat up; could have used the belt sander to get it cleaned up, but I'll just flip them over so the nice side is showing.

Need to try the Roloc scotchbrite pads; pretty sure I have some of those here.
 
To avoid these ads, REGISTER NOW!
Top Bottom