To avoid these ads, REGISTER NOW!

garage expansion in NC

ghnl

Well-known member
Joined
Mar 27, 2009
Messages
1,372
Location
Mebane, NC
I've been enjoying this site and browsing around for a little while gathering up ideas and info.

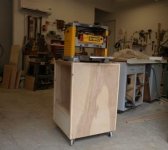
I've been frustrated by a 22'w X 22'd so-called "2-car" garage as my workshop for the past few years. We moved to NC from MA where I had a basement workshop and a 22' X 24' garage. Here we don't have a basement so I've had to cram everything into the garage - my wife's car has to stay outside. I have all my large tools (mostly woodworking) on mobile bases or casters but I have to move cars out to do woodwork or push tools aside to work on cars. Did I mention my frustration? The garage has an 11' ceiling but the attic space is only accessable with drop down stair.

We like our house & its location. We looked at buying another house either with a large garage/workshop or space to build one but we didn't find anything we liked. Our budget has finally allowed us to start a long anticipated garage expansion.

The garage has a small breezeway between it and the house. The plan is to add 22'w X 25'd and include a 'bonus room' above. (my other hobby is model railroading so I have plans for that space, too)

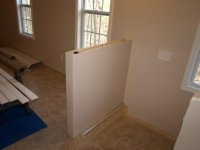
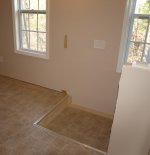
Here's what we have:


And here's where I hope to go:


Here's what the floor plan looks like:


One decision I made was to have three 10' doors instead of two 16' doors. I know I could probably get more 'things' in the garage with two large doors but my intent is to have one bay for parking the 'daily driver', one bay for working on cars (likely to include a 4 post lift) and the third bay for shop area (tools, work bench, etc). I am thinking the daily driver will be the right side bay (closest to the house), the lift will be the center bay & the workshop will be the left side bay. Then again, if the 'workshop' is in the center, I could easily use the 'daily driver' space for (temporary) project space. Decisions, decisions...

There'll be no supporting columns/bearing walls in the 22' X 44' area. The 22' depth is less than ideal but I am limited by zoning set backs & a small pond on our property.

The "mechanical room" will be a sort of 'lean to' on the back to house my air compressor and dust collector. The wall between the garage & the mechanical room will be a bearing wall to support the floor trusses for the room above.

I solict your ideas, thoughts & comments...
 
To avoid these ads, REGISTER NOW!

nova65ss

Well-known member
Joined
Sep 20, 2005
Messages
1,556
Location
Raleigh, NC
Very nice! That 22 deep is a killer with the steps. Looks like your cars are fairly small though. My wifes Suburban barely fits in our attached garage and it is 22 deep.
 

robert mitchell

Well-known member
Joined
May 12, 2008
Messages
81
Looks good . If the budget allows it-I would make it at least 28 feet deep.
But all that cost more money. 22 feet is a little too short.
Got one 22 feet deep and full size cars are a little tight.
Second garage is 30 feet deep and love it.
 

PurdueSD

Well-known member
Joined
Mar 25, 2006
Messages
1,577
Location
Indiana
I too had a shop that was 22' deep, it got torn down and was replaced with the new shop (30' deep). You cannot even put a work bench on the front wall and expect to pull a truck in. All that being said, if you are stuck on this floorplan, i would seriously consider putting the stairs outside the building.

If it were mine, i would look in to adding on to the left side of the current structure leaving the old roof line intact. You could add a ridge running 90 degrees from the old garage ridge. Then, you could bring the new part of the shop out (towards the road more) giving you some room to work inside without always having to back a car out.
 
Last edited:

Steve in Mi

Well-known member
Joined
Mar 13, 2007
Messages
1,042
Location
Mid Michigan
There'll be no supporting columns/bearing walls in the 22' X 44' area.
I solict your ideas, thoughts & comments...

That is going to be some real trick ... 25 to 30% of your upper level floor joist are interrupted by the stairs. I see a load bearing wall on each side of the stairwell at the back wall. If you can rotate the long side of the stairs to be parallel to the floor joist (run front to back) it could help some.
 

IDASHO

Well-known member
Joined
Mar 5, 2007
Messages
1,809
Location
Moscow, Idaho
Hows a bout a spiral staircase?

I know they are a pain to carry stuff up, but they would certainly save you a ton of much-needed space. :)
 
OP
G

ghnl

Well-known member
Joined
Mar 27, 2009
Messages
1,372
Location
Mebane, NC
Thanks for the replies. I do wish I had more than 22' d to work with but I don't. I have been able to get many things done in the present size so
I am looking forward to being able to spread out some.

...i would seriously consider putting the stairs outside the building.

Yes, that is a good idea. I will think long & hard about that one.


... 25 to 30% of your upper level floor joist are interrupted by the stairs. I see a load bearing wall on each side of the stairwell at the back wall. If you can rotate the long side of the stairs to be parallel to the floor joist (run front to back) it could help some.

OK, I mis-spoke (stupid keyboard...). The staircase wall will be a bearing wall. What I meant was there won't be any support columns in the middle of the garage.

I'll have to mock things up to see if turning the staircase as you suggest is do-able.

FWIW, here are a few of my projects that I've been able to accomplish in the current space.

Window seat & bookcases for spare bedroom. (wide angle lens causes distortion)


Sewing cabinet.


Crib for grandson.


MGB.


MGA - body off frame. (sorry it's out of focus)


Alfa Romeo.
 
OP
G

ghnl

Well-known member
Joined
Mar 27, 2009
Messages
1,372
Location
Mebane, NC
Work has finally started! The footings were poured and the foundation laid.

2951922230044267019S425x425Q85.jpg


The old roof was removed:

2334676640044267019S425x425Q85.jpg


And framing commenced and we're mostly sheathed. The old side wall is still in place but will be removed soon.

2727591730044267019S425x425Q85.jpg
 

dipper

Well-known member
Joined
Jun 27, 2007
Messages
759
Location
Rochester, NY
That's great. They always say on here to make it bigger and deeper than you suggest but sometimes it can't be done. I wish i had a bigger lot to build on but don't. You do what works best for you and your budget. You definitely have more space now, and having the mechanical room section will save you floor space. I'm glad i put my compressor in my attic, that saved me 4 sqft for something else.

It looks good.
Did you ever decide on the stairs? I have pull down, but considering the size of your attic regular stairs might be better suited. Putting them outside with a landing and 36" door at the top might be something to think about.

keep up the good work and pics.
 
OP
G

ghnl

Well-known member
Joined
Mar 27, 2009
Messages
1,372
Location
Mebane, NC
The garage is getting closer to completion. The concrete floor is in and looks great. Vinyl siding is almost done. Electrical rough in has started. The holiday weekend will slow things down a bit but that is nothing compared to the sacrifices our military men & women have made (and are making).

Here's the front with siding on.
2637998370044267019S425x425Q85.jpg


And the back side.
2778171710044267019S425x425Q85.jpg


Upstairs 'bonus room'.
2216102240044267019S425x425Q85.jpg


And the garage.
2323852860044267019S425x425Q85.jpg


Funny story about the stair case (well, funny now...). I had left a note with scale drawings showing how I wanted the staircase to be built. I wanted a landing at the bottom and another at the top. (I had to work the day the carpenters were going to be building the stairs.)

My wife called me to say, 'they said you can't have a landing at the top - there isn't enough room'. She told me later she could sense my exasperation in the silence that followed. Not much I could do 'long distance' so I figured I'd end up rebuilding it later.

When I got home from work that afternoon they were just finishing up and proudly pointed out to me that there was a landing at the top & bottom. They even made it seem like it was their idea...

And, yes the stairs are inside. I will lose some garage space that way but I decided I like the stairs inside. That way I can go from the house, through the screened breezeway and into the garage or up to the bonus room without really going 'outside'. I'll end up with a short bay, medium bay and long bay. My workshop will be in the short bay, my wife's car will park in the medium bay (and can easily be moved out for more workspace) and the long bay will have a lift for working on & storing cars.
 
Last edited:
OP
G

ghnl

Well-known member
Joined
Mar 27, 2009
Messages
1,372
Location
Mebane, NC
Dredging up an old thread for an update. I have installed two ductless mini split heat-A/C units - one for the garage, the other for the room upstairs. They work well and I am pleased with their ability to heat/cool and their quietness.

We're finishing off the room upstairs ourselves. After insulating the walls & ceiling we paid a crew to install the drywall and mud the seams. Saved me a ton of work. My wife I painted it then we picked out a sheet vinyl floor and paid to have that installed. The space is about 20' x 42' so it needed some long seams I did not want to have to fuss with. Again, well worth it to pay someone to do that job. Next is to install baseboard molding (I prefer to put the floor down first and then install the baseboard).

At the top of the stairs we have a landing. I wanted a short wall ninety degrees to the run of the stairs for safety (we have grandkids and I know they'll be running around up there). However, having a straight run up the stairs makes it a lot easier to get large items/furniture up & down. My solution was to make a removable wall. I built it out of 1/2 plywood.

I put a 3/8" X 16 threaded insert into the floor and a wedge shaped dovetail bolted to the wall. Now I can undo one handscrew, lift the 'wall' a few inches to free it from the dovetail and move the wall out of the way. (If I thought this was something I'd need to do often I might have made it with a hidden hinge instead.)

Forgot to add: later (when I get a RounTuit) I will add an oak cap to the wall. I'll leave it loose (maybe a cabinet magnet to hold it place) so I can access the hand screw and handles to lift if off.
 

Attachments

  • temp wall 02.jpg
    temp wall 02.jpg
    30 KB · Views: 72
  • temp wall 03.jpg
    temp wall 03.jpg
    126.3 KB · Views: 74
  • temp wall 00.jpg
    temp wall 00.jpg
    26.4 KB · Views: 75
  • temp wall 01.jpg
    temp wall 01.jpg
    55.1 KB · Views: 67
  • temp wall 04.jpg
    temp wall 04.jpg
    22 KB · Views: 65
Last edited:
To avoid these ads, REGISTER NOW!

Ex-Pat

Active member
Joined
Oct 29, 2009
Messages
43
Location
Mebane NC
Nice job.

Did you get a lift yet ? and if you have did you source it locally I have been talking to a company in Raleigh who have used lifts for sale i was wondering if you knew of anyone else around here.
 
OP
G

ghnl

Well-known member
Joined
Mar 27, 2009
Messages
1,372
Location
Mebane, NC
A four post lift is on my 'soon' list. Tell me more about the company in Raleigh.
 

chyagge

New member
Joined
Nov 30, 2009
Messages
1
Dredging up an old thread for an update. I have installed two ductless mini split heat-A/C units - one for the garage, the other for the room upstairs. They work well and I am pleased with their ability to heat/cool and their quietness.

We're finishing off the room upstairs ourselves. After insulating the walls & ceiling we paid a crew to install the drywall and mud the seams. Saved me a ton of work. My wife I painted it then we picked out a sheet vinyl floor and paid to have that installed. The space is about 20' x 42' so it needed some long seams I did not want to have to fuss with. Again, well worth it to pay someone to do that job. Next is to install baseboard molding (I prefer to put the floor down first and then install the baseboard).

At the top of the stairs we have a landing. I wanted a short wall ninety degrees to the run of the stairs for safety (we have grandkids and I know they'll be running around up there). However, having a straight run up the stairs makes it a lot easier to get large items/furniture up & down. My solution was to make a removable wall. I built it out of 1/2 plywood.

I put a 3/8" X 16 threaded insert into the floor and a wedge shaped dovetail bolted to the wall. Now I can undo one handscrew, lift the 'wall' a few inches to free it from the dovetail and move the wall out of the way. (If I thought this was something I'd need to do often I might have made it with a hidden hinge instead.)

Forgot to add: later (when I get a RounTuit) I will add an oak cap to the wall. I'll leave it loose (maybe a cabinet magnet to hold it place) so I can access the hand screw and handles to lift if off.

Hey hey great idea! That way people can name their tanks for visitors to see! Once again great idea!
 

Ex-Pat

Active member
Joined
Oct 29, 2009
Messages
43
Location
Mebane NC
C & A equipment will sell me a USED 2 post asymmetrical from AMMCO or another us make centurion / chieftian or something like that installed in my shop in mebane set up and warrantied for 90 days for $2200 or a rotary for $2500 i was going to drive over there this week to see just how USED they are
 

greg

Well-known member
Joined
Dec 12, 2006
Messages
201
Location
Eden NC
Nice looking garage , keep us updated on what lift you go with . I am also looking for one and I am in the same area .
 
OP
G

ghnl

Well-known member
Joined
Mar 27, 2009
Messages
1,372
Location
Mebane, NC
Couple of updates on an old thread. Finished off the half wall upstairs with an oak cap. And built some shelves/drawers upstairs to fit in front of a knee wall area. (forgot to take a photo with the drawers in place...)

Haven't got a lift yet but I built a flip-top tool stand based on photos/plans in Wood Magazine.

I put my thickness planer on it - haven't decided what to put on the other side yet. Perhaps a benchtop belt/disc sander (if I can find one that isn't too toy-like) or a spindle sander. I have an 6"X48" belt & 10" disc sander but the motor mounts underneath unlike the direct drive bench top models.
 

Attachments

  • flip top 02.jpg
    flip top 02.jpg
    31.1 KB · Views: 54
  • flip top 01.jpg
    flip top 01.jpg
    33.7 KB · Views: 55
  • shelves 01.jpg
    shelves 01.jpg
    44 KB · Views: 193
  • half wall 02.jpg
    half wall 02.jpg
    46.1 KB · Views: 47
  • shop 01.jpg
    shop 01.jpg
    39.1 KB · Views: 71

Snap50

Well-known member
Joined
Dec 29, 2009
Messages
145
Location
New England
It would be nice to have a 4' or 5' space past the last garage door to store motorbikes, tractor, etc or even a work bench. We have only 3' and the equipment fits but there's no getting out of the vehicles or walking by very well.
 

Kevin54

MEMBER EMERITUS
Joined
Jan 12, 2005
Messages
29,341
Location
Urbana, Ohio
attachment.php


Details on the shelving unit please. Size, type of lumber, how it is fastened together. It looks very nice. Any other pics of it a little closer up maybe? TIA
 
OP
G

ghnl

Well-known member
Joined
Mar 27, 2009
Messages
1,372
Location
Mebane, NC
The shelves are built from 3/4" birch plywood - 'shop grade' & pine face frames. I built it in three sections - the toe kick, the base unit for drawers & the upper unit with shelves. The ceiling pitch is 12/12 (45 degrees slope) so that made figuring the angle for the upper section easy. I use a dowel jig to assemble the face frames & a biscuit joiner for the plywood case. A few drywall screws (in places not visible later) hold it together while the glue dries.

The vertical plywood sides are narrower than the space the unit fits into so I only had to scribe the face frames for a snug fit to the walls.

The base unit is ~ 30" deep, the bottom of the upper unit ~ 24" deep. The vertical back of the shelf unit is 1/4" plywood, the sloped part is the ceiling's drywall. That does leave some wasted space but the convenience of the drawers makes up for that. I put 1/4" steel rods in two of the drawers for hanging file folders. I save tax returns and owners manuals & reciepts for all my tools and household appliances. (anyone need an owner's manual for a 1970's Craftsman radial arm saw...?)

I'll have to come back later with more photos. Anything specific you want to see?
 
To avoid these ads, REGISTER NOW!
Top Bottom